iOS 图标和文字自定按钮
Posted 长沙火山
tags:
篇首语:本文由小常识网(cha138.com)小编为大家整理,主要介绍了iOS 图标和文字自定按钮相关的知识,希望对你有一定的参考价值。
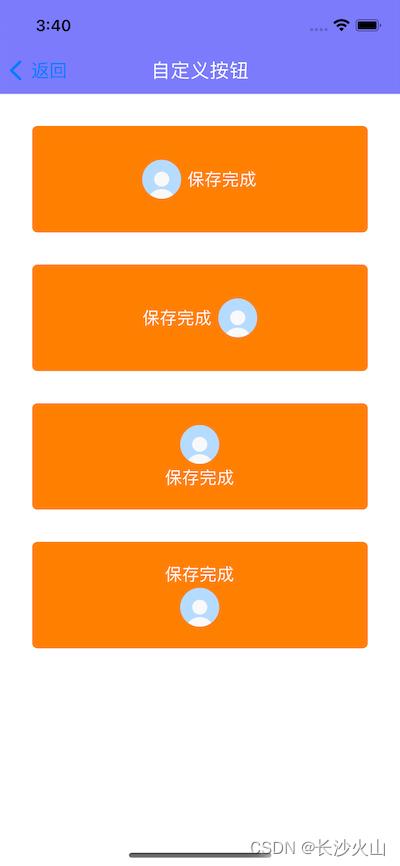
在项目开发中,经常需要用到按钮,系统默认的按钮是图标在左边,标题在右边。但往往实际情况是多变的,有时候图标在右边、有时候图标在上面,这个时候系统的按钮往往无法满足需求,所以我们需要自定义按钮来满足需求的开发。下面提供两种方法来实现按钮图标和文字自定按钮。
一、采用添加分类,利用EdgeInsets属性实现
创建一个UIButton的分类,文件名为:UIButton+Icon,在分类里添加如下代码:
1.1 UIButton+Icon.h
#import <UIKit/UIKit.h>

NS_ASSUME_NONNULL_BEGIN

typedef NS_ENUM(NSUInteger, HSButtonEdgeInsetsStyle)
    HSButtonEdgeInsetsStyleTop, // image在上,label在下
    HSButtonEdgeInsetsStyleLeft, // image在左,label在右
    HSButtonEdgeInsetsStyleBottom, // image在下,label在上
    HSButtonEdgeInsetsStyleRight // image在右,label在左
;

@interface UIButton (Icon)

- (void)layoutEdgeInsetsStyle:(HSButtonEdgeInsetsStyle)style space:(CGFloat)space;

@end

NS_ASSUME_NONNULL_END
1.2 UIButton+Icon.m
#import "UIButton+Icon.h"

@implementation UIButton (Icon)

- (void)layoutEdgeInsetsStyle:(HSButtonEdgeInsetsStyle)style space:(CGFloat)space

    CGFloat imageWith = self.imageView.frame.size.width;
    CGFloat imageHeight = self.imageView.frame.size.height;
    CGFloat labelWidth = self.titleLabel.frame.size.width;
    CGFloat labelHeight = self.titleLabel.frame.size.height;

    UIEdgeInsets imageEdgeInsets = UIEdgeInsetsZero;
    UIEdgeInsets labelEdgeInsets = UIEdgeInsetsZero;

    switch (style)
    case HSButtonEdgeInsetsStyleTop:

        imageEdgeInsets = UIEdgeInsetsMake(-labelHeight-space/2.0, 0, 0, -labelWidth);
        labelEdgeInsets = UIEdgeInsetsMake(0, -imageWith, -imageHeight-space/2.0, 0);

    break;
    case HSButtonEdgeInsetsStyleLeft:

        imageEdgeInsets = UIEdgeInsetsMake(0, -space/2.0, 0, space/2.0);
        labelEdgeInsets = UIEdgeInsetsMake(0, space/2.0, 0, -space/2.0);

    break;
    case HSButtonEdgeInsetsStyleBottom:

        imageEdgeInsets = UIEdgeInsetsMake(0, 0, -labelHeight-space/2.0, -labelWidth);
        labelEdgeInsets = UIEdgeInsetsMake(-imageHeight-space/2.0, -imageWith, 0, 0);

    break;
    case HSButtonEdgeInsetsStyleRight:

        imageEdgeInsets = UIEdgeInsetsMake(0, labelWidth+space/2.0, 0, -labelWidth-space/2.0);
        labelEdgeInsets = UIEdgeInsetsMake(0, -imageWith-space/2.0, 0, imageWith+space/2.0);

    break;
    default: break;


    self.titleEdgeInsets = labelEdgeInsets;
    self.imageEdgeInsets = imageEdgeInsets;


@end
1.3 使用
#import "IconButtonController.h"
#import "UIButton+Icon.h"

@interface IconButtonController ()

@end

@implementation IconButtonController

- (void)viewDidLoad
    [super viewDidLoad];

    self.title = @"自定义按钮";

    UIButton *btn1 = [[UIButton alloc] initWithFrame:CGRectMake(30, 30, SCREEN_WIDTH-60, 100)];
    [btn1 setImage:[UIImage imageNamed:@"user_default_blue"] forState:UIControlStateNormal];
    [btn1 setTitle:@"保存完成" forState:UIControlStateNormal];
    [btn1.titleLabel setTextColor:[UIColor whiteColor]];
    [btn1 setTitleColor:[UIColor whiteColor] forState:UIControlStateNormal];
    [btn1.titleLabel setFont:[UIFont systemFontOfSize:16]];
    [btn1 setBackgroundColor:[UIColor orangeColor]];
    btn1.layer.cornerRadius = 5;
    btn1.layer.masksToBounds = YES;
    [self.view addSubview:btn1];

    UIButton *btn2 = [[UIButton alloc] initWithFrame:CGRectMake(30, 160, SCREEN_WIDTH-60, 100)];
    [btn2 setImage:[UIImage imageNamed:@"user_default_blue"] forState:UIControlStateNormal];
    [btn2 setTitle:@"保存完成" forState:UIControlStateNormal];
    [btn2.titleLabel setTextColor:[UIColor whiteColor]];
    [btn2 setTitleColor:[UIColor whiteColor] forState:UIControlStateNormal];
    [btn2.titleLabel setFont:[UIFont systemFontOfSize:16]];
    [btn2 setBackgroundColor:[UIColor orangeColor]];
    btn2.layer.cornerRadius = 5;
    btn2.layer.masksToBounds = YES;
    [self.view addSubview:btn2];

    UIButton *btn3 = [[UIButton alloc] initWithFrame:CGRectMake(30, 290, SCREEN_WIDTH-60, 100)];
    [btn3 setImage:[UIImage imageNamed:@"user_default_blue"] forState:UIControlStateNormal];
    [btn3 setTitle:@"保存完成" forState:UIControlStateNormal];
    [btn3.titleLabel setTextColor:[UIColor whiteColor]];
    [btn3 setTitleColor:[UIColor whiteColor] forState:UIControlStateNormal];
    [btn3.titleLabel setFont:[UIFont systemFontOfSize:16]];
    [btn3 setBackgroundColor:[UIColor orangeColor]];
    btn3.layer.cornerRadius = 5;
    btn3.layer.masksToBounds = YES;
    [self.view addSubview:btn3];

    UIButton *btn4 = [[UIButton alloc] initWithFrame:CGRectMake(30, 420, SCREEN_WIDTH-60, 100)];
    [btn4 setImage:[UIImage imageNamed:@"user_default_blue"] forState:UIControlStateNormal];
    [btn4 setTitle:@"保存完成" forState:UIControlStateNormal];
    [btn4.titleLabel setTextColor:[UIColor whiteColor]];
    [btn4 setTitleColor:[UIColor whiteColor] forState:UIControlStateNormal];
    [btn4.titleLabel setFont:[UIFont systemFontOfSize:16]];
    [btn4 setBackgroundColor:[UIColor orangeColor]];
    btn4.layer.cornerRadius = 5;
    btn4.layer.masksToBounds = YES;
    [self.view addSubview:btn4];

    [btn1 layoutEdgeInsetsStyle:HSButtonEdgeInsetsStyleLeft space:5];
    [btn2 layoutEdgeInsetsStyle:HSButtonEdgeInsetsStyleRight space:5];
    [btn3 layoutEdgeInsetsStyle:HSButtonEdgeInsetsStyleTop space:5];
    [btn4 layoutEdgeInsetsStyle:HSButtonEdgeInsetsStyleBottom space:5];


@end
1.4 效果图

二、采用按钮子类,自定图标和标题位置实现
创建一个类:IconButton,继承于UIButton,添加如下代码:
2.1 IconButton.h
#import <UIKit/UIKit.h>

NS_ASSUME_NONNULL_BEGIN

typedef NS_ENUM(NSUInteger, IconButtonStyle)
    IconButtonStyleTop, // image在上,label在下
    IconButtonStyleLeft, // image在左,label在右
    IconButtonStyleBottom, // image在下,label在上
    IconButtonStyleRight // image在右,label在左
;

@interface IconButton : UIButton

@property (nonatomic, assign) IconButtonStyle style;

@end

NS_ASSUME_NONNULL_END
2.2 IconButton.m
#import "IconButton.h"

#define SPACE   5

@implementation IconButton

// 重写layoutSubviews方法,手动设置按钮子控件的位置
- (void)layoutSubviews
    [super layoutSubviews];

    CGFloat buttonWith = self.frame.size.width;
    CGFloat buttonHeight = self.frame.size.height;
    CGFloat imageWith = self.imageView.frame.size.width;
    CGFloat imageHeight = self.imageView.frame.size.height;
    CGFloat labelWidth = self.titleLabel.frame.size.width;
    CGFloat labelHeight = self.titleLabel.frame.size.height;

    CGFloat totalWidth = imageWith+labelWidth+SPACE;


    if (self.style == IconButtonStyleLeft)

        self.imageView.frame = CGRectMake((buttonWith-totalWidth)/2,
                                          self.imageView.frame.origin.y,
                                          imageWith,
                                          imageHeight);

        self.titleLabel.frame = CGRectMake(self.imageView.frame.origin.x+imageWith+5,
                                           self.titleLabel.frame.origin.y,
                                           labelWidth,
                                           labelHeight);

     else if (self.style == IconButtonStyleRight)
        self.titleLabel.frame = CGRectMake((buttonWith-totalWidth)/2,
                                           self.titleLabel.frame.origin.y,
                                           labelWidth,
                                           labelHeight);

        self.imageView.frame = CGRectMake(self.titleLabel.frame.origin.x+labelWidth+SPACE,
                                          self.imageView.frame.origin.y,
                                          imageWith,
                                          imageHeight);

     else if (self.style == IconButtonStyleTop)
        self.imageView.frame = CGRectMake((buttonWith-imageWith)/2,
                                          (buttonHeight-imageHeight-labelHeight-SPACE)/2,
                                          imageWith,
                                          imageHeight);

        self.titleLabel.frame = CGRectMake((buttonWith-labelWidth)/2,
                                           (buttonHeight-imageHeight-labelHeight-SPACE)/2+imageHeight+SPACE,
                                           labelWidth,
                                           labelHeight);

     else

        self.titleLabel.frame = CGRectMake((buttonWith-labelWidth)/2,
                                           (buttonHeight-imageHeight-labelHeight-5)/2,
                                           labelWidth,
                                           labelHeight);

        self.imageView.frame = CGRectMake((buttonWith-imageWith)/2,
                                          (buttonHeight-imageHeight-labelHeight-5)/2+labelHeight+5,
                                          imageWith,
                                          imageHeight);


@end
2.3 使用
#import "IconButtonController.h"
#import "IconButton.h"

@interface IconButtonController ()

@end

@implementation IconButtonController

- (void)viewDidLoad
    [super viewDidLoad];

    self.title = @"自定义按钮";

    IconButton *btn1 = [[IconButton alloc] initWithFrame:CGRectMake(30, 30, SCREEN_WIDTH-60, 100)];
    [btn1 setImage:[UIImage imageNamed:@"user_default_blue"] forState:UIControlStateNormal];
    [btn1 setTitle:@"保存完成" forState:UIControlStateNormal];
    [btn1.titleLabel setTextColor:[UIColor whiteColor]];
    [btn1 setTitleColor:[UIColor whiteColor] forState:UIControlStateNormal];
    [btn1.titleLabel setFont:[UIFont systemFontOfSize:16]];
    [btn1 setBackgroundColor:[UIColor orangeColor]];
    btn1.layer.cornerRadius = 5;
    btn1.layer.masksToBounds = YES;
    [self.view addSubview:btn1];

    IconButton *btn2 = [[IconButton alloc] initWithFrame:CGRectMake(30, 160, SCREEN_WIDTH-60, 100)];
    [btn2 setImage:[UIImage imageNamed:@"user_default_blue"] forState:UIControlStateNormal];
    [btn2 setTitle:@"保存完成" forState:UIControlStateNormal];
    [btn2.titleLabel setTextColor:[UIColor whiteColor]];
    [btn2 setTitleColor:[UIColor whiteColor] forState:UIControlStateNormal];
    [btn2.titleLabel setFont:[UIFont systemFontOfSize:16]];
    [btn2 setBackgroundColor:[UIColor orangeColor]];
    btn2.layer.cornerRadius = 5;
    btn2.layer.masksToBounds = YES;
    [self.view addSubview:btn2];

    IconButton *btn3 = [[IconButton alloc] initWithFrame:CGRectMake(30, 290, SCREEN_WIDTH-60, 100)];
    [btn3 setImage:[UIImage imageNamed:@"user_default_blue"] forState:UIControlStateNormal];
    [btn3 setTitle:@"保存完成" forState:UIControlStateNormal];
    [btn3.titleLabel setTextColor:[UIColor whiteColor]];
    [btn3 setTitleColor:[UIColor whiteColor] forState:UIControlStateNormal];
    [btn3.titleLabel setFont:[UIFont systemFontOfSize:16]];
    [btn3 setBackgroundColor:[UIColor orangeColor]];
    btn3.layer.cornerRadius = 5;
    btn3.layer.masksToBounds = YES;
    [self.view addSubview:btn3];

    IconButton *btn4 = [[IconButton alloc] initWithFrame:CGRectMake(30, 420, SCREEN_WIDTH-60, 100)];
    [btn4 setImage:[UIImage imageNamed:@"user_default_blue"] forState:UIControlStateNormal];
    [btn4 setTitle:@"保存完成" forState:UIControlStateNormal];
    [btn4.titleLabel setTextColor:[UIColor whiteColor]];
    [btn4 setTitleColor:[UIColor whiteColor] forState:UIControlStateNormal];
    [btn4.titleLabel setFont:[UIFont systemFontOfSize:16]];
    [btn4 setBackgroundColor:[UIColor orangeColor]];
    btn4.layer.cornerRadius = 5;
    btn4.layer.masksToBounds = YES;
    [self.view addSubview:btn4];

    btn1.style = IconButtonStyleLeft;
    btn2.style = IconButtonStyleRight;
    btn3.style = IconButtonStyleTop;
    btn4.style = IconButtonStyleBottom;


@end
2.4 效果图

三、采用继承UIControl,重写按钮控件方式实现
新建一个类:HSImageBtn,继承于:UIControl,添加如下代码:
3.1 HSImageBtn.h
#import <UIKit/UIKit.h>

NS_ASSUME_NONNULL_BEGIN

typedef NS_ENUM(NSUInteger, HSImageBtnStyle)
    HSImageBtnStyleTop, // image在上,label在下
    HSImageBtnStyleLeft, // image在左,label在右
    HSImageBtnStyleBottom, // image在下,label在上
    HSImageBtnStyleRight // image在右,label在左
;


@interface HSImageBtn : UIControl

@property(nonatomic, copy)NSString *title;
@property(nonatomic, copy)UIColor *titleColor;
@property(nonatomic, copy)UIFont *font;
@propert以上是关于iOS 图标和文字自定按钮的主要内容,如果未能解决你的问题,请参考以下文章