Ansible 快速入门
Posted tashanzhishi
tags:
篇首语:本文由小常识网(cha138.com)小编为大家整理,主要介绍了Ansible 快速入门相关的知识,希望对你有一定的参考价值。
Ansible介绍
Ansible是什么
Ansible是一种IT自动化工具。它可以配置系统,部署软件以及协调更高级的IT任务,例如连续部署或零停机滚动更新。
Ansible的主要目标是简单和易用。它还着重于安全性和可靠性,其特点是活动部件最少,使用OpenSSH进行运输(使用其他运输方式和拉动模式作为替代),以及一种围绕人员(即使是不熟悉的人)可审核性设计的语言。该程序。
Ansible以无代理的方式管理机器。从来没有关于如何升级远程守护程序的问题,也没有因为卸载守护程序而无法管理系统的问题。由于OpenSSH是最受同行评审的开源组件之一,因此可以大大降低安全风险。Ansible是分散式的-它依靠您现有的OS凭据来控制对远程计算机的访问。如果需要,Ansible可以轻松地与Kerberos,LDAP和其他集中式身份验证管理系统连接。
特点总结:
1. ansible不要安装单独的agent, 也不用启动任何的服务.
2. ansible是python中的一套完整的自动化执行任务模块.
3. ansible playblook采用yaml进行配置,对自动化任务执行了然.
4. ansibe 是基于ssh进行通信,从而达到自动化任务的.
Ansible的组成
Ansible: 是ansible的命令工具,用来执行各种操作.
Ansible Playbook: 任务剧本, 用于编排定义Ansible的任务集的配置文件, 由Ansible顺序依次执行, 用yaml格式进行编排.
Inventory: Anisble管理主机的清单, 默认为/etc/ansible/hosts文件
Modules: Ansible执行各种功能操作的功能模块.
Plugins: 插件,模块功能的补充,常有连接类型插件,循环插件,变量插件,过滤插件,插件功能用的较少
API: 提供给第三方程序调用的应用程序编程接口。
Ansible安装配置
环境准备
| IP | 系统 | 主机名 | 描述 |
|---|---|---|---|
| 192.168.100.11 | CentOS7 | server01 | ansible管理节点 |
| 192.168.100.12 | CentOS7 | server02 | 被管理节点1 |
| 192.168.100.13 | CentOS7 | server03 | 被管理节点2 |
| 192.168.100.14 | CentOS6 | hd1 | 被管理节点3 |
| 192.168.100.15 | CentOS6 | hd2 | 被管理节点4 |
下载安装
第一步: 安装epel源
# 安装epel源
[root@wallace /]# wget -O /etc/yum.repos.d/epel.repo http://mirrors.aliyun.com/repo/epel-7.repo
第二步: 安装ansible
[root@wallace /]# yum install -y ansible
第三步: 检查版本
[root@wallace /]# ansible --version
ansible 2.9.10
  config file = /etc/ansible/ansible.cfg
  configured module search path = [u‘/root/.ansible/plugins/modules‘, u‘/usr/share/ansible/plugins/modules‘]
  ansible python module location = /usr/lib/python2.7/site-packages/ansible
  executable location = /usr/bin/ansible
  python version = 2.7.5 (default, Apr 11 2018, 07:36:10) [GCC 4.8.5 20150623 (Red Hat 4.8.5-28)]
Ansible的Inventory文件
Inventory文件通常用于定义要管理的主机的认证信息,例如ssh登录用户名、密码以及key相关信息。可以同时操作一个组的多台主机,组与主机组之间的关系都是通过inventory文件配置。配置文件路径为:/etc/ansible/hosts
Ansible的使用前提
前面已经说过,ansible实现自动化管理是基于ssh进行操作的,所以在进行管理操作的时候,需要开启ssh权限,或者在Inventory文件中定义好用户和密码等信息.
基于密码连接
第一步: 需对ansible.cfg进行配置, 配置host_key_checking:
[root@wallace /]# vim /etc/ansible/ansible.cfg
#roles_path = /etc/ansible/roles
# uncomment this to disable SSH key host checking
host_key_checking = False # 将这个#号去掉
第二步: 配置 /etc/ansible/hosts文件
[root@wallace /]# vim /etc/ansible/hosts
[server]
192.168.100.12 ansible_ssh_port=22 ansible_ssh_user=root ansible_ssh_pass="qwe123"
192.168.100.13 ansible_ssh_port=22 ansible_ssh_user=root ansible_ssh_pass="qwe123"
192.168.100.14 ansible_ssh_port=22 ansible_ssh_user=root ansible_ssh_pass="qwe123"
192.168.100.15 ansible_ssh_port=22 ansible_ssh_user=root ansible_ssh_pass="qwe123"
第三步: 测试
[root@wallace /]# ansible server -m shell -a ‘uptime‘ -o
192.168.100.13 | CHANGED | rc=0 | (stdout)  22:00:36 up  1:07,  2 users,  load average: 0.00, 0.01, 0.05
192.168.100.12 | CHANGED | rc=0 | (stdout)  22:00:36 up  1:06,  3 users,  load average: 0.00, 0.01, 0.05
192.168.100.14 | CHANGED | rc=0 | (stdout)  05:44:21 up 5 min,  2 users,  load average: 0.25, 0.17, 0.08
192.168.100.15 | CHANGED | rc=0 | (stdout)  00:00:55 up 5 min,  2 users,  load average: 0.00, 0.03, 0.00
第四步: 其他方式进行密码方式连接
# 方法二 主机+端口+密码
[server]
192.168.100.1[2:5] ansible_ssh_user=root ansible_ssh_pass="qwe123"


# 方法二 主机+端口+密码
[server]
192.168.100.1[2:5]
[server:vars]
ansible_ssh_pass="qwe123"
基于秘钥链接
基于秘钥连接需要先创建公钥和私钥,并发送给被管理机器
第一步: 生成公私钥并发送
[root@wallace ~]# ssh-keygen
[root@wallace ~]# for i in {2,3,4,5}; do ssh-copy-id -i 192.168.100.1$i ; done
第二步: 配置连接
[root@wallace~]# vim /etc/ansible/hosts
# 方法一 主机+端口+密钥
[webserver]
192.168.100.12:22
192.168.100.13
192.168.100.14
192.168.100.15
# 方法二 别名主机+端口+密钥
[server]
node1 ansible_ssh_host=192.168.100.12 ansible_ssh_port=22
node2 ansible_ssh_host=192.168.100.13 ansible_ssh_port=22
node3 ansible_ssh_host=192.168.100.14 ansible_ssh_port=22
node4 ansible_ssh_host=192.168.100.15 ansible_ssh_port=22
第三步: 测试
[root@wallace /]# ansible server -m shell -a ‘uptime‘ -o
192.168.100.15 | CHANGED | rc=0 | (stdout)  00:56:33 up  1:01,  2 users,  load average: 0.00, 0.00, 0.00
192.168.100.13 | CHANGED | rc=0 | (stdout)  22:56:25 up  2:03,  2 users,  load average: 0.01, 0.05, 0.05
192.168.100.14 | CHANGED | rc=0 | (stdout)  06:40:00 up  1:01,  2 users,  load average: 0.00, 0.00, 0.00
192.168.100.12 | CHANGED | rc=0 | (stdout)  22:56:25 up  2:02,  3 users,  load average: 0.01, 0.03, 0.05
主机组的使用
就是将多个类型的组进行归类整合,如下:
# 主机组变量名+主机+密码
[apache]
192.168.100.12
192.168.100.13
[apache.vars]
ansible_ssh_pass=‘qwe123‘

# 主机组变量名+主机+密钥
[nginx]
192.168.100.1[2:3]

# 定义多个组,把一个组当另外一个组的组员
[server:children]  #webserver组包括两个子组:apache nginx
apache
nginx
临时指定Inventory
第一步: 编写主机清单
[root@ansible ~]# vim /tmp/dockers
[dockers]
192.168.100.13 ansible_ssh_pass=‘qwe123‘
192.168.100.14
192.168.100.15
第二步: 指定主机清单使用
[root@wallace~]# ansible dockers -m ping -i /etc/dockers -o
192.168.100.13 | SUCCESS => {"ansible_facts": {"discovered_interpreter_python": "/usr/bin/python"}, "changed": false, "ping": "pong"}
192.168.100.14 | SUCCESS => {"ansible_facts": {"discovered_interpreter_python": "/usr/bin/python"}, "changed": false, "ping": "pong"}
192.168.100.15 | SUCCESS => {"ansible_facts": {"discovered_interpreter_python": "/usr/bin/python"}, "changed": false, "ping": "pong"}
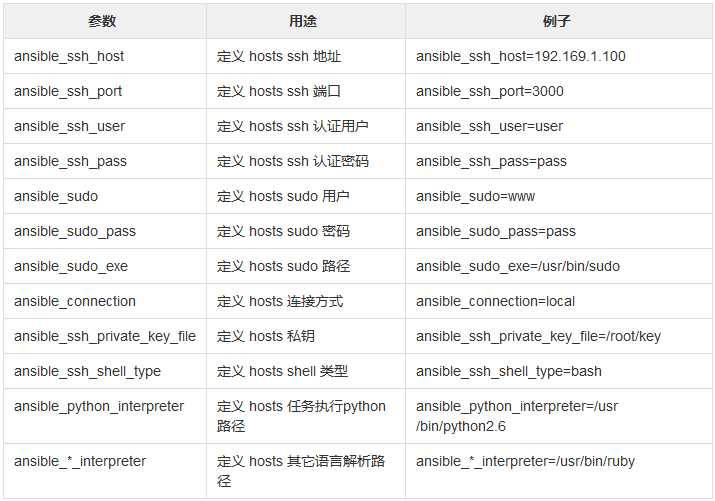
Inventory的内置参数

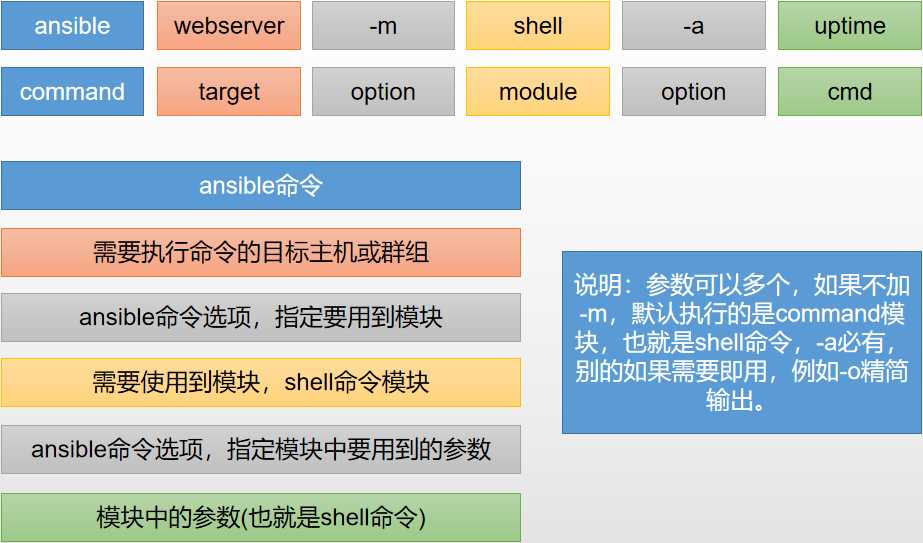
Ansible的命令格式
常用命令参数
可以通过命令查看参数:
[root@wallace /]# ansible -h
这里对其进行说明:
-m:要执行的模块,默认为command
-a:指定模块的参数
-u:ssh连接的用户名,默认用root,ansible.cfg中可以配置
-b,--become:变成那个用户身份,不提示密码
-k:提示输入ssh登录密码,当使用密码验证的时候用
-s:sudo运行
-U:sudo到哪个用户,默认为root
-K:提示输入sudo密码,当不是NOPASSWD模式时使用
-C:只是测试一下会改变什么内容,不会真正去执行
-c:连接类型(default=smart)
-f:fork多少进程并发处理,默认为5个
-i:指定hosts文件路径,默认default=/etc/ansible/hosts
-I:指定pattern,对已匹配的主机中再过滤一次
-list-host:只打印有哪些主机会执行这个命令,不会实际执行
-M:要执行的模块路径,默认为/usr/share/ansible
-o:压缩输出,摘要输出
--private-key:私钥路径
-T:ssh连接超时时间,默认是10秒
-t:日志输出到该目录,日志文件名以主机命名
-v:显示详细日志
测试:
[root@wallace /]# ansible server -m shell -a ‘uptime‘ -o
192.168.100.15 | CHANGED | rc=0 | (stdout)  00:56:33 up  1:01,  2 users,  load average: 0.00, 0.00, 0.00
192.168.100.13 | CHANGED | rc=0 | (stdout)  22:56:25 up  2:03,  2 users,  load average: 0.01, 0.05, 0.05
192.168.100.14 | CHANGED | rc=0 | (stdout)  06:40:00 up  1:01,  2 users,  load average: 0.00, 0.00, 0.00
192.168.100.12 | CHANGED | rc=0 | (stdout)  22:56:25 up  2:02,  3 users,  load average: 0.01, 0.03, 0.05
命令格式:

host-pattern格式
目标target主机,主机组匹配方式
主机匹配
#  一台目标主机
[root@wallace~]# ansible 192.168.100.12 -m ping

# 多台目标主机
[root@wallace~]# ansible 192.168.100.12,192.168.100.13 -m ping

# 所有目标主机
[root@wallace~]# ansible all -m ping
主机组匹配
# 组的配置信息如下:这里定义了一个nginx组和一个apache组
[root@wallace ~]# ansible nginx --list
  hosts (2):
    192.168.100.12
    192.168.100.13
[root@wallace ~]# ansible apache --list
  hosts (3):
    192.168.100.13
    192.168.100.14
    192.168.100.15

# 一个组的所有主机匹配
[root@wallace ~]# ansible apache -m ping

# 匹配apache组中有,但是nginx组中没有的所有主机
[root@wallace ~]# ansible ‘apache:!nginx‘ -m ping -o
192.168.100.12 | SUCCESS => {"ansible_facts": {"discovered_interpreter_python": "/usr/bin/python"}, "changed": false, "ping": "pong"}
192.168.100.13 | SUCCESS => {"ansible_facts": {"discovered_interpreter_python": "/usr/bin/python"}, "changed": false, "ping": "pong"}

# 匹配apache组和nginx组中都有的机器(并集)
[root@wallace ~]# ansible ‘apache:&nginx‘ -m ping -o
192.168.100.13 | SUCCESS => {"ansible_facts": {"discovered_interpreter_python": "/usr/bin/python"}, "changed": false, "ping": "pong"}

# 匹配apache组nginx组两个组所有的机器(并集);等于ansible apache,nginx -m ping
[root@wallace ~]# ansible ‘apache:nginx‘ -m ping -o
192.168.100.12 | SUCCESS => {"ansible_facts": {"discovered_interpreter_python": "/usr/bin/python"}, "changed": false, "ping": "pong"}
192.168.100.13 | SUCCESS => {"ansible_facts": {"discovered_interpreter_python": "/usr/bin/python"}, "changed": false, "ping": "pong"}
192.168.100.14 | SUCCESS => {"ansible_facts": {"discovered_interpreter_python": "/usr/bin/python"}, "changed": false, "ping": "pong"}
192.168.100.15 | SUCCESS => {"ansible_facts": {"discovered_interpreter_python": "/usr/bin/python"}, "changed": false, "ping": "pong"}
以上是关于Ansible 快速入门的主要内容,如果未能解决你的问题,请参考以下文章