实现点亮LED灯
Posted 053179hu
tags:
篇首语:本文由小常识网(cha138.com)小编为大家整理,主要介绍了实现点亮LED灯相关的知识,希望对你有一定的参考价值。
学习目的
- 基于第一个驱动程序框架,加入硬件操作,实现LED的点亮和熄灭操作
在上面学习中,已经搭建好了驱动框架,实现了在应用程序调用open、read函数时,通过系统调进入内核空间,调用驱动程序中与之对应的xxx_open、xxx_read函数。现在我们在驱动中加入相应的硬件操作,实现在应用程序调用open、write函数操作开发板上led的点亮和熄灭。
实现本功能主要分为以下几步:
1)查看开发板原理图,找到LED连接的GPIO引脚
2)看芯片手册,查看如何配置相关GPIO引脚
3)修改驱动程序
4)编写测试应用程序
1、阅读开发板原理图

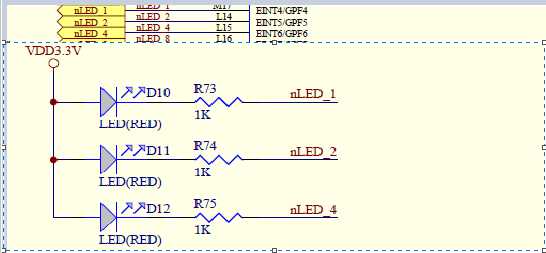
图1 开发板上LED连接方式
硬件平台为JZ2440开发板,主控是s3c2440芯片。原理图上的三个LED阳极连接3.3v电源,阴极接电阻后分别连接到芯片的GPF4、GPF5、GPF6引脚。
2、读芯片手册
阅读s3c2440芯片手册,配置引脚的寄存器有三种类型,分别为配置寄存器(GPACON-GPJCON)、数据寄存器(GPADAT-GPJDAT)、上拉模式寄存器(GPBUP-GPJUP)
配置寄存器:2440芯片的引脚大多为复用功能引脚,通过该寄存器可以设置每个引脚的功能,在这里我们设置GPF4、GPF5、GPF6引脚为普通输出引脚。每个引脚配置模式占配置寄存器中两位,设置成01=Output

图2 2440芯片GPF端口引脚的配置寄存器
数据寄存器:如果该引脚配置成输出引脚,将控制该引脚的寄存器的某相应位设置为1时,该引脚输出高电平;当引脚配置成输入模式时,读该引脚对应寄存器对应某位,可以获取当前引脚的输入电平状态
上拉寄存器:设置引脚对应寄存器某一位为0时,使能上拉功能,当设置该位为1时,关闭该引脚上拉功能
3、修改驱动程序
3.1 xxx_init、xxx_exit函数修改
在module_init、module_exit函数在insmod加载驱动模块、rmnod卸载驱动模块时被调用,在此修饰函数中完成GPF寄存器的映射。驱动编程中,配置寄存器之前必需相关寄存器的地址映射,这也是驱动编程和裸机编程的区别之一。裸机编程和单片机编程一样,使用寄存器的物理地址,而linux驱动中使用的虚拟地址,读写使用虚拟地址经MMU转换成物理地址,紧接着再执行,作用于实际物理内存。
xxx_init函数添加内容,完成物理地址到虚拟地址映射
static int led_drv_init(void)
{
       ......
   +    gpfcon = (volatile unsigned long *)ioremap(0x56000050, 16);
   +    gpfdat = gpfcon + 1;
     ......
}
ioremap函数实现物理地址向虚拟地址映射功能,函数第一个参数是需要映射物理地址,第二个参数是映射区域的大小,返回值为映射后的虚拟地址值。
xxx_exit函数添加内容,卸载映射虚拟地址
static void led_drv_exit(void)
{
        ......
   +    iounmap(gpfcon);
        ......
}
3.2 xxx_open函数修改
设置2440芯片与LED连接引脚为普通输出模式
static int led_drv_open(struct inode *inode, struct file *file)
{
    *gpfcon &= ~((0x3<<(4*2)) | (0x3<<(5*2)) | (0x3<<(6*2)));
    *gpfcon |= ((0x1<<(4*2)) | (0x1<<(5*2)) | (0x1<<(6*2)));

    return 0;
}
3.3 xxx_wirte函数修改
根据应用程序write函数传入的值,设置与LED连接的GPF引脚的GPFDAT数据寄存器值,用于控制LED点亮和熄灭
static ssize_t led_drv_write(struct file *file, const char __user *buf, size_t count, loff_t *ppos)
{
    int val;

    copy_from_user(&val, buf, count); //    copy_to_user();

    if (val == 1)
    {
        // 点灯
        *gpfdat &= ~((1<<4) | (1<<5) | (1<<6));
    }
    else
    {
        // 灭灯
        *gpfdat |= (1<<4) | (1<<5) | (1<<6);
    }

    return 0;
}
copy_from_user:从用户空间中拷贝数据到内核空间,第一个参数为拷贝到内核控制存放的目的地址,第二个参数为用户空间数据存放地址,第三个参数为要拷贝的数据字节数
4、编写测试应用程序
应用测试程序根据读取终端输入的命令,执行相关的操作。输入‘s‘字符时,点亮所有LED;输入‘o‘字符时,关闭所有LED;输入‘q‘时,退出当前应用程序;输入‘h‘时,打印帮助信息
int main(int argc, char **argv)
{
    int fd, val, old_val = -1;
    char com;

    fd = open("/dev/led", O_RDWR);
    if(fd == -1)
    {
        printf("can‘t open...
");
        exit(EXIT_FAILURE);
    }

    help_info();

    printf("----> ");
    while(1)
    {
        com = getchar();
        switch(com)
        {
            case ‘s‘:
                val = 1;
                break;

            case ‘o‘:
                val = 0;
                break;

            case ‘q‘:
                exit(EXIT_SUCCESS);

            case ‘h‘:
                help_info();
                break;

            case ‘
‘:
                printf("----> ");
                break;

            default:
                break;
        }

        if(val != old_val)
        {
            write(fd, &val, 4);
            old_val = val;
        }
    }

    exit(EXIT_SUCCESS);
}
完整驱动程序代码

#include <linux/module.h>
#include <linux/kernel.h>
#include <linux/fs.h>
#include <linux/init.h>
#include <linux/delay.h>
#include <linux/device.h>
#include <asm/uaccess.h>
#include <asm/irq.h>
#include <asm/io.h>
//#include <asm/arch/regs-gpio.h>
//#include <asm/hardware.h>

int major;

volatile unsigned long *gpfcon = NULL;
volatile unsigned long *gpfdat = NULL;

static struct class *led_drv_class;
static struct class_device    *led_drv_class_dev;

static int led_drv_open(struct inode *inode, struct file *file);
static ssize_t led_drv_read(struct file *file, char __user *buf, size_t count, loff_t *ppos);
static ssize_t led_drv_write(struct file *file, const char __user *buf, size_t count, loff_t *ppos);

struct file_operations led_drv_fileop = {
    .owner  =   THIS_MODULE,    /* 这是一个宏,推向编译模块时自动创建的__this_module变量 */
    .open   =   led_drv_open,
    .read   =   led_drv_read,
    .write  =   led_drv_write,
};

static int led_drv_open(struct inode *inode, struct file *file)
{
    *gpfcon &= ~((0x3<<(4*2)) | (0x3<<(5*2)) | (0x3<<(6*2)));
    *gpfcon |= ((0x1<<(4*2)) | (0x1<<(5*2)) | (0x1<<(6*2)));

    return 0;
}

static ssize_t led_drv_read(struct file *file, char __user *buf, size_t count, loff_t *ppos)
{
    printk("led_drv_read
");
    return 0;
}

static ssize_t led_drv_write(struct file *file, const char __user *buf, size_t count, loff_t *ppos)
{
    int val;

    copy_from_user(&val, buf, count); //    copy_to_user();

    if (val == 1)
    {
        // 点灯
        *gpfdat &= ~((1<<4) | (1<<5) | (1<<6));
    }
    else
    {
        // 灭灯
        *gpfdat |= (1<<4) | (1<<5) | (1<<6);
    }

    return 0;
}


static int led_drv_init(void)
{
    major = register_chrdev(0, "led_light", &led_drv_fileop);

    led_drv_class = class_create(THIS_MODULE, "led_drv");
    //led_drv_class_dev = class_device_create(led_drv_class, NULL, MKDEV(major, 0), NULL, "led"); /* /dev/led */
    led_drv_class_dev = device_create(led_drv_class, NULL, MKDEV(major, 0), NULL, "led"); /* /dev/led */

    gpfcon = (volatile unsigned long *)ioremap(0x56000050, 16);
    gpfdat = gpfcon + 1;

    return 0;
}

static void led_drv_exit(void)
{
    unregister_chrdev(major, "led_drv");

    //class_device_unregister(led_drv_class_dev);
    device_unregister(led_drv_class_dev);
    class_destroy(led_drv_class);

    iounmap(gpfcon);
}

module_init(led_drv_init);
module_exit(led_drv_exit);

MODULE_LICENSE("GPL");
完整应用程序代码

#include <unistd.h>
#include <sys/types.h>
#include <sys/stat.h>
#include <sys/fcntl.h>
#include <stdlib.h>
#include <stdio.h>

void help_info(void)
{
    printf("LED Contrl Function:
");
    printf("s---->Turn On
");
    printf("o---->Trun Off
");
    printf("q---->Quit
");
    printf("h---->Help Info
");
}

int main(int argc, char **argv)
{
    int fd, val, old_val = -1;
    char com;

    fd = open("/dev/led", O_RDWR);
    if(fd == -1)
    {
        printf("can‘t open...
");
        exit(EXIT_FAILURE);
    }

    help_info();

    printf("----> ");
    while(1)
    {
        com = getchar();
        switch(com)
        {
            case ‘s‘:
                val = 1;
                break;

            case ‘o‘:
                val = 0;
                break;

            case ‘q‘:
                exit(EXIT_SUCCESS);

            case ‘h‘:
                help_info();
                break;

            case ‘
‘:
                printf("----> ");
                break;

            default:
                break;
        }

        if(val != old_val)
        {
            write(fd, &val, 4);
            old_val = val;
        }
    }

    exit(EXIT_SUCCESS);
}
以上是关于实现点亮LED灯的主要内容,如果未能解决你的问题,请参考以下文章
