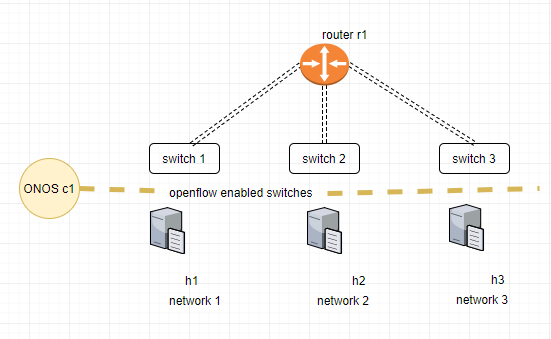
As we have progressed through learning SDN essentials by installing ONOS and testing out a simple network topology with one switch and two hosts .Now its time to take it to another level by adding a routing in between .
Note we wont be using any real simulated router in between for this setup as the intention here is to test the network topology with a router in between .Ip forwarding functionality in linux which is our base server for mininet and ONOS will be used for the routing purpose.
The initial setup and configuration involves creating a python code to create the required topology.
#!/usr/bin/python
"""
linuxrouter.py: Example network with Linux IP router
This example converts a Node into a router using IP forwarding
already built into Linux.
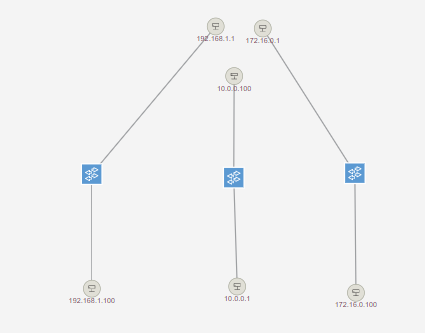
The example topology creates a router and three IP subnets:
- 192.168.1.0/24 (r0-eth1, IP: 192.168.1.1)
- 172.16.0.0/12 (r0-eth2, IP: 172.16.0.1)
- 10.0.0.0/8 (r0-eth3, IP: 10.0.0.1)
Each subnet consists of a single host connected to
a single switch:
r0-eth1 - s1-eth1 - h1-eth0 (IP: 192.168.1.100)
r0-eth2 - s2-eth1 - h2-eth0 (IP: 172.16.0.100)
r0-eth3 - s3-eth1 - h3-eth0 (IP: 10.0.0.100)
The example relies on default routing entries that are
automatically created for each router interface, as well
as ‘defaultRoute‘ parameters for the host interfaces.
Additional routes may be added to the router or hosts by
executing ‘ip route‘ or ‘route‘ commands on the router or hosts.
"""
from mininet.topo import Topo
from mininet.net import Mininet
from mininet.node import Node,Controller, OVSKernelSwitch, RemoteController
from mininet.log import setLogLevel, info
from mininet.cli import CLI
class LinuxRouter( Node ):
"A Node with IP forwarding enabled."
def config( self, **params ):
super( LinuxRouter, self).config( **params )
# Enable forwarding on the router
self.cmd( ‘sysctl net.ipv4.ip_forward=1‘ )
def terminate( self ):
self.cmd( ‘sysctl net.ipv4.ip_forward=0‘ )
super( LinuxRouter, self ).terminate()
class NetworkTopo( Topo ):
"A LinuxRouter connecting three IP subnets"
def build( self, **_opts ):
# net = Mininet(controller=RemoteController, switch=OVSKernelSwitch)
# c1 = net.addController(‘c1‘, controller=RemoteController, ip="10.128.0.4")
# c2 = net.addController(‘c2‘, controller=RemoteController, ip="127.0.0.1", port=6633)
defaultIP = ‘192.168.1.1/24‘ # IP address for r0-eth1
router = self.addNode( ‘r0‘, cls=LinuxRouter, ip=defaultIP )
s1, s2, s3 = [ self.addSwitch( s ) for s in ( ‘s1‘, ‘s2‘, ‘s3‘ ) ]
self.addLink( s1, router, intfName2=‘r0-eth1‘,
params2={ ‘ip‘ : defaultIP } ) # for clarity
self.addLink( s2, router, intfName2=‘r0-eth2‘,
params2={ ‘ip‘ : ‘172.16.0.1/12‘ } )
self.addLink( s3, router, intfName2=‘r0-eth3‘,
params2={ ‘ip‘ : ‘10.0.0.1/8‘ } )
h1 = self.addHost( ‘h1‘, ip=‘192.168.1.100/24‘,
defaultRoute=‘via 192.168.1.1‘ )
h2 = self.addHost( ‘h2‘, ip=‘172.16.0.100/12‘,
defaultRoute=‘via 172.16.0.1‘ )
h3 = self.addHost( ‘h3‘, ip=‘10.0.0.100/8‘,
defaultRoute=‘via 10.0.0.1‘ )
for h, s in [ (h1, s1), (h2, s2), (h3, s3) ]:
self.addLink( h, s )
def run():
"Test linux router"
topo = NetworkTopo()
#c = RemoteController(‘c‘, ‘10.128.0.4‘)
#net.addController(c)
#net = Mininet( topo=topo ) # controller is used by s1-s3
net = Mininet(topo=topo,controller=RemoteController, switch=OVSKernelSwitch)
c1 = net.addController(‘c1‘, controller=RemoteController, ip="10.10.18.131")
#net.addController(c)
net.start()
info( ‘*** Routing Table on Router:
‘ )
info( net[ ‘r0‘ ].cmd( ‘route‘ ) )
CLI( net )
net.stop()
if __name__ == ‘__main__‘:
setLogLevel( ‘info‘ )
run()
This will create a topology
Running the python code will execute all the steps and create the above mentioned topology .
We have mentioned our ONOS controller installed in the same server as controller to the code.
root@master1:/home/sreejithkj52# python top1.py
*** Creating network
*** Adding controller
*** Adding hosts:
h1 h2 h3 r0
*** Adding switches:
s1 s2 s3
*** Adding links:
(h1, s1) (h2, s2) (h3, s3) (s1, r0) (s2, r0) (s3, r0)
*** Configuring hosts
h1 h2 h3 r0
*** Starting controller
c0 c1
*** Starting 3 switches
s1 s2 s3 ...
*** Routing Table on Router:
Kernel IP routing table
Destination     Gateway         Genmask         Flags Metric Ref    Use Iface
10.0.0.0        0.0.0.0         255.0.0.0       U     0      0        0 r0-eth3
172.16.0.0      0.0.0.0         255.240.0.0     U     0      0        0 r0-eth2
192.168.1.0     0.0.0.0         255.255.255.0   U     0      0        0 r0-eth1
*** Starting CLI:

Topology view in ONOS
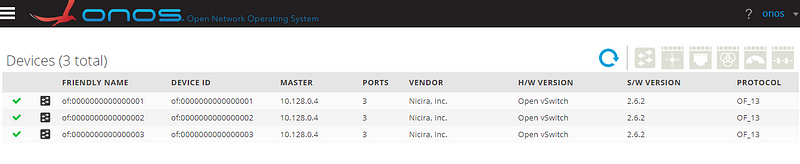
From the devices view we will be able to see the configured three switch and its details.
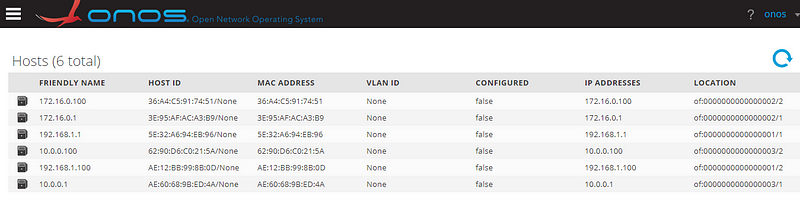
To view the hosts attached to the switches click on the host view section.
After the configuration all the hosts will be reachable to each other .
mininet> h1 ping h3
PING 10.0.0.100 (10.0.0.100) 56(84) bytes of data.
64 bytes from 10.0.0.100: icmp_seq=1 ttl=63 time=26.1 ms
64 bytes from 10.0.0.100: icmp_seq=2 ttl=63 time=0.285 ms
mininet> h1 ping h2
PING 172.16.0.100 (172.16.0.100) 56(84) bytes of data.
64 bytes from 172.16.0.100: icmp_seq=1 ttl=63 time=7.86 ms
64 bytes from 172.16.0.100: icmp_seq=2 ttl=63 time=0.240 ms
mininet> h3 ping h2
PING 172.16.0.100 (172.16.0.100) 56(84) bytes of data.
64 bytes from 172.16.0.100: icmp_seq=1 ttl=63 time=6.37 ms
64 bytes from 172.16.0.100: icmp_seq=2 ttl=63 time=0.233 ms
Note the time delay for the first packet ,this is the time required to contact SDN controller and get the enforced flows after doing this step for the first packet flow will be populated in all sdn enabled switches and there is no need to contact controller any more further communication will happen directly .
mininet> h1 ifconfig
h1-eth0: flags=4163<UP,BROADCAST,RUNNING,MULTICAST>  mtu 1500
        inet 192.168.1.100  netmask 255.255.255.0  broadcast 192.168.1.255
        inet6 fe80::ac12:bbff:fe99:8b0d  prefixlen 64  scopeid 0x20<link>
        ether ae:12:bb:99:8b:0d  txqueuelen 1000  (Ethernet)
        RX packets 1189  bytes 96316 (94.0 KiB)
        RX errors 0  dropped 1182  overruns 0  frame 0
        TX packets 21  bytes 1642 (1.6 KiB)
        TX errors 0  dropped 0 overruns 0  carrier 0  collisions 0
We will continue doing further test by enabling a python webserver from h1 and accessing it through other hosts .
mininet> h1 python -m SimpleHTTPServer 80 &
mininet> h2 wget -O - h1
--2018-02-23 12:46:49--  http://192.168.1.100/
Connecting to 192.168.1.100:80... connected.
HTTP request sent, awaiting response... 200 OK
Length: 604 [text/html]
Saving to: ‘STDOUT’

-                     0%[                    ]       0  --.-KB/s               <!DOCTYPE html PUBLIC "-//W3C//DTD HTML 3.2 Final//EN"><html>
<title>Directory listing for /</title>
<body>
<h2>Directory listing for /</h2>
<hr>
<ul>
<li><a href=".bash_history">.bash_history</a>
<li><a href=".bash_logout">.bash_logout</a>
<li><a href=".bashrc">.bashrc</a>
<li><a href=".profile">.profile</a>
<li><a href=".ssh/">.ssh/</a>
<li><a href=".viminfo">.viminfo</a>
<li><a href="customtopo.py">customtopo.py</a>
<li><a href="gitpulltest/">gitpulltest/</a>
<li><a href="gitsync/">gitsync/</a>
<li><a href="playbooks/">playbooks/</a>
<li><a href="top1.py">top1.py</a>
</ul>
<hr>
</body>
</html>
-                   100%[===================>]     604  --.-KB/s    in 0s

2018-02-23 12:46:49 (191 MB/s) - written to stdout [604/604]
Accessing from h3
mininet> h3 wget -O - h1
--2018-02-23 12:48:09--  http://192.168.1.100/
Connecting to 192.168.1.100:80... connected.
HTTP request sent, awaiting response... 200 OK
Length: 604 [text/html]
Saving to: ‘STDOUT’

-                     0%[                    ]       0  --.-KB/s               <!DOCTYPE html PUBLIC "-//W3C//DTD HTML 3.2 Final//EN"><html>
<title>Directory listing for /</title>
<body>
<h2>Directory listing for /</h2>
<hr>
<ul>
<li><a href=".bash_history">.bash_history</a>
<li><a href=".bash_logout">.bash_logout</a>
<li><a href=".bashrc">.bashrc</a>
<li><a href=".profile">.profile</a>
<li><a href=".ssh/">.ssh/</a>
<li><a href=".viminfo">.viminfo</a>
<li><a href="customtopo.py">customtopo.py</a>
<li><a href="gitpulltest/">gitpulltest/</a>
<li><a href="gitsync/">gitsync/</a>
<li><a href="playbooks/">playbooks/</a>
<li><a href="top1.py">top1.py</a>
</ul>
<hr>
</body>
</html>
-                   100%[===================>]     604  --.-KB/s    in 0s

2018-02-23 12:48:09 (202 MB/s) - written to stdout [604/604]
This tutorial has demonstrated how easy is to setup a custom topology in mininet and connecting the same to ONOS controller.