RT-Thread 添加 DS18B20 详解
Posted raowz
tags:
篇首语:本文由小常识网(cha138.com)小编为大家整理,主要介绍了RT-Thread 添加 DS18B20 详解相关的知识,希望对你有一定的参考价值。
闲来无事,板子上有一个DS18B20的传感器,所以就在RT-Thread系统上小试一下。。。
1.新建工程,这次改使用bsp,操作图(1)
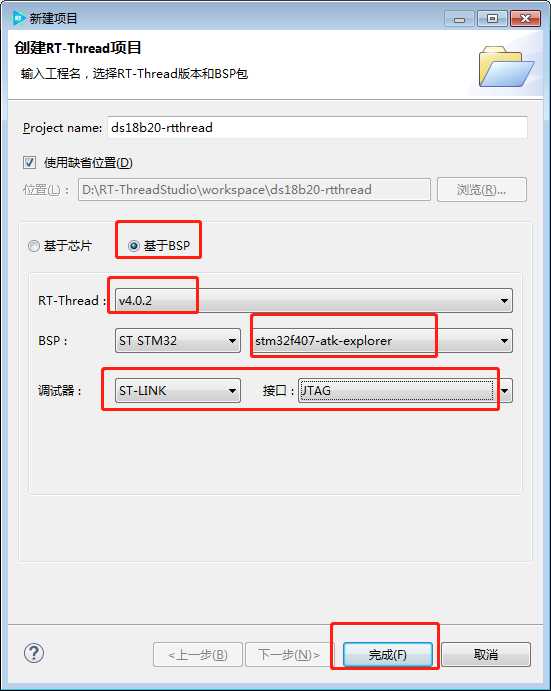
图 (1)
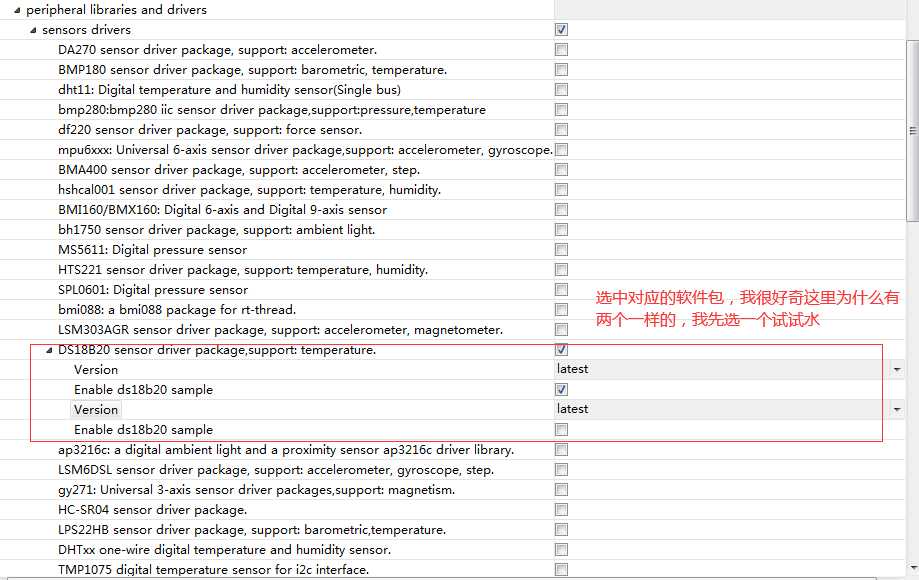
2.打开RT-Thread Settings,如图(2)添加ds18b20的软件包
图(2)
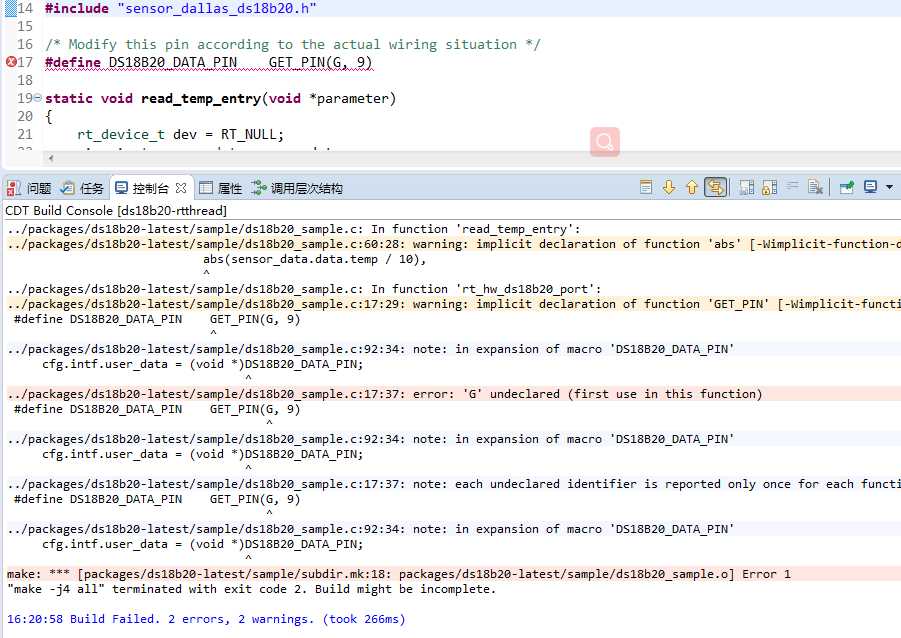
3.可以先编译一下,会出如图(3)的错误信息
图(3)
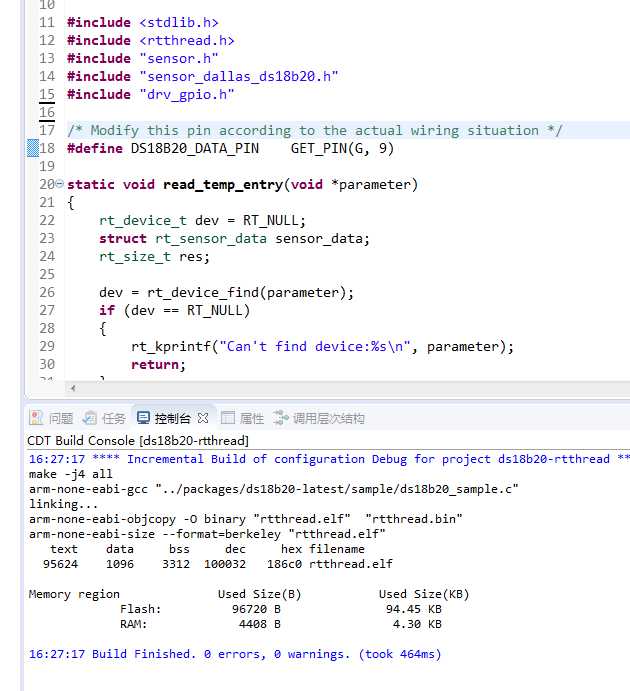
出错很正常,不慌,先看看啥问题,根据错误提示和位置,应该是找不到GET_PIN这个宏引发的问题,在该文件头部加上该宏所在的头文件drv_gpio.h即可。
这下就编译通过了,如图(4)。
图(4)
4.接下来就是根据自己的板子来修改代码。查看原理图,找到ds18b20连接到mcu的那个gpio口
我的板子接的是PG9,所以不用修改
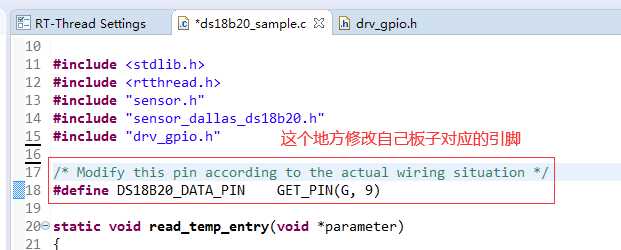
5.下面就可以直接下载到板子运行了,如图(5)
经过上面的步骤,我们已经可以完成rtthread针对ds18b20的使用了,结果已经达到了,如果只需要结果的到此为止。
下面是看源码,rtthread是如何对ds18b20进行操作的。
懒得自己写例程了,直接看rtthread软件包中写好的sample,也就是ds18b20_sample.c
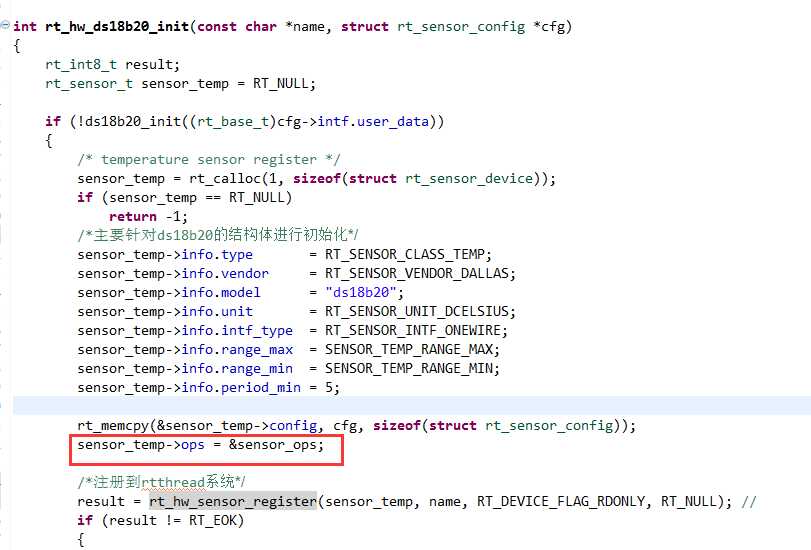
- (一) 首先,看 ds18b20_sample.c,rt_hw_ds18b20_port是针对ds18b20进行初始化,包括结构体填充和注册到rtthread系统中,标红字体需细看
 1 static int rt_hw_ds18b20_port(void)
 2 {
 3     struct rt_sensor_config cfg;
 4     /*user_data存放的是引脚信息,后面会用*/
 5     cfg.intf.user_data = (void *)DS18B20_DATA_PIN; //我们修改自己板子上引脚的宏
 6     rt_hw_ds18b20_init("ds18b20", &cfg);
 7
 8     return RT_EOK;
 9 }
10 /*该函数启动时自动执行*/
11 INIT_COMPONENT_EXPORT(rt_hw_ds18b20_port);
 1 int rt_hw_ds18b20_init(const char *name, struct rt_sensor_config *cfg)
 2 {
 3     rt_int8_t result;
 4     rt_sensor_t sensor_temp = RT_NULL;
 5
 6     if (!ds18b20_init((rt_base_t)cfg->intf.user_data))
 7     {
 8         /* temperature sensor register */
 9         sensor_temp = rt_calloc(1, sizeof(struct rt_sensor_device));
10         if (sensor_temp == RT_NULL)
11             return -1;
12         /*主要针对ds18b20的结构体进行初始化*/
13         sensor_temp->info.type       = RT_SENSOR_CLASS_TEMP;
14         sensor_temp->info.vendor     = RT_SENSOR_VENDOR_DALLAS;
15         sensor_temp->info.model      = "ds18b20";
16         sensor_temp->info.unit       = RT_SENSOR_UNIT_DCELSIUS;
17         sensor_temp->info.intf_type  = RT_SENSOR_INTF_ONEWIRE;
18         sensor_temp->info.range_max  = SENSOR_TEMP_RANGE_MAX;
19         sensor_temp->info.range_min  = SENSOR_TEMP_RANGE_MIN;
20         sensor_temp->info.period_min = 5;
21
22         rt_memcpy(&sensor_temp->config, cfg, sizeof(struct rt_sensor_config));
23         sensor_temp->ops = &sensor_ops;
24
25         /*注册到rtthread系统*/
26         result = rt_hw_sensor_register(sensor_temp, name, RT_DEVICE_FLAG_RDONLY, RT_NULL);
27         if (result != RT_EOK)
28         {
29             LOG_E("device register err code: %d", result);
30             goto __exit;
31         }
32
33     }
34     return RT_EOK;
35
36 __exit:
37     if (sensor_temp)
38         rt_free(sensor_temp);
39     return -RT_ERROR;
40 }
 1 /*
 2  * sensor register
 3  */
 4 int rt_hw_sensor_register(rt_sensor_t sensor,
 5                           const char              *name,
 6                           rt_uint32_t              flag,
 7                           void                    *data)
 8 {
 9     rt_int8_t result;
10     rt_device_t device;
11     RT_ASSERT(sensor != RT_NULL);
12
13     char *sensor_name = RT_NULL, *device_name = RT_NULL;
14
15     /* Add a type name for the sensor device */
16     sensor_name = sensor_name_str[sensor->info.type];
17     device_name = (char *)rt_calloc(1, rt_strlen(sensor_name) + 1 + rt_strlen(name));
18     if (device_name == RT_NULL)
19     {
20         LOG_E("device_name calloc failed!");
21         return -RT_ERROR;
22     }
23
24     rt_memcpy(device_name, sensor_name, rt_strlen(sensor_name) + 1);
25     strcat(device_name, name);
26
27     if (sensor->module != RT_NULL && sensor->module->lock == RT_NULL)
28     {
29         /* Create a mutex lock for the module */
30         sensor->module->lock = rt_mutex_create(name, RT_IPC_FLAG_FIFO);
31         if (sensor->module->lock == RT_NULL)
32         {
33             rt_free(device_name);
34             return -RT_ERROR;
35         }
36     }
37
38     device = &sensor->parent;
39
40 #ifdef RT_USING_DEVICE_OPS
41     device->ops         = &rt_sensor_ops;
42 #else
43     device->init        = RT_NULL;
44     device->open        = rt_sensor_open;
45     device->close       = rt_sensor_close;
46     device->read        = rt_sensor_read;
47     device->write       = RT_NULL;
48     device->control     = rt_sensor_control;
49 #endif
50     device->type        = RT_Device_Class_Sensor;
51     device->rx_indicate = RT_NULL;
52     device->tx_complete = RT_NULL;
53     device->user_data   = data;
54
55     result = rt_device_register(device, device_name, flag | RT_DEVICE_FLAG_STANDALONE);
56     if (result != RT_EOK)
57     {
58         rt_free(device_name);
59         LOG_E("rt_sensor register err code: %d", result);
60         return result;
61     }
62
63     rt_free(device_name);
64     LOG_I("rt_sensor init success");
65     return RT_EOK;
66 }
*************************************************以上就完成了DS18B20对rtthread系统的适配********************************************
- (二) 对ds18b20的实际使用,还是截图吧,可以在图上添解释
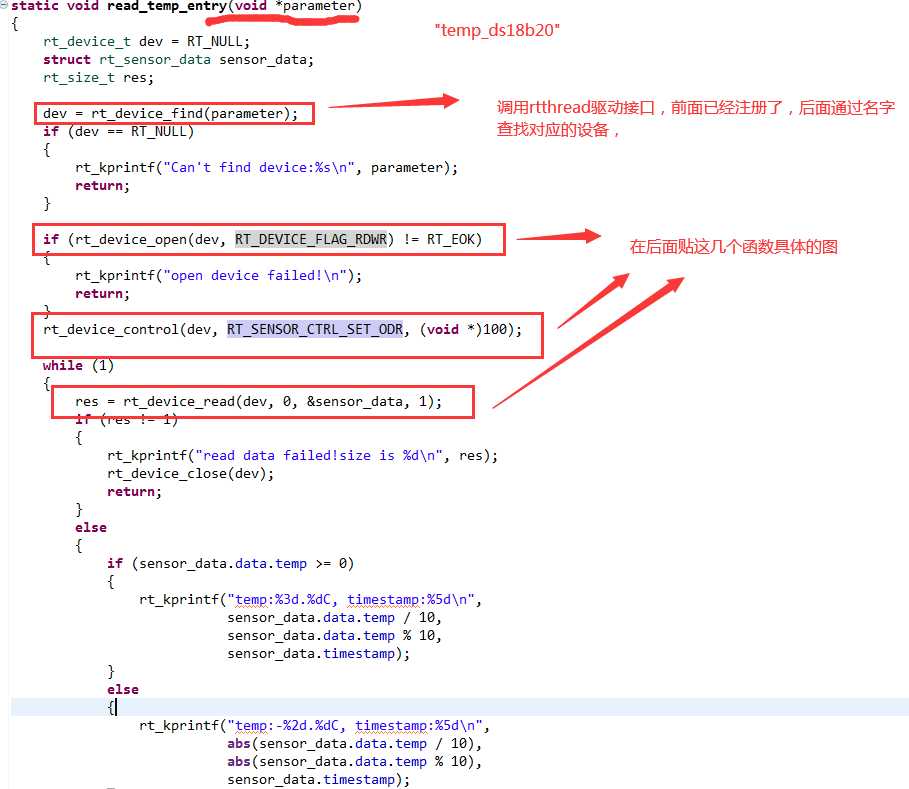
如下图是对上图函数指针操作的实际函数,在上述注册过程中赋值,也就是这里:

1. rt_sensor_open: 主要执行标红处
/* RT-Thread Device Interface */

根据上面的截图,传入的参数是dev也就是ds18b20,oflag = RT_DEVICE_FLAG_RDWR
static rt_err_t rt_sensor_open(rt_device_t dev, rt_uint16_t oflag)
{
    rt_sensor_t sensor = (rt_sensor_t)dev;
    RT_ASSERT(dev != RT_NULL);
    rt_err_t res = RT_EOK;

    if (sensor->module)
    {
        /* take the module mutex */
        rt_mutex_take(sensor->module->lock, RT_WAITING_FOREVER);
    }

    if (sensor->module != RT_NULL && sensor->info.fifo_max > 0 && sensor->data_buf == RT_NULL)
    {
        /* Allocate memory for the sensor buffer */
        sensor->data_buf = rt_malloc(sizeof(struct rt_sensor_data) * sensor->info.fifo_max);
        if (sensor->data_buf == RT_NULL)
        {
            res = -RT_ENOMEM;
            goto __exit;
        }
    }

    if (oflag & RT_DEVICE_FLAG_RDONLY && dev->flag & RT_DEVICE_FLAG_RDONLY)
    {
        if (sensor->ops->control != RT_NULL)
        {
            /* If polling mode is supported, configure it to polling mode */
            sensor->ops->control(sensor, RT_SENSOR_CTRL_SET_MODE, (void *)RT_SENSOR_MODE_POLLING);
        }
        sensor->config.mode = RT_SENSOR_MODE_POLLING;
    }
    else if (oflag & RT_DEVICE_FLAG_INT_RX && dev->flag & RT_DEVICE_FLAG_INT_RX)
    {
        if (sensor->ops->control != RT_NULL)
        {
            /* If interrupt mode is supported, configure it to interrupt mode */
            sensor->ops->control(sensor, RT_SENSOR_CTRL_SET_MODE, (void *)RT_SENSOR_MODE_INT);
        }
        /* Initialization sensor interrupt */
        rt_sensor_irq_init(sensor);
        sensor->config.mode = RT_SENSOR_MODE_INT;
    }
    else if (oflag & RT_DEVICE_FLAG_FIFO_RX && dev->flag & RT_DEVICE_FLAG_FIFO_RX)
    {
        if (sensor->ops->control != RT_NULL)
        {
            /* If fifo mode is supported, configure it to fifo mode */
            sensor->ops->control(sensor, RT_SENSOR_CTRL_SET_MODE, (void *)RT_SENSOR_MODE_FIFO);
        }
        /* Initialization sensor interrupt */
        rt_sensor_irq_init(sensor);
        sensor->config.mode = RT_SENSOR_MODE_FIFO;
    }
    else
    {
        res = -RT_EINVAL;
        goto __exit;
    }

    /* Configure power mode to normal mode */
    if (sensor->ops->control(sensor, RT_SENSOR_CTRL_SET_POWER, (void *)RT_SENSOR_POWER_NORMAL) == RT_EOK)
    {
        sensor->config.power = RT_SENSOR_POWER_NORMAL;
    }

__exit:
    if (sensor->module)
    {
        /* release the module mutex */
        rt_mutex_release(sensor->module->lock);
    }

    return res;
}
rt_sensor_read:
static rt_size_t rt_sensor_read(rt_device_t dev, rt_off_t pos, void *buf, rt_size_t len)
{
    rt_sensor_t sensor = (rt_sensor_t)dev;
    rt_size_t result = 0;
    RT_ASSERT(dev != RT_NULL);

    if (buf == NULL || len == 0)
    {
        return 0;
    }

    if (sensor->module)
    {
        rt_mutex_take(sensor->module->lock, RT_WAITING_FOREVER);
    }

    /* The buffer is not empty. Read the data in the buffer first */
    if (sensor->data_len > 0)
    {
        if (len > sensor->data_len / sizeof(struct rt_sensor_data))
        {
            len = sensor->data_len / sizeof(struct rt_sensor_data);
        }

        rt_memcpy(buf, sensor->data_buf, len * sizeof(struct rt_sensor_data));

        /* Clear the buffer */
        sensor->data_len = 0;
        result = len;
    }
    else
    {
        /* If the buffer is empty read the data */
        result = sensor->ops->fetch_data(sensor, buf, len);
    }

    if (sensor->module)
    {
        rt_mutex_release(sensor->module->lock);
    }

    return result;
}
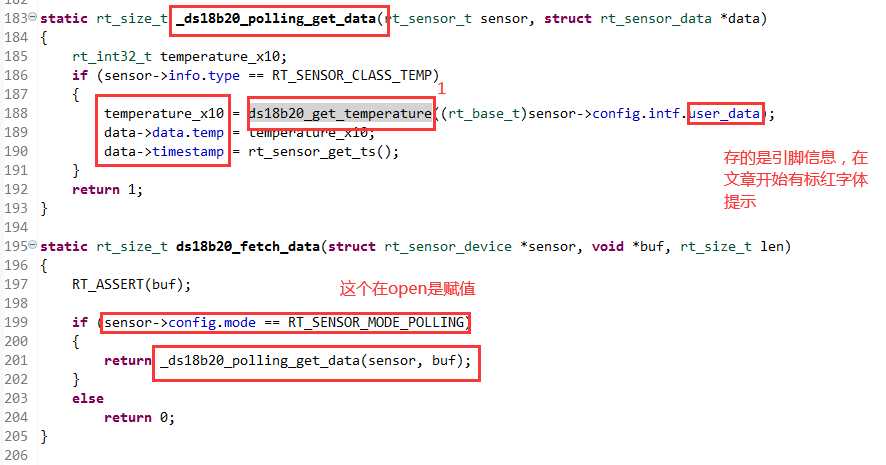
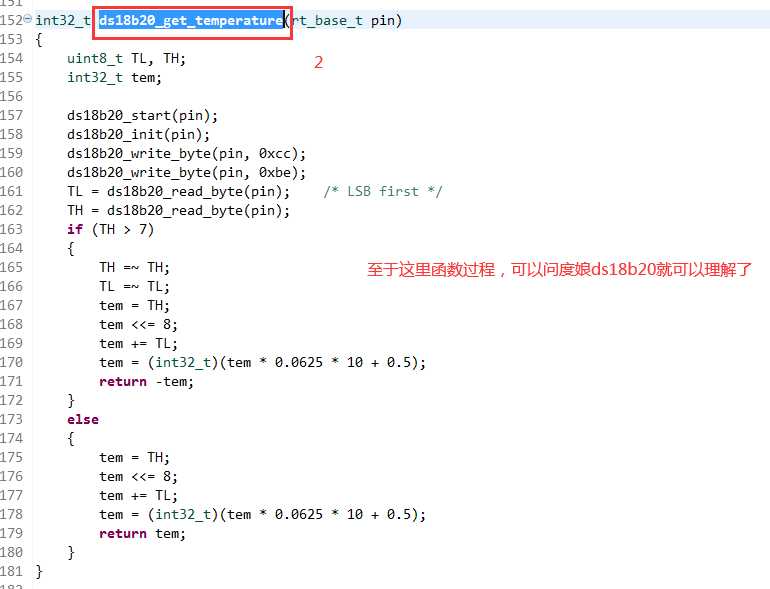
上面的fetch_data函数指针也是在注册是赋值的,可以翻上去看标红部分。也就是这里

顺便把fetch_data,也就是ds18b20传输温度数据的函数贴出来
rt_sensor_control:
传过来的参数:dev是ds18b20,cmd = RT_SENSOR_CTRL_SET_ODR args = 100
static rt_err_t rt_sensor_control(rt_device_t dev, int cmd, void *args)
{
    rt_sensor_t sensor = (rt_sensor_t)dev;
    rt_err_t result = RT_EOK;
    RT_ASSERT(dev != RT_NULL);

    if (sensor->module)
    {
        rt_mutex_take(sensor->module->lock, RT_WAITING_FOREVER);
    }

    switch (cmd)
    {
    case RT_SENSOR_CTRL_GET_ID:
        if (args)
        {
            sensor->ops->control(sensor, RT_SENSOR_CTRL_GET_ID, args);
        }
        break;
    case RT_SENSOR_CTRL_GET_INFO:
        if (args)
        {
            rt_memcpy(args, &sensor->info, sizeof(struct rt_sensor_info));
        }
        break;
    case RT_SENSOR_CTRL_SET_RANGE:

        /* Configuration measurement range */
        result = sensor->ops->control(sensor, RT_SENSOR_CTRL_SET_RANGE, args);
        if (result == RT_EOK)
        {
            sensor->config.range = (rt_int32_t)args;
            LOG_D("set range %d", sensor->config.range);
        }
        break;
    case RT_SENSOR_CTRL_SET_ODR:

        /* Configuration data output rate */
        result = sensor->ops->control(sensor, RT_SENSOR_CTRL_SET_ODR, args);
        if (result == RT_EOK)
        {
            sensor->config.odr = (rt_uint32_t)args & 0xFFFF;
            LOG_D("set odr %d", sensor->config.odr);
        }
        break;
    case RT_SENSOR_CTRL_SET_POWER:

        /* Configuration sensor power mode */
        result = sensor->ops->control(sensor, RT_SENSOR_CTRL_SET_POWER, args);
        if (result == RT_EOK)
        {
            sensor->config.power = (rt_uint32_t)args & 0xFF;
            LOG_D("set power mode code:", sensor->config.power);
        }
        break;
    case RT_SENSOR_CTRL_SELF_TEST:

        /* Device self-test */
        result = sensor->ops->control(sensor, RT_SENSOR_CTRL_SELF_TEST, args);
        break;
    default:
        return -RT_ERROR;
    }

    if (sensor->module)
    {
        rt_mutex_release(sensor->module->lock);
    }

    return result;
}
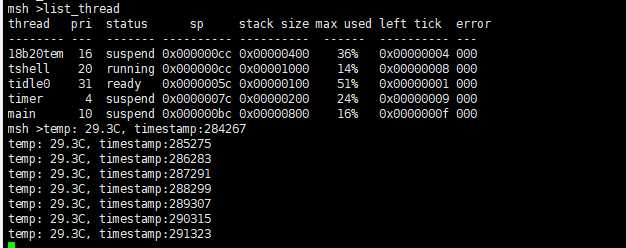
实验结果:
以上是关于RT-Thread 添加 DS18B20 详解的主要内容,如果未能解决你的问题,请参考以下文章