Pytest08-pytest工具与插件
Posted surpassme
tags:
篇首语:本文由小常识网(cha138.com)小编为大家整理,主要介绍了Pytest08-pytest工具与插件相关的知识,希望对你有一定的参考价值。
8.pytest工具与插件
8.1 converage.py-代码覆盖率
? ? 测试覆盖率是指项目代码被测试用例覆盖的百分比。使用覆盖率工具可以知道,系统哪些部分的功能没有被测试覆盖。converage.py是Python推荐的覆盖率工具。
8.1.1 覆盖率工具安装
? ? 在pytest中可以使用pytest-cov插件,其安装方法如下所示:
pip install -U pytest-cov
8.1.2 常用用法
1.运行pytest-cov
? ? 使用覆盖工具,可使用选项--cov=src,示例代码路径如下所示:
Lesson05
  |——src
  |    |—— sample
  |    |——————| __init__.py
  |    |——————| calculator.py
  |    |——————| ListSample.py
  |——test
  |    |——————| __init__.py
  |    |——————| conftest.py
  |    |——————| test_calculator.py
? ? 各代码详细内容如下所示:
calculator.py
def calculator(x,y,operator):
    if not isinstance(x,(int,)) or not isinstance(y,(int,)) or not isinstance(operator,(str,)):
        raise TypeError("args must be integer")
    elif operator=="+":
        return x+y
    elif operator=="-":
        return x-y
    elif operator=="*":
        return x*y
    elif operator=="/" and y!=0:
        return x/y
    else:
        raise ValueError("operator must be + - * /")
ListSample.py
tmpList = []
def registor(name,pwd):
    if name or pwd:
       raise ValueError("name or password is empty")
    else:
        tmpList.append({"name":name,"password":pwd})

def getUserInfo(name):
    if name:
        raise ValueError("name is empty")
    else:
        for item in tmpList:
            if name in item.values():
                return item
conftest.py
@pytest.fixture(name="addFixture")
def getAddData():
    return [(1, 2, 3), (4, 5, 9), (-9, -8, -17)]

@pytest.fixture(name="subFixture")
def getSubData():
    return [(1, 2, -1), (4, 5, -1), (-9, -8, -1)]

@pytest.fixture(name="registorData")
def getRegistorData():
    return [("Surpass","1"),("Surmount","2")]
test_calculator.py
import sys
import os
sys.path.append((os.path.abspath(os.path.join(os.path.dirname(__file__),"../src/sample"))))
from calculator import calculator

def test_add(addFixture):
    for item in addFixture:
        actual=calculator(item[0],item[1],"+")
        expect=item[2]
        assert actual==expect

def test_sub(subFixture):
    for item in subFixture:
        actual=calculator(item[0],item[1],"-")
        expect=item[2]
        assert actual==expect
? ? 运行覆盖率工具结果如下所示:
>>> Lesson05> pytest --cov=src
================================ test session starts =========================
platform win32 -- Python 3.7.6, pytest-5.4.2, py-1.8.1, pluggy-0.13.1
rootdir: C:UsersSurpassDocumentsPycharmProjectsPytestStudyLesson05
plugins: cov-2.9.0
collected 2 items

test	est_calculator.py ..                                             [100%]

----------- coverage: platform win32, python 3.7.6-final-0 -----------
Name                       Stmts   Miss  Cover
----------------------------------------------
srcsampleListSample.py      11     11     0%
srcsample\\__init__.py         0      0   100%
srcsamplecalculator.py      12      6    50%
----------------------------------------------
TOTAL                         23     17    26%

============================ 2 passed in 0.21s =================================
? ? 使用--cov=src指定源码所在路径,可以单独计算此目录的覆盖率并生成报告。从生成的报告中,可以看到各个代码相应的
覆盖率。如果需要查看遗漏的哪些代码,可以生成html报告。
2.生成HTML报告
? ? 如果要生成HTML报告,可以使用选项--cov-report=html,如下所示:
>>> Lesson05>pytest --cov=src --cov-report=html
==========================test session starts =============================
platform win32 -- Python 3.7.6, pytest-5.4.2, py-1.8.1, pluggy-0.13.1
rootdir: C:UsersSurpassDocumentsPycharmProjectsPytestStudyLesson05
plugins: cov-2.9.0
collected 2 items

test	est_calculator.py ..                                         [100%]

----------- coverage: platform win32, python 3.7.6-final-0 -----------
Coverage HTML written to dir htmlcov

=========================== 2 passed in 0.26s ============================
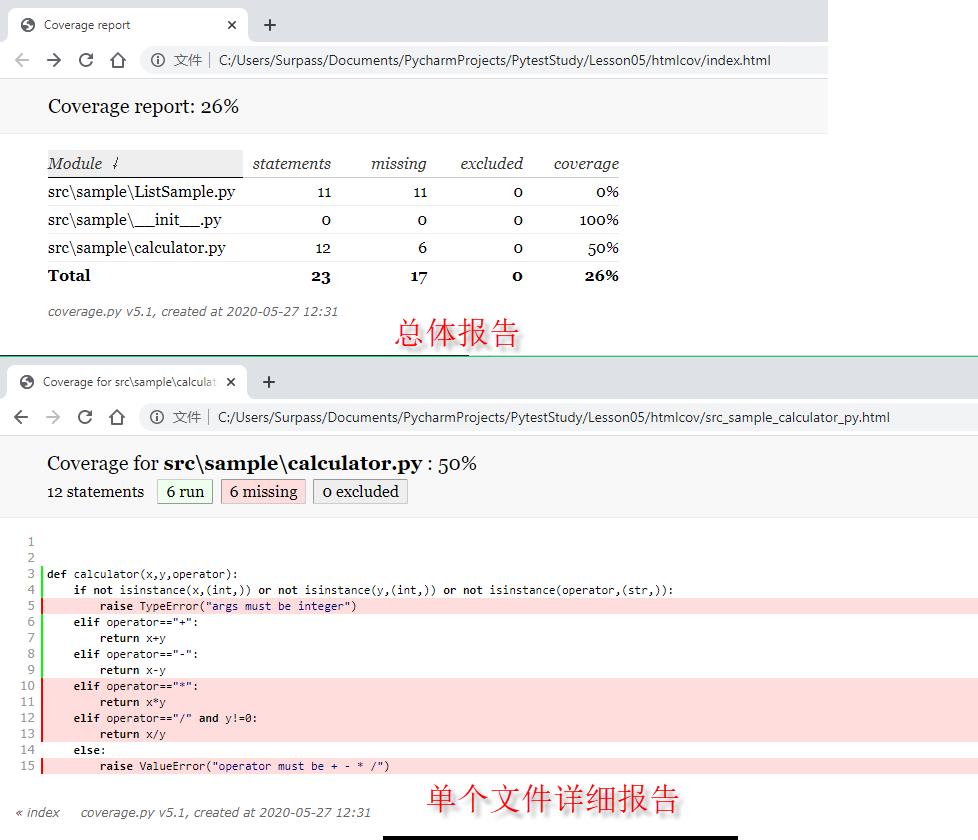
? ? 运行完成,会在根目录(本例为Lesson05)中生成一个htmlcov文件夹,进入文件夹后,使用浏览器打开index.html文件,点击对应的文件,即可打与之对应的测试详细报告,如下所示:

- 从详情页面中可以看到已经覆盖的和未覆盖的数量
- 底色为红色的代表未覆盖的代码,如乘法、除法和参数x,y不是整形,operator不是字符串等
8.2 重复运行测试
? ? 如果希望一个会话中重复运行测试,则可以使用pytest-repeat。安装方式如下所示:
pip install -U pytest-repeat
? ? 安装完成pytest-repeat之后,可以使用--count来指定每个测试用例运行的次数,如下所示:
>>> Lesson05>pytest --count=5 -v .
=====================test session starts ================================
platform win32 -- Python 3.7.6, pytest-5.4.2, py-1.8.1, pluggy-0.13.1 -- d:program filespythonpython.exe
cachedir: .pytest_cache
rootdir: C:UsersSurpassDocumentsPycharmProjectsPytestStudyLesson05
plugins: cov-2.9.0, repeat-0.8.0
collected 10 items

test/test_calculator.py::test_add[1-5] PASSED                          [ 10%]
test/test_calculator.py::test_add[2-5] PASSED                          [ 20%]
test/test_calculator.py::test_add[3-5] PASSED                          [ 30%]
test/test_calculator.py::test_add[4-5] PASSED                          [ 40%]
test/test_calculator.py::test_add[5-5] PASSED                          [ 50%]
test/test_calculator.py::test_sub[1-5] PASSED                          [ 60%]
test/test_calculator.py::test_sub[2-5] PASSED                          [ 70%]
test/test_calculator.py::test_sub[3-5] PASSED                          [ 80%]
test/test_calculator.py::test_sub[4-5] PASSED                          [ 90%]
test/test_calculator.py::test_sub[5-5] PASSED                          [100%]

========================= 10 passed in 0.19s =================================
8.3 并行运行测试
? ? 通常测试都是依次顺序执行的。如果各个测试用例之前没有需要共享使用的资料、配置、数据等,则可以考虑并行运行,从而提高效率。并行运行测试可以使用pytest-xdist,安装方式如下所示:
pip install -U pytest-xdist
? ? 我们来测试使用pytest-xdist是否真能提高效率。
import pytest
import time
@pytest.mark.parametrize("x",range(10))
def test_paraell(x):
    time.sleep(1)
? ? 运行结果如下所示:
>>>p ytest -v test_paraell.py
=======================test session starts ======================================
latform win32 -- Python 3.7.6, pytest-5.4.2, py-1.8.1, pluggy-0.13.1 -- d:program filespythonpython.exe
achedir: .pytest_cache
ootdir: C:UsersSurpassDocumentsPycharmProjectsPytestStudyLesson06
lugins: cov-2.9.0, repeat-0.8.0
ollected 10 items

est_paraell.py::test_paraell[0] PASSED                                   [ 10%]
est_paraell.py::test_paraell[1] PASSED                                   [ 20%]
est_paraell.py::test_paraell[2] PASSED                                   [ 30%]
est_paraell.py::test_paraell[3] PASSED                                   [ 40%]
est_paraell.py::test_paraell[4] PASSED                                   [ 50%]
est_paraell.py::test_paraell[5] PASSED                                   [ 60%]
est_paraell.py::test_paraell[6] PASSED                                   [ 70%]
est_paraell.py::test_paraell[7] PASSED                                   [ 80%]
est_paraell.py::test_paraell[8] PASSED                                   [ 90%]
est_paraell.py::test_paraell[9] PASSED                                   [100%]

========================10 passed in 10.27s ====================================
? ? 使用pytest-xdist后,运行结果如下所示:
>>> pytest -v -n auto .	est_paraell.py
======================test session starts ==============================
platform win32 -- Python 3.7.6, pytest-5.4.2, py-1.8.1, pluggy-0.13.1 -- d:program filespythonpython.exe
cachedir: .pytest_cache
rootdir: C:UsersSurpassDocumentsPycharmProjectsPytestStudyLesson06
plugins: cov-2.9.0, forked-1.1.3, repeat-0.8.0, xdist-1.32.0
[gw0] win32 Python 3.7.6 cwd: C:UsersSurpassDocumentsPycharmProjectsPytestStudyLesson06
[gw1] win32 Python 3.7.6 cwd: C:UsersSurpassDocumentsPycharmProjectsPytestStudyLesson06
[gw2] win32 Python 3.7.6 cwd: C:UsersSurpassDocumentsPycharmProjectsPytestStudyLesson06
[gw3] win32 Python 3.7.6 cwd: C:UsersSurpassDocumentsPycharmProjectsPytestStudyLesson06
[gw0] Python 3.7.6 (tags/v3.7.6:43364a7ae0, Dec 19 2019, 00:42:30) [MSC v.1916 64 bit (AMD64)]
[gw1] Python 3.7.6 (tags/v3.7.6:43364a7ae0, Dec 19 2019, 00:42:30) [MSC v.1916 64 bit (AMD64)]
[gw2] Python 3.7.6 (tags/v3.7.6:43364a7ae0, Dec 19 2019, 00:42:30) [MSC v.1916 64 bit (AMD64)]
[gw3] Python 3.7.6 (tags/v3.7.6:43364a7ae0, Dec 19 2019, 00:42:30) [MSC v.1916 64 bit (AMD64)]
gw0 [10] / gw1 [10] / gw2 [10] / gw3 [10]
scheduling tests via LoadScheduling

test_paraell.py::test_paraell[1]
test_paraell.py::test_paraell[0]
test_paraell.py::test_paraell[2]
test_paraell.py::test_paraell[3]
[gw0] [ 10%] PASSED test_paraell.py::test_paraell[0]
[gw2] [ 20%] PASSED test_paraell.py::test_paraell[2]
[gw3] [ 30%] PASSED test_paraell.py::test_paraell[3]
[gw1] [ 40%] PASSED test_paraell.py::test_paraell[1]
test_paraell.py::test_paraell[4]
test_paraell.py::test_paraell[6]
test_paraell.py::test_paraell[7]
test_paraell.py::test_paraell[5]
[gw0] [ 50%] PASSED test_paraell.py::test_paraell[4]
[gw3] [ 60%] PASSED test_paraell.py::test_paraell[7]
[gw2] [ 70%] PASSED test_paraell.py::test_paraell[6]
[gw1] [ 80%] PASSED test_paraell.py::test_paraell[5]
test_paraell.py::test_paraell[8]
test_paraell.py::test_paraell[9]
[gw0] [ 90%] PASSED test_paraell.py::test_paraell[8]
[gw2] [100%] PASSED test_paraell.py::test_paraell[9]

=========================== 10 passed in 5.37s ===============================
? ? pytest-xdist使用参数-n=processornum或auto,可以指定运行测试的处理器进程数,如果为auto,则可以自动检测系统CPU数目。
8.4 设置超时时间
? ? 正常情况下,pytest中的测试是没有时间限制的。但如果想对一些测试设置时间限制,则可以使用pytest-timeout,该插件可以在命令行指定超时时间或直接在测试代码中标注超时时间,其安装方式如下所示:
pip install -U pytest-timeout
测试用例上标注的超时时间优先级高于命令行上的超时时间,所以测试时间可能长于或短于命令行的设置
>>> pytest --timeout=0.5 -x .	est_paraell.py
========================= test session starts ============================
platform win32 -- Python 3.7.6, pytest-5.4.2, py-1.8.1, pluggy-0.13.1
rootdir: C:UsersSurpassDocumentsPycharmProjectsPytestStudyLesson06
plugins: cov-2.9.0, forked-1.1.3, repeat-0.8.0, timeout-1.3.4, xdist-1.32.0
timeout: 0.5s
timeout method: thread
timeout func_only: False
collected 10 items

test_paraell.py
+++++++++++++++++++++++++++++++ Timeout ++++++++++++++++++++++++++++++++++++

~~~~~~~~~~~~~~~~~~~~ Stack of MainThread (10272) ~~~~~~~~~~~~~~~~~~~~~~~~~~~

  File "d:program filespythonlib
unpy.py", line 193, in _run_module_as_main
    "__main__", mod_spec)
  File "d:program filespythonlib
unpy.py", line 85, in _run_code
    exec(code, run_globals)
  File "D:Program FilesPythonScriptspytest.exe\\__main__.py", line 7, in <module>
    sys.exit(main())
  File "d:program filespythonlibsite-packages\\_pytestconfig\\__init__.py", line 125, in main
  ...
    time.sleep(1)

++++++++++++++++++++++++++++++ Timeout ++++++++++++++++++++++++++++++++++++++
8.5 查看详细错误信息
? ? 通常pytest会显示每个测试的运行状态,当的有测试运行完毕后,pytest将显示错误和失败用例的错误信息。如果测试很快就运行完成,可能不是问题。但如果运行需要很长时间,就希望一出错就能看到错误信息。针对这种情况,可以使用pytest-instafail,安装方式如下所示:
pip install -U pytest-instafail
? ? 使用pytest-instafail后的情况,如下所示:
>>>  pytest --instafail --timeout=0.5 --tb=line --maxfa=2 .	est_paraell.py
================= test session starts =====================================
platform win32 -- Python 3.7.6, pytest-5.4.2, py-1.8.1, pluggy-0.13.1
rootdir: C:UsersSurpassDocumentsPycharmProjectsPytestStudyLesson06
plugins: cov-2.9.0, forked-1.1.3, instafail-0.4.1.post0, repeat-0.8.0, timeout-1.3.4, xdist-1.32.0
timeout: 0.5s
timeout method: thread
timeout func_only: False
collected 10 items

test_paraell.py
+++++++++++++++++++++++++++++++Timeout +++++++++++++++++++++++++++++++++++++

~~~~~~~~~~~~~~~~~~~~~~~ Stack of MainThread (8316) ~~~~~~~~~~~~~~~~~~~~~~~~~~

  File "d:program filespythonlib
unpy.py", line 193, in _run_module_as_main
    "__main__", mod_spec)
  File "d:program filespythonlib
unpy.py", line 85, in _run_code
  ..
++++++++++++++++++++++++++++++ Timeout ++++++++++++++++++++++++++++++++++++++
8.6 显示色彩和进度条
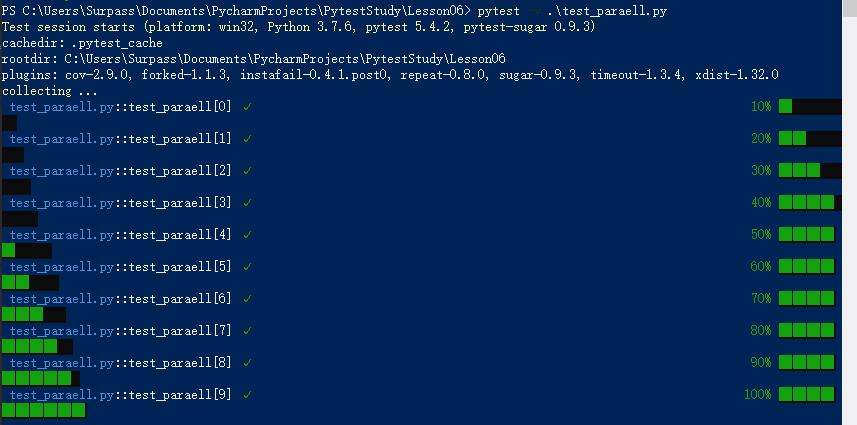
? ? 默认的pytest运行时,是没有进度条和色彩的,如果想要美化一些,可以使用pytest-sugar添加一些色彩和进度条,其安装方式如下所示:
pip install -U pytest-sugar
? ? 使用方式如下所示:

8.7 生成HTML报告
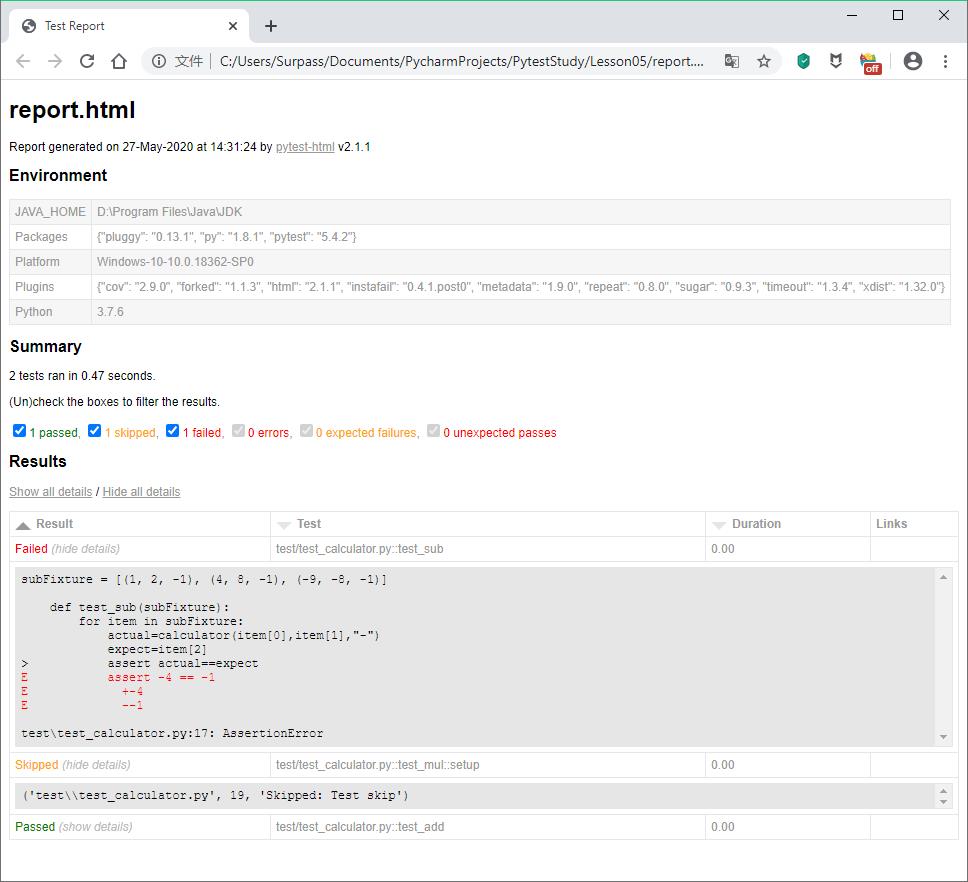
? ? 为pytest生成一份HTML报告,可以直观的查看各测试用例运行情况,可以使用pytest-html,其安装方式如下所示:
pip install -U pytest-html
? ? 用法如下所示:
pytest -v --html=report.html .
? ? 运行完成后,会在指定的目录生成一份HTML格式的报告,内容包含通过、跳过、失败、错误、预期失败和预测失败但实际通过的详细信息,如下所示:

? ? 默认生成报告是包含css文件和html文件,两者只有在同一个目录时,才能查看完整的测试报告,如果需要生成一份独立的HTML报告,可以使用参数--html=report.html --self-contained-html,使用方式如下所示:
pytest -v --html=D:
eport.html --self-contained-html
原文地址:https://www.cnblogs.com/surpassme/p/13262608.html
本文同步在微信订阅号上发布,如各位小伙伴们喜欢我的文章,也可以关注我的微信订阅号:woaitest,或扫描下面的二维码添加关注:

以上是关于Pytest08-pytest工具与插件的主要内容,如果未能解决你的问题,请参考以下文章