搭建ELK日志分析平台的详细过程
Posted timfruit
tags:
篇首语:本文由小常识网(cha138.com)小编为大家整理,主要介绍了搭建ELK日志分析平台的详细过程相关的知识,希望对你有一定的参考价值。
搭建ELK日志分析平台的详细过程
日志分析系统-ELK平台
由于日志文件都离散的存储在各个服务实例的文件系统之上,仅仅通过查看日志文件来分析我们的请求链路依然是一件相当麻烦的差事。 ELK平台,它可以轻松的帮助我们来收集和存储这些跟踪日志,同时在需要的时候我们也可以根据Trace ID来轻松地搜索出对应请求链路相关的明细日志
ELK平台主要有由ElasticSearch、Logstash和Kiabana三个开源免费工具组成:
- Elasticsearch是个开源分布式搜索引擎,它的特点有:分布式,零配置,自动发现,索引自动分片,索引副本机制,restful风格接口,多数据源,自动搜索负载等。
- Logstash是一个完全开源的工具,他可以对你的日志进行收集、过滤,并将其存储供以后使用。
- Kibana 也是一个开源和免费的工具,它Kibana可以为 Logstash 和 ElasticSearch 提供的日志分析友好的 Web 界面,可以帮助您汇总、分析和搜索重要数据日志。
本人下载的均为7.6.2版本
1.下载elasticsearch
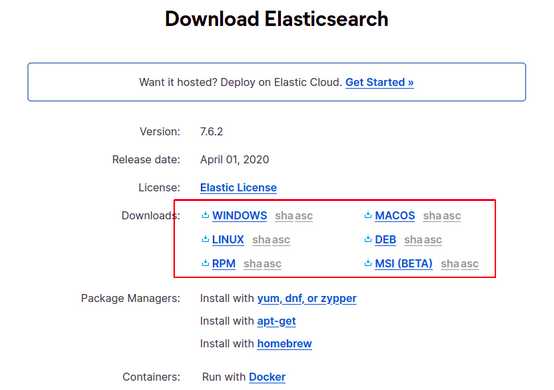
解压后, linux平台下运行 bin/elasticsearch命令启动es (or binelasticsearch.bat on Windows)
2.下载kibana
解压后,修改配置config/kibana.yml,设置es
# The URLs of the Elasticsearch instances to use for all your queries.
elasticsearch.hosts: ["http://localhost:9200"]
linux平台下运行bin/kibana启动 (or binkibana.bat on Windows)
启动后,可以在浏览器中访问http://localhost:5601
3.下载logstash
解压后,在config目录下, 复制配置logstash-sample.conf 为 logstash.conf 配置修改如下:
# Sample Logstash configuration for creating a simple
# Beats -> Logstash -> Elasticsearch pipeline.
input {
beats {
port => 5044
}
}
filter {
grok {
match => [ "message", ‘{"logtimeUTC":"%{DATA:logtimeUTC}","logtime":"%{DATA:logtime}","loglevel":"%{DATA:loglevel}","service":"%{DATA:service}","traceId":"%{DATA:traceId}","spanId":"%{DATA:spanId}","exportable":"%{DATA:exportable}","pid":"%{DATA:pid}","thread":"%{DATA:thread}","class":"%{DATA:class}","logbody":"%{DATA:logbody}"}‘]
}
mutate {
remove_field => "message"
}
}
output {
elasticsearch {
hosts => ["http://localhost:9200"]
index => "springcloud-json-log-%{+YYYY.MM.dd}"
#user => "elastic"
#password => "changeme"
}
}
上面的意思是,由beat发送数据给logstash,然后再发给Elasticsearch
最后, linux平台下运行bin/logstash -f config/logstash.conf启动logstash
注意事项,上面的
match => [ "message", ‘{"logtimeUTC":"%{DATA:logtimeUTC}","logtime":"%{DATA:logtime}","loglevel":"%{DATA:loglevel}","service":"%{DATA:service}","traceId":"%{DATA:traceId}","spanId":"%{DATA:spanId}","exportable":"%{DATA:exportable}","pid":"%{DATA:pid}","thread":"%{DATA:thread}","class":"%{DATA:class}","logbody":"%{DATA:logbody}"}‘]
对应于logback-logstash.xml中的json格式日志,意思是, 将属性message中的json日志文本,转成成json属性,
remove_field => "message"
转换之后移除message属性
index => "springcloud-json-log-%{+YYYY.MM.dd}"
指定了日志存储入es时,使用的索引模板, 看下面的5.创建索引模板步骤
4.下载filebeat
解压后,修改filebeat.yml配置, 本人配置示例
主要修改如下(摘抄):
filebeat.inputs:
# Each - is an input. Most options can be set at the input level, so
# you can use different inputs for various configurations.
# Below are the input specific configurations.
- type: log
# Change to true to enable this input configuration.
enabled: true #修改为true
# Paths that should be crawled and fetched. Glob based paths.
paths:
# /var/log/*.log
#- c:programdataelasticsearchlogs*
- /home/timfruit/work/spring-cloud-demo/logs/*.json # 配置我们要读取的 Spring Boot 应用的日志
#-------------------------- Elasticsearch output ------------------------------
#output.elasticsearch:
# Array of hosts to connect to. #去掉输出到es
#hosts: ["localhost:9200"]
# Protocol - either `http` (default) or `https`.
#protocol: "https"
# Authentication credentials - either API key or username/password.
#api_key: "id:api_key"
#username: "elastic"
#password: "changeme"
#----------------------------- Logstash output --------------------------------
output.logstash:
# The Logstash hosts #启用输出到logstash
hosts: ["localhost:5044"]
注意事项,
- /home/timfruit/work/spring-cloud-demo/logs/*.json # 配置我们要读取的 Spring Boot 应用的日志
该配置需要修改为自己的日志路径
最后, linux平台下运行./filebeat -e -c filebeat.yml启动
Logstash是基于JVM的重量级工具,可以添加集成轻量级filebeat。
本demo日志收集流程
应用日志 -> filebeat -> logstash -> Elasticsearch -> Kibana
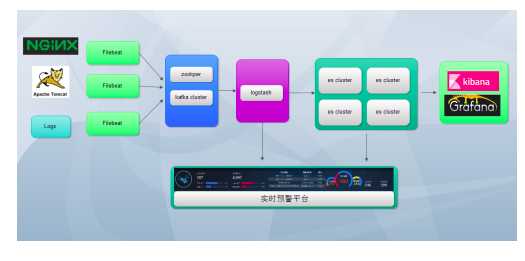
实际生产中,如果日志量每秒钟很大,写入es时可能有问题,就需要添加使用消息队列kafka。
应用日志 -> filebeat -> kafka -> logstash -> Elasticsearch -> Kibana
5.创建索引模板
在启动es,kibana之后,访问kibana http://localhost:5601
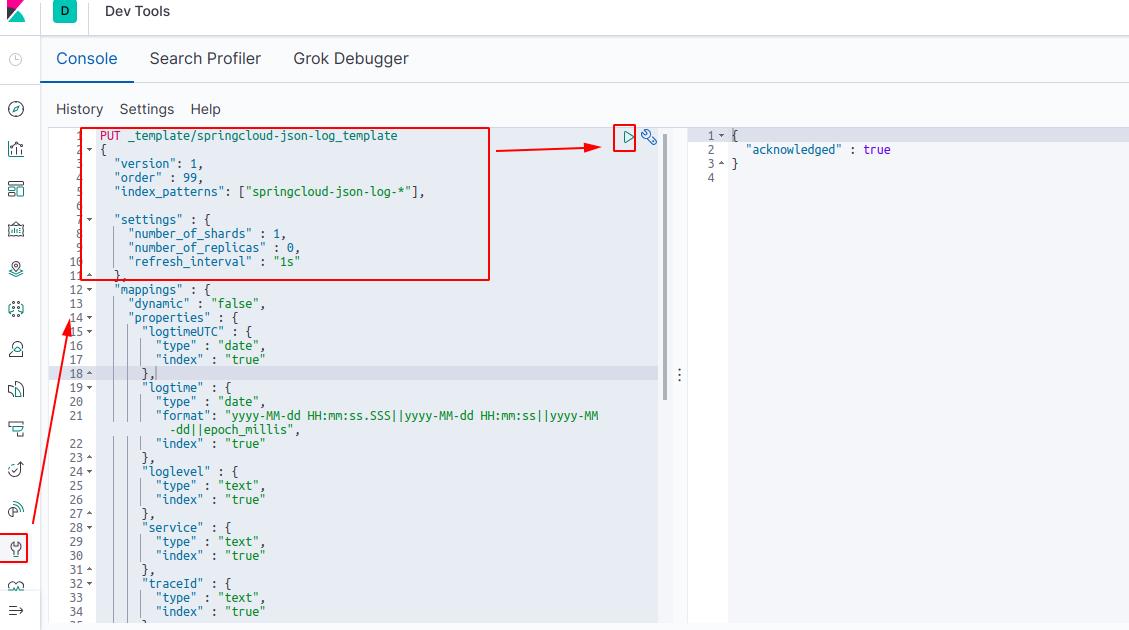

PUT _template/springcloud-json-log_template
{
"version": 1,
"order" : 99,
"index_patterns": ["springcloud-json-log-*"],
"settings" : {
"number_of_shards" : 1,
"number_of_replicas" : 0,
"refresh_interval" : "1s"
},
"mappings" : {
"dynamic" : "false",
"properties" : {
"logtimeUTC" : {
"type" : "date",
"index" : "true"
},
"logtime" : {
"type" : "date",
"format": "yyyy-MM-dd HH:mm:ss.SSS||yyyy-MM-dd HH:mm:ss||yyyy-MM-dd||epoch_millis",
"index" : "true"
},
"loglevel" : {
"type" : "text",
"index" : "true"
},
"service" : {
"type" : "text",
"index" : "true"
},
"traceId" : {
"type" : "text",
"index" : "true"
},
"spanId" : {
"type" : "text",
"index" : "true"
},
"exportable" : {
"type" : "text",
"index" : "false"
},
"pid" : {
"type" : "text",
"index" : "false"
},
"thread" : {
"type" : "text",
"index" : "false"
},
"class" : {
"type" : "text",
"index" : "false"
},
"logbody" : {
"type" : "text",
"index" : "false"
}
}
}
}
View Code
说明:
- index_patherns: 以 springcloud-json-log-开头的索引均会应用此模板
- order: 模板的优先级,数字越大优先级越高,避免模板冲突
- number_of_shards: 索引使用的分片数量
- number_of_replicas: 索引的副本数,当你需要导入大量数据,第一次建立索引时,可以设置为0,提高写入速度,导入完成后可以动态修改
- refresh_interval: 向临时空间刷写的频率,类似于硬盘的 fsync
- index: true:字段可用于搜索, false: 不能用于搜索
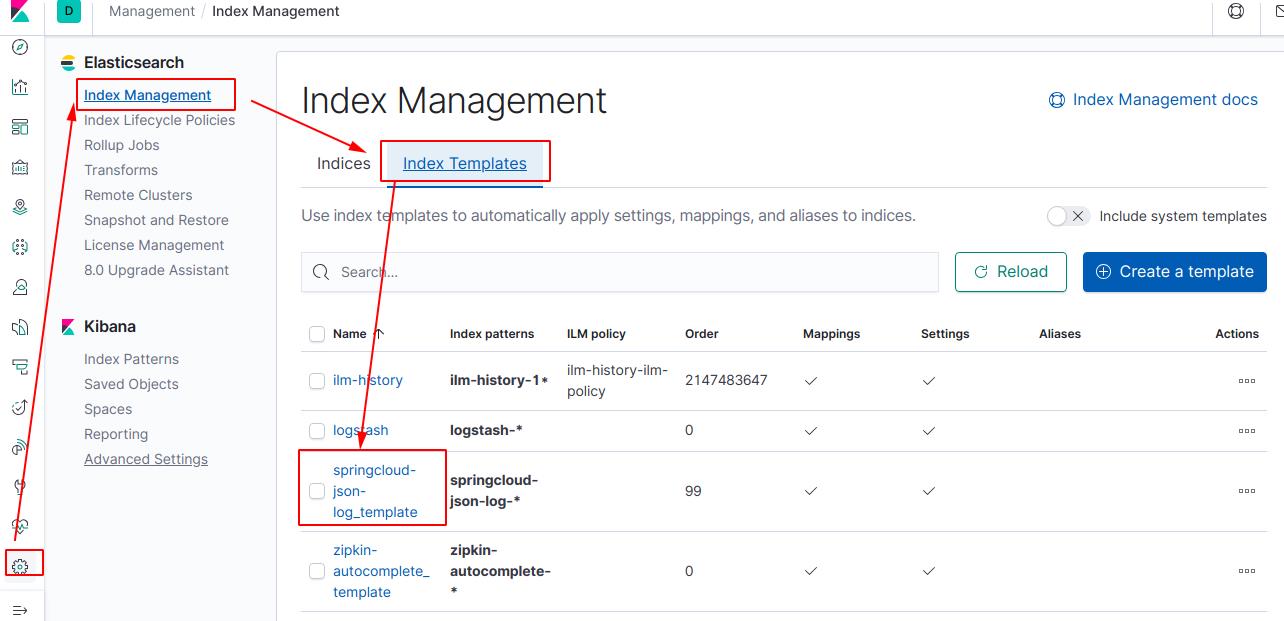
查看已创建的模板
6.配置应用日志,启动应用输出日志到logs文件夹
application.yml
# 配置应用名,logback-logstash.xml使用到,输出的日志名为应用名
spring:
application:
name: netflix-account-example
##====================================log config===============================================
logging:
config: classpath:logback-logstash.xml
注意事项,需要添加logback-logstash.xml到resources下,需要添加依赖包
<!-- elk logstash 日志-->
<dependency>
<groupId>net.logstash.logback</groupId>
<artifactId>logstash-logback-encoder</artifactId>
<version>6.3</version>
</dependency>
本demo可以仅启动两个应用测试,一是eureka-server,二是mall-account-application
(不使用本人的demo也是可以的,自己可以搭建一个springboot应用,并且配置好日志,运行输出日志即可)
启动后可以看到logs文件夹下有.json日志
filebeat会读取日志文件,发送给logstash
7.通过kibaba查看应用日志
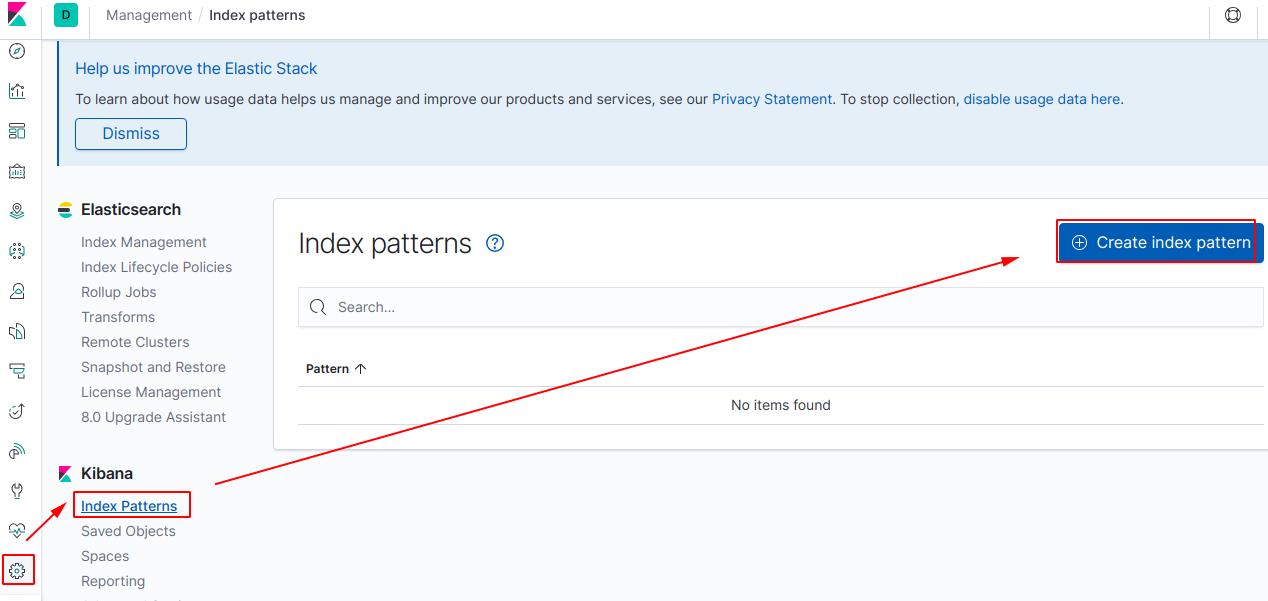
-
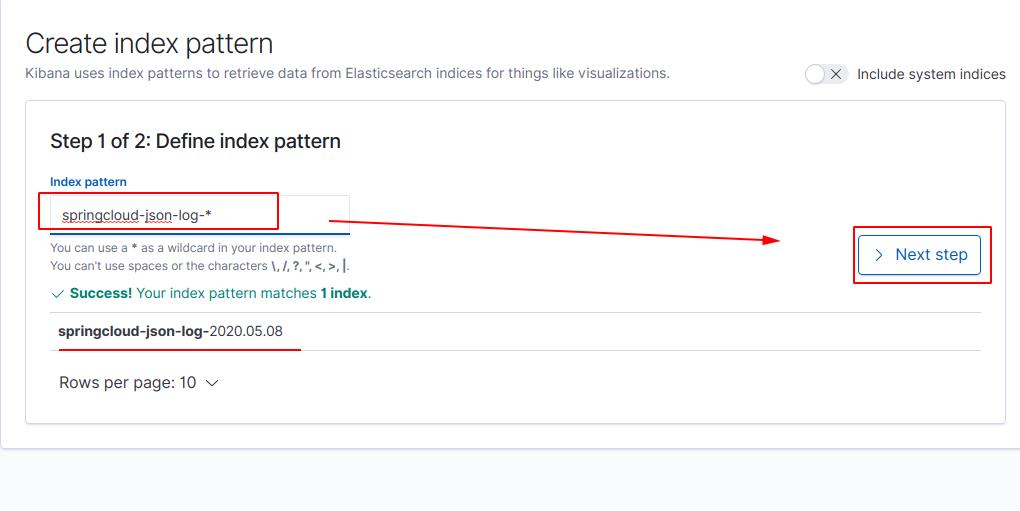
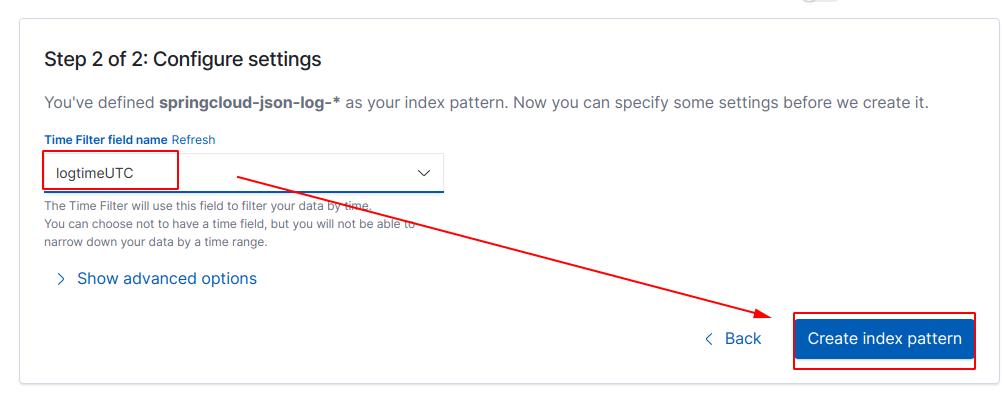
创建index pattern
-
输入"springcloud-json-log-*"模糊匹配日志索引,注意,这里如果没有对应日志,是创建不了的
-
选择logtimeUTC字段作为排序时间,最后点击创建即可。
-
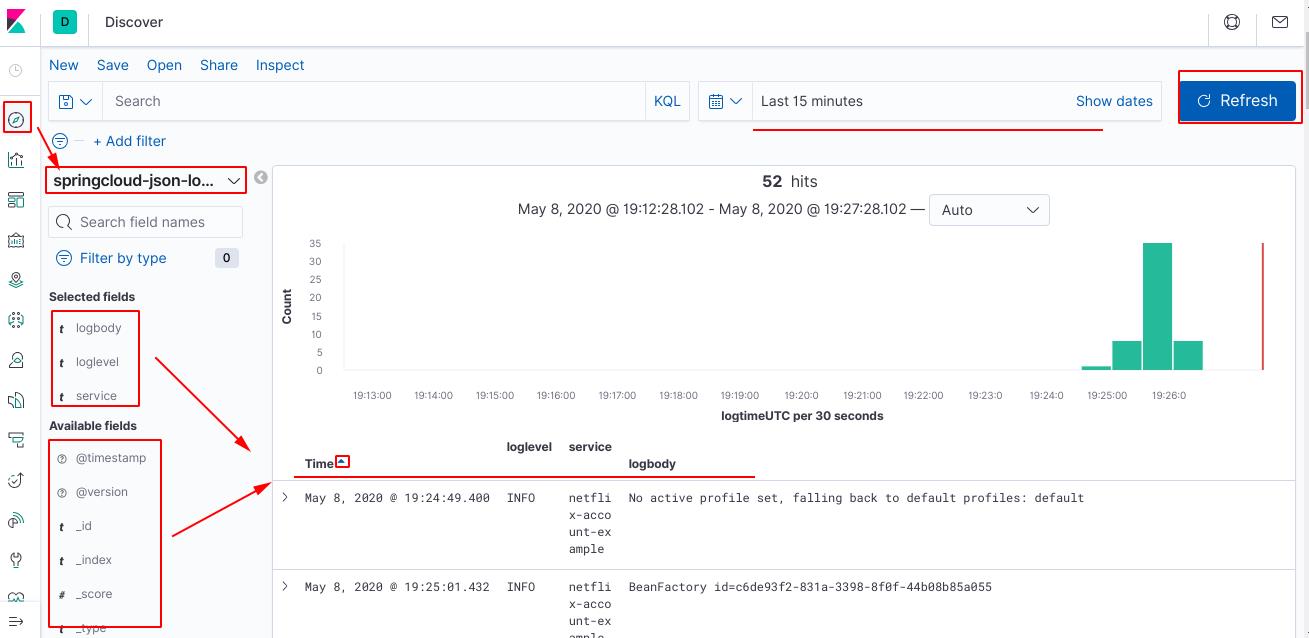
在dashboard面板查看日志
点开dashboard后,选择刚才创建的index pattern "springcloud-json-log-*" 查看
左下方可以选择需要查看的字段,本人选择了Time,loglevel,service,logbody,其中Time字段为刚才选择的logtimeUTC字段
可以根据Time字段进行时间排序,
可以选择时间范围进行查看,一般范围是15分钟
在该基础上可以搭建监控平台
参考资料:
Spring Cloud构建微服务架构:分布式服务跟踪(整合logstash)
芋道 ELK(Elasticsearch + Logstash + Kibana) 极简入门
优化es index patterns 和 kibana 多余字段
how-to-apply-grok-filter-for-json-logs-to-from-filebeat-in-logstash
以上是关于搭建ELK日志分析平台的详细过程的主要内容,如果未能解决你的问题,请参考以下文章
