第3天:CSS浮动定位表格表单总结
Posted
tags:
篇首语:本文由小常识网(cha138.com)小编为大家整理,主要介绍了第3天:CSS浮动定位表格表单总结相关的知识,希望对你有一定的参考价值。
今天学的是浮动、定位、表格、表单等内容,这些是CSS中最容易混淆的知识,有许多小技巧在写代码过程中需要注意。下面是主要知识点:
一、float浮动
1、块元素在一行显示
2、内联元素支持宽高
3、默认内容撑开宽度
4、脱离文档流
5、提升层级半层
二、clear清除浮动
1、加高(扩展性不好)
给浮动元素的父级设置同样的高度
2、给父级加浮动(页面中所有元素都要加浮动,margin左右失效)
3、inline-block(margin左右auto失效)
4、空标签加浮动(div )(任何用到的地方都要加)
.clearfix{clear:both;}(IE6最小高度19px,解决后还有2px偏差)
5、.br清浮动(不符合工作中结构、样式、行为,三者分离的要求)
<br clear="all"/>
6、after清浮动(现在主流方法)
.clearfix{
*zoom:1;}
.clearfix:after{
content:"";
display:block;
clear:both;
}
只需要给浮动元素的父级加上clearfix,就可以。
7、overflow:hidden;清除浮动(给浮动元素父级加)
需要配合宽度、zoom兼容IE6、IE7
scroll(滚动条)
overflow:hidden/scroll/auto
三、浏览器
BFC(标准浏览器)
1、float的值不为none
2、overflow的值不为visible
3、display的值为table-cell,table-caption,inline-block中的任何一个
4、position的值不为relation和static
width/height/min-width/min-height:(!auto)
haslayout(IE浏览器)
1、writing-mode:tb-rl
2、-ms-writing-mode:tb-rl
3、zoom:(!normal)
四、position定位
相对定位(relative)
1、不影响元素本身的特性
2、不使元素脱离文档流(元素移动之后原始位置会保留)
3、如果没有定位偏移量,对元素本身没有任何影响
4、提升层级
绝对定位(absolute)
1、使元素完全脱离文档流
2、使内嵌支持宽高
3、块属性内容撑开宽度
4、如果有定位父级相对于定位父级发生偏移,没有定位父级相对于document发生偏移
5、相对定位一般都是配合绝对定位元素使用
6、提升层级
一般来说,父级相对定位,子级绝对定位。
固定定位(fixed)
1、固定右下角
position:fixed;
right:0;
bottom:0;
与绝对定位特性基本一致。始终相对整个文档进行定位;IE6不支持固定定位。
定位其他值
static(默认值)
inherit(从父元素继承定位属性的值)(不兼容)
position:relative|absolute|fixed|static|inherit
五、遮罩透明度
opacity:(0~1);透明度参数从0到1(标准浏览器)
父级加了透明度,子级也会继承透明度;
IE滤镜:filter:alpha(opacity=0~100);(IE6、IE7浏览器透明度设置)
z-index定位层级
默认后者的值高于前者
六、表格(table)
thead(表头)、tbody(表格主体)、tr(表格行)、th(元素定义表头)、td(元素定义表格单元)
表格样式重置
table{border-collapse:collapse;}单元格间隙合并
th,td{padding:0}重置单元格默认填充
给table加border=“1”;单元格加边框
合并单元格
colspan=“2”(跨列)
rowspan="2"(跨行)
七、表单form
<form action="">
<input type="..." name="" value=""/>
text 文本
password 密码
radio 单选(单选按钮name必须相同)
checkbox 复选
submit 提交
reset 重置
button 按钮
image 图片<input type="image"/>
file 上传<input type="file"/>
hidden 隐藏<input type="hidden"/>不让用户看到,需要存储
button 按钮
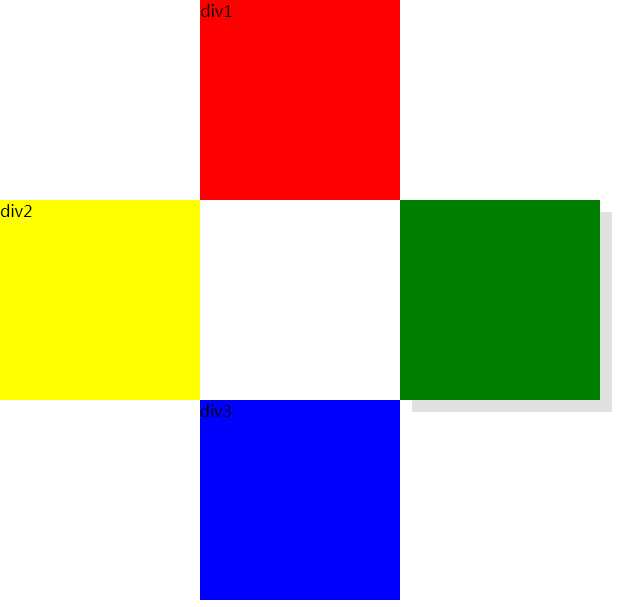
最后做了个定位的小练习:
<!DOCTYPE html>
<html lang="en">
<head>
<meta charset="UTF-8">
<title>定位</title>
<style>
*{
margin: 0;
padding: 0;
}
.div1{
width:200px;
height:200px;
background: red;
position: absolute;
left: 200px;
}
.div2{
width:200px;
height:200px;
background: yellow;
position: absolute;
top: 200px;
}
.div3{
width:200px;
height:200px;
background: blue;
position: absolute;
top: 400px;
left: 200px;
}
.div4{
width:200px;
height:200px;
/*background: red;*/
position: relative;
top: 206px;
left: 406px;
}
.content{
width:200px;
height:200px;
background: green;
position: absolute;
top: -6px;
left: -6px;
z-index: 2;
}
.mask{
width:200px;
height:200px;
background: #ccc;
opacity: 0.6;
position: absolute;
top: 6px;
left: 6px;
z-index: 1;
}
</style>
</head>
<body>
<div class="div1">div1</div>
<div class="div2">div2</div>
<div class="div3">div3</div>
<div class="div4">
<div class="content"></div>
<div class="mask"></div>
</div>
</body>
</html>
运行效果:

以上是关于第3天:CSS浮动定位表格表单总结的主要内容,如果未能解决你的问题,请参考以下文章