opencv阈值处理--threshold函数自适应阈值处理Otsu处理(大津法)
Posted pheasant
tags:
篇首语:本文由小常识网(cha138.com)小编为大家整理,主要介绍了opencv阈值处理--threshold函数自适应阈值处理Otsu处理(大津法)相关的知识,希望对你有一定的参考价值。
threshold函数
retval, dst = cv2.threshold(src, thresh, maxval, type)
‘‘‘
retval:返回的阈值;dst:阈值分割结果图像
src:输入图像
thresh:阈值;maxval:需设定的最大值
type:阈值分割类型
‘‘‘
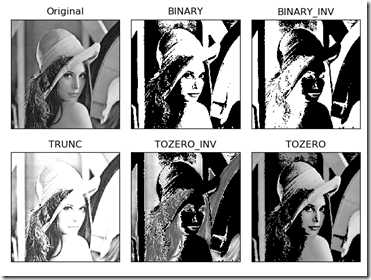
简单的阈值分割类型有:
- cv.THRESH_BINARY
- cv.THRESH_BINARY_INV
- cv.THRESH_TRUNC
- cv.THRESH_TOZERO
- cv.THRESH_TOZERO_INV
  1 import matplotlib.pyplot as plt
  2 import numpy as np
  3 import cv2 as cv
  4
  5 img = cv.imread(r‘Lena.png‘)
  6 imgray = cv.cvtColor(img, cv.COLOR_BGR2GRAY)
  7 t1, rst1 = cv.threshold(imgray,127,255,cv.THRESH_BINARY) # 二值化阈值处理。大于127的像素点会被处理为255,其余处理为0
  8 t2, rst2 = cv.threshold(imgray,127,255,cv.THRESH_BINARY_INV) # 反二值化阈值处理。灰度值大于127的像素点处理为0,其余为255
  9 t3, rst3 = cv.threshold(imgray,127,255,cv.THRESH_TRUNC) # 截断阈值化处理。大于127的像素点处理为127,其余保持不变
 10 t4, rst4 = cv.threshold(imgray,127,255,cv.THRESH_TOZERO_INV) # 超阈值零处理。大于127的像素点处理为0,其余保持不变
 11 t5, rst5 = cv.threshold(imgray,127,255,cv.THRESH_TOZERO) # 低阈值零处理。大于127的像素点保持不变,其余处理为0
 12 titles = [‘Original‘,‘BINARY‘,‘BINARY_INV‘,‘TRUNC‘,‘TOZERO_INV‘,‘TOZERO‘]
 13 images = [imgray,rst1,rst2,rst3,rst4,rst5]
 14 for i in range(6):
 15     plt.subplot(2,3,i+1), plt.imshow(images[i],‘gray‘)
 16     plt.title(titles[i])
 17     plt.xticks([]), plt.yticks([])
 18 plt.show()
效果图
自适应阈值处理
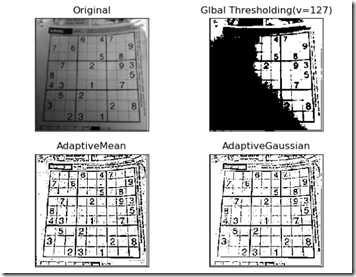
上述阈值处理对于色彩均衡的图像来说结果较为理想,但对于色彩不均衡的图像来说,只使用一个阈值,无法得到较理想的阈值分割结果。自适应阈值处理通过计算每个像素点周围临近的加权平均值获得阈值,能够更好的处理由光照变化带来影响的图像。
dst = cv2.adaptiveThreshold(src, maxValue, adaptiveMethod, thresholdType, blockSize, C)
‘‘‘
src:输入图像。该图像须是8位单通道图像
maxValue:最大值
adaptiveMethod:自适应方法
thresholdType:阈值处理方式
blockSize:像素在计算其阈值时参考的邻域尺寸大小,通常为3,5,7
C:常量
‘‘‘
阈值处理方法须为 cv2.THRESH_BINARY 或 cv2.THRESH_BINARY_INV
自适应方法有 cv2.ADAPTIVE_THRESH_MEAN_C 和 cv2.ADAPTIVE_THRESH_GAUSSIAN_C 。前者领域所有像素点的权重值一致;后者与邻域各个像素点到中心点的距离有关,通过高斯方程获得各点的权重。
  1 import matplotlib.pyplot as plt
  2 import numpy as np
  3 import cv2 as cv
  4
  5 img = cv.imread(r‘exc.png‘)
  6 imgray = cv.cvtColor(img, cv.COLOR_BGR2GRAY)
  7 t, rst = cv.threshold(imgray,127,255,cv.THRESH_BINARY)
  8 athdMEAN = cv.adaptiveThreshold(imgray,255,cv.ADAPTIVE_THRESH_MEAN_C,cv.THRESH_BINARY,5,3)
  9 athdGAUS = cv.adaptiveThreshold(imgray,255,cv.ADAPTIVE_THRESH_GAUSSIAN_C,cv.THRESH_BINARY,5,3)
 10 titles = [‘Original‘,‘Glbal Thresholding(v=127)‘,‘AdaptiveMean‘,‘AdaptiveGaussian‘]
 11 images = [imgray,rst,athdMEAN,athdGAUS]
 12 for i in range(4):
 13     plt.subplot(2,2,i+1)
 14     plt.imshow(images[i],‘gray‘)
 15     plt.title(titles[i])
 16     plt.xticks([]), plt.yticks([])
 17 plt.show()
对一幅图像分别使用二值化阈值处理和自适应阈值处理,效果图:
Otsu处理(大津法)
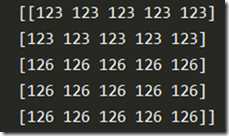
当我们有一个图像,其像素值矩阵如下矩阵时,此时将阈值设置为127时阈值处理的结果是失败的。
但我们并不能观察出最合适的阈值,Otsu处理能够根据图像给出最佳的分割阈值。
通过在函数 cv2.threshold() 中对 type 的类型多传递一个参数 cv2.THRESH_OTSU 即可实现Otsu。
注意在使用Otsu处理时需将阈值设为0。
  1 import numpy as np
  2 import cv2 as cv
  3
  4 img = np.zeros((5,5),dtype=np.uint8)
  5 img[0:2,0:5] = 123
  6 img[2:5,0:5] = 126
  7 print(‘img=
‘, img)
  8 t1, thd = cv.threshold(img,127,255,cv.THRESH_BINARY)
  9 t2, otsu = cv.threshold(img,0,255,cv.THRESH_BINARY+cv.THRESH_OTSU)
 10 print(‘thd=
‘, thd)
 11 print(‘otsu=
‘, otsu)
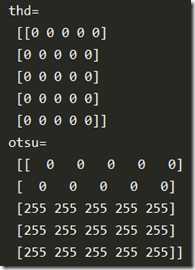
对上述像素矩阵进行直观处理
另外Otsu处理也返回了最佳阈值,上述该阈值为 t2 = 123。
以上是关于opencv阈值处理--threshold函数自适应阈值处理Otsu处理(大津法)的主要内容,如果未能解决你的问题,请参考以下文章


