使用vue+zrender绘制体温单 三测单
Posted hprblog
tags:
篇首语:本文由小常识网(cha138.com)小编为大家整理,主要介绍了使用vue+zrender绘制体温单 三测单相关的知识,希望对你有一定的参考价值。
先上预览地址 http://106.12.212.110:8077/#/
1.创建项目
使用vue init webpack temperaure 创建一个vue项目 然后安装axios zrender
命令分别是 npm install axios -S npm install zrender安装这2个组件
2.创建公共文件
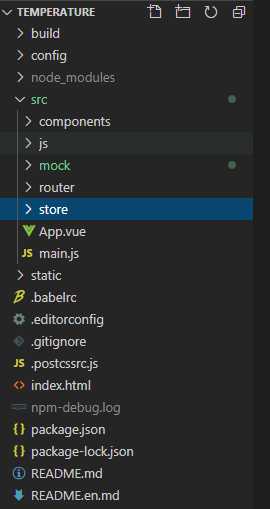
在以后的使用中会出现本地调试和先上地址这是我们就创建以下目录
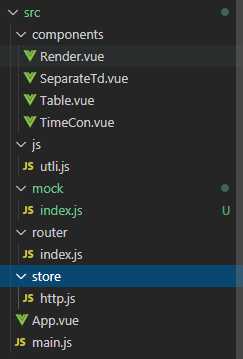
src/components这个目录放置我们的页面文件
src/js 这里放置我们以后绘制折线图 阴影图等公共方法
src/mock 这里放置我们的模拟数据
src/store 这里放置请求的是本地还是线上的方法
router就是路由

首先我们在src/store 文件下创建http.js文件 在里面添加以下代码
import Vue from ‘vue‘
import Vuex from ‘vuex‘
import axios from ‘axios‘

Vue.use(Vuex)

//configUrl这里写线上地址 httpType 这里是请求本地还是线上 线上换成http 本地换成 mock data未传递的数据可根据自己需要自行修改
const store = new Vuex.Store({
    state:{
        configUrl:‘‘,
        httpType:"mock",
        data:JSON.parse(localStorage.getItem(‘patientData‘)),
    },
    mutations:{

    },
    actions:{
        getUrlData(context){
            context.commit(‘setUrlData‘,data)
        }
    }
})

export default store
然后我们在main.js文件里写
import Vue from ‘vue‘
import App from ‘./App‘
import router from ‘./router‘
import ElementUI from ‘element-ui‘;
import ‘element-ui/lib/theme-chalk/index.css‘;
import store from ‘./store/http‘
import axios from ‘axios‘
Vue.use(ElementUI);
Vue.config.productionTip = false
Vue.prototype.$axios = axios

/* eslint-disable no-new */
new Vue({
  el: ‘#app‘,
  router,
  store,
  components: { App },
  template: ‘<App/>‘
})
这是我们写请求方法
this.$axios({
            method:‘‘,
            url:``,
            data:{},
          }).then(res => {

          })
然后我们先创建后面需要的一些文件

src/components/Render.vue 这个文件就是我们绘制体温单的画板页面 也是最核心的一个文件
src/compontents/SeparateTd.vue 这个文件是用来生成血压这个表格的
![]()
Table.vue 就是这个体温单页面 包含了表格 病人信息
timeCon.vue 这个页面是生成每日时间的文件
项目的基础构建我们准备完毕 下一节我们开始绘制一个体温单
需要源码的伙伴可以加我qq 896705559 咨询
也可以关注我的微信公众号 web少年QAQ 回复体温单

以上是关于使用vue+zrender绘制体温单 三测单的主要内容,如果未能解决你的问题,请参考以下文章