前端常用总结
Posted zhangliang91
tags:
篇首语:本文由小常识网(cha138.com)小编为大家整理,主要介绍了前端常用总结相关的知识,希望对你有一定的参考价值。
阅读目录
一、vue父组件调用子组件方法
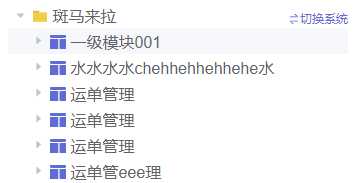
二、el-tree自定制
三、vue自定制项目启动命令
四、Tinymce富文本框
一、vue父组件调用子组件方法
1.子组件
Children.vue
methods:{
  doing_someting(){
     console.log("doing...")
  }
}
2.父组件
<template>
  <div>
     <!-- 引用子组件 赋值ref-->
     <Children  ref="children"></Children>
  </div>
</template>
<script>
    import Children from "./Children.vue"
    export default {
        components:{
            Children,
        },
        methods: {
           todo(){
                 //父组件通过this.$refs.children定位到子组件,然后调用子组件方法。
                 this.$refs.children.doing_someting();
           }
        }

    }
</script>
二、el-tree自定制
组件应用
<el-tree
  v-if="showTree"
  class="tree"
  :highlight-current="true"
  :data="treeInfos"
  :props="defaultProps"
  :show-checkbox="treeShowCheckBox"
  node-key="id"
  :default-expand-all="treeExpandAllFlag"
  :default-expanded-keys="treeDefaultExpendKey"
  :default-checked-keys="treeDefaultCheckedKey"
  :filter-node-method="filterNode"
  @node-contextmenu="handleNodeRightClick"         //处理右击事件
  @node-click="handleNodeClick"                    //处理左击事件
  @node-expand="handleNodeExpand"                  //处理展开事件
  :expand-on-click-node="false"
  ref="tree"
>
  <!--插槽设置-->
  <span class="custom-tree-node" slot-scope="{ node, data }">
     <!--data获取每个节点的对象,可以根据对象中的值设置唯一的icon类型-->
     <svg-icon v-if="data.module_level && data.module_level === 1" icon-class="tree-module-first"/>
     <svg-icon v-else-if="data.module_level && data.module_level === 2" icon-class="tree-module-second" />
     <svg-icon v-else icon-class="tree-case-manual"/>
     {{ node.label }}
  </span>
</el-tree>
1.添加图标(icon)

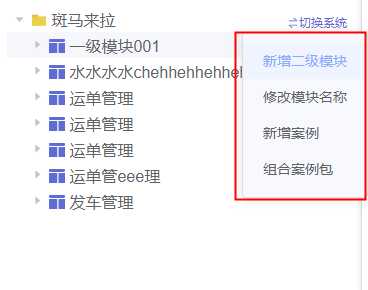
2.右击浮框
鼠标右击出现浮框,类似windows文档操作右击

下拉框html
  <div class="dropdown-container" @mouseleave="close_dropdown">
    <ul class="el-dropdown-menu el-popper context-menu-right"
        :style="{top: top_height, left:left_width}"               <!--设置动态样式-->
        v-if="show_dropdown">
        <!--添加下拉框选择按钮-->
        <li tabindex="-1" class="el-dropdown-menu__item" v-if="rightClickLevel === 1" @click="handleInsertModule">新增一级模块</li>
        <li tabindex="-1" class="el-dropdown-menu__item" v-if="rightClickLevel !== 1 && !rightClickCase" @click="handleUpdateModule">修改模块名称</li>
    </ul>
  </div>
右击事件
  handleNodeRightClick(event, data, node, x){
    let height = 0;
    let width = 0;
    height = event.screenY - 180;
    width =  event.screenX - 210;
    this.top_height = height + "px";            //修改height值
    this.left_width = width + "px";             //修改width值
    this.rightClickLevel = node.level;
    this.show_dropdown = true;                  //打开浮动框
  },
3.节点异步加载
3.1 elementUI懒加载示例
<el-tree
  :props="props"
  :load="loadNode"
  lazy
  show-checkbox>
</el-tree>

<script>
  export default {
    data() {
      return {
        props: {
          label: ‘name‘,
          children: ‘zones‘,
          isLeaf: ‘leaf‘
        },
      };
    },
    methods: {
      loadNode(node, resolve) {
        if (node.level === 0) {
          return resolve([{ name: ‘region‘ }]);
        }
        if (node.level > 1) return resolve([]);
        //设置异步回调事件
        setTimeout(() => {
          const data = [{
            name: ‘leaf‘,
            leaf: true
          }, {
            name: ‘zone‘
          }];

          resolve(data);
        }, 500);
      }
    }
  };
</script>
3.2 自定制异步加载事件
elementUI官方懒加载只能从第一级开始每一级都异步加载获取节点,但如果预加载二级,之后级别(数据量大)需要异步加载,就不能用官方示例了
节点展开事件
async handleNodeExpand(data, node, arr){
  //根据节点级别处理不同的加载事件
  if(data.module_level){
      //可以设置加载完后默认展开节点
      this.treeDefaultExpendKey = [data.id]
      if(data.loaded){
          return
      }
      //不太好的一点就是需要后端返回数据给设置一个leaf标记,data.children[0]属性
      let params = {level: data.module_level, module_id:data.module_id};
      if(data.children[0].leaf){
          //存在叶子节点,无有效数据
          node.loading = true;
          await this.HTTPgetCaseByModule(params).then((_dta)=>{
              //数据覆盖
              data.children = _dta
              data.loaded = true;
          }).catch((err)=>{console.log(err)})
          node.loading = false;
      }else{
          //开启节点加载loading
          node.loading = true;
          //获取节点数据
          await this.HTTPgetCaseByModule(params).then((_dta)=>{
              //直接对节点data属性children赋值,底层应该是引用类型
              //数据添加到最后
              data.children = data.children.concat(_dta);
              data.loaded = true;
          }).catch((err)=>{console.log(err)});
          node.loading = false;
      }
  }
},
三、vue自定制项目启动命令
1.目录树:
|--src
      |--config.js
|--package.json
2.实现效果
# 1.不同环境不同的启动
npm run local  # 本地启动
npm run prod   # 生产打包

# 2.不同环境访问不同后端url
3.package.json
修改package.json文件中scripts对象,增加local键,终端执行npm run local触发local对应的值
  "scripts": {
    "local": "cross-env NODE_ENV=local vue-cli-service serve",
    "uat": "cross-env NODE_ENV=uat vue-cli-service build",
    "build": "cross-env NODE_ENV=prod vue-cli-service build",
    "lint": "vue-cli-service lint"
  },
cross-env用来设置环境变量,windows不支持NODE_ENV=loc的设置方式,所以引用cross-env三方包来设置环境变量
安装
npm install --save-dev cross-env
4.config.js
//通过process.env.NODE_ENV可以拿到当前环境变量设置的值
var globalEnv=process.env.NODE_ENV;

//声明后端URL
var BACKEND_URL;

//不同的环境配置不同的后端访问,最简单配置
if(globalEnv===‘uat‘){
    BACKEND_URL= "https://uat.xxx";
}else if(globalEnv===‘prod‘){
    BACKEND_URL= "https://prod.xxx";
}else{
    BACKEND_URL= "https://local.xxx";
}
四、Tinymce富文本框
目录结构
|--components
             |--EditorImage.vue
             |--EditorLink.vue
|--index.vue
|--dynamicLoadScript.js
|--plugins.js
|--toolbar.js
toolbar.js
工具栏
const toolbar = [‘undo redo  subscript superscript codesample hr bullist numlist link image charmap  table  forecolor  fullscreen‘]

export default toolbar
plugins.js
插件
const plugins = [‘advlist anchor autolink autosave code codesample colorpicker colorpicker contextmenu directionality emoticons fullscreen hr image imagetools insertdatetime link lists media nonbreaking noneditable pagebreak paste preview print save searchreplace spellchecker tabfocus table template textcolor textpattern visualblocks visualchars wordcount‘]

export default plugins
dynamicLoadScript.js
let callbacks = []

function loadedTinymce() {
  // to fixed https://github.com/PanJiaChen/vue-element-admin/issues/2144
  // check is successfully downloaded script
  return window.tinymce
}

const dynamicLoadScript = (src, callback) => {
  const existingScript = document.getElementById(src)
  const cb = callback || function() {}

  if (!existingScript) {
    const script = document.createElement(‘script‘)
    script.src = src // src url for the third-party library being loaded.
    script.id = src
    document.body.appendChild(script)
    callbacks.push(cb)
    const onEnd = ‘onload‘ in script ? stdOnEnd : ieOnEnd
    onEnd(script)
  }

  if (existingScript && cb) {
    if (loadedTinymce()) {
      cb(null, existingScript)
    } else {
      callbacks.push(cb)
    }
  }

  function stdOnEnd(script) {
    script.onload = function() {
      // this.onload = null here is necessary
      // because even IE9 works not like others
      this.onerror = this.onload = null
      for (const cb of callbacks) {
        cb(null, script)
      }
      callbacks = null
    }
    script.onerror = function() {
      this.onerror = this.onload = null
      cb(new Error(‘Failed to load ‘ + src), script)
    }
  }

  function ieOnEnd(script) {
    script.onreadystatechange = function() {
      if (this.readyState !== ‘complete‘ && this.readyState !== ‘loaded‘) return
      this.onreadystatechange = null
      for (const cb of callbacks) {
        cb(null, script) // there is no way to catch loading errors in IE8
      }
      callbacks = null
    }
  }
}

export default dynamicLoadScript
index.vue
<template>
<!-- <div :class="{fullscreen:fullscreen}" class="tinymce-container" :style="{width:containerWidth max-height: 200px; }">-->
<div :class="{fullscreen:fullscreen}" class="tinymce-container" style="width: 99.8%">
<textarea :id="tinymceId" class="tinymce-textarea" :readonly="disabled"/>
<div class="editor-custom-btn-container">
<editorImage color="#1890ff" class="editor-upload-btn" @successCBK="imageSuccessCBK" />
</div>
<div class="editor-custom-link-container">
<editorLink @addFormula="insertFormulaLink"
:formulaOptions="formulaOptions"
class="editor-upload-btn"
></editorLink>
</div>
</div>
</template>
<script>
/**
* docs:
* https://panjiachen.github.io/vue-element-admin-site/feature/component/rich-editor.html#tinymce
*/
import editorImage from ‘./components/EditorImage‘
import editorLink from ‘./components/EditorLink‘
import plugins from ‘./plugins‘
import toolbar from ‘./toolbar‘
import load from ‘./dynamicLoadScript‘
// why use this cdn, detail see https://github.com/PanJiaChen/tinymce-all-in-one
const tinymceCDN = ‘https://cdn.jsdelivr.net/npm/tinymce-all-in-one@4.9.3/tinymce.min.js‘
export default {
name: ‘Tinymce‘,
components: { editorImage, editorLink },
props: {
hasChange:{type: Boolean, default: false},
disabled:{
type: Boolean,
},
formulaOptions:{
type: Array,
},
id: {
type: String,
default: function() {
return ‘vue-tinymce-‘ + +new Date() + ((Math.random() * 1000).toFixed(0) + ‘‘)
}
},
value: {
type: String,
default: ‘‘
},
toolbar: {
type: Array,
required: false,
default() {
return []
}
},
menubar: {
type: String,
// default: ‘file edit insert view format table‘
default: ‘‘
},
height: {
type: [Number, String],
required: false,
default: 170
},
width: {
type: [Number, String],
required: false,
default: ‘auto‘
}
},
data() {
return {
hasInit: false,
tinymceId: this.id,
fullscreen: false,
editing: false,
hasChangeBak2: true,
languageTypeList: {
‘zh‘: ‘zh_CN‘,
}
}
},
computed: {
hasChangeBak:{
get(){
return this.hasChange;
},
set(newVal){
this.$emit("setHasChange", newVal)
}
},
containerWidth() {
const width = this.width
if (/^[d]+(.[d]+)?$/.test(width)) { // matches `100`, `‘100‘`
return `${width}px`
}
return width
}
},
watch: {
value(val) {
// hasChange -> 页面刷新
// hasChangeBak -> 页面刷新备份
// editing -> 有在输入
// hasInit -> 有初始化
let _this = this;
if(!window.tinymce){
return
}
if(_this.hasChangeBak){
console.log("==set content==");
_this.$nextTick(() =>
//异步改变dom信息
window.tinymce.get(_this.tinymceId).setContent(val || ‘‘)
);
//修改完后备份改为false
_this.hasChangeBak=false;
}else if (_this.hasInit && !_this.editing) {
console.log("==set content==");
_this.$nextTick(() =>
//异步改变dom信息
window.tinymce.get(_this.tinymceId).setContent(val || ‘‘)
);
}
}
},
mounted() {
this.init()
},
activated() {
if (window.tinymce) {
this.initTinymce()
}
},
deactivated() {
this.destroyTinymce()
},
destroyed() {
this.destroyTinymce()
},
methods: {
init() {
// dynamic load tinymce from cdn
load(tinymceCDN, (err) => {
if (err) {
this.$message.error(err.message)
return
}
this.initTinymce()
})
},
initTinymce() {
const _this = this
window.tinymce.init({
selector: `#${this.tinymceId}`,
language: this.languageTypeList[‘zh‘],
// height: this.height,
height: 176,
max_height:180,
body_class: ‘panel-body ‘,
object_resizing: false,
toolbar: this.toolbar.length > 0 ? this.toolbar : toolbar,
menubar: false, //关闭
// removed_menuitems: "undo, redo",
// toolbar_mode: "floating",
// toolbar_groups: {
// formatting: {
// text: ‘文字格式‘,
// tooltip: ‘Formatting‘,
// items: ‘bold italic underline | superscript subscript‘,
// },
// alignment: {
// icon: ‘align-left‘,
// tooltip: ‘alignment‘,
// items: ‘alignleft aligncenter alignright alignjustify‘,
// },
// },
plugins: plugins,
end_container_on_empty_block: true,
powerpaste_word_import: ‘clean‘,
// autoresize_max_height: 180, // 编辑区域的最大高
// code_dialog_height: 450,
// code_dialog_width: 1000,
advlist_bullet_styles: ‘square‘,
advlist_number_styles: ‘default‘,
imagetools_cors_hosts: [‘www.tinymce.com‘, ‘codepen.io‘],
default_link_target: ‘_blank‘,
link_title: false,
nonbreaking_force_tab: true, // inserting nonbreaking space need Nonbreaking Space Plugin
init_instance_callback: editor => {
if (_this.value) {
editor.setContent(_this.value)
}
_this.hasInit = true
editor.on(‘NodeChange Change KeyUp SetContent‘, () => {
// _this.hasChange = true
_this.editing = true;
_this.$emit(‘input‘, editor.getContent())
})
},
setup(editor) {
editor.on(‘FullscreenStateChanged‘, (e) => {
_this.fullscreen = e.state
})
}
})
},
destroyTinymce() {
const tinymce = window.tinymce.get(this.tinymceId)
if (this.fullscreen) {
tinymce.execCommand(‘mceFullScreen‘)
}
if (tinymce) {
tinymce.destroy()
}
},
setContent(value) {
console.log("set:", value);
window.tinymce.get(this.tinymceId).setContent(value)
},
getContent() {
window.tinymce.get(this.tinymceId).getContent()
},
imageSuccessCBK(arr) {
const _this = this
arr.forEach(v => {
window.tinymce.get(_this.tinymceId).insertContent(`<img class="wscnph" src="${v.url}" >`)
})
},
mouseover(arg){
console.log(arg)
},
insertFormulaLink(content) {
window.tinymce.get(this.tinymceId).insertContent(content)
}
}
}
</script>
<style scoped>
/deep/ iframe >>> #tinymce{
line-height: 0.5!important;
}
.tinymce-container {
position: relative;
line-height: normal;
}
.tinymce-container>>>.mce-fullscreen {
z-index: 10000;
}
.tinymce-textarea {
visibility: hidden;
z-index: -1;
}
.editor-custom-link-container {
position: absolute;
right: 120px;
top: 4px;
/*z-index: 2005;*/
}
.fullscreen .editor-custom-link-container {
z-index: 10000;
position: fixed;
}
.editor-custom-btn-container {
position: absolute;
right: 4px;
top: 4px;
/*z-index: 2005;*/
}
.fullscreen .editor-custom-btn-container {
z-index: 10000;
position: fixed;
}
.editor-upload-btn {
display: inline-block;
}
</style>
EditorImage.vue
自定义添加图片
<template>
  <div class="upload-container">
    <el-button :style="{background:color,borderColor:color}" icon="el-icon-upload" size="mini" type="primary" @click=" dialogVisible=true">
      上传图片
    </el-button>
    <el-dialog :visible.sync="dialogVisible">
      <el-upload
        :multiple="true"
        :file-list="fileList"
        :show-file-list="true"
        :on-remove="handleRemove"
        :on-success="handleSuccess"
        :before-upload="beforeUpload"
        class="editor-slide-upload"
        action="https://httpbin.org/post"
        list-type="picture-card"
      >
        <el-button size="small" type="primary">
          Click upload
        </el-button>
      </el-upload>
      <el-button @click="dialogVisible = false">
        Cancel
      </el-button>
      <el-button type="primary" @click="handleSubmit">
        Confirm
      </el-button>
    </el-dialog>
  </div>
</template>

<script>
// import { getToken } from ‘api/qiniu‘

export default {
  name: ‘EditorSlideUpload‘,
  props: {
    color: {
      type: String,
      default: ‘#1890ff‘
    }
  },
  data() {
    return {
      dialogVisible: false,
      listObj: {},
      fileList: []
    }
  },
  methods: {
    checkAllSuccess() {
      return Object.keys(this.listObj).every(item => this.listObj[item].hasSuccess)
    },
    handleSubmit() {
      const arr = Object.keys(this.listObj).map(v => this.listObj[v])
      if (!this.checkAllSuccess()) {
        this.$message(‘Please wait for all images to be uploaded successfully. If there is a network problem, please refresh the page and upload again!‘)
        return
      }
      this.$emit(‘successCBK‘, arr)
      this.listObj = {}
      this.fileList = []
      this.dialogVisible = false
    },
    handleSuccess(response, file) {
      const uid = file.uid
      const objKeyArr = Object.keys(this.listObj)
      for (let i = 0, len = objKeyArr.length; i < len; i++) {
        if (this.listObj[objKeyArr[i]].uid === uid) {
          this.listObj[objKeyArr[i]].url = response.files.file
          this.listObj[objKeyArr[i]].hasSuccess = true
          return
        }
      }
    },
    handleRemove(file) {
      const uid = file.uid
      const objKeyArr = Object.keys(this.listObj)
      for (let i = 0, len = objKeyArr.length; i < len; i++) {
        if (this.listObj[objKeyArr[i]].uid === uid) {
          delete this.listObj[objKeyArr[i]]
          return
        }
      }
    },
    beforeUpload(file) {
      const _self = this
      const _URL = window.URL || window.webkitURL
      const fileName = file.uid
      this.listObj[fileName] = {}
      return new Promise((resolve, reject) => {
        const img = new Image()
        img.src = _URL.createObjectURL(file)
        img.onload = function() {
          _self.listObj[fileName] = { hasSuccess: false, uid: file.uid, width: this.width, height: this.height }
        }
        resolve(true)
      })
    }
  }
}
</script>

<style lang="scss" scoped>
.editor-slide-upload {
  margin-bottom: 20px;
  /deep/ .el-upload--picture-card {
    width: 100%;
  }
}
</style>
EditorLink.vue
自定义添加链接
<template>
  <div class="edit-container">
<!--    <div class="linkButton" @click="dialogVisible=true;addLink()"><i class="linkIcon"></i></div>-->
    <el-button icon="el-icon-plus" size="mini" type="success" @click="dialogVisible=true">
      插入公式
    </el-button>
    <!-- 弹出框 -->
    <el-dialog
        v-if="dialogVisible"
        title="公式库"
        :visible.sync="dialogVisible"
        :close-on-click-modal="false"
        width="500px"
        center
    >
        <el-form :model="dialogFormData" ref="dialogForm">
          <el-form-item label="公式" label-width="50px" >
              <el-select
                  multiple
                  style="width: 100%"
                  v-model="sel_values"
                  placeholder="请选择公式"
                  size="mini"
              >
                  <el-option
                      v-for="(item,index) in formulaOptions"
                      :key="index"
                      :label="item.name"
                      :value="item.name"
                  ></el-option>
              </el-select>
          </el-form-item>
        </el-form>
        <div slot="footer" class="dialog-footer">
            <el-button @click="dialogVisible=false" size="mini">取 消</el-button>
            <el-button type="primary" @click="addLinkSubmit" size="mini">确 定</el-button>
        </div>
    </el-dialog>
  </div>
</template>

<script>

export default {
  name: ‘EditorLink‘,
  props: {
    formulaOptions: {
      type: Array,
    }
  },
  data() {
    return {
      dialogVisible: false,
      sel_values:null,
      //选中的文本
      // sel_text: "",
      dialogFormData:{},
    }
  },
  methods: {

    getFormulaInfo(v){
      for(let i=0;i<this.formulaOptions.length;i++){
        if(this.formulaOptions[i][‘name‘] === v){
          return [this.formulaOptions[i][‘id‘], this.formulaOptions[i][‘formula‘]]
        }
      }
    },

    addLinkSubmit(){
      let _this = this;
      let link_content = "";
      this.sel_values.forEach(v => {
        // 不能添加js事件
        let formula =  _this.getFormulaInfo(v);
        link_content += `<a href="/#/sysCaseLab/catFormula?formula_id=${formula[0]}" target="_blank" id="${formula[0]}" value="${formula[1]}" style="color:red">  ${v}  </a>`
      });
      console.log(link_content);
      this.$emit(‘addFormula‘, link_content);
      // // tinyMCE.activeEditor.selection.setContent(linkTab)
      this.dialogVisible = false;

    },
    mouseover(arg){
      console.log(arg)
    },
    mouselevel(){
    },
    addLink(){
      //获取富文本编辑器中选中的文本
      this.sel_text = tinyMCE.activeEditor.selection.getContent()
    }
  }
}
</script>

<style lang="scss" scoped>
.edit-container{
  .linkButton{
    /*height:20px;*/
  }
}

</style>
以上是关于前端常用总结的主要内容,如果未能解决你的问题,请参考以下文章