vue的使用及工作原理源码分析
Posted yingaxiang
tags:
篇首语:本文由小常识网(cha138.com)小编为大家整理,主要介绍了vue的使用及工作原理源码分析相关的知识,希望对你有一定的参考价值。
Vuex作为Vue的核心无人不知无人不晓,都知道Vuex 是一个专为 Vue.js 应用程序开发的状态管理模式,也知道当我们的应用遇到多个组件共享状态时,单向数据流的简洁性很容易被破坏,多个视图依赖于同一状态,来自不同视图的行为需要变更同一状态的时候要用到vuex,可是vuex实现的原理是什么啊?一直都见到的是遮着面纱的vuex好奇心让我今天想要揭开她神秘的面纱。
第一部分复习一下vuex基本的用法以及她的API,第二部分学习Vuex原理及其源码分析。
一.Vuex的使用
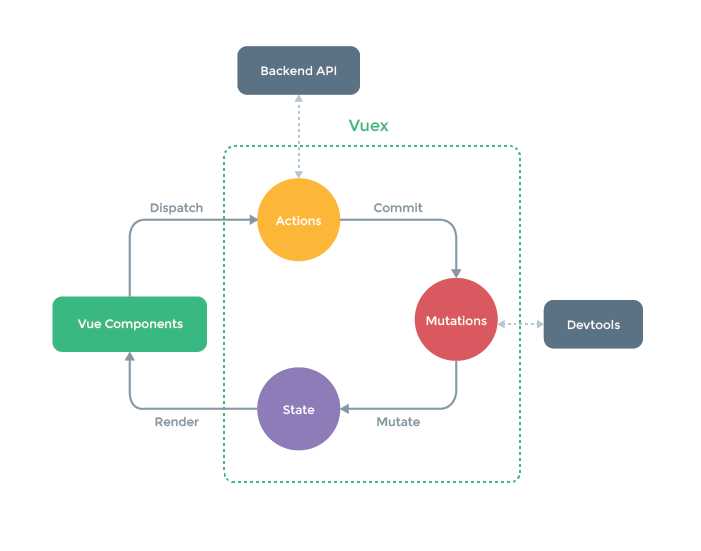
1.先介绍一下官方的这张经典图

①state:里面就是存放的状态
②mutations:更改 Vuex 的 store 中的状态的唯一方法是提交 mutation。Vuex 中的 mutation 非常类似于事件:每个 mutation 都有一个字符串的 事件类型 (type) 和 一个 回调函数 (handler)。需要通过commit触发mutation方法,同时mutation必须是同步函数
③actions:这个类似于mutation,不过actions定义的是异步函数。Action提交的是mutation,而不是直接变更状态
④getter:通过Getters可以派生出一些新的状态,相当于vuex的计算属性
⑤modules:模块化每个模块拥有自己的 state、mutation、action、getter、甚至是嵌套子模块
⑥mutation的辅助函数mapMutations把mutations里面的方法映射到methods中。映射的名称一定要相同,然后就可以通过this调用mutaition的方法。
⑦mapAcions:把actions里面的方法映射到methods中
⑧mapGetters:把getters属性映射到computed身上
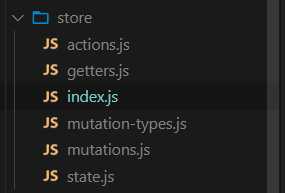
2.新建store文件夹,然后建立如下文件,接下来慢慢看看他们有什么用

①在index.js文件引入一些文件,这里我们把方法和数据单独抽离出来方便管理,在index.js中统一引入
 1 import Vue from "vue";
 2 import Vuex from "vuex";
 3 import * as actions from "./actions";
 4 import * as getters from "./getters";
 5 import state from "./state";
 6 import mutations from "./mutations";
 7 Vue.use(Vuex);
 8 export default new Vuex.Store({
 9   actions,
10   getters,
11   state,
12   mutations,
13 });
②在state.js保存所有数据,以对象的方式导出
1 const state = {
2   singer: {},
3   playing: false,
4   fullScreen: false,
5   playlist: [],
6   sequenceList: [],
7 };
8 export default state;
③mutations.js :保存所有方法,用来改变state的数据
 1 import * as types from "./mutation-types";
 2 const mutations = {
 3   [types.SET_SINGER](state, singer) {
 4     state.singer = singer;
 5   },
 6   [types.SET_PLAYING_STATE](state, flag) {
 7     state.playing = flag;
 8   },
 9   [types.SET_FULL_SCREEN](state, flag) {
10     state.fullScreen = flag;
11   },
12   [types.SET_PLAYLIST](state, list) {
13     state.playlist = list;
14   },
15   [types.SET_SEQUENCE_LIST](state, list) {
16     state.sequenceList = list;
17   }
18 };
19
20 export default mutations;
④actions.js :暴露给用户使用,借此触发mutations中的方法,保存数据(执行异步操作)
 1 import * as types from "./mutation-types";
 2 export const randomPlay = function({ commit }, { list }) {
 3   commit(types.SET_PLAY_MODE, playMode.random);
 4   commit(types.SET_SEQUENCE_LIST, list);
 5   let randomList = shuffle(list);
 6   commit(types.SET_PLAYLIST, randomList);
 7   commit(types.SET_CURRENT_INDEX, 0);
 8   commit(types.SET_FULL_SCREEN, true);
 9   commit(types.SET_PLAYING_STATE, true);
10 };
⑤完整简单的使用
 1 / 存储数据的对象,我们可以将你需要存储的数据在这个state中定义
 2 const state = {
 3   // 当前登陆的用户名
 4   username: ‘‘
 5 }
 6 const mutations = {
 7   // 提供一个方法,为state中的username赋值
 8 //   这些方法有一个默认的参数,这个参数就是当前store中的State
 9   setUserName (state, username) {
10     //存入一个值
11     state.username = username
12     localStorage.setItem(‘myname‘, username)
13   },
14   getUserName (state) {
15     //输出一个值
16     return state.username
17   }
18 }
19
20 //使用的时候---> 通过commit调用mutations中定义的函数,这个函数就是操作state中定义的成员的函数
21    // this.$store.commit(‘setUserName‘, res.data.username(请求返回的值))
22
23
24 const actions = {
25   setUserNameAction: ({commit}, username) => {
26     commit(‘setUserName‘, username)
27   },
28   getUserNameAction: ({commit}) => {
29     commit(‘getUserName‘)
30   }
31 }
32
33 // 通过action来触发mutations中的函数,这种触发方式是异步方式--->使用
34 //存入  this.$store.dispatch(‘setUserNameAction‘, res.data.username + ‘aa‘)
35 //取出  this.currentUserName = this.$store.dispatch(‘getUserNameAction‘)
36
37
38 //Getters是从 store 中的 state 中派生出一些状态,即当出现多处需要导入某个状态时,结果不是很理想,所以getters的返回值会根据它的依赖被缓存起来,且只有当它的依赖值发生了改变才会被重新计算。
39 const getters = {
40   getUserName: (state) => {
41     return localStorage.getItem(‘myname‘)
42   }
43 }
二.Vuex的原理
我曾经粗浅的认为:vuex原理是相当于军营大本营统一管理许多状态数据,普通的组件传参需要一级一级的传达,而vuex无论在多么偏远的地方也不需要一级一级的去传达而是直接传到需要用到数据的地方。现在我们通过源码来学习一下他的原理。
Vuex是通过全局注入store对象,来实现组件间的状态共享。在大型复杂的项目中(多级组件嵌套),需要实现一个组件更改某个数据,多个组件自动获取更改后的数据进行业务逻辑处理,这时候使用vuex比较合适。假如只是多个组件间传递数据,使用vuex未免有点大材小用,其实只用使用组件间常用的通信方法即可。

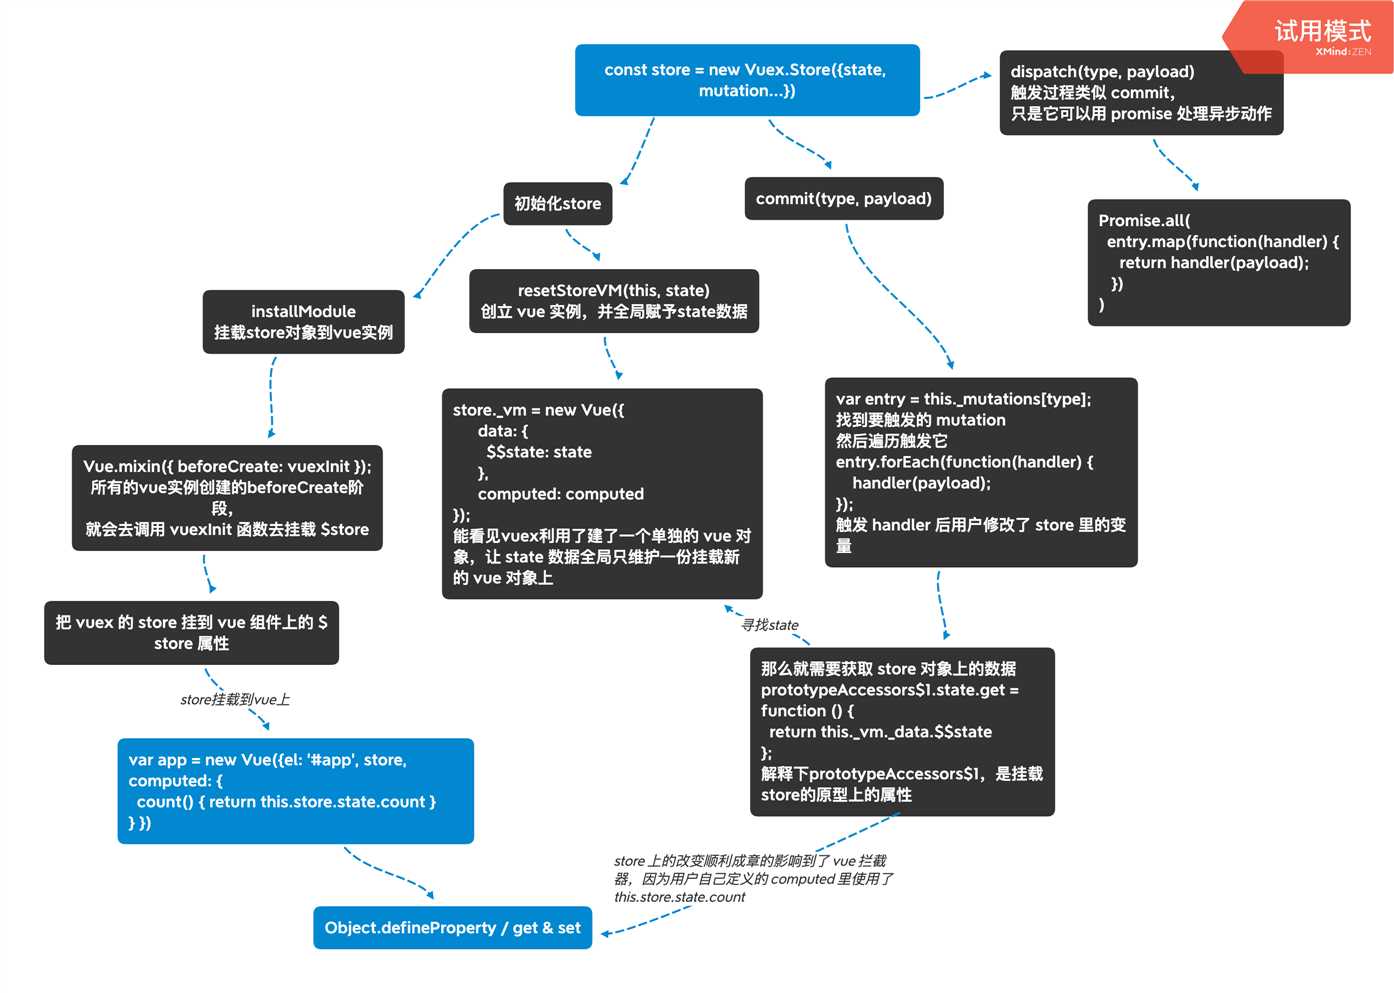
注意:下边的分析是从树形图的左侧到右侧深度遍历介绍
1.store是怎么挂载到全局的
1 import Vuex from ‘vuex‘;
2 Vue.use(vuex);// vue的插件机制
利用vue的插件机制,使用Vue.use(vuex)时,会调用vuex的install方法,装载vuex,install方法的代码如下:
 1 export function install (_Vue) {
 2   if (Vue && _Vue === Vue) {
 3     if (process.env.NODE_ENV !== ‘production‘) {
 4       console.error(
 5         ‘[vuex] already installed. Vue.use(Vuex) should be called only once.‘
 6       )
 7     }
 8     return
 9   }
10   Vue = _Vue
11   applyMixin(Vue)
12 }
applyMixin方法使用vue混入机制,vue的生命周期beforeCreate钩子函数前混入vuexInit方法,核心代码如下:
 1 Vue.mixin({ beforeCreate: vuexInit });
 2
 3 function vuexInit () {
 4     const options = this.$options
 5     // store injection
 6     if (options.store) {
 7       this.$store = typeof options.store === ‘function‘
 8         ? options.store()
 9         : options.store
10     } else if (options.parent && options.parent.$store) {
11       this.$store = options.parent.$store
12     }
13 }
通过源码我们知道了vuex是利用vue的mixin混入机制,在beforeCreate钩子前混入vuexInit方法,vuexInit方法实现了store注入vue组件实例,并注册了vuex store的引用属性$store。即 每个vue组件实例化过程中,会在 beforeCreate 钩子前调用 vuexInit 方法。
2.vuex中的数据状态是怎么维护的,为啥就是响应式的
 1 function resetStoreVM (store, state, hot) {
 2   // 省略无关代码
 3   Vue.config.silent = true
 4   store._vm = new Vue({
 5     data: {
 6       $$state: state
 7     },
 8     computed
 9   })
10 }
上边的代码我们发现,vuex的state本质就是作为一个隐藏的vue组件的data,换句话说当执行commit操作其实是修改这个组件的data值,我们知道组件中只有在data中定义的变量才是响应式的,这样就能解释了为什么vuex中的state的对象属性必须提前定义好,如果该state中途增加一个属性,因为该属性没有被defineReactive,所以其依赖系统没有检测到,自然不能更新。所以不难知道store._vm.$data.$$state === store.state。
3.commit提交mutation
 1 Store.prototype.commit = function commit(_type, _payload, _options) {
 2   var this$1 = this;
 3   var mutation = { type: type, payload: payload };
 4   var entry = this._mutations[type];
 5
 6   this._withCommit(function() {
 7     entry.forEach(function commitIterator(handler) {
 8       handler(payload);
 9     });
10   });
11
12   // ...
13 };
14
15 // _withCommit 执行它所传入的 fn,它遍历 entry,执行用户自定义的 handler 处理函数,
16 // 这个 handler 就是我们定义的 commit 里的函数 increment (state, n = 1) { state.count += n; },总之要变动 state.count,就会进入 state 的拦截器,
17
18 prototypeAccessors$1.state.get = function () {
19   return this._vm._data.$$state
20 };
21
22 // 一旦触发去 vue 的 _data 上有 vue 自己的拦截器 get,而动作做 state.count += n 后,就触发了 vue 自己拦截器里的 set。最后这样就开始vue自身的渲染逻辑。
4.dispatch提交action
dispatch其实和commit同理,只不过是他会使用 Promise.all 来保证 handler 函数的异步触发。
 1 Store.prototype.dispatch = function dispatch(_type, _payload) {
 2   var this$1 = this;
 3
 4   // check object-style dispatch
 5   var ref = unifyObjectStyle(_type, _payload);
 6   var type = ref.type;
 7   var payload = ref.payload;
 8
 9   var action = { type: type, payload: payload };
10   var entry = this._actions[type];
11
12     entry.length > 1
13       ? Promise.all(
14           entry.map(function(handler) {
15             return handler(payload);
16           })
17         )
18       : entry[0](payload);
19
20   return result.then(function(res) {
21     return res;
22   });
23 };
拓展:
我们发现vuex中其实好多东西和vue是相通的,所以最后我们把vuex映射到vue做一下对比。
①数据:state---> data
②获取数据:getter--->computed
③修改数据:mutation--->methods
以上是关于vue的使用及工作原理源码分析的主要内容,如果未能解决你的问题,请参考以下文章