实现简单的手写涂鸦板(demo源码)
Posted
tags:
篇首语:本文由小常识网(cha138.com)小编为大家整理,主要介绍了实现简单的手写涂鸦板(demo源码)相关的知识,希望对你有一定的参考价值。
在一些软件系统中,需要用到手写涂鸦的功能,然后可以将涂鸦的结果保存为图片,并可以将“真迹”通过网络发送给对方。这种手写涂鸦功能是如何实现的了?最直接的,我们可以使用Windows提供的GDI技术或GDI+技术来实现绘图功能。但是,要实现一个如此简单的涂鸦板,也不是那么容易的事情。幸运的是,我们可以直接使用OMCS提供的内置集成了这种功能的一个WinForm控件HandwritingPanel。
HandwritingPanel控件的主要接口如下图所示:
        /// <summary>
        /// 设置画笔颜色。
         /// </summary>
        Color PenColor {set;}

        /// <summary>
        /// 设置画笔粗细。
         /// </summary>
        float PenWidth {set;}

        /// <summary>
        /// 清空画板。
         /// </summary>
        void Clear();

        /// <summary>
        /// 获取涂鸦的结果(位图)。
         /// </summary>
        Bitmap GetHandWriting();
将HandwritingPanel控件从工具箱拖到你的UI上,可以通过PenColor和PenWidth属性设置画笔的颜色和粗细。运行起来后,就可以在控件的表面进行涂鸦和手写了。
如果需要清空手写板,则调用Clear方法。
当手写结束的时候,则调用GetHandWriting方法得到手写的结果,并保存为位图。位图的大小即是HandwritingPanel控件的尺寸。
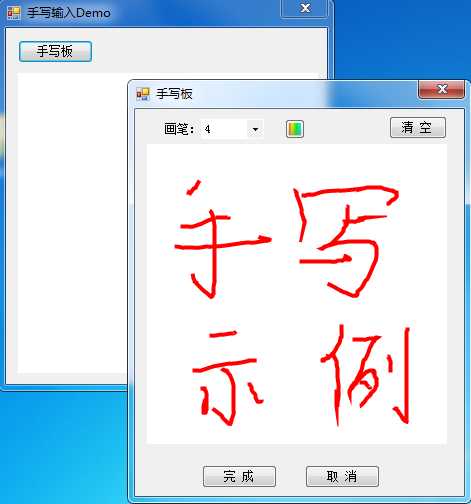
OK,下面我们就写了一个使用HandwritingPanel来实现手写涂鸦板的demo,demo的主要代码如下所示:
    public partial class HandwritingForm : Form
    {
        private Color currentColor = Color.Red;
        private List<float> penWidthList = new List<float>();
        private Bitmap currentImage;
        public Bitmap CurrentImage
        {
            get { return currentImage; }
        }

        public HandwritingForm()
        {
            InitializeComponent();

            this.handwritingPanel1.PenColor = this.currentColor; //设置画笔颜色

              this.penWidthList.Add(2);
            this.penWidthList.Add(4);
            this.penWidthList.Add(6);
            this.penWidthList.Add(8);
            this.penWidthList.Add(10);
            this.comboBox_brushWidth.DataSource = this.penWidthList;
            this.comboBox_brushWidth.SelectedIndex = 1;
        }

        private void button_color_Click(object sender, EventArgs e)
        {
            try
            {
                this.colorDialog1.Color = this.currentColor;
                DialogResult result = this.colorDialog1.ShowDialog();
                if (result == DialogResult.OK)
                {
                    this.currentColor = this.colorDialog1.Color;
                    this.handwritingPanel1.PenColor = this.currentColor;   //设置画笔颜色
                }
            }
            catch (Exception ee)
            {
                MessageBox.Show(ee.Message);
            }
        }

        //设置画笔宽度
        private void comboBox_brushWidth_SelectedIndexChanged(object sender, EventArgs e)
        {
            if (this.comboBox_brushWidth.SelectedIndex > 0)
            {
                this.handwritingPanel1.PenWidth = this.penWidthList[this.comboBox_brushWidth.SelectedIndex];
            }
            else
            {
                this.handwritingPanel1.PenWidth = this.penWidthList[0];
            }
        }

        private void Button_clear_Click(object sender, EventArgs e)
        {
            this.handwritingPanel1.Clear(); //清空手写板
        }

        private void button_Ok_Click(object sender, EventArgs e)
        {
            this.currentImage = this.handwritingPanel1.GetHandWriting(); //获取手写图片
              this.DialogResult = System.Windows.Forms.DialogResult.OK;
        }

        private void Button_cancel_Click(object sender, EventArgs e)
        {
            this.DialogResult = System.Windows.Forms.DialogResult.Cancel;
        }
    }
其运行效果如下图所示:

以上是关于实现简单的手写涂鸦板(demo源码)的主要内容,如果未能解决你的问题,请参考以下文章
