Spring Cloud Sleuth使用简介
Posted 楠倏之语
tags:
篇首语:本文由小常识网(cha138.com)小编为大家整理,主要介绍了Spring Cloud Sleuth使用简介相关的知识,希望对你有一定的参考价值。
Spring-Cloud
Spring Cloud为开发者提供了在分布式系统(如配置管理、服务发现、断路器、智能路由、微代理、控制总线、一次性Token、全局锁、决策竞选、分布式会话和集群状态)操作的开发工具。使用SpringCloud开发者可以快速实现上述这些模式。
SpringCloud Sleuth
Distributed tracing for Spring Cloud applications, compatiblewith Zipkin, HTrace and log-based(e.g. ELK)tracing.
Spring-Cloud-Sleuth是Spring Cloud的组成部分之一,为SpringCloud应用实现了一种分布式追踪解决方案,其兼容了Zipkin, HTrace和log-based追踪
术语(Terminology)
Span:基本工作单元,例如,在一个新建的span中发送一个RPC等同于发送一个回应请求给RPC,span通过一个64位ID唯一标识,trace以另一个64位ID表示,span还有其他数据信息,比如摘要、时间戳事件、关键值注释(tags)、span的ID、以及进度ID(通常是IP地址)
span在不断的启动和停止,同时记录了时间信息,当你创建了一个span,你必须在未来的某个时刻停止它。
Trace:一系列spans组成的一个树状结构,例如,如果你正在跑一个分布式大数据工程,你可能需要创建一个trace。
Annotation:用来及时记录一个事件的存在,一些核心annotations用来定义一个请求的开始和结束
- cs - Client Sent -客户端发起一个请求,这个annotion描述了这个span的开始
- sr - Server Received -服务端获得请求并准备开始处理它,如果将其sr减去cs时间戳便可得到网络延迟
- ss - Server Sent -注解表明请求处理的完成(当请求返回客户端),如果ss减去sr时间戳便可得到服务端需要的处理请求时间
- cr - Client Received -表明span的结束,客户端成功接收到服务端的回复,如果cr减去cs时间戳便可得到客户端从服务端获取回复的所有所需时间
将Span和Trace在一个系统中使用Zipkin注解的过程图形化:

每个颜色的注解表明一个span(总计7个spans,从A到G),如果在注解中有这样的信息:
Trace Id = X
Span Id = D
Client Sent
这就表明当前span将Trace-Id设置为X,将Span-Id设置为D,同时它还表明了ClientSent事件。
spans 的parent/child关系图形化:

目的(Purpose)
基于Zipkin的分布式追踪
总计11个spans,如果在Zipkin中查看traces将看到如下图:

但如果你选取一个特殊的trace你将看到8个spans:

| 当选取一个特殊trace时你会看到合并的spans,这意味着如果有两个spans使用客户端接收发送/服务端接收发送注解发送至Zipkin时,他们将表现为一个单独的span |
在展示Span和Trace图形化的图片中有20个颜色标签,Zipkin又是如何接收10个spans的呢?
- 2个span A标签表明span的开始和结束,接近结束时一个单独的span发送给Zipkin
- 4个span B标签实际上是一个有4个注解的单独span,然而这个span是由两个分离的实例组成的,一个由 service 1发出,一个由service 2发出,因此实际上两个span实例是发送到Zipkin并在那合并
- 2个span C标签表明span的开始和结束,接近结束时一个单独的span发送给Zipkin
- 4个span D标签实际上是一个有4个注解的单独span,然而这个span是由两个分离的实例组成的,一个由 service 2发出,一个由service 3发出,因此实际上两个span实例是发送到Zipkin并在那合并
- 2个span E标签表明span的开始和结束,接近结束时一个单独的span发送给Zipkin
- 4个span F标签实际上是一个有4个注解的单独span,然而这个span是由两个分离的实例组成的,一个由 service 2发出,一个由service 4发出,因此实际上两个span实例是发送到Zipkin并在那合并
- 2个span G标签表明span的开始和结束,接近结束时一个单独的span发送给Zipkin
因此1个span来自A,2个span来自B,1个span来自C,2个span来自D,1个span来自E,2个span来自F,1个来自G,总计10个spans。
Zipkin中的依赖图:

Log相关
当使用trace id为2485ec27856c56f4抓取这四个应用的log时,会获得如下输出:
| service1.log:2016-02-26 11:15:47.561 INFO [service1,2485ec27856c56f4,2485ec27856c56f4,true] 68058 --- [nio-8081-exec-1] i.s.c.sleuth.docs.service1.Application : Hello from service1. Calling service2 service2.log:2016-02-26 11:15:47.710 INFO [service2,2485ec27856c56f4,9aa10ee6fbde75fa,true] 68059 --- [nio-8082-exec-1] i.s.c.sleuth.docs.service2.Application : Hello from service2. Calling service3 and then service4 service3.log:2016-02-26 11:15:47.895 INFO [service3,2485ec27856c56f4,1210be13194bfe5,true] 68060 --- [nio-8083-exec-1] i.s.c.sleuth.docs.service3.Application : Hello from service3 service2.log:2016-02-26 11:15:47.924 INFO [service2,2485ec27856c56f4,9aa10ee6fbde75fa,true] 68059 --- [nio-8082-exec-1] i.s.c.sleuth.docs.service2.Application : Got response from service3 [Hello from service3] service4.log:2016-02-26 11:15:48.134 INFO [service4,2485ec27856c56f4,1b1845262ffba49d,true] 68061 --- [nio-8084-exec-1] i.s.c.sleuth.docs.service4.Application : Hello from service4 service2.log:2016-02-26 11:15:48.156 INFO [service2,2485ec27856c56f4,9aa10ee6fbde75fa,true] 68059 --- [nio-8082-exec-1] i.s.c.sleuth.docs.service2.Application : Got response from service4 [Hello from service4] service1.log:2016-02-26 11:15:48.182 INFO [service1,2485ec27856c56f4,2485ec27856c56f4,true] 68058 --- [nio-8081-exec-1] i.s.c.sleuth.docs.service1.Application : Got response from service2 [Hello from service2, response from service3 [Hello from service3] and from service4 [Hello from service4]] |
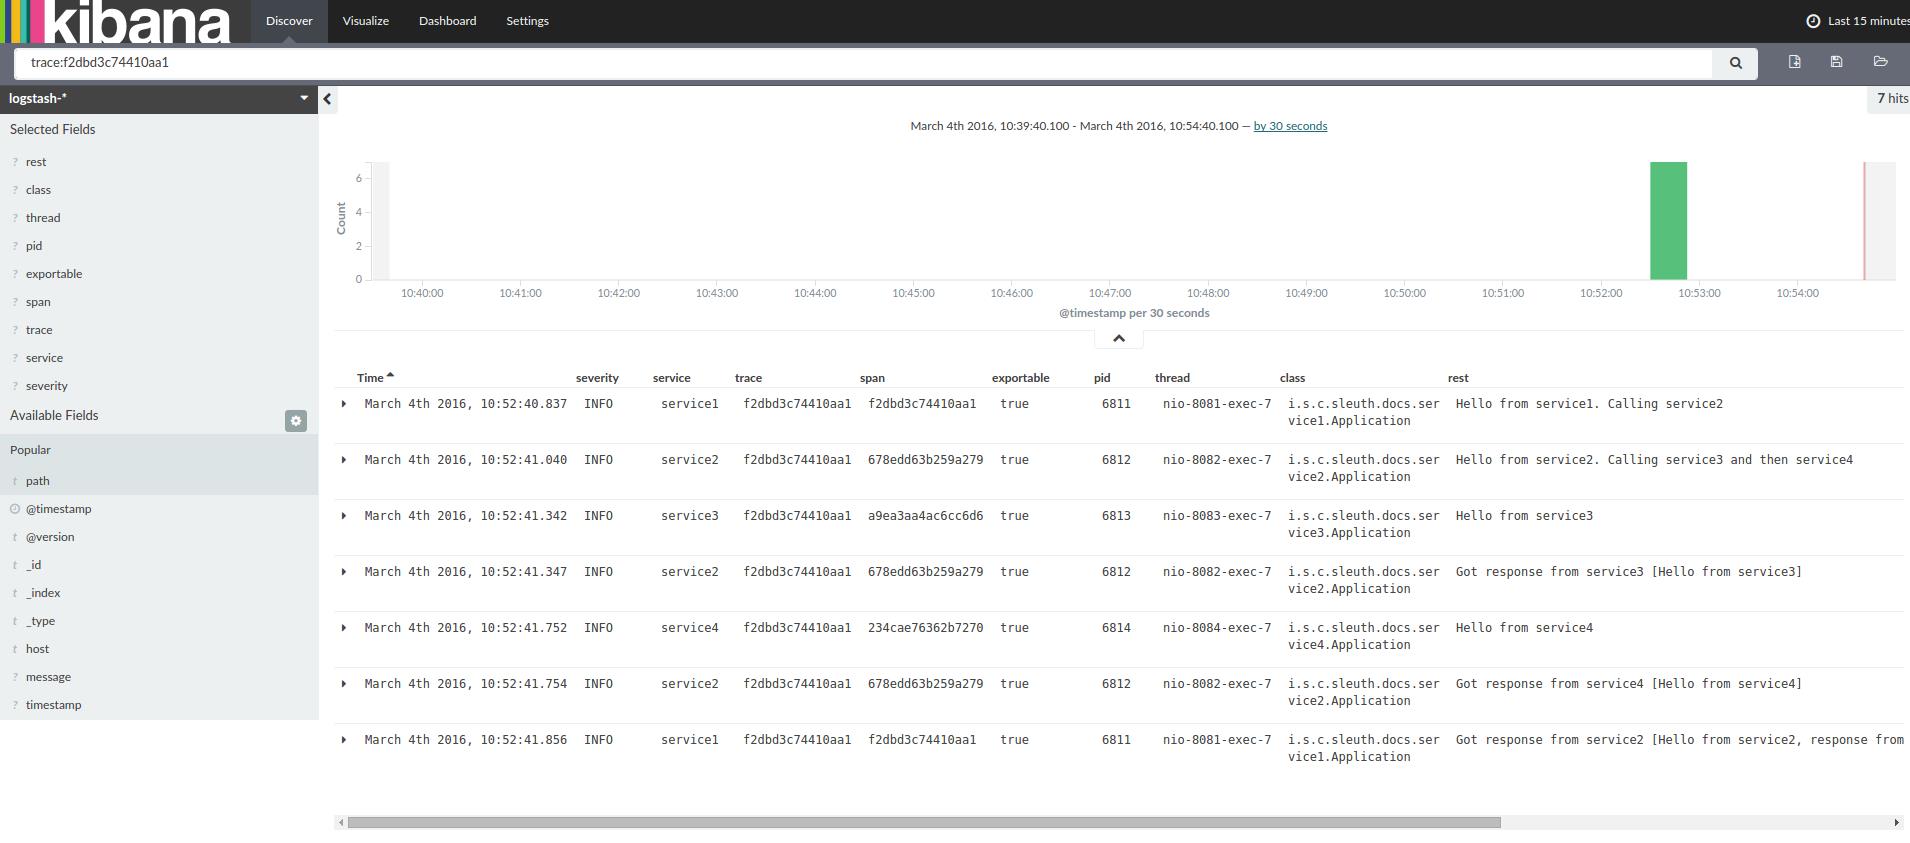
如果你使用log集合工具例如Kibana、Splunk等,你可以看到事件的发生信息,Kibana的例子如下:

以下是Logstash的Grok模式:
| filter # pattern matching logback pattern grok match => "message" => "%TIMESTAMP_ISO8601:timestamp\\s+%LOGLEVEL:severity\\s+\\[%DATA:service,%DATA:trace,%DATA:span,%DATA:exportable\\]\\s+%DATA:pid---\\s+\\[%DATA:thread\\]\\s+%DATA:class\\s+:\\s+%GREEDYDATA:rest"
|
JSON Logback with Logstash
为了方便获取Logstash,通常保存log在JSON文件中而不是text文件中,配置方法如下:
依赖建立
- 确保Logback在classpath中(ch.qos.logback:logback-core)
- 增加LogstashLogback编码 - version 4.6的例子:net.logstash.logback:logstash-logback-encoder:4.6
Logback建立
以下是一个Logback配置的例子:
- 使用JSON格式记录应用信息到build/$spring.application.name.json文件
- 有两个添加注释源- console和标准log文件
- 与之前章节使用相同的log模式
| <?xml version="1.0" encoding="UTF-8"?> <configuration> <include resource="org/springframework/boot/logging/logback/defaults.xml"/>
<springProperty scope="context" name="springAppName" source="spring.application.name"/> <!-- Example for logging into the build folder of your project --> <property name="LOG_FILE" value="$BUILD_FOLDER:-build/$springAppName"/>
<property name="CONSOLE_LOG_PATTERN" value="%clr(%dyyyy-MM-dd HH:mm:ss.SSS)faint %clr($LOG_LEVEL_PATTERN:-%5p) %clr([$springAppName:-,%XX-B3-TraceId:-,%XX-B3-SpanId:-,%XX-Span-Export:-])yellow %clr($PID:- )magenta %clr(---)faint %clr([%15.15t])faint %clr(%-40.40logger39)cyan %clr(:)faint %m%n$LOG_EXCEPTION_CONVERSION_WORD:-%wEx"/>
<!-- Appender to log to console --> <appender name="console" class="ch.qos.logback.core.ConsoleAppender"> <filter class="ch.qos.logback.classic.filter.ThresholdFilter"> <!-- Minimum logging level to be presented in the console logs--> <level>INFO</level> </filter> <encoder> <pattern>$CONSOLE_LOG_PATTERN</pattern> <charset>utf8</charset> </encoder> </appender>
<!-- Appender to log to file --> <appender name="flatfile" class="ch.qos.logback.core.rolling.RollingFileAppender"> <file>$LOG_FILE</file> <rollingPolicy class="ch.qos.logback.core.rolling.TimeBasedRollingPolicy"> <fileNamePattern>$LOG_FILE.%dyyyy-MM-dd.gz</fileNamePattern> <maxHistory>7</maxHistory> </rollingPolicy> <encoder> <pattern>$CONSOLE_LOG_PATTERN</pattern> <charset>utf8</charset> </encoder> </appender>
<!-- Appender to log to file in a JSON format --> <appender name="logstash" class="ch.qos.logback.core.rolling.RollingFileAppender"> <file>$LOG_FILE.json</file> <rollingPolicy class="ch.qos.logback.core.rolling.TimeBasedRollingPolicy"> <fileNamePattern>$LOG_FILE.json.%dyyyy-MM-dd.gz</fileNamePattern> <maxHistory>7</maxHistory> </rollingPolicy> <encoder class="net.logstash.logback.encoder.LoggingEventCompositeJsonEncoder"> <providers> <timestamp> <timeZone>UTC</timeZone> </timestamp> <pattern> <pattern>
"severity": "%level", "service": "$springAppName:-", "trace": "%XX-B3-TraceId:-", "span": "%XX-B3-SpanId:-", "exportable": "%XX-Span-Export:-", "pid": "$PID:-", "thread": "%thread", "class": "%logger40", "rest": "%message"
</pattern> </pattern> </providers> </encoder> </appender>
<root level="INFO"> <!--<appender-ref ref="console"/>--> <appender-ref ref="logstash"/> <!--<appender-ref ref="flatfile"/>--> </root> </configuration> |
添加进工程
仅Sleuth(log收集)
如果仅需要Spring Cloud Sleuth而不需要Zipkin集成,只需要增加spring-cloud-starter-sleuth模块到你工程中
- 为了不手动添加版本号,更好的方式是通过Spring BOM添加dependencymanagement
- 添加依赖到spring-cloud-starter-sleuth
| <dependencyManagement> (1) <dependencies> <dependency> <groupId>org.springframework.cloud</groupId> <artifactId>spring-cloud-dependencies</artifactId> <version>Brixton.RELEASE</version> <type>pom</type> <scope>import</scope> </dependency> </dependencies> </dependencyManagement>
<dependency> (2) <groupId>org.springframework.cloud</groupId> <artifactId>spring-cloud-starter-sleuth</artifactId> </dependency> |
- 为了不手动添加版本号,更好的方式是通过Spring BOM添加dependencymanagement
- 添加依赖到spring-cloud-starter-sleuth
| dependencyManagement (1) imports mavenBom "org.springframework.cloud:spring-cloud-dependencies:Brixton.RELEASE"
dependencies (2) compile "org.springframework.cloud:spring-cloud-starter-sleuth"
|
通过HTTP使用基于Zipkin的Sleuth
如果你需要Sleuth和Zipkin,只需要添加spring-cloud-starter-zipkin依赖
- 为了不手动添加版本号,更好的方式是通过Spring BOM添加dependencymanagement
- 添加依赖到spring-cloud-starter-zipkin
| <dependencyManagement> (1) <dependencies> <dependency> <groupId>org.springframework.cloud</groupId> <artifactId>spring-cloud-dependencies</artifactId> <version>Brixton.RELEASE</version> <type>pom</type> <scope>import</scope> </dependency> </dependencies> </dependencyManagement>
<dependency> (2) <groupId>org.springframework.cloud</groupId> <artifactId>spring-cloud-starter-zipkin</artifactId> </dependency> |
- 为了不手动添加版本号,更好的方式是通过Spring BOM添加dependencymanagement
- 添加依赖到spring-cloud-starter-zipkin
| dependencyManagement (1) imports mavenBom "org.springframework.cloud:spring-cloud-dependencies:Brixton.RELEASE"
dependencies (2) compile "org.springframework.cloud:spring-cloud-starter-zipkin"
|
通过Spring Cloud Stream使用Sleuth+Zipkin
- 为了不手动添加版本号,更好的方式是通过Spring BOM添加dependencymanagement
- 添加依赖到spring-cloud-sleuth-stream
- 添加依赖到spring-cloud-starter-sleuth
- 添加一个binder(e.g.Rabbit binder)来告诉Spring Cloud Stream应该绑定什么
| <dependencyManagement> (1) <dependencies> <dependency> <groupId>org.springframework.cloud</groupId> <artifactId>spring-cloud-dependencies</artifactId> <version>Brixton.RELEASE</version> <type>pom</type> <scope>import</scope> </dependency> </dependencies> </dependencyManagement>
<dependency> (2) <groupId>org.springframework.cloud</groupId> <artifactId>spring-cloud-sleuth-stream</artifactId> </dependency> <dependency> (3) <groupId>org.springframework.cloud</groupId> <artifactId>spring-cloud-starter-sleuth</artifactId> </dependency> <!-- EXAMPLE FOR RABBIT BINDING --> <dependency> (4) <groupId>org.springframework.cloud</groupId> <artifactId>spring-cloud-stream-binder-rabbit</artifactId> </dependency> |
- 为了不手动添加版本号,更好的方式是通过Spring BOM添加dependencymanagement
- 添加依赖到spring-cloud-sleuth-stream
- 添加依赖到spring-cloud-starter-sleuth
- 添加一个binder(e.g.Rabbit binder)来告诉Spring Cloud Stream应该绑定什么
| dependencyManagement (1) imports mavenBom "org.springframework.cloud:spring-cloud-dependencies:Brixton.RELEASE"
dependencies compile "org.springframework.cloud:spring-cloud-sleuth-stream" (2) compile "org.springframework.cloud:spring-cloud-starter-sleuth" (3) // Example for Rabbit binding compile "org.springframework.cloud:spring-cloud-stream-binder-rabbit" (4)
|
Spring Cloud Sleuth Stream Zipkin Collector
启动一个Spring Cloud Sleuth Stream Zipkin收集器只需要添加spring-cloud-sleuth-zipkin-stream依赖
- 为了不手动添加版本号,更好的方式是通过Spring BOM添加dependencymanagement
- 添加依赖到spring-cloud-sleuth-zipkin-stream
- 添加依赖到spring-cloud-starter-sleuth
- 添加一个binder(e.g.Rabbit binder)来告诉Spring Cloud Stream应该绑定什么
| <dependencyManagement> (1) <dependencies> <dependency> <groupId>org.springframework.cloud</groupId> <artifactId>spring-cloud-dependencies</artifactId> <version>Brixton.RELEASE</version> <type>pom</type> <scope>import</scope> </dependency> </dependencies> </dependencyManagement>
<dependency> (2) <groupId>org.springframework.cloud</groupId> <artifactId>spring-cloud-sleuth-zipkin-stream</artifactId> </dependency> <dependency> (3) <groupId>org.springframework.cloud</groupId> <artifactId>spring-cloud-starter-sleuth</artifactId> </dependency> <!-- EXAMPLE FOR RABBIT BINDING --> <dependency> (4) <groupId>org.springframework.cloud</groupId> <artifactId>spring-cloud-stream-binder-rabbit</artifactId> </dependency> |
- 为了不手动添加版本号,更好的方式是通过Spring BOM添加dependencymanagement
- 添加依赖到spring-cloud-sleuth-zipkin-stream
- 添加依赖到spring-cloud-starter-sleuth
- 添加一个binder(e.g.Rabbit binder)来告诉Spring Cloud Stream应该绑定什么
| dependencyManagement (1) imports mavenBom "org.springframework.cloud:spring-cloud-dependencies:Brixton.RELEASE"
dependencies compile "org.springframework.cloud:spring-cloud-sleuth-zipkin-stream" (2) compile "org.springframework.cloud:spring-cloud-starter-sleuth" (3) // Example for Rabbit binding compile "org.springframework.cloud:spring-cloud-stream-binder-rabbit" (4)
|
之后只需要在你的主类中添加@EnableZipkinStreamServer注解
| package example;
import org.springframework.boot.SpringApplication; import org.springframework.boot.autoconfigure.SpringBootApplication; import org.springframework.cloud.sleuth.zipkin.stream.EnableZipkinStreamServer;
@SpringBootApplication @EnableZipkinStreamServer public class ZipkinStreamServerApplication
public static void main(String[] args) throws Exception SpringApplication.run(ZipkinStreamServerApplication.class, args);
|
特点(Features)
添加trace和spanid到Slf4J MDC,然后就可以从一个给定的trace或span中提取所有的log,例如
| 2016-02-02 15:30:57.902 INFO [bar,6bfd228dc00d216b,6bfd228dc00d216b,false] 23030 --- [nio-8081-exec-3] ... 2016-02-02 15:30:58.372 ERROR [bar,6bfd228dc00d216b,6bfd228dc00d216b,false] 23030 --- [nio-8081-exec-3] ... 2016-02-02 15:31:01.936 INFO [bar,46ab0d418373cbc9,46ab0d418373cbc9,false] 23030 --- [nio-8081-exec-4] ... |
注意MDC中的[appname,traceId,spanId,exportable]:
- spanId - the id of a specific operation that took place
- appname - the name of the application that logged the span
- traceId - the id of the latency graph that contains the span
- exportable - whether the log should be exported to Zipkin or not. Whenwould you like the span not to be exportable? In the case in which you want towrap some operation in a Span and have it written to the logs only.
在通常的分布式追踪数据模型上提供一种抽象模型:traces、spans(生成一个DAG)、annotations、key-value annotations。基于HTrace是较为宽松的,但Zipkin(Dapper)更具兼容性
Sleuth记录时间信息来帮助延迟分析,使用Sleuth可以精确找到应用中延迟的原因,Sleuth不会log太多,因此不会导致你的应用挂掉
- propagatesstructural data about your call-graph in-band, and the rest out-of-band
- includesopinionated instrumentation of layers such as HTTP
- includessampling policy to manage volume
- canreport to a Zipkin system for query and visualization
使用Spring应用装备出入口点(servletfilter、async endpoints、rest template、scheduled actions、messagechannels、zuul filters、feign client)
Sleuth包含默认逻辑通过http或messaging boundaries来加入一个trace,例如,http传播通过Zipkin-compatiblerequest headers工作,这个传播逻辑定义和定制是通过SpanInjector和SpanExtractor实现提供简单的接受或放弃span
度量(metrics)
如果依赖了spring-cloud-sleuth-zipkin,应用将生成并收集Zipkin-compatible traces,一般会通过HTTP将这些traces发送给一个本地Zipkin服务器(port 9411),使用spring.zipkin.baseUrl来配置服务的地址
如果依赖了spring-cloud-sleuth-stream,应用将通过Spring Cloud Stream生成并收集traces,应用自动成为tracer消息的生产者,这些消息会通过你的中间件分发(e.g. RabbitMQ,Apache Kafka,Redis)
| 如果使用Zipkin或Stream,使用spring.sleuth.sampler.percentage配置输出spans的百分比(默认10%),不然你可能会认为Sleuth没有工作,因为他省略了一些spans |
| SLF4J MDC一直处于工作状态,logback用户可以在logs中立刻看到trace和span id,其他logging系统不得不配置他们自己的模式以得到相同的结果,默认logging.pattern.level设置为%clr(%5p) %clr([$spring.application.name:,%XX-B3-TraceId:-,%XX-B3-SpanId:-,%XX-Span-Export:-])yellow(对于logback用户,这是一种Spring Boot特征),这意味着如果你没有使用SLF4J这个模式将不会自动适用 |
抽样(Samling)
在分布式追踪时,数据量可能会非常大,因此抽样就变得非常重要(通常不需要导出所有的spans以得到事件发生原貌),Spring Cloud Sleuth有一个Sampler战略,即用户可以控制抽样算法,Samplers不会停止正在生成的span id(相关的),但他们会阻止tags和events附加和输出,默认 以上是关于Spring Cloud Sleuth使用简介的主要内容,如果未能解决你的问题,请参考以下文章