2.Prometheus邮件报警配置
Posted sanduzxcvbnm
tags:
篇首语:本文由小常识网(cha138.com)小编为大家整理,主要介绍了2.Prometheus邮件报警配置相关的知识,希望对你有一定的参考价值。
1、安装配置 Alertmanager
wget https://github.com/prometheus/alertmanager/releases/download/v0.20.0/alertmanager-0.20.0.linux-amd64.tar.gz
tar -zxv -f alertmanager-0.20.0.linux-amd64.tar.gz -C /usr/local
cd /usr/local
mv alertmanager-0.20.0.linux-amd64/ alertmanager
2,创建启动文件
vim /usr/lib/systemd/system/alertmanager.service

[Unit]
Description=alertmanager
Documentation=https://github.com/prometheus/alertmanager
After=network.target

[Service]
Type=simple
User=prometheus
ExecStart=/usr/local/alertmanager/alertmanager --config.file=/usr/local/alertmanager/alert-test.yml --storage.path=/usr/local/alertmanager/data
Restart=on-failure

[Install]
WantedBy=multi-user.target
Alertmanager 安装目录下默认有 alertmanager.yml 配置文件,可以创建新的配置文件,在启动时指定即可。
cd /usr/local/alertmanager
vim alert-test.yml
global:
  smtp_smarthost: ‘smtp.qiye.aliyun.com:25‘
  smtp_from: ‘jump@tongchuangkeji.net‘
  smtp_auth_username: ‘jump@tongchuangkeji.net‘
  smtp_auth_password: ‘xxxx‘
  smtp_require_tls: false

templates:
  - ‘/alertmanager/template/*.tmpl‘

route:
  group_by: [‘alertname‘, ‘cluster‘, ‘service‘]
  group_wait: 30s
  group_interval: 5m
  repeat_interval: 10m
  receiver: default-receiver

receivers:
- name: ‘default-receiver‘
  email_configs:
  - to: ‘liqilong@edspay.com‘
    html: ‘‘
    headers: {Subject: "[WARN] 报警邮件 test"}
邮箱一开始使用的是公司的邮箱,结果在后边验证的时候,总是会报错level=error ts=2019-01-26T06:21:59.062483579Z caller=notify.go:332 component=dispatcher msg="Error on notify" err="*smtp.plainAuth failed: unencrypted connection",也在这里看了一些人踩坑的报告,试验了25、465、587端口,发现均无效果,最后改成163邮箱,直接就生效了。
- smtp_smarthost:是用于发送邮件的邮箱的 SMTP 服务器地址+端口;
- smtp_auth_password:是发送邮箱的授权码而不是登录密码;
- smtp_require_tls:不设置的话默认为 true,当为 true 时会有 starttls 错误,为了简单这里设置为 false;
- templates:指出邮件的模板路径;
- receivers 下 html 指出邮件内容模板名,这里模板名为 “alert.html”,在模板路径中的某个文件中定义。
- headers:为邮件标题;
使用阿里云企业邮箱无法发送邮件,报错如下:
Jun 11 13:40:52 worker alertmanager: level=error ts=2020-06-11T05:40:52.638Z caller=notify.go:372 component=dispatcher msg="Error on notify" err="*smtp.plainAuth auth: unencrypted connection" context_err="context deadline exceeded"
Jun 11 13:40:52 worker alertmanager: level=error ts=2020-06-11T05:40:52.638Z caller=dispatch.go:301 component=dispatcher msg="Notify for alerts failed" num_alerts=1 err="*smtp.plainAuth auth: unencrypted connection"
3,配置告警规则
配置 rule.yml。
cd /usr/local/prometheus
vim rule.yml
groups:
- name: alert-rules.yml
  rules:
  - alert: InstanceStatus # alert 名字
    expr: up{job="192.168.75.10"} == 0 # 判断条件,job是指prometheus.yml文件中的job_name
    for: 10s # 条件保持 10s 才会发出 alter
    labels: # 设置 alert 的标签
      severity: "critical"
    annotations:  # alert 的其他标签,但不用于标识 alert
      description: 服务器  已当机超过 20s
      summary: 服务器  运行状态
在 prometheus.yml 中指定 rule.yml 的路径
cat prometheus.yml

# my global config
global:
  scrape_interval:     15s # Set the scrape interval to every 15 seconds. Default is every 1 minute.
  evaluation_interval: 15s # Evaluate rules every 15 seconds. The default is every 1 minute.
  # scrape_timeout is set to the global default (10s).

# Alertmanager configuration
alerting:
  alertmanagers:
  - static_configs:
    - targets:
      - localhost:9093 # 这里修改为 localhost,# 新增

# Load rules once and periodically evaluate them according to the global ‘evaluation_interval‘.
rule_files:
  # - "first_rules.yml"
  # - "second_rules.yml"
  - "/usr/local/prometheus/rule.yml" # 新增

# A scrape configuration containing exactly one endpoint to scrape:
# Here it‘s Prometheus itself.
scrape_configs:
  # The job name is added as a label `job=<job_name>` to any timeseries scraped from this config.
  - job_name: ‘192.168.75.11‘

    # metrics_path defaults to ‘/metrics‘
    # scheme defaults to ‘http‘.

    static_configs:
    - targets: [‘localhost:9090‘,‘localhost:9100‘]

  - job_name: ‘192.168.75.10‘
    scrape_interval: 5s
    static_configs:
    - targets: [‘192.168.75.10:9100‘]
重启 Prometheus 服务:
chown -R prometheus.prometheus /usr/local/prometheus/rule.yml
systemctl restart prometheus
4,编写邮件模板
注意:文件后缀为 tmpl
mkdir -pv /alertmanager/template/ # 路径跟上面的alertmanager.yml 配置文件保持一致
vim /alertmanager/template/alert.tmpl
<table>
	<tr><td>报警名</td><td>开始时间</td></tr>
	<tr><td></td><td></td></tr>
</table>
注意:启动的时候报错如下:
Jun 11 12:55:44 worker alertmanager: level=error ts=2020-06-11T04:55:44.744Z caller=main.go:236 msg="Unable to create data directory" err="mkdir data/: permission denied"
Jun 11 12:55:44 worker systemd: alertmanager.service: main process exited, code=exited, status=1/FAILURE
Jun 11 12:55:44 worker systemd: Unit alertmanager.service entered failed state.
Jun 11 12:55:44 worker systemd: alertmanager.service failed.
Jun 11 12:55:44 worker systemd: alertmanager.service holdoff time over, scheduling restart.
Jun 11 12:55:44 worker systemd: Stopped alertmanager.
这是因为在新版本中默认情况下存储路径
--storage.path是相对目录data/,但是prometheus用户在该路径下没权限创建目录,所以导致启动报错
解决办法:在alertmanager.service文件中指定默认存储路径在当前路径下即可
5,启动 Alertmanager
chown -R prometheus.prometheus /usr/local/alertmanager
systemctl daemon-reload
systemctl start alertmanager.service
systemctl status alertmanager.service
ss -tnl|grep 9093
6,验证效果
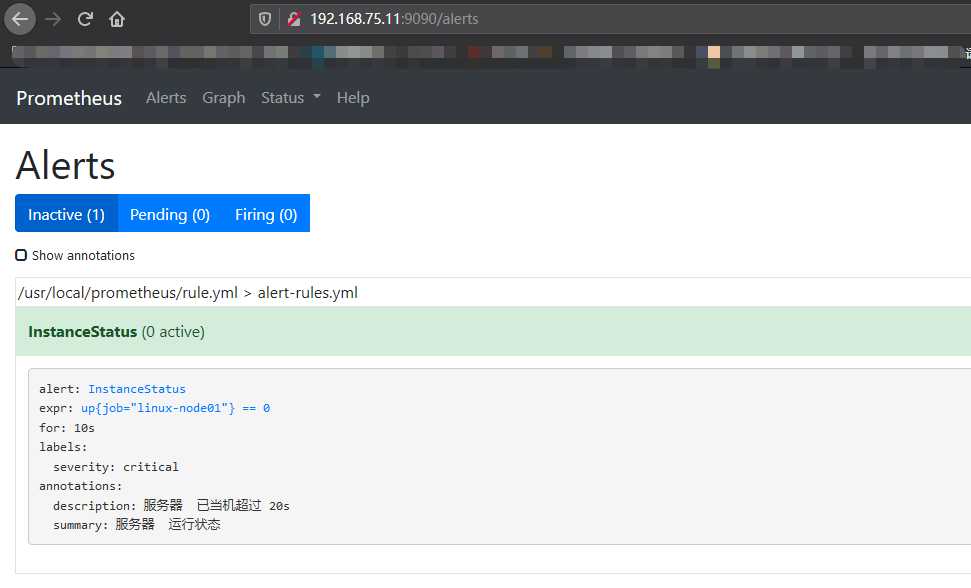
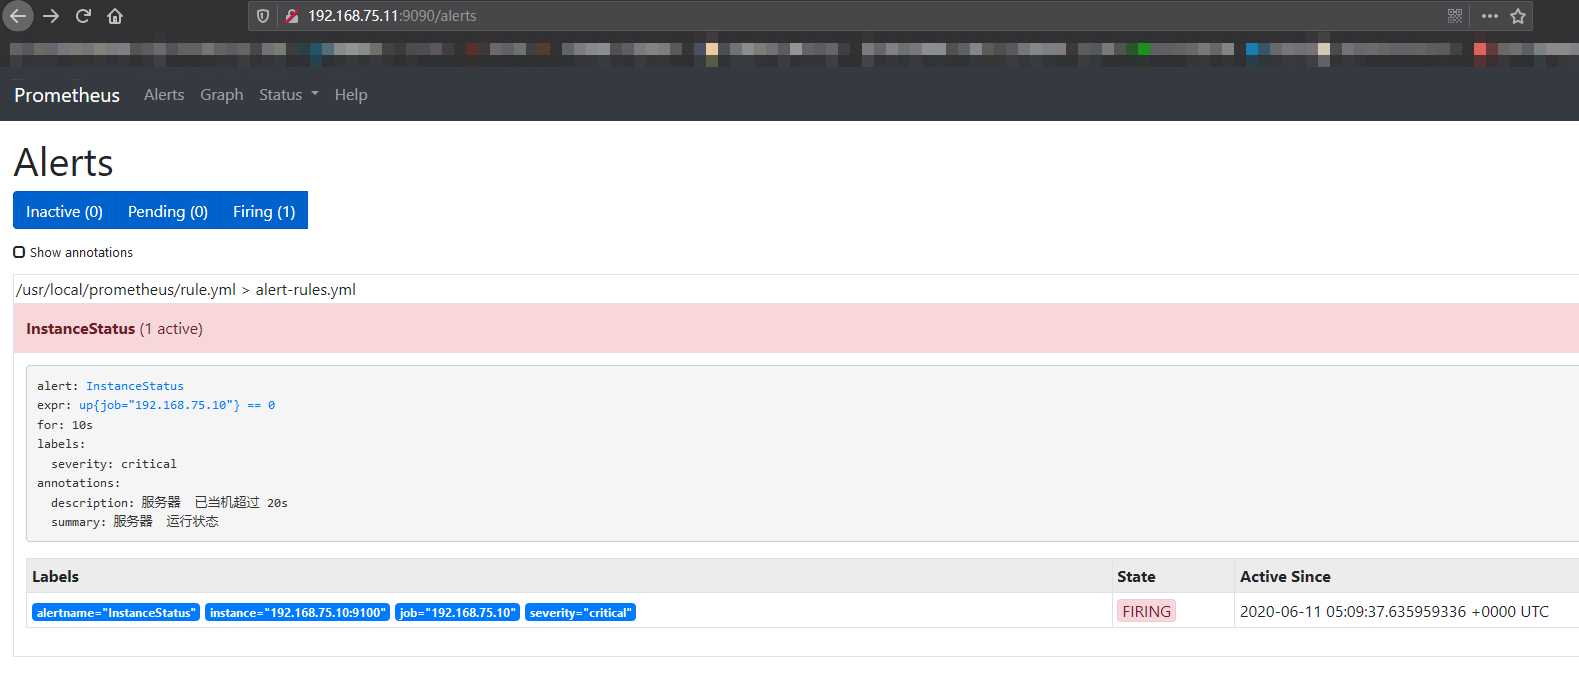
此时到管理界面可以看到如下信息:

然后停止192.168.75.10节点上的 node_exporter 服务,然后再看效果。

接着邮箱应该会收到邮件:
略
以上是关于2.Prometheus邮件报警配置的主要内容,如果未能解决你的问题,请参考以下文章