并发编程之Semaphore源码解析
Posted housh
tags:
篇首语:本文由小常识网(cha138.com)小编为大家整理,主要介绍了并发编程之Semaphore源码解析相关的知识,希望对你有一定的参考价值。
一 什么是Semaphore、Semaphore用来做什么
semaphore是计数信号量,可用于多线程并发执行时,限制获取资源的线程数量。常用场景为:限流。
二 Semaphore用法

 1 public class SemaphoreTest {
 2
 3     public static void main(String[] args) {
 4         // 声明5个窗口  state:  资源数
 5         Semaphore semaphore = new Semaphore(3);
 6
 7         for (int i = 0; i < 3; i++) {
 8             new Thread(new Runnable() {
 9                 @Override
10                 public void run() {
11                     try {
12                         // 占用窗口
13                         semaphore.acquire(2);
14                         System.out.println(Thread.currentThread().getName() + ": 开始买票");
15                         //模拟买票流程
16                         Thread.sleep(5000);
17                         System.out.println(Thread.currentThread().getName() + ": 购票成功");
18                         // 释放窗口
19                         semaphore.release(2);
20                     } catch (InterruptedException e) {
21                         e.printStackTrace();
22                     }
23                 }
24             }).start();
25         }
26     }
27 }
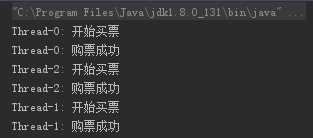
执行结果为:

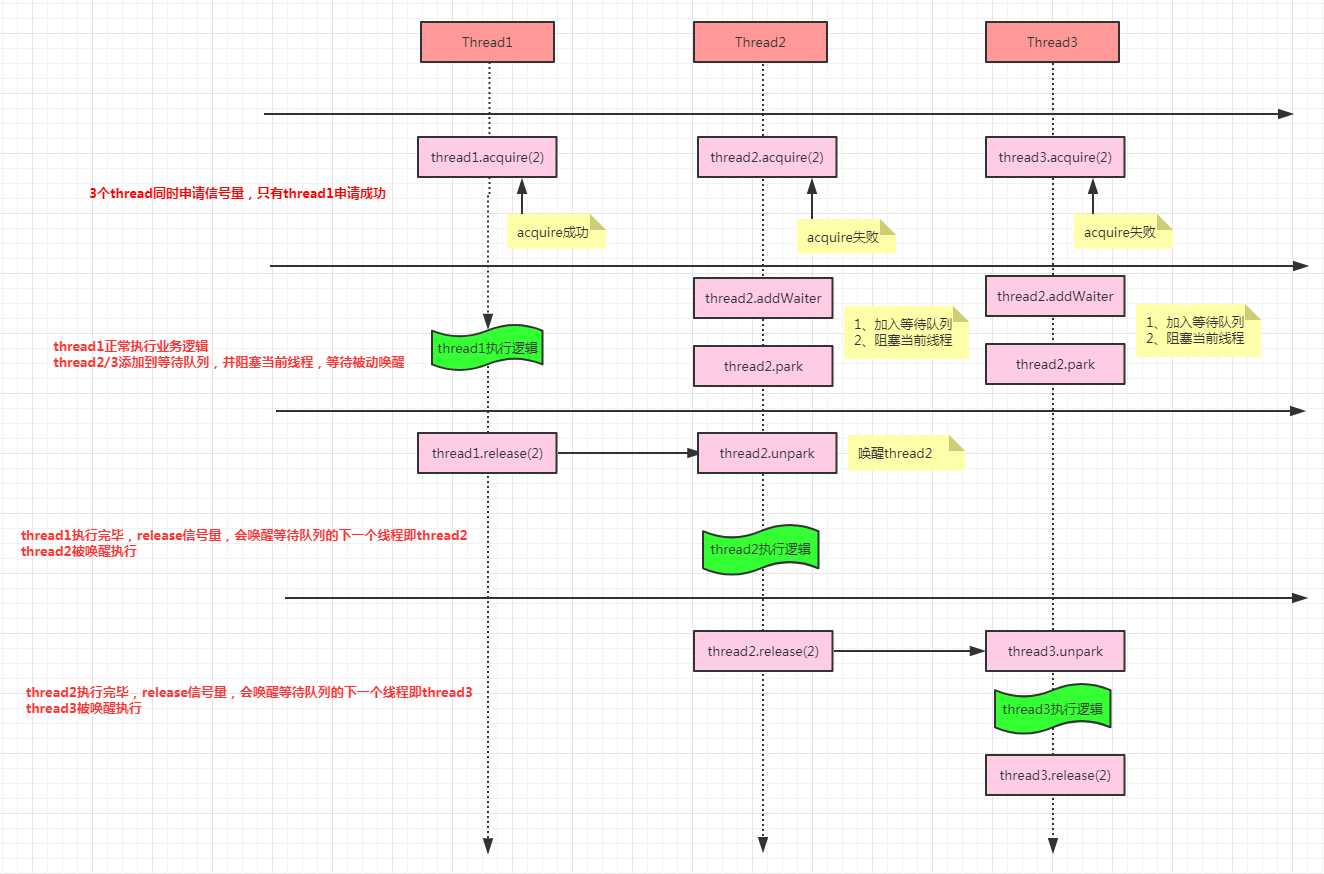
为什么会出现这种情况呢?

三 Semaphore源码解析
看上图执行结果和执行过程,我们会提出三个疑问:
1、Semaphore如何获取信号量
2、Semaphore获取信号量失败,又如何进入等待队列
3、等待队列线程如何阻塞的
4、release信号量时,又如何唤醒下一个线程的。

看上图可以解答如何获取信号量、获取信号量失败时如何添加到等待队列
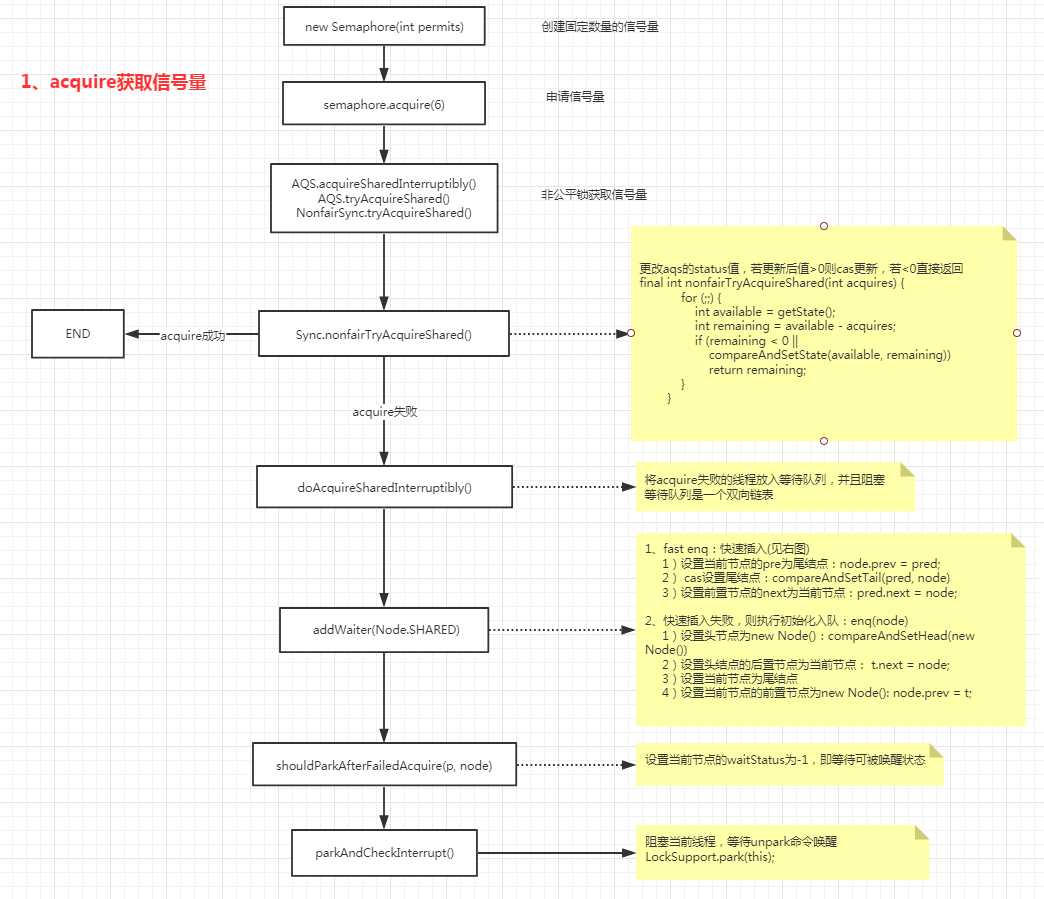
1、Semaphore如何获取信号量
核心逻辑在Sync.nonfairTryAcquireShared()方法,首先getState(),state为volatitle变量,remaining>0且cas更新成功,代表获取信号量成功

 1 abstract static class Sync extends AbstractQueuedSynchronizer {
 2         final int nonfairTryAcquireShared(int acquires) {
 3             for (;;) {
 4                 int available = getState();
 5                 int remaining = available - acquires;
 6                 if (remaining < 0 ||
 7                     compareAndSetState(available, remaining))
 8                     return remaining;
 9             }
10         }
11 }
2、Semaphore获取信号量失败,又如何进入等待队列
首先等待队列是一个双向链表。
thread2插入的时候,链表为空,需要初始化head节点,然后把thread2放到head节点的next
thread3,可以快速插入,放到thread2的next节点。

 1 private Node addWaiter(Node mode) {
 2 // 以给定的模式来构建节点, mode有两种模式
 3 // 共享式SHARED, 独占式EXCLUSIVE;
 4  Node node = new Node(Thread.currentThread(), mode);
 5   // 尝试快速将该节点加入到队列的尾部
 6   Node pred = tail;
 7   if (pred != null) {
 8     node.prev = pred;
 9       if (compareAndSetTail(pred, node)) {
10         pred.next = node;
11         return node;
12      }
13    }
14     // 如果快速加入失败,则通过 anq方式入列
15     enq(node);
16     return node;
17  }
18 private Node enq(final Node node) {
19 // CAS自旋,直到加入队尾成功
20 for (;;) {
21   Node t = tail;
22     if (t == null) { // 如果队列为空,则必须先初始化CLH队列,新建一个空节点标识作为
23 Hader节点,并将tail 指向它
24       if (compareAndSetHead(new Node()))
25         tail = head;
26      } else {// 正常流程,加入队列尾部
27         node.prev = t;
28           if (compareAndSetTail(t, node)) {
29             t.next = node;
30             return t;
31        }
32 出队操作
33 同步队列(CLH)遵循FIFO,首节点是获取同步状态的节点,首节点的线程释放同步状态后,将会唤醒
34 它的后继节点(next),而后继节点将会在获取同步状态成功时将自己设置为首节点
35 Condition队列
36 Condition 将 Object 监视器方法(wait、notify 和 notifyAll)分解成截然不同的对象,以便通过将这些
37 对象与任意 Lock 实现组合使用,为每个对象提供多个等待 set(wait-set)。其中,Lock 替代了
38 synchronized 方法和语句的使用,Condition 替代了 Object 监视器方法的使用。
39      }
40    }
41  }

3、等待队列线程如何阻塞的
加入等待队列成功后,调用shouldParkAfterFailedAcquire方法把等待队列waitStatus置为-1(等待被通知执行状态),然后调用parkAndCheckInterrupt方法阻塞当前线程。

1  private final boolean parkAndCheckInterrupt() {
2         LockSupport.park(this);
3         return Thread.interrupted();
4     }
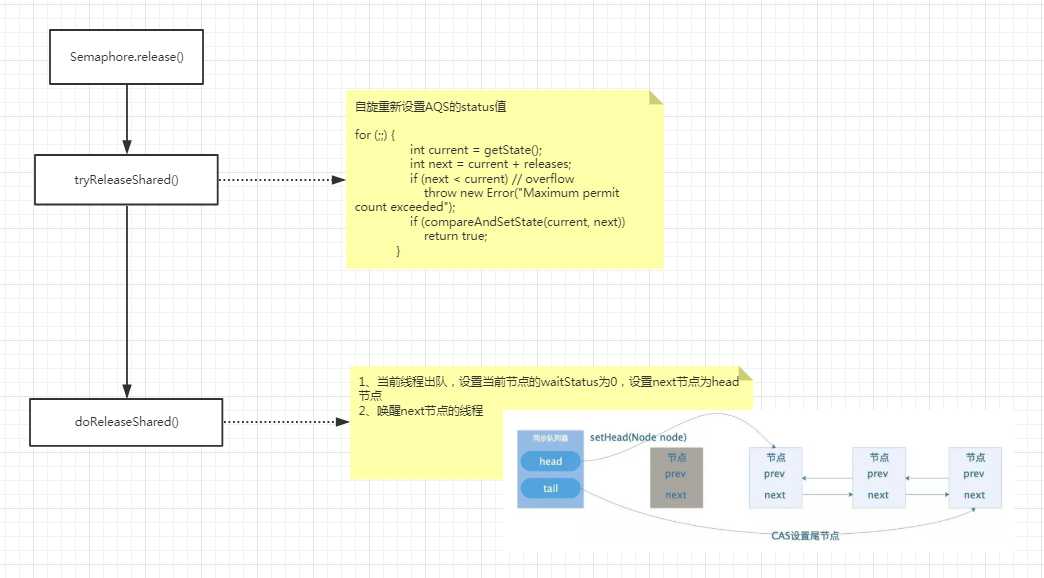
4、release信号量时,又如何唤醒下一个线程的
1、自旋为aqs的state值cas添加释放的信号量

 1 protected final boolean tryReleaseShared(int releases) {
 2             for (;;) {
 3                 int current = getState();
 4                 int next = current + releases;
 5                 if (next < current) // overflow
 6                     throw new Error("Maximum permit count exceeded");
 7                 if (compareAndSetState(current, next))
 8                     return true;
 9             }
10         }
2、当前线程出队,next节点为head节点,并且唤醒next线程

 1 private void doReleaseShared() {
 2 //移除当前节点,设置next接单为head
 3         for (;;) {
 4             Node h = head;
 5             if (h != null && h != tail) {
 6                 int ws = h.waitStatus;
 7                 if (ws == Node.SIGNAL) {
 8                     if (!compareAndSetWaitStatus(h, Node.SIGNAL, 0))
 9                         continue;            // loop to recheck cases
10                    //唤醒next线程
11                     unparkSuccessor(h);
12                 }
13                 else if (ws == 0 &&
14                          !compareAndSetWaitStatus(h, 0, Node.PROPAGATE))
15                     continue;                // loop on failed CAS
16             }
17             if (h == head)                   // loop if head changed
18                 break;
19         }
20     }
unparkSuccessor---->LockSupport.unpark(s.thread);

以上是关于并发编程之Semaphore源码解析的主要内容,如果未能解决你的问题,请参考以下文章
