架构师内功心法,连接两个空间维度的桥接模式详解
Posted 1994july
tags:
篇首语:本文由小常识网(cha138.com)小编为大家整理,主要介绍了架构师内功心法,连接两个空间维度的桥接模式详解相关的知识,希望对你有一定的参考价值。
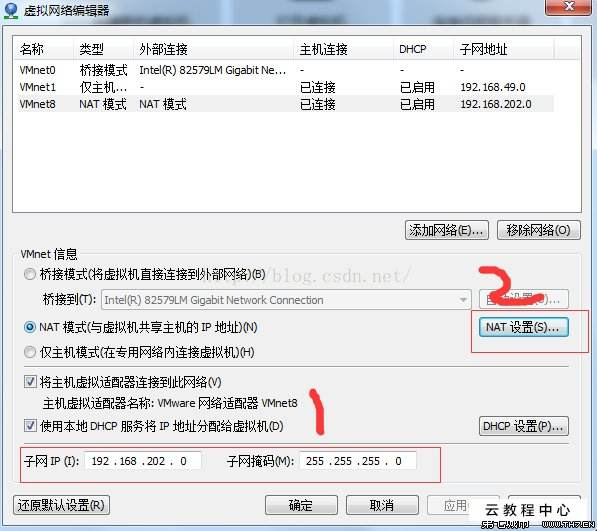
在现实生活中的桥接模式也随处可见,比如连接两个空间维度的桥,连接虚拟网络与真实网络的连接。 

桥接模式(Bridge Pattern)也成为桥梁模式、接口模式或柄体(Handle And Body)模式,是将抽象部分与它的具体实现部分分离,使得它们都可以独立地变化。
一、桥接模式的应用场景
桥接模式主要目的是通过组合的方式建立两个类之间的联系,而不是继承。但又类似于多重继承方案,但是多重继承方案又违背了类的单一职责原则,其复用性比较差,桥接模式是比多重继承更好的替代方案。桥接模式的核心在于解耦抽象和实现。
1.1 桥接模式的角色
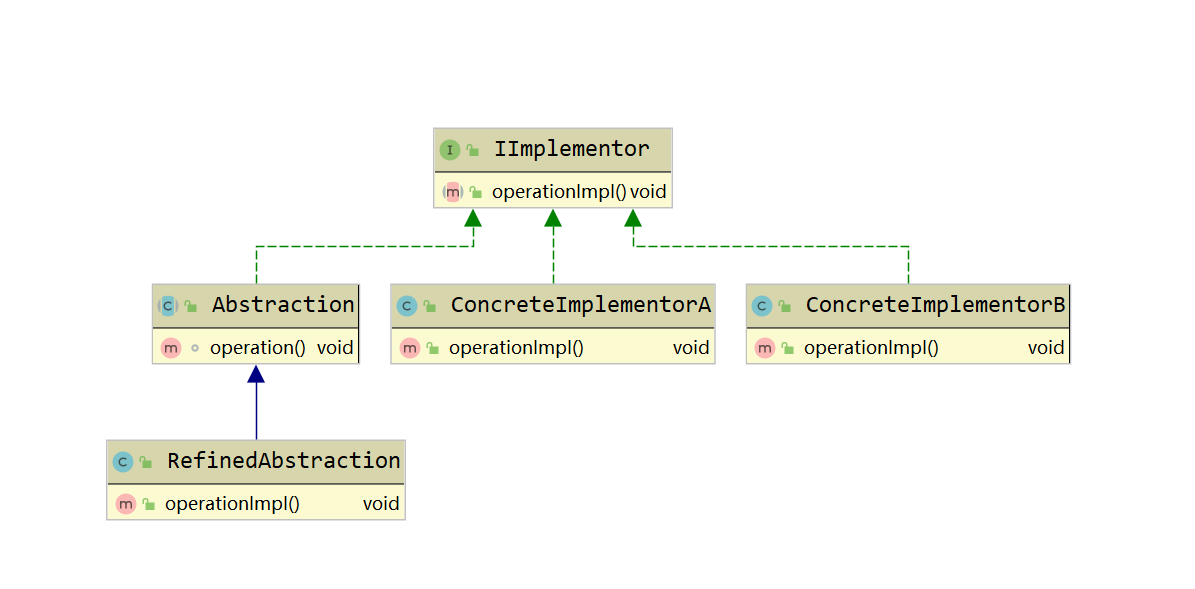
接下来我们看下桥接模式通用的UML图:

从UML图中可以看出桥接模式主要包含四种角色:
- 抽象(Abstraciton):该类持有一个对实现角色的引用,抽象角色中的方法需要实现角色来实现。抽象角色一般就是抽象类(构造函数规定子类要传入一个实现对象);
- 修正抽象(RefinedAbstraction):抽象的具体实现,对抽象类方法进行扩展和完善。
- 实现(Implementor):确定实现维度的基本操作,提供给抽象类使用。该类一般为抽象类或接口。
- 具体实现(ConcreteImplementor):实现类(Implementor)的具体实现。
下面来看具体实现的代码:
首先创建抽象 Abstraction 类:
public abstract class Abstraction {

    protected IImplementor iImplementor;

    public Abstraction(IImplementor iImplementor) {
        this.iImplementor = iImplementor;
    }

    void operation(){
        this.iImplementor.operationImpl();
    }

}
创建修正抽象 RefinedAbstraction 类:
public class RefinedAbstraction extends Abstraction {

    public RefinedAbstraction(IImplementor iImplementor) {
        super(iImplementor);
    }

    @Override
    void operation(){
        super.operation();
        System.out.println("refined operation");
    }

}
创建角色实现 IImplementor 接口:
public interface IImplementor {

    void operationImpl();
}
创建具体实现ConcreteImplementorA、ConcreteImplementorB 类:
public class ConcreteImplementorA implements IImplementor {
    @Override
    public void operationImpl() {
        System.out.println("concreteImplementor A");
    }
}
public class ConcreteImplementorB implements IImplementor {
    @Override
    public void operationImpl() {
        System.out.println("concreteImplementor B");
    }
}
测试main方法:
   public static void main(String[] args) {

    IImplementor iImplementorA = new ConcreteImplementorA();
    IImplementor iImplementorB = new ConcreteImplementorB();

    Abstraction absA = new RefinedAbstraction(iImplementorA);
    Abstraction absB = new RefinedAbstraction(iImplementorB);

    absA.operation();
    absB.operation();
}
桥接模式有以下几个应用场景:
- 在抽象和具体实现之间需要增加更多灵活性的场景;
- 一个类存在两个(或多个)独立变化的维度,而这两个(或多个)维度都需要独立进行扩展;
- 不希望使用继承,或因为多层继承导致系统类的个数剧增。
1.2 桥接模式的业务实现案例
我们在平时办公的时候经常需要通过发送邮件消息、钉钉消息或者系统内消息和同事进行沟通。尤其是在使用一些流程审批的时候,我们需要记录这些过程以备查。可以根据消息的类型来进行划分,可以分为邮件消息,钉钉消息和系统内消息。但是,如果根据消息的紧急程度来划分的话,可以分为普通消息、紧急消息和特急消息。显然,整个消息系统可以划分为两个大维度。
如果使用继承的话情况就复杂了,而且不利于扩展。邮件信息可以是普通的,也可以是紧急的;钉钉消息可以是普通的,也可以是紧急的。下面使用桥接模式解决这类问题:
首先创建一个IMessage接口担任桥接的角色:
/**
 * 实现消息发送的统一接口
 */
public interface IMessage {

    /**
     * 发送消息
     * @param message
     *                  内容
     * @param user
     *                  接收人
     */
   public void send(String message, String user);
}
创建邮件消息类实现IMessage接口:
/**
 * 邮件信息实现类
 */
public class EmailMessage implements IMessage {
    @Override
    public void send(String message, String user) {
        System.out.println(String.format("使用邮件的方式发送消息 %s 给 %s", message, user));
    }
}
创建钉钉消息类也实现IMessage接口:
/**
 * 钉钉信息实现类
 */
public class DingMessage implements IMessage {
    @Override
    public void send(String message, String user) {
        System.out.println(String.format("使用钉钉的方式发送消息 %s 给 %s", message, user));
    }
}
然后在创建抽象角色 AbstractMessage 类,
/**
 * 抽象消息类
 */
public abstract class AbstractMessage {

    //实现对象
    IMessage message;

    //构造方法传入实现部分的对象
    public AbstractMessage(IMessage message) {
        this.message = message;
    }

    /**
     * 发送消息,委派给实现对象的方法
     * @param message
     * @param user
     */
    public void sendMessage(String message, String user) {
        this.message.send(message, user);
    }
}
创建具体的普通消息实现 NormalMessage 类:
/**
 * 普通消息类
 */
public class NormalMessage extends AbstractMessage {

    //构造方法传入实现的对象
    public NormalMessage(IMessage message) {
        super(message);
    }

    /**
     * 发送消息,直接调用父类的方法即可
     * @param message
     * @param user
     */
    public void sendMessage(String message, String user) {
        super.sendMessage(message, user);
    }
}
创建具体的紧急消息实现 UrgencyMessage 类:
/**
 * 紧急消息类
 */
public class UngencyMessage extends AbstractMessage {
    public UngencyMessage(IMessage message) {
        super(message);
    }

    /**
     * 发送消息,直接调用父类的方法即可
     * @param message
     * @param user
     */
    public void sendMessage(String message, String user) {
        super.sendMessage(message, user);
    }

    /**
     * 扩展自己的功能,监控消息的状态
     * @param messageId
     * @return
     */
    public Object watch(String messageId) {
        return null;
    }
}
测试main方法:
public static void main(String[] args) {

    IMessage message = new EmailMessage();
    AbstractMessage abstractMessage = new NormalMessage(message);
    abstractMessage.sendMessage("周末加班申请", "张三");

    message = new DingMessage();
    abstractMessage = new UngencyMessage(message);
    abstractMessage.sendMessage("请假申请", "李四");
}
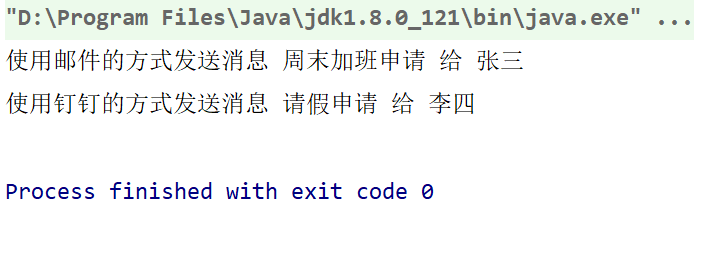
运行结果:

在上面的案例中,我们采用了桥接模式解耦了“消息类型”和“消息紧急程度”这两个独立变化的维度。如果需要扩展这两个维度的内容,按照上述代码的方式进行扩展就好了。
二、桥接模式的源码体现
JDBC中的Driver类
我们都非常熟悉JDBC的API,其中有个Driver类就是桥接类。在使用的时候通过Class.forName() 方法可以动态的加载各个数据库厂商实现的Driver类。具体代码我们以mysql客户端为例:
private Vector<Connection> pool;
private String url = "jdbc:mysql://localhost:3306/testDB";
private String username = "root";
private String password = "123456";
private String driverClassName = "com.mysql.jdbc.Driver";
private int poolSize = 100;
public ConnectionPool() {
    pool = new Vector<Connection>(poolSize);
    try{
        Class.forName(driverClassName);
        for (int i = 0; i < poolSize; i++) {
            Connection conn = DriverManager.getConnection(url,username,password);
            pool.add(conn);
        }
    }catch (Exception e){
        e.printStackTrace();
    }
}
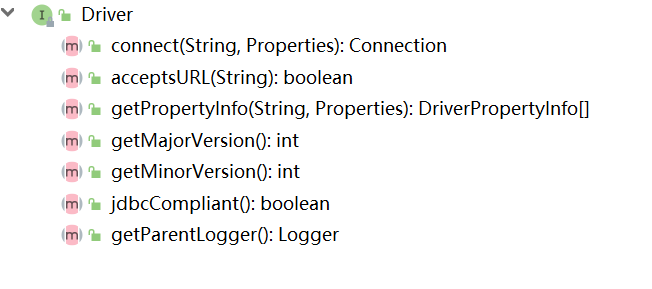
首先来看一下Driver接口的定义:

Driver在JDBC中并没有做任何实现,具体的功能实现由各厂商完成,我们以Mysql为例:
public class Driver extends NonRegisteringDriver implements java.sql.Driver {
    public Driver() throws SQLExeption {}
    static {
        try {
            DriverManager.registerDriver(new Driver()) ;
        } catch (SQLE xception var1) {
            throw new RuntimeExcept ion("Can‘t register driver!");
        }
    }
}
当我们执行Class.forName("com.mysql.jdbc.Driver")方法的时候,就会执行上面类的静态块中的代码。而静态块只是调用了DriverManager的registerDriver()方法,然后将Driver对象注册到DriverManager中。接下来看一下DriverManager中相关的源代码:
/**
     * Registers the given driver with the {@code DriverManager}.
     * A newly-loaded driver class should call
     * the method {@code registerDriver} to make itself
     * known to the {@code DriverManager}. If the driver is currently
     * registered, no action is taken.
     *
     * @param driver the new JDBC Driver that is to be registered with the
     *               {@code DriverManager}
     * @exception SQLException if a database access error occurs
     * @exception NullPointerException if {@code driver} is null
     */
    public static synchronized void registerDriver(java.sql.Driver driver)
        throws SQLException {

        registerDriver(driver, null);
    }

    /**
     * Registers the given driver with the {@code DriverManager}.
     * A newly-loaded driver class should call
     * the method {@code registerDriver} to make itself
     * known to the {@code DriverManager}. If the driver is currently
     * registered, no action is taken.
     *
     * @param driver the new JDBC Driver that is to be registered with the
     *               {@code DriverManager}
     * @param da     the {@code DriverAction} implementation to be used when
     *               {@code DriverManager#deregisterDriver} is called
     * @exception SQLException if a database access error occurs
     * @exception NullPointerException if {@code driver} is null
     * @since 1.8
     */
    public static synchronized void registerDriver(java.sql.Driver driver,
            DriverAction da)
        throws SQLException {

        /* Register the driver if it has not already been added to our list */
        if(driver != null) {
            registeredDrivers.addIfAbsent(new DriverInfo(driver, da));
        } else {
            // This is for compatibility with the original DriverManager
            throw new NullPointerException();
        }

        println("registerDriver: " + driver);

    }
在注册之前,将传递过来的Driver对象封装成一个DriverInfo对象。接下来调用DriverManager中的getConnection() 方法获得连接对象,看下源代码:
/**
     * Attempts to establish a connection to the given database URL.
     * The <code>DriverManager</code> attempts to select an appropriate driver from
     * the set of registered JDBC drivers.
     *<p>
     * <B>Note:</B> If a property is specified as part of the {@code url} and
     * is also specified in the {@code Properties} object, it is
     * implementation-defined as to which value will take precedence.
     * For maximum portability, an application should only specify a
     * property once.
     *
     * @param url a database url of the form
     * <code> jdbc:<em>subprotocol</em>:<em>subname</em></code>
     * @param info a list of arbitrary string tag/value pairs as
     * connection arguments; normally at least a "user" and
     * "password" property should be included
     * @return a Connection to the URL
     * @exception SQLException if a database access error occurs or the url is
     * {@code null}
     * @throws SQLTimeoutException  when the driver has determined that the
     * timeout value specified by the {@code setLoginTimeout} method
     * has been exceeded and has at least tried to cancel the
     * current database connection attempt
     */
    @CallerSensitive
    public static Connection getConnection(String url,
        java.util.Properties info) throws SQLException {

        return (getConnection(url, info, Reflection.getCallerClass()));
    }

    /**
     * Attempts to establish a connection to the given database URL.
     * The <code>DriverManager</code> attempts to select an appropriate driver from
     * the set of registered JDBC drivers.
     *<p>
     * <B>Note:</B> If the {@code user} or {@code password} property are
     * also specified as part of the {@code url}, it is
     * implementation-defined as to which value will take precedence.
     * For maximum portability, an application should only specify a
     * property once.
     *
     * @param url a database url of the form
     * <code>jdbc:<em>subprotocol</em>:<em>subname</em></code>
     * @param user the database user on whose behalf the connection is being
     *   made
     * @param password the user‘s password
     * @return a connection to the URL
     * @exception SQLException if a database access error occurs or the url is
     * {@code null}
     * @throws SQLTimeoutException  when the driver has determined that the
     * timeout value specified by the {@code setLoginTimeout} method
     * has been exceeded and has at least tried to cancel the
     * current database connection attempt
     */
    @CallerSensitive
    public static Connection getConnection(String url,
        String user, String password) throws SQLException {
        java.util.Properties info = new java.util.Properties();

        if (user != null) {
            info.put("user", user);
        }
        if (password != null) {
            info.put("password", password);
        }

        return (getConnection(url, info, Reflection.getCallerClass()));
    }

    /**
     * Attempts to establish a connection to the given database URL.
     * The <code>DriverManager</code> attempts to select an appropriate driver from
     * the set of registered JDBC drivers.
     *
     * @param url a database url of the form
     *  <code> jdbc:<em>subprotocol</em>:<em>subname</em></code>
     * @return a connection to the URL
     * @exception SQLException if a database access error occurs or the url is
     * {@code null}
     * @throws SQLTimeoutException  when the driver has determined that the
     * timeout value specified by the {@code setLoginTimeout} method
     * has been exceeded and has at least tried to cancel the
     * current database connection attempt
     */
    @CallerSensitive
    public static Connection getConnection(String url)
        throws SQLException {

        java.util.Properties info = new java.util.Properties();
        return (getConnection(url, info, Reflection.getCallerClass()));
    }

private static Connection getConnection(
        String url, java.util.Properties info, Class<?> caller) throws SQLException {
        /*
         * When callerCl is null, we should check the application‘s
         * (which is invoking this class indirectly)
         * classloader, so that the JDBC driver class outside rt.jar
         * can be loaded from here.
         */
        ClassLoader callerCL = caller != null ? caller.getClassLoader() : null;
        synchronized(DriverManager.class) {
            // synchronize loading of the correct classloader.
            if (callerCL == null) {
                callerCL = Thread.currentThread().getContextClassLoader();
            }
        }

        if(url == null) {
            throw new SQLException("The url cannot be null", "08001");
        }

        println("DriverManager.getConnection("" + url + "")");

        // Walk through the loaded registeredDrivers attempting to make a connection.
        // Remember the first exception that gets raised so we can reraise it.
        SQLException reason = null;

        for(DriverInfo aDriver : registeredDrivers) {
            // If the caller does not have permission to load the driver then
            // skip it.
            if(isDriverAllowed(aDriver.driver, callerCL)) {
                try {
                    println("    trying " + aDriver.driver.getClass().getName());
                    Connection con = aDriver.driver.connect(url, info);
                    if (con != null) {
                        // Success!
                        println("getConnection returning " + aDriver.driver.getClass().getName());
                        return (con);
                    }
                } catch (SQLException ex) {
                    if (reason == null) {
                        reason = ex;
                    }
                }

            } else {
                println("    skipping: " + aDriver.getClass().getName());
            }

        }

        // if we got here nobody could connect.
        if (reason != null)    {
            println("getConnection failed: " + reason);
            throw reason;
        }

        println("getConnection: no suitable driver found for "+ url);
        throw new SQLException("No suitable driver found for "+ url, "08001");
    }
在getConnection()中又会调用各自厂商实现的Driver的Connect()方法获得连接对象。这样巧妙的避开了使用继承,为不同的数据库提供了相同的接口。
三、桥接模式的优缺点
桥接模式很好的遵循了里氏替换原则和依赖倒置原则,最终实现了开闭原则,对修改关闭,对扩展开发。优缺点总结如下:
优点:
- 分离抽象部分及其具体实现部分;
- 提高系统的扩展性;
- 符合开闭原则;
- 符合合成复原则。
缺点:
- 增加系统的设计和理解难度;
- 需要正确识别系统中两个独立变化的维度
来源:迅闻网
以上是关于架构师内功心法,连接两个空间维度的桥接模式详解的主要内容,如果未能解决你的问题,请参考以下文章