20182301 2019-2020-1 《数据结构与面向对象程序设计》实验6报告
Posted zhaopeining
tags:
篇首语:本文由小常识网(cha138.com)小编为大家整理,主要介绍了20182301 2019-2020-1 《数据结构与面向对象程序设计》实验6报告相关的知识,希望对你有一定的参考价值。
20182301 2019-2020-1 《数据结构与面向对象程序设计》实验6报告
课程:《程序设计与数据结构》
班级: 1823
姓名: 赵沛凝
学号:20182301
实验教师:王志强
实验日期:2019年10月23日
必修/选修: 必修
1.实验内容
- 链表练习,要求实现下列功能:
- 通过键盘输入一些整数,建立一个链表;这些数是你学号中依次取出的两位数,再加上今天的时间。例如你的学号是 20172301,今天时间是 2018/10/1, 16:23:49。数字就是:20, 17,23,1, 20, 18,10,1,16,23,49打印所有链表元素, 并输出元素的总数。
- 在你的程序中,请用一个特殊变量名来纪录元素的总数,变量名就是你的名字。 例如你叫 张三, 那么这个变量名就是:int nZhangSan = 0; //初始化为 0.
- 做完这一步,把你的程序签入源代码控制(git push)。
- 链表练习,要求实现下列功能:
- 实现节点插入、删除、输出操作;
- 继续你上一个程序, 扩展它的功能,每做完一个新功能,或者写了超过10行新代码,就签入代码,提交到源代码服务器;
- 从磁盘读取一个文件, 这个文件有两个数字。
- 从文件中读入数字1, 插入到链表第 5 位,并打印所有数字,和元素的总数。 保留这个链表,继续下面的操作。
- 从文件中读入数字2, 插入到链表第 0 位,并打印所有数字,和元素的总数。 保留这个链表,并继续下面的操作。
- 从链表中删除刚才的数字1. 并打印所有数字和元素的总数。
- 链表练习,要求实现下列功能:
- 使用冒泡排序法或者选择排序法根据数值大小对链表进行排序;
- 如果你学号是单数, 选择冒泡排序, 否则选择选择排序。
- 在排序的每一个轮次中, 打印元素的总数,和目前链表的所有元素。
- 在(2)得到的程序中继续扩展,用同一个程序文件,写不同的函数来实现这个功能。 仍然用 nZhangSan (你的名字)来表示元素的总数。
在android上实现实验(1)和(2)
在android平台上实现实验(3)
2. 实验过程及结果
第一个:
首先,将一个字符串,进行分割,代码如下:
        String[] arr = str.split(","); // 用,分割
        System.out.println(Arrays.toString(arr)); // [0, 1, 2, 3, 4, 5]
        NumNode head = new NumNode(Integer.valueOf(arr[0]));
        int[] intss=new int[20];
        intss=StringToInt(arr);

        for(int i=1;i<10;i++){
            NumNode x = new NumNode(intss[i]);
            AddTrail(head,x);
        }
然后将字符转为数字,代码如下:
public static int[] StringToInt(String[] arrs){
    int[] ints = new int[arrs.length];
   for(int i=0;i<arrs.length;i++){
   ints[i] = Integer.parseInt(arrs[i]);
   }
第二个
- 首先就是要从磁盘里读取文件里的数字,我一开始并没有头绪,再复习过FileTest这个代码,有关于文件输入、输出的,就有了想法:
- 找到文件—>读取文件(固定三行)—>使用StringTokenizer分解数字—>定义数组进行存储—>将数组实例化。代码如下:
        File file = new File("D:/File/Shuzi.txt");
        FileReader fileReader = new FileReader(file);
        BufferedReader R =new BufferedReader(fileReader);
        String p ="";
        p= R.readLine();
        fileReader.close();

        StringTokenizer tokenizer = new StringTokenizer(p);
        int[] number = new int[tokenizer.countTokens()];
        int y = 0;
        while(tokenizer.hasMoreTokens()){
            number[y] = Integer.parseInt(tokenizer.nextToken());
            y++;
        }
        int m = number[0];
        NumNode m1 = new NumNode(m);
        int n = number[1];
NumNode n1 = new NumNode(n);- 其次,就是在第五个位置进行插入,我只了解过:尾部插入、头部插入、中部插入。于是,我又摸索了一个位置插入,代码如下:
public static void AddShu(int x, NumNode element,NumNode head)
    {
        NumNode temp = head;
        if (x == 0)
        {
            element.next = head;
            head = element;
        }
        else {
            for (int y = 1; y < x - 1; y++) {
                temp = temp.next;
            }
            element.next = temp.next;
            temp.next = element;
        }
}- 最后,是关于删除数字的,在这个地方出现了一个问题,具体见问题2:
 public static NumNode Delete(NumNode head, NumNode node) {

        NumNode current = head, prev = head;
        if(current.num==node.num){
            head=current.next;}
        while (current != null) {
            if (current.num != node.num) {
                prev = current;
                current = current.next;
            }
            else {
                break;
            }
        }
        prev.next = current.next;
        if (current.num != node.num)
            System.out.println("找不到节点,删除失败。");
        return head;
    }
    public static NumNode AddHead(NumNode head,NumNode node)//头插法为什么有返回值?因为head改了
    {
        //头插法:在头部插入节点
        node.next = head;
        head = node;
        return head;
    }
第三个
第三个相较于第二个改动较少,只需要添加一个排序方法,代码如下:
public static void  Select(NumNode head)
    {
        NumNode current = head;
        int temp;

        while (current != null)//现在的指针
        {
            NumNode numNode = current.next;//下一个
            while (numNode != null)
            {
                if (numNode.num < current.num)//如果小于
                {
                    temp = current.num;
                    current.num = numNode.num;
                    numNode.num = temp;
                }
                numNode = numNode.next;//下一个
            }
            current = current.next;//下一个检验,是否需要调换,直到结束
            PrintLink(head);
            System.out.println("
"+"链表的个数为:  "+length(head));

        }
    }
第四个
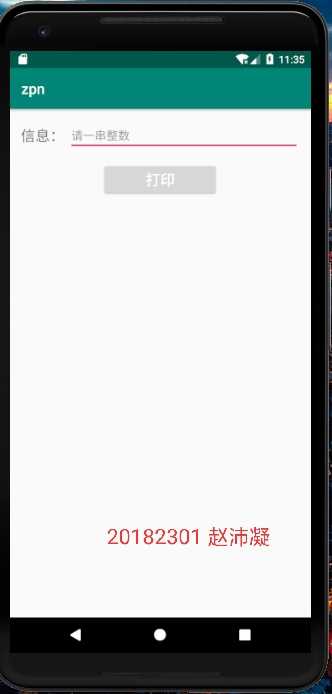
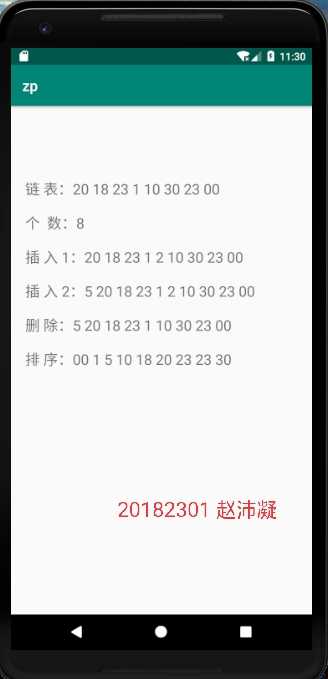
在Andriod中需要将主函数的内容进行修改,放在MainActivity进行操作,修改源代码,能够支持两个界面的传递与接受
public void onClick(View v) {

                    Intent intent = new Intent(MainActivity.this,PrintActivity.class);


                        //从文件读取数字
                    InputStream input=getResources().openRawResource(R.raw.test);
                    BufferedInputStream bufferedInputStream = new BufferedInputStream(input);
                    byte[] buffer = new byte[1024];
                    String content = "";
                    int flag = 0;
                    while (true){
                        try {
                            if (!((flag =bufferedInputStream.read(buffer))!=-1)) break;
                        } catch (IOException e) {
                            e.printStackTrace();
                        }
                        content += new String(buffer,0,flag);
                    }

                        StringTokenizer tokenizer = new StringTokenizer(content);
                        int[] number = new int[tokenizer.countTokens()];
                        int y = 0;
                        while(tokenizer.hasMoreTokens()){
                            number[y] = Integer.parseInt(tokenizer.nextToken());
                            y++;
                        }
                        int m = number[0];
                        Size.NumNode m1 = new Size.NumNode(m);
                        int n = number[1];
                        Size.NumNode n1 = new Size.NumNode(n);
                        String[] arr = str.split(","); // 用,分割
                        System.out.println(Arrays.toString(arr)); // [0, 1, 2, 3, 4, 5]
                        Size.NumNode head = new Size.NumNode(Integer.valueOf(arr[0]));
                        int[] intss=new int[20];
                        intss=StringToInt(arr);

                        for(int i=1;i<10;i++){
                            Size.NumNode x = new Size.NumNode(intss[i]);
                            AddTrail(head,x);
                        }

                        int nzpn=length(head);

                    intent.putExtra("username",nzpn);
                    intent.putExtra("count", PrintLink(head));

                        //System.out.println("在第五位插入文件中第一个数");
                        AddShu(5,m1,head);
                    intent.putExtra("count1", PrintLink(head));

                        //System.out.println("在第0位插入第二个数");
                        head=AddHead(head,n1);
                    intent.putExtra("count2", PrintLink(head));

                        //System.out.println("从链表中删除刚才的数字1");
                        Delete(head,m1);
                    intent.putExtra("delect", PrintLink(head));

                        Select(head);
                    intent.putExtra("select", PrintLink(head));

                    startActivity(intent);
                }
            });
        }
第五个
第五个相较于第四个没有太大的区别,只需添加一个Select方法进行排序,添加传递和接受


3. 实验过程中遇到的问题和解决过程
- 问题1:新建new module 时出现“Project needs to be converted to androidx.* dependencies”如下图:
- 问题1解决方案:
- 方法一:把整个项目升级到AndroidX
- 方法二:项目不升级到AndroidX
- gradle.properties下添加如下,然后点一下右上角Sync Now
android.useAndroidX=true
android.enableJetifier=true- 新建module_test,这时就没有“Project needs to be converted to androidx.* dependencies”,File——New——New Module——Android Library(Next)——填好信息后Finish
- 把module_test的build.gradle——dependencies下引入的androidX包改成android的,如果不知道怎么改,就从原先的module对应的build.gradle里拷贝过来
- 在步骤一种添加的改成false
android.useAndroidX=false
android.enableJetifier=false- 问题2:题目要求为删除第一个插入的数字,但是出现问题的是如果前面有与它相同的数字,就会首先删除第一个,怎么办?
- 问题2解决方案:
- 可以使用位置删除,但是如果出现多次操作,就比较麻烦,也难以分析问题。最后使用此种方法
public void deleteNodeByIndex(int index) {
if (index < 1 || index > getListLength()) {
System.out.println("删除位置不合法");}
Node temp = head;
int length = 1;
while (temp.next != null) {
if (index == length) {
temp.next = temp.next.next;
return;}
else {
temp = temp.next;
}
length++;
}
}
- 问题3:如何从Android中读取文件
- 问题3解决方法:
        btn = (Button) findViewById(R.id.button1);
        btn.setOnClickListener(new View.OnClickListener() {
            @Override
            public void onClick(View v) {

                try {
                    dis.setText(readFileSdcardFile(FILE_NAME));
                    dis.setText(readSDFile(FILE_NAME));
                } catch (IOException e) {
                    // TODO Auto-generated catch block
                    e.printStackTrace();
                }
            }
        });
    }

public String readSDFile(String fileName) throws IOException {

        File file = new File(fileName);

        FileInputStream fis = new FileInputStream(file);

        int length = fis.available();

         byte [] buffer = new byte[length];
         fis.read(buffer);

         String res = EncodingUtils.getString(buffer, "UTF-8");

         fis.close();
         return res;
}?


    public String readFileSdcardFile(String fileName) throws IOException{
          String res="";
          try{
                 FileInputStream fin = new FileInputStream(fileName);

                 int length = fin.available();

                 byte [] buffer = new byte[length];
                 fin.read(buffer);

                 res = EncodingUtils.getString(buffer, "UTF-8");

                 fin.close();
                }

                catch(Exception e){
                 e.printStackTrace();
                }
                return res;
        }
其他(感悟、思考等)
本次实验从idea转战android,我需要把Android理解透彻,才能为以后的APP开发打下更好的基础。
参考资料
- 解决Project needs to be converted to androidx.* dependencies
- 从一个应用的activity跳转到另一个应用的activity-三种方法
- 读取文件
以上是关于20182301 2019-2020-1 《数据结构与面向对象程序设计》实验6报告的主要内容,如果未能解决你的问题,请参考以下文章