第二课 栈_队列_堆
Posted zach0812
tags:
篇首语:本文由小常识网(cha138.com)小编为大家整理,主要介绍了第二课 栈_队列_堆相关的知识,希望对你有一定的参考价值。
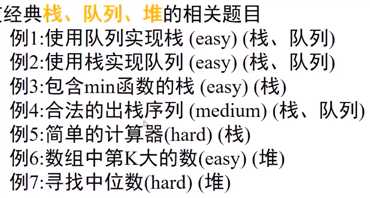
内容概览及预备知识:
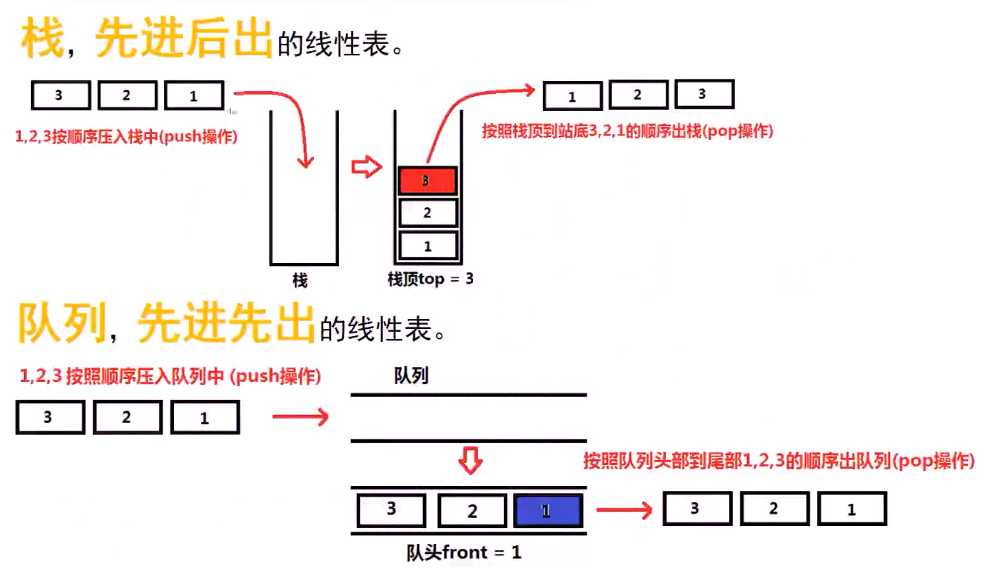
预备知识:栈与队列:
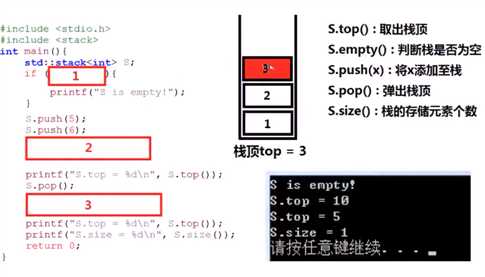
STL基本的栈操作(stack):

 1 #include <iostream>
 2 using namespace std;
 3
 4 #include <stack>
 5 int main(){
 6     stack <int> stk;
 7     if(stk.empty()){ //判断是否为空 isempty()
 8         cout <<"The Stack is empty!!!"<<endl;
 9     }
10     stk.push(5); //压栈
11     stk.push(6);
12     stk.push(10);
13
14     cout <<"The Stack‘ top is " <<stk.top()<<endl;
15     stk.pop(); //弹出栈顶
16     stk.pop();
17     cout <<"The Stack‘ top is "<<stk.top()<<endl;
18     cout <<"The Stack‘ size is "<<stk.size()<<endl; //栈中的size
19
20     return 0;
21 }
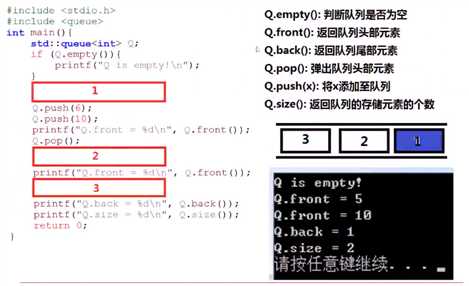
STL基本的队列操作(queue):

 1 #include <iostream>
 2 using namespace std;
 3
 4 #include <queue>
 5 int main(){
 6     queue <int> quu;
 7     if(quu.empty()){
 8         cout << "The Queue is empty!"<<endl;
 9     }
10     quu.push(5); //加入队列
11     quu.push(6);
12     quu.push(10);
13
14     cout<<"The Queue‘ front is "<<quu.front()<<endl;
15     quu.pop(); //从队列头拿出
16     quu.pop();
17     cout<<"The Queue‘ front is "<<quu.front()<<endl;//队头
18     quu.push(1);  //队列后加入 1
19     cout<<"The Queue‘ back is "<<quu.back()<<endl; //队尾
20
21
22     cout<<"The Queue‘ size is "<<quu.size()<<endl; //队列的大小
23
24     return 0;
25 }
例1:使用队列实现栈 (No.225):
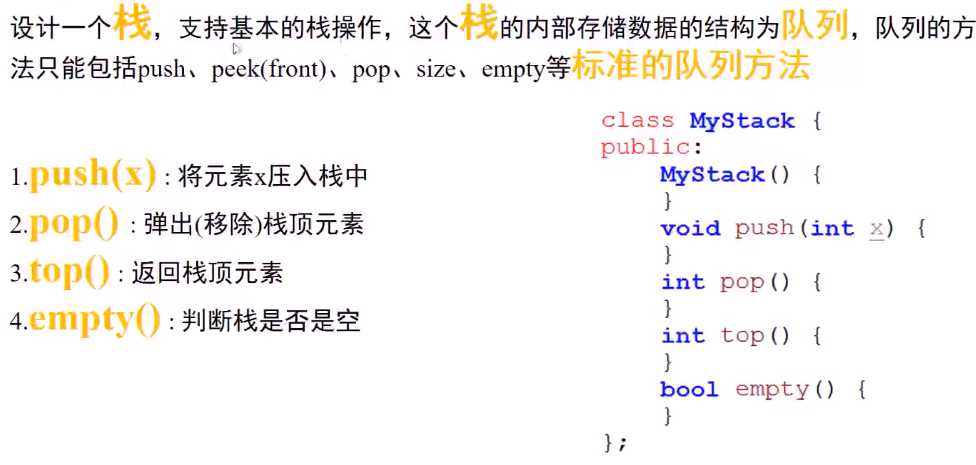
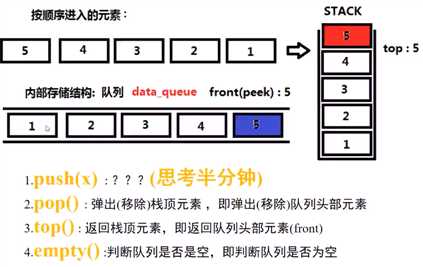
思路及代码:
假设前4个已经调整好了,下面是如何调整第五个!!!
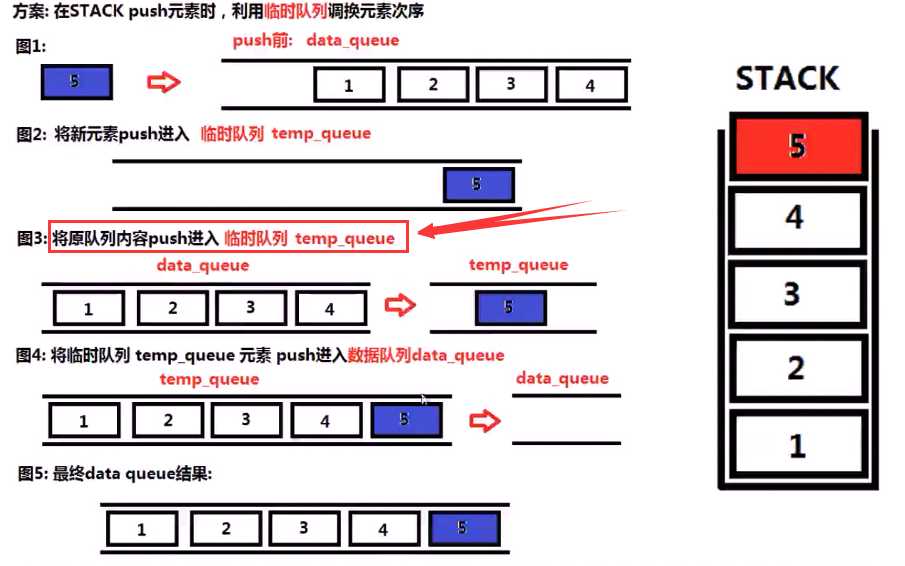
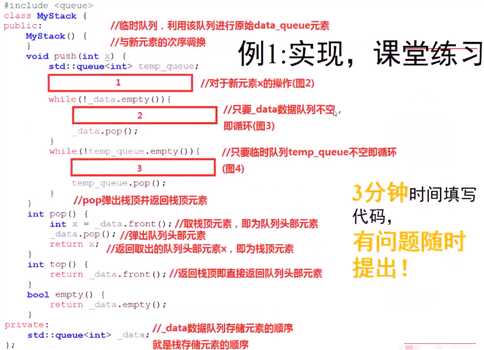
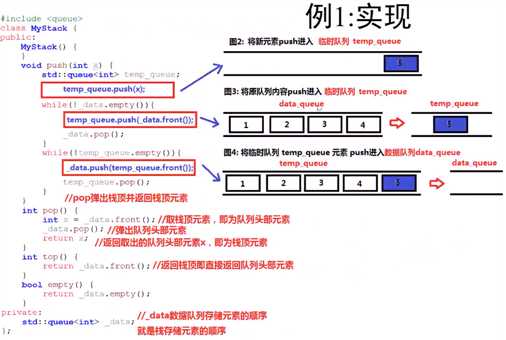
代码:

 1 class MyStack{
 2 public:
 3     MyStack(){}
 4     void push(int x){
 5         queue <int> temp_queue; //临时队列
 6         temp_queue.push(x);
 7         while(!_data.empty()){ //将_data中的数据push 到临时队列
 8             temp_queue.push(_data.front());
 9             _data.pop();
10         }
11         while(!temp_queue.empty()){ //将 temp_queue中重新放入到_data中
12              _data.push(temp_queue.front());
13              temp_queue.pop();
14         }
15     }
16
17     int pop(){
18         int x = _data.front();
19         _data.pop();
20         return x;
21     }
22
23     int top(){
24         return _data.front();
25     }
26
27     bool empty(){
28         return _data.empty();
29     }
30 private:
31     queue <int> _data; // _data中存储的是 栈存储的顺序
32 };

 1 #include <iostream>
 2 using namespace std;
 3
 4 #include <queue>
 5
 6 class MyStack{
 7 public:
 8     MyStack(){}
 9     void push(int x){
10         queue <int> temp_queue; //临时队列
11         temp_queue.push(x);
12         while(!_data.empty()){ //将_data中的数据push 到临时队列
13             temp_queue.push(_data.front());
14             _data.pop();
15         }
16         while(!temp_queue.empty()){ //将 temp_queue中重新放入到_data中
17              _data.push(temp_queue.front());
18              temp_queue.pop();
19         }
20     }
21
22     int pop(){
23         int x = _data.front();
24         _data.pop();
25         return x;
26     }
27
28     int top(){
29         return _data.front();
30     }
31
32     bool empty(){
33         return _data.empty();
34     }
35 private:
36     queue <int> _data; // _data中存储的是 栈存储的顺序
37 };
38
39
40
41 int main(){
42     MyStack * stk = new MyStack();
43     stk->push(2);
44     stk->push(4);
45     stk->push(8);
46     int a = stk->pop();
47     int b = stk->top();
48     bool c = stk->empty();
49     cout <<a <<b<<c<<endl;
50
51     return 0;
52 }
例2:使用栈实现队列 (No.232):
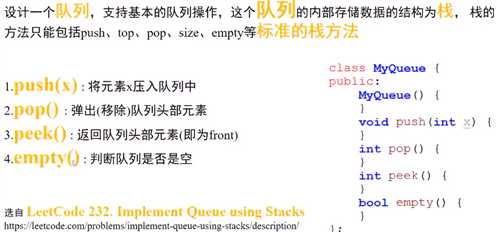
思路及代码:
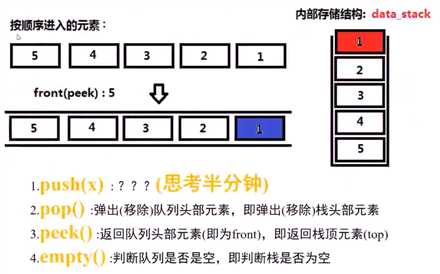
和例1一样,先假设已经有了四个元素,现在准备插入第五个元素,就是如何将5 放到栈的最下面!!!
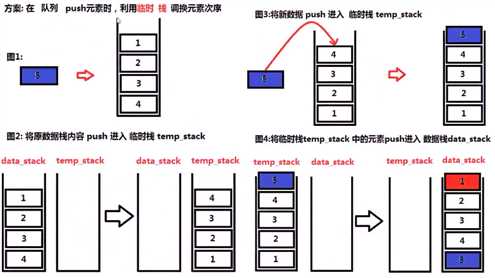
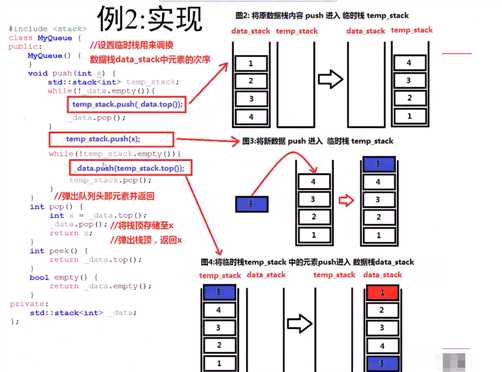

 1 class MyQueue{
 2 public:
 3     MyQueue(){}
 4     void push(int x) {
 5         //先将原有的栈中元素都出栈  进入临时栈中 temp_stk
 6         stack <int> temp_stk;
 7         while(!_data_stk.empty()){
 8             temp_stk.push(_data_stk.top());
 9             _data_stk.pop();
10         }
11         _data_stk.push(x);  //将要加入的放到临时栈中
12         while(!temp_stk.empty()){  //最后再将临时中的元素全部转回到data_stack中
13             _data_stk.push(temp_stk.top());
14             temp_stk.pop();
15         }
16     }
17
18     int pop(){
19         int x = _data_stk.top();
20         _data_stk.pop(); //返回类型是void
21         return x;
22     }
23     int peek(){ //front
24         return _data_stk.top();
25     }
26     bool empty(){
27         return _data_stk.empty();
28     }
29
30 private:
31     stack <int> _data_stk;
32 };

 1 #include <iostream>
 2 using namespace std;
 3
 4 #include <stack>
 5
 6 class MyQueue{
 7 public:
 8     MyQueue(){}
 9     void push(int x) {
10         //先将原有的栈中元素都出栈  进入临时栈中 temp_stk
11         stack <int> temp_stk;
12         while(!_data_stk.empty()){
13             temp_stk.push(_data_stk.top());
14             _data_stk.pop();
15         }
16         _data_stk.push(x);  //将要加入的放到临时栈中
17         while(!temp_stk.empty()){  //最后再将临时中的元素全部转回到data_stack中
18             _data_stk.push(temp_stk.top());
19             temp_stk.pop();
20         }
21     }
22
23     int pop(){
24         int x = _data_stk.top();
25         _data_stk.pop(); //返回类型是void
26         return x;
27     }
28     int front(){ //peek()
29         return _data_stk.top();
30     }
31     bool empty(){
32         return _data_stk.empty();
33     }
34
35 private:
36     stack <int> _data_stk;
37 };
38
39
40 int main(){
41
42     return 0;
43 }
例3:包含min函数的栈(No.155):
思路及代码:
例4:(No.):
思路及代码:
以上是关于第二课 栈_队列_堆的主要内容,如果未能解决你的问题,请参考以下文章
