docker学习笔记- 仓库
Posted Galen Tong
tags:
篇首语:本文由小常识网(cha138.com)小编为大家整理,主要介绍了docker学习笔记- 仓库相关的知识,希望对你有一定的参考价值。
Docker仓库是镜像存储、分发、部署的关键,制作好应用程序镜像后上传到仓库,使用Docker daemon从仓库拉取后运行,我们可以使用官方共有仓库docker hub或者搭建私有仓库
- Docker Hub包含众多镜像,无需登录就可以搜索和使用
- 注册Docker Hub账户后可以上传和分享我们创建的镜像(https://hub.docker.com/)
- 支持用户创建私有仓库
Docker Hub
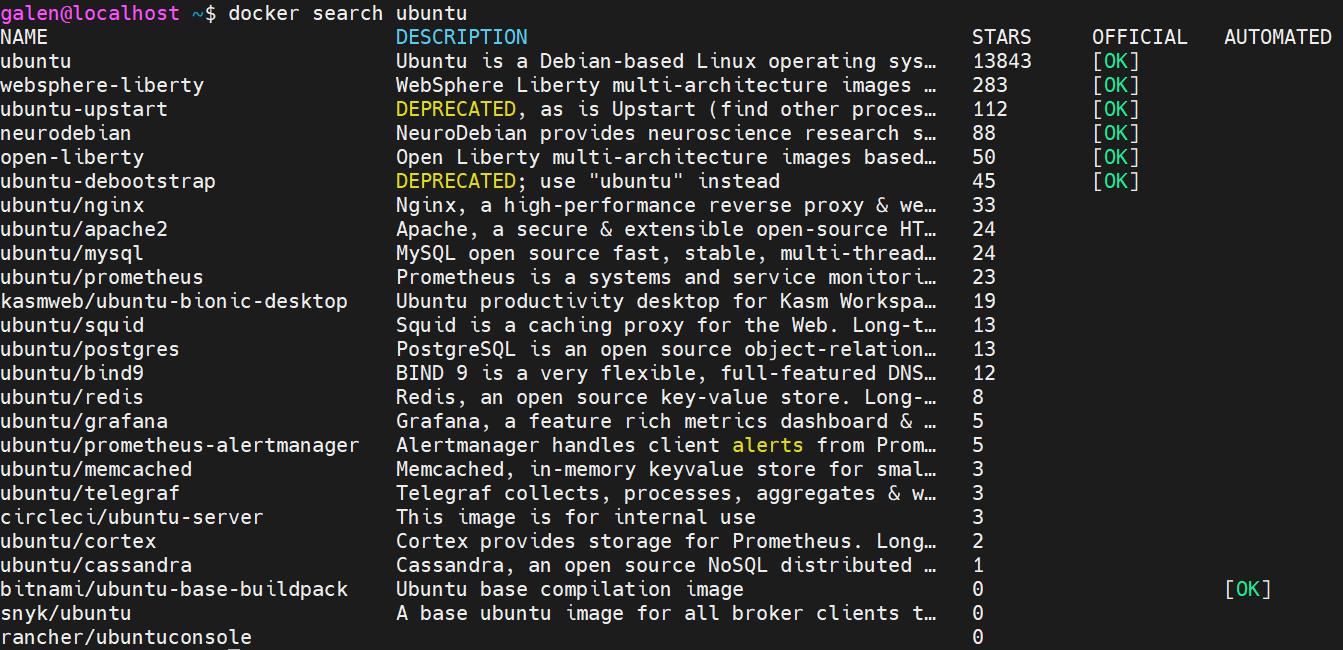
查找Ubuntu image

- OFFICIAL:官方维护的镜像,提供最基础的OS、编程语言、数据存储等一系列镜像,类似于PAAS。安全更新及时,并且有详细的文档、最佳实践、通用的设计方式。可以通过dockerfile进行学习
- AUTOMATED:可以关联github等源码仓库,进行自动构建并上传到Docker Hub
命令
# 查找镜像
docker search <NAME>
# 拉取镜像
docker pull <NAME>
# 推送镜像到仓库,通过添加不同的tag可以推送多个镜像到一个仓库
# 推送前需要登录docker hub
docker login
docker push <hub-user>/<repo-name>:<tag>
搭建私有仓库
如果想要构建一个基于Docker的PaaS平台,使用Docker Hub大多时候都满足要求,原因如下:
- 很多公司关键IDC无法访问外网,并且对于部署和分发而言网速带宽是较大的瓶颈
- 很多应用放到公共仓库是不安全的
- 可以将镜像存储和分发集成到内部的开发工作流中
registry是docker官方提供的开源组件,用于存储和分发镜像,无状态并且可扩缩容
registry
# 启动registry
docker run -d \\
-e REGISTRY_HTTP_ADDR=0.0.0.0:5500 \\
-p 6000:5500 \\
--name registry-galen \\
-v /mnt/docker-registry:/var/lib/registry \\
--restart always \\
registry:2
本地使用
docker pull ubuntu:16.04
# 为ubuntu image附加tag,
docker tag ubuntu:16.04 localhost:6000/galen-ubuntu
# push image 到跑在 localhost:6000的registry
docker push localhost:6000/galen-ubuntu
# 删除本地镜像
docker image rm ubuntu:16.04
docker image rm localhost:6000/galen-ubuntu
# 从registry中下拉
docker pull localhost:6000/galen-ubuntu
上传其他主机的image到仓库(115主机->129主机)
docker pull ubuntu:16.04
docker tag ubuntu:16.04 172.17.73.129:6000/galen-115-ubuntu
# 在要上传镜像的客户端(115)/etc/docker/daemon.json目录下,添加insecure-registries

  "registry-mirror": [
    "https://hub-mirror.c.163.com",
    "https://mirror.baidubce.com"
  ],
  "insecure-registries": [
    "172.17.73.129:6000"
  ]

docker push 172.17.73.129:6000/galen-115-ubuntu
# 查询registry中的仓库
curl -X GET http://172.17.73.129:6000/v2/_catalog
"repositories":["galen-115-ubuntu","galen-ubuntu"]
- 以上部署registry的方法不安全,没有认证功能,任何可以访问到地址的客户端都可以上传镜像
使用nginx做认证
删除之前registry容器,重新启动
# 停止并删除
docker container rm -f registry-galen
# 启动registry
docker run -d \\
-p 6000:5000 \\
--name registry-galen \\
-v /mnt/docker-registry:/var/lib/registry \\
--restart always \\
registry:2
vim /etc/nginx/conf.d/registry.conf
upstream registry-galen
    server 127.0.0.1:6000;

server
    listen 443 ssl;
    server_name www.codemachine.in;
    # 开启ssl
    ssl on;
    # 公钥证书
    ssl_certificate /etc/ssl/certs/docker-registry.crt;
    # 私钥
    ssl_certificate_key /etc/ssl/private/docker-registry.key;
    # 关闭对较大image请求的限制, HTTP 413
    client_max_body_size 0;
    # 避免HTTP 411
    chunked_transfer_encoding on;
    location /v2/
        auth_basic "Need to login";
        auth_basic_user_file /etc/nginx/conf.d/nginx.htpasswd;
        include docker-registry.conf;


    location /_ping/
        auth_basic off;
        include docker-registry.conf;


    location /v2/_ping
        auth_basic off;
        include docker-registry.conf;
vim /etc/nginx/docker-registry.conf
proxy_pass                          http://registry-galen;
proxy_set_header  Host              $http_host;   # required for docker client\'s sake
proxy_set_header  X-Real-IP         $remote_addr; # pass on real client\'s IP
proxy_set_header  X-Forwarded-For   $proxy_add_x_forwarded_for;
proxy_set_header  X-Forwarded-Proto $scheme;
proxy_read_timeout                  900;
利用htpasswd工具创建用户认证的用户名和密码,将密码加密后生成到文件中
[root@localhost nginx]# htpasswd -bc /etc/nginx/conf.d/nginx.htpasswd
galendocker p@ssw0rd
Adding password for user galendocker
创建私有SSL证书
go 1.15 版本开始废弃 CommonName需要使用SAN证书
使用OpenSSL创建私有CA,CA包含公钥和私钥,公钥用于他人验证证书有效性,私钥用于给其他证书签名
使用openssl生成带有SAN扩展的证书请求文件,编辑/etc/pki/tls/openssl.cnf
req_extetions = v3_req

[ v3_req ]
# Extensions to add to a certificate request
basicConstraints = CA:FALSE
keyUsage = nonRepudiation, digitalSignature, keyEncipherment
subjectAltName = @alt_names

[ alt_names ]
DNS.1 = www.codemachine.in
DNS.2 = www.galen.codemachine.com
生成CA
mkdir /etc/pki/CA/ && cd /etc/pki/CA/ && mkdir certs && mkdir newcerts && touch index.txt
# 指定第一个颁发证书的序列号
echo 01 > serial
# 生成CA私钥文件,输入密码
openssl genrsa -des3 -out ca-key.pem 2048
# 生成CA自签证书,指明私钥文件,证书保存路径,有效期限等
openssl req -new -x509 -days 365 -key private/ca-key.pem -out private/ca-cert.pem
>
Enter pass phrase for ca-key.pem:
You are about to be asked to enter information that will be incorporated
into your certificate request.
What you are about to enter is what is called a Distinguished Name or a DN.
There are quite a few fields but you can leave some blank
For some fields there will be a default value,
If you enter \'.\', the field will be left blank.
-----
Country Name (2 letter code) [XX]:CN
State or Province Name (full name) []:Jiangsu
Locality Name (eg, city) [Default City]:Nanjing
Organization Name (eg, company) [Default Company Ltd]:bigtera
Organizational Unit Name (eg, section) []:
Common Name (eg, your name or your server\'s hostname) []:codemachine
Email Address []:937013596@qq.com
CA签署具有SAN(Subject Alt Name)扩展的服务器证书
# 生成服务器私钥文件
openssl genrsa -des3 -out server-key.pem 2048
# 生成服务器证书签署请求文件,默认国家,省,公司名称三项必须和CA一致
openssl req -new -key server-key.pem -out server.csr -extensions v3_req
>
Enter pass phrase for server-key.pem:
You are about to be asked to enter information that will be incorporated
into your certificate request.
What you are about to enter is what is called a Distinguished Name or a DN.
There are quite a few fields but you can leave some blank
For some fields there will be a default value,
If you enter \'.\', the field will be left blank.
-----
Country Name (2 letter code) [XX]:CN
State or Province Name (full name) []:Jiangsu
Locality Name (eg, city) [Default City]:Nanjing
Organization Name (eg, company) [Default Company Ltd]:bigtera
Organizational Unit Name (eg, section) []:
Common Name (eg, your name or your server\'s hostname) []:codemachine
Email Address []:937013596@qq.com

Please enter the following \'extra\' attributes
to be sent with your certificate request
A challenge password []:
An optional company name []:

# 签发证书
openssl ca -in server.csr -keyfile ca-key.pem -cert ca-crt.pem -extensions v3_req -out server.crt
>
Using configuration from /etc/pki/tls/openssl.cnf
Enter pass phrase for ca-key.pem:
Check that the request matches the signature
Signature ok
Certificate Details:
        Serial Number: 1 (0x1)
        Validity
            Not Before: Mar 11 09:15:27 2022 GMT
            Not After : Mar 11 09:15:27 2023 GMT
        Subject:
            countryName               = CN
            stateOrProvinceName       = Jiangsu
            organizationName          = bigtera
            commonName                = codemachine
            emailAddress              = 937013596@qq.com
        X509v3 extensions:
            X509v3 Basic Constraints:
                CA:FALSE
            X509v3 Key Usage:
                Digital Signature, Non Repudiation, Key Encipherment
            X509v3 Subject Alternative Name:
                DNS:www.codemachine.in, DNS:www.galen.codemachine.com
Certificate is to be certified until Mar 11 09:15:27 2023 GMT (365 days)
Sign the certificate? [y/n]:y


1 out of 1 certificate requests certified, commit? [y/n]y
Write out database with 1 new entries
Data Base Updated
# 删除server-key中的pass phrase
openssl rsa -in server-key.pem -out server-key.pem
# 安装server-key和server.crt到我们nginx配置开启ssl的目录下
cp server.crt /etc/ssl/certs/docker-registry.crt
mkdir /etc/ssl/private
cp server-key.pem /etc/ssl/private/docker-registry.key
开启nginx
systemctl start nginx
客户端使用
实验中没有配置DNS server,所以需要在hosts文件中添加www.codemachine.in与主机IP地址的映射:172.17.73.129 www.codemachine.in
- windows: C:\\Windows\\System32\\drivers\\etc\\hosts
- linux:/etc/hosts
docker客户端
为了Docker能够正常地访问Nginx,发送ca证书到客户端,重启docker与registry容器
update-ca-trust force-enable
scp ca-crt.pem root@172.17.73.115:/etc/pki/ca-trust/source/anchors/ca-cert.crt
update-ca-trust extract
# 修改tag
docker tag busybox:latest www.codemachine.in/busybox:latest
# 未登录推送
docker push www.codemachine.in/centos:galen
>
Using default tag: latest
The push refers to repository [www.codemachine.in/busybox]
797ac4999b67: Preparing
no basic auth credentials
# 登录
docker login -u galendocker -p p@ssw0rd www.codemachine.in
# 再次推送
>
Using default tag: latest
The push refers to repository [www.codemachine.in/busybox]
797ac4999b67: Pushed
latest: digest: sha256:14d4f50961544fdb669075c442509f194bdc4c0e344bde06e35dbd55af842a38 size: 527
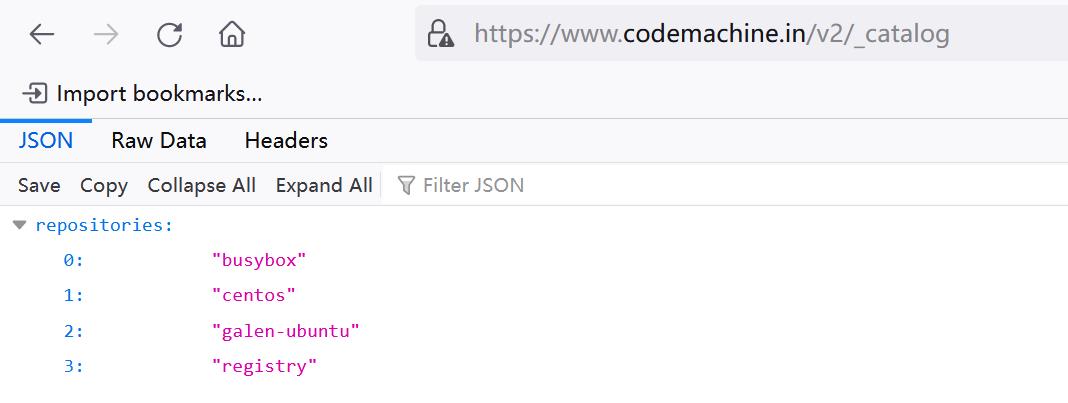
使用windows浏览器
使用浏览器打开 https://www.codemachine.in/v2/_catalog


望各位大佬指出错误!
不断学习更新,转载请注明出处
以上是关于docker学习笔记- 仓库的主要内容,如果未能解决你的问题,请参考以下文章