PHP使用Elasticsearch简单实践
Posted FangAoLin
tags:
篇首语:本文由小常识网(cha138.com)小编为大家整理,主要介绍了PHP使用Elasticsearch简单实践相关的知识,希望对你有一定的参考价值。
背景
之前对 ES 不是很了解,最多是用 Kibana 去查一下日志,突然有任务希望我能加个 ES 搜索优化一下商品搜索的性能。
主要是一些在 MySQL 数据量多的情况,通过 like 模糊搜索会拉低性能,用户体验不是很好。
之前也看过一点 ES 教程,但是没有上手做的话云里雾里的,经过上手练习了一下后,之前学的内容一下都能理解了。
因为是总结所以我脱离了项目框架用原生大致写了一遍,这样就不用考虑业务上的一些逻辑了降低学习成本。
demo 代码我上传到 码云
搭建开发环境
为了方便我直接使用 docker 去搭建开发环境,本地我的 PHP 开发版本是7.2。
// 1. 拉取镜像文件
// 拉取es镜像
docker pull elasticsearch:7.7.1
// 拉取kibana镜像
docker pull kibana:7.7.1

// 2. 实例化容器
// 将es跑起来,这里我将本地 /Users/fangaolin/www/es_plugin 目录和容器 /www/es_plugin 映射起来,你可以换成你本地的目录路径。
docker run -d --name es -p 9200:9200 -p 9300:9300 -v /Users/fangaolin/www/es_plugin:/www/es_plugin -e "discovery.type=single-node" -e "ES_JAVA_OPTS=-Xms512m -Xmx512m" elasticsearch:7.7.1
// 将kibana跑起来
docker run -d --name kibana -e ELASTICSEARCH_HOSTS=http://host.docker.internal:9200/ --name kibana -p 5601:5601 kibana:7.7.1

// 3. 进入容器安装分词扩展
// 进入es容器
docker exec -it es /bin/sh
// 安装扩展,这里要等一会,可能网络原因比较慢。
 ./bin/elasticsearch-plugin install https://github.com/medcl/elasticsearch-analysis-ik/releases/download/v7.7.1/elasticsearch-analysis-ik-7.7.1.zip

// 4. 新建同义词文件
vi /usr/share/elasticsearch/config/synonyms.txt
// 保存退出
:wq
// 5. 退出容器
exit

// 6. 其它注意
// 后面再启动容器就直接start,docker start [CONTAINER NAME] 如:
docker start es
这时候可以在浏览器中看一下是否跑起来了(这两个一般完全跑起来有点慢,没出来多刷新试试)
打开 http://localhost:5601/ 进入 kibana 后台
打开 http://localhost:9200/ 查看 ES 信息
后面我们生成的信息其实都存在 ES 中,kibana其实是方便我们查看的可视化工具,就和 Navicat 和 MySQL 的关系。
安装好后就可以开始写 PHP 代码了,新建一个目录再右键打开终端。
    // 初始化项目的composer 一路默认即可
    composer init
    // 引入包
    composer require elasticsearch/elasticsearch 7.11.0
    composer require ruflin/elastica 7.1
首先需要用上 PHP elasticsearch/elasticsearch 这个包,安装时要注意和ES的版本相对应;
如果直接用我上传在码云的项目只需在项目根目录下执行 composer install 即可
如果你想自己新建可以执行下面命令
    // 初始化项目的composer 一路默认即可
    composer init

    // 执行命令
    composer require elasticsearch/elasticsearch 7.11.0

    composer require ruflin/elastica 7.1
关于PHP API的使用,ES 官网的文档库中有一份中文文档
实例化客户端PHP代码:
        $builder = ClientBuilder::create();
        // 连接地址
        $hosts = [\'localhost\'];
        // 设置es地址
        $builder->setHosts($hosts);

        // 还可以设置记录日志的实例,但要实现 LoggerInterface 接口的方法。
        // $builder->setLogger();

        $client = $builder->build();
后面的操作都将基于这个实例完成,所以可以把这个步骤用单例封装一下,如果是在框架里使用可以考虑用框架中容器工具封装下。
除此之外还把配置信息单独抽离了出来:
class ElasticsearchObj


    private static $singleObj;

    private $client;

    private function __construct()

        $this->client = $this->init();
        return $this->client;


    /**
     * 初始化es连接实例
     *
     * @return Client
     */
    private function init()

        $builder = ClientBuilder::create();
        // 连接地址
        $hosts = Config::getConfig(\'hosts\');
        // 设置es地址
        $builder->setHosts($hosts);

        // 还可以设置记录日志的实例,但要完成 LoggerInterface 接口的方法。
        // $builder->setLogger();

        return $builder->build();


    /**
     * 获得单例对象
     *
     * @return ElasticsearchObj
     */
    public static function getInstance()

        if (isset(self::$singleObj))
            return self::$singleObj;

        self::$singleObj = new ElasticsearchObj();
        return self::$singleObj;


class Config
    private static $config = [
        \'hosts\' => [
            \'127.0.0.1\'
        ]
    ];

    public static function getConfig($name)

        if (isset(self::$config[$name]))
            return self::$config[$name];

        return \'\';
快速添加数据 & Kibana 查看数据
ES 一般默认是打开 Dynamic Mapping 的,即 ES 在插入时没有 mapping 时会自己推算类型,创造一个 mapping 让文档插入成功。
可以先写一些简单的 demo 尝试往 ES 中写一些数据:
    // 通过直接插入数据,生成一条全新的index
    $docItem = [
        \'id\'       => 10,
        \'name\'     => \'红富士苹果\',
        \'price\'    => 19.9,
        \'category\' => \'fruit\'
    ];

    $indexName = \'new_index\';

    $params = [
        \'index\' => $indexName,
        \'id\'    => $docItem[\'id\'],
        \'body\'  => $docItem
    ];

    // 是不是很简单 主要是构造一些参数
    $client->index($params);
同样可以对插入操作进行封装并放在 ES 对象中:
     /**
     * 插入文档
     *
     * @param string $indexName
     * @param int $id
     * @param array $insertData
     * @return array|callable
     */
    public function insert(string $indexName, int $id, array $insertData)

        $params = [
            \'index\' => $indexName,
            \'id\'    => $id,
            \'body\'  => $insertData
        ];

        return $this->client->index($params);
封装后就可以通过面向对象的方式调用,即数据和操作相分离:
    $client = ElasticsearchObj::getInstance();

    // 通过直接插入数据,生成一条全新的index
    $docItem = [
        \'id\'       => 10,
        \'name\'     => \'红富士苹果\',
        \'price\'    => 19.9,
        \'category\' => \'fruit\'
    ];

    $indexName = \'new_index\';

    $client->insert($indexName, $docItem[\'id\'], $docItem);
直接在 src 目录下执行 php index.php 即可。
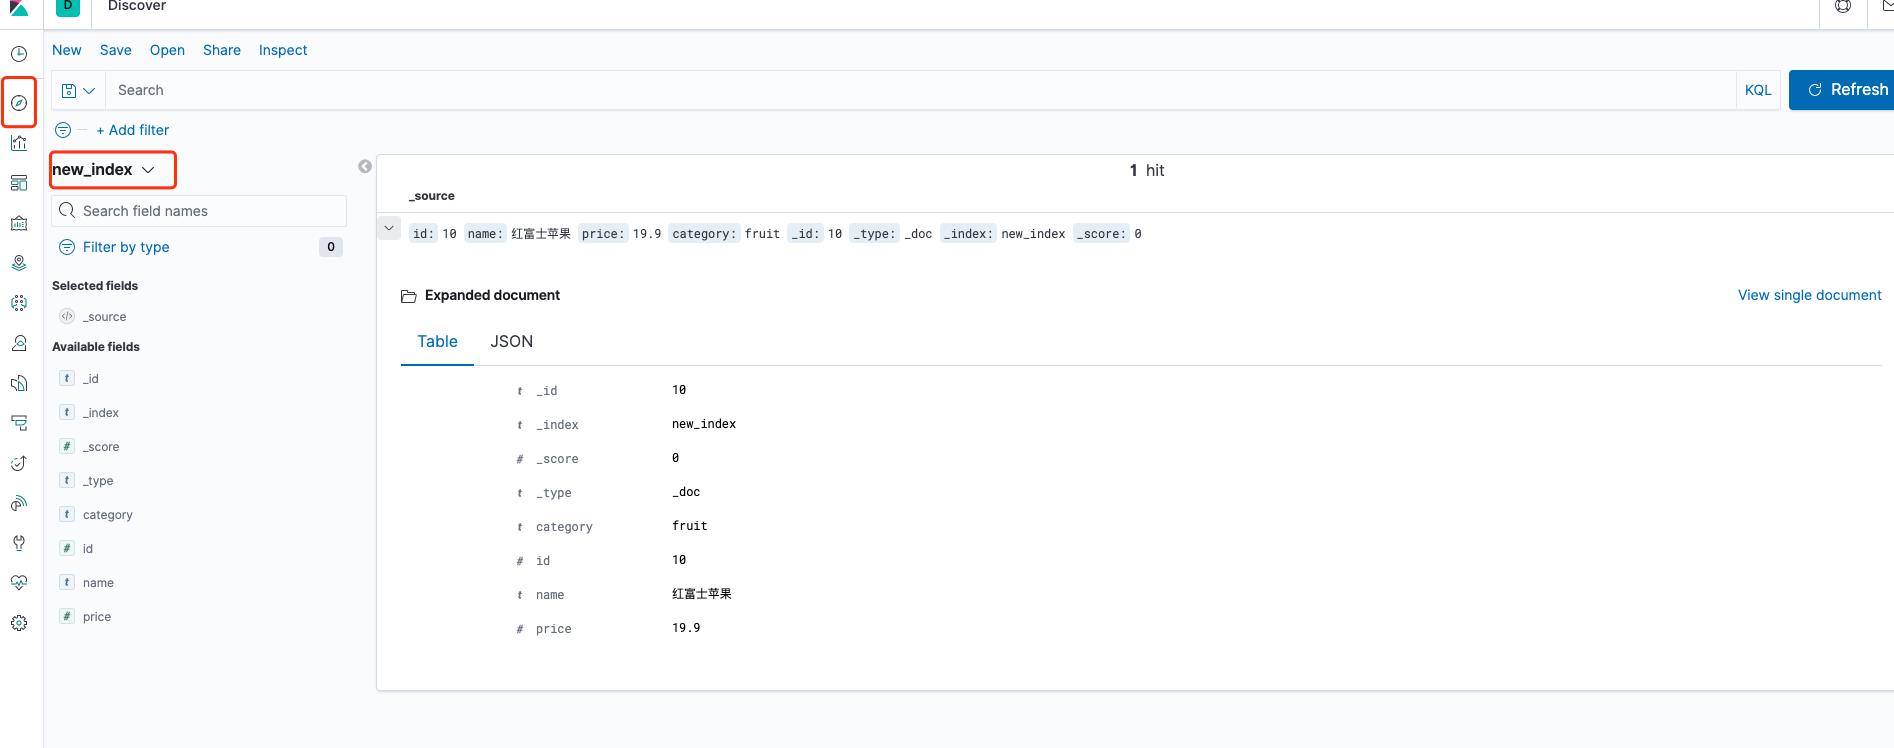
如果没有报错的话,现在通过配置一下 Kibana 就可以看到刚刚添加的数据。
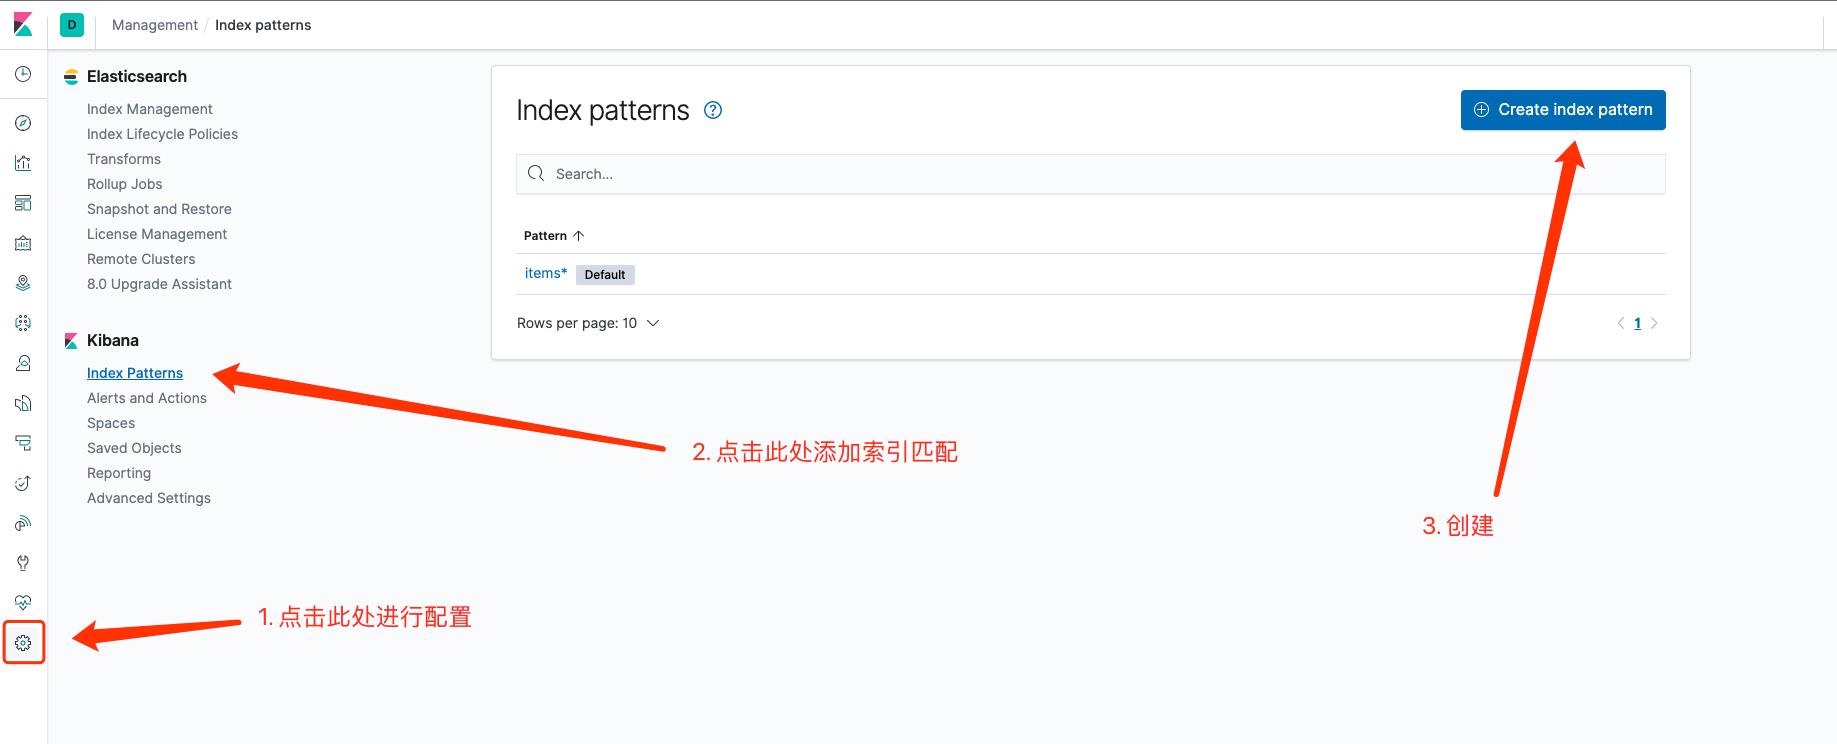
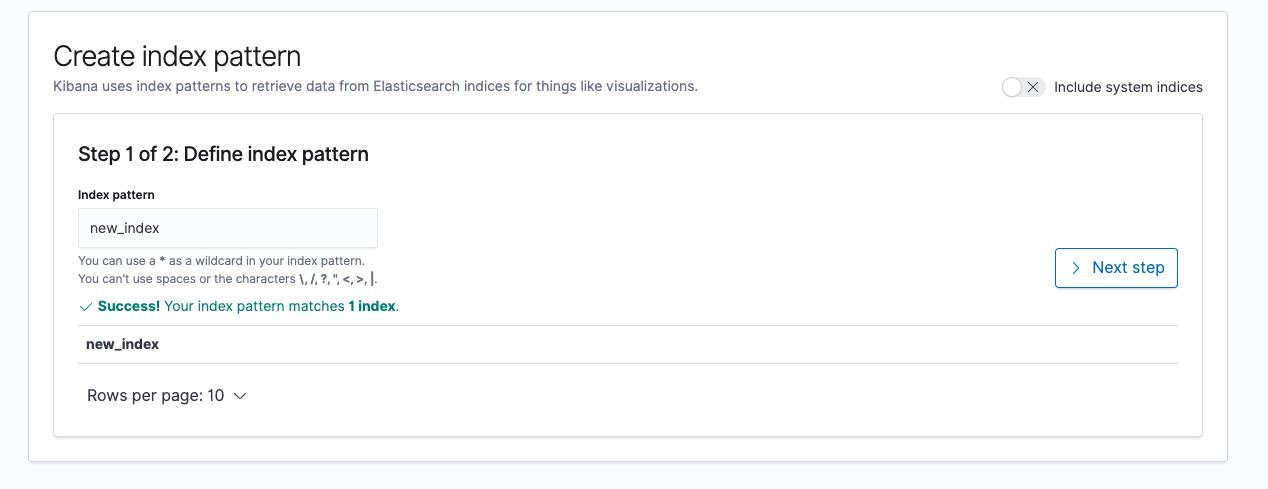
Mappings
Mapping 类似与数据库中表的定义,指定了字段的类型与其它信息。
但至此并没有设置任何 Mapping。
前面说过 ES 会默认推算字段类型,并且可以在 Kibana 上查看到。
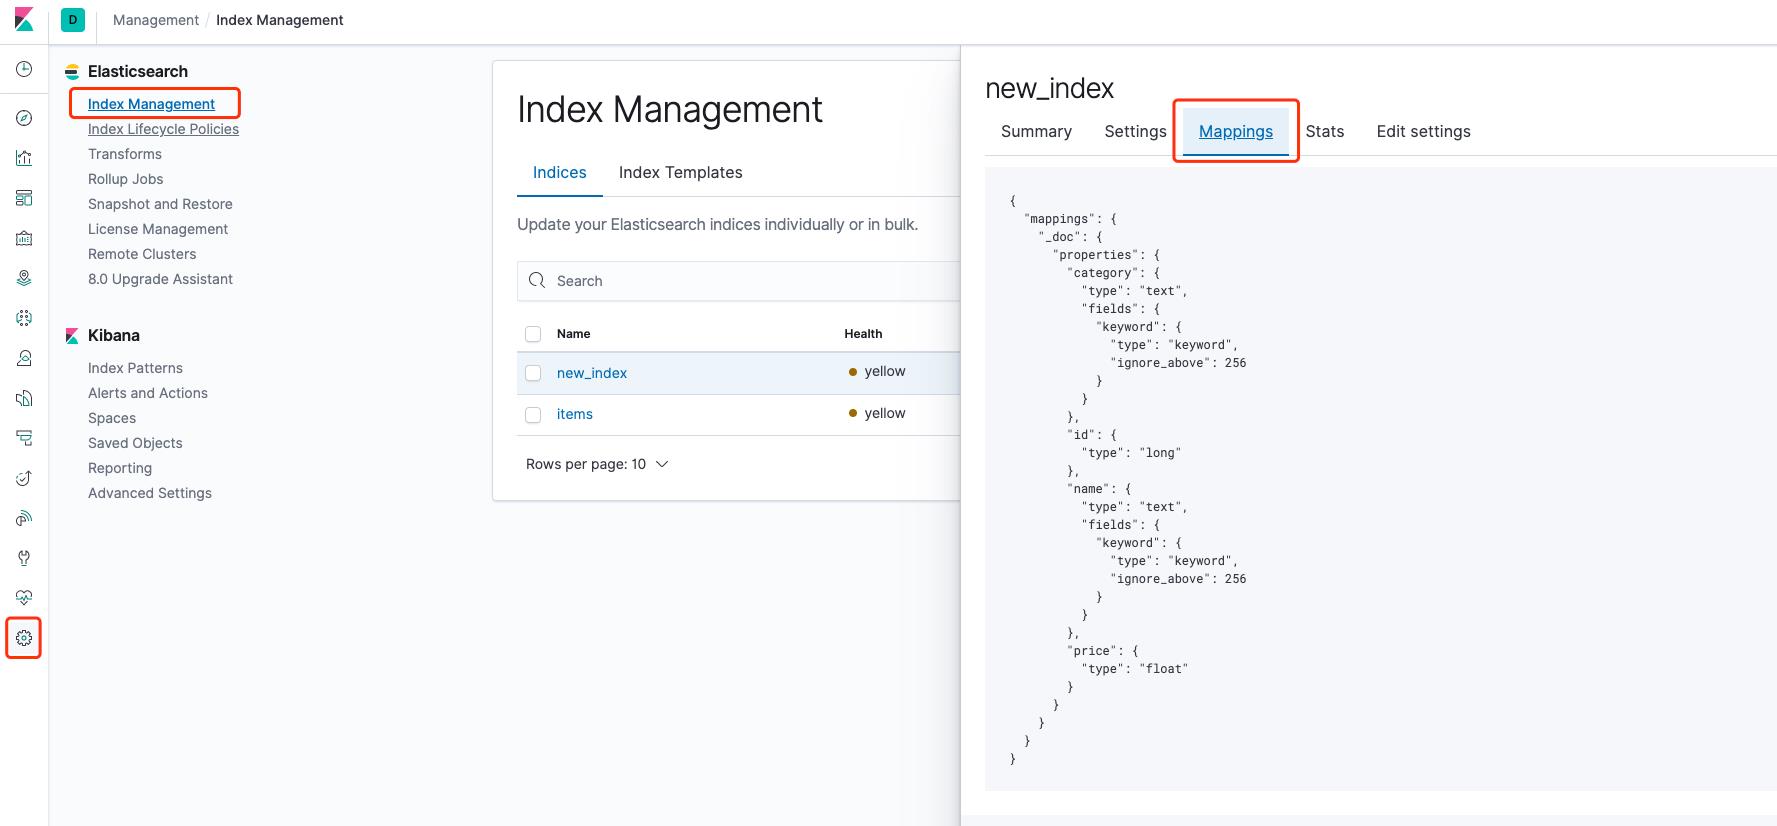
为了方便快捷,可以参考自动生成的 Mapping,在这个基础上修改字段类型,至于有哪些类型可以网上查一下;
不仅需要知道字段有哪些类型还需要知道 tokenizers & analyzer & filter 三者的区别:
Tokenizers 分词器
分词器可以按照我们的设定将文本进行拆分,打散。
Token Filters 字符过滤器
前者打散后的字符称为 token,token filters 即进一步过滤,比如统一转大写,转小写。
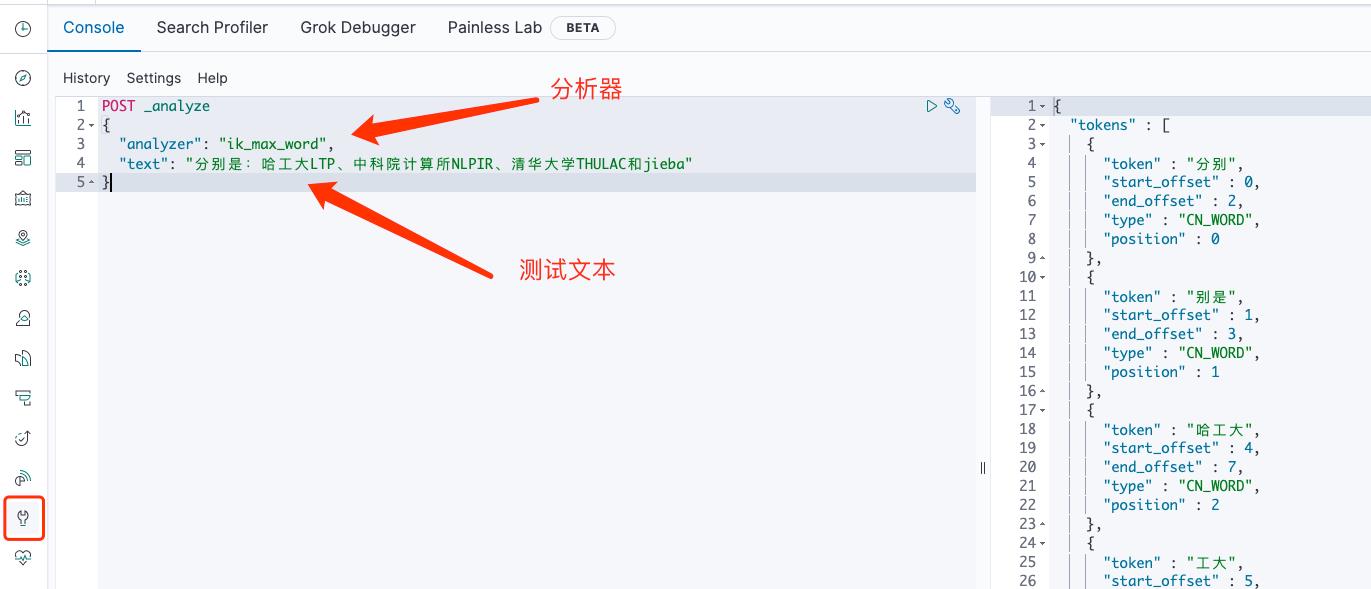
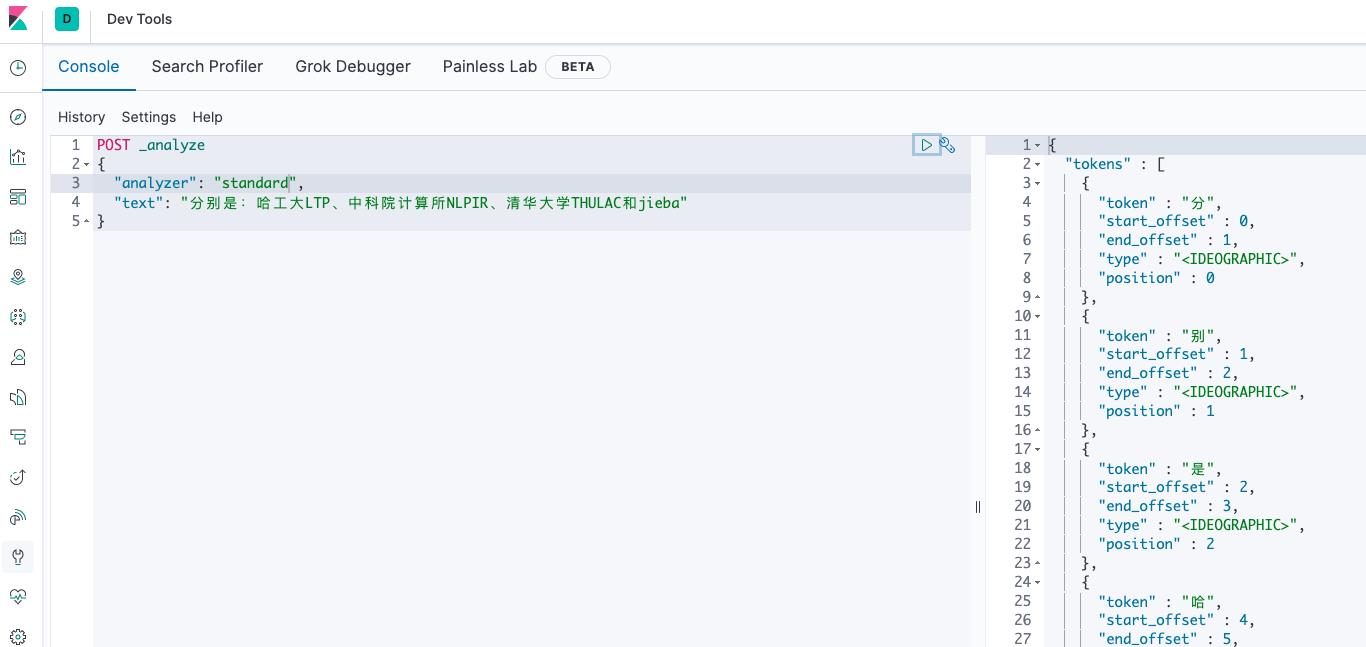
Analyzer 分析器
即分词器与字符过滤器的组合,通过分析器可以应用在 elasticsearch 字段上;
elasticsearch 默认自带了很多的分析器但是对中文的拆分都不是很好,前面安装的ik对中文支持就非常好。
通过 Kibana 可以测试分析器对文本应用的效果:
 详细的内容还可以看下 官方文档
知道了这些概念后就可以回归代码了,对于 ES 的每个索引来说就和 MySQL 中的表一样。
为了能合理存放这些索引属性信息,将每个索引信息分别对应存放在一个对象实例中并通过接口约束实例的方法。
后面使用时只需面向接口编程,不用考虑实际用了哪个索引。
说了这么多,直接看代码吧:
// 新建接口
interface IndexInterface

    /**
     * 获取索引名称
     *
     * @return mixed
     */
    public function getIndexName(): string;

    /**
     * 获取属性信息
     *
     * @return mixed
     */
    public function getProperties(): array;

    /**
     * 获取索引上的分词设置
     *
     * @return mixed
     */
    public function getSettings(): array;


// 实现接口填充接口方法
class ItemsIndex implements IndexInterface

    public static $name = \'new_index\';

    // 前面说到的分词设置
    private static $settings = [
        \'analysis\' => [
            \'filter\'   => [
                // 这里 key 是自定义名称
                \'word_synonym\'        => [
                    // 同义词过滤
                    \'type\'          => \'synonym\',
                    \'synonyms_path\' => \'synonyms.txt\',
                ],
            ],
            // 前面说到的分析器
            \'analyzer\' => [
                // 这里 key 是自定义名称
                \'ik_max_word_synonym\' => [
                    // 分词器 这里用了ik分词器,其它的一些用法可以去ik github 上看下
                    \'tokenizer\' => \'ik_max_word\',
                    // 用到了上面我们自定义的过滤器
                    \'filter\'    => \'word_synonym\',
                ],
            ]
        ]
    ];

    /**
     * 对应名称
     * @return string
     */
    public function getIndexName(): string

        return self::$name;


    /**
     * ES 字段MAPPING
     * @return array
     */
    public function getProperties(): array


        // 这里就是按照es自动生成的json改改
        return [
            \'id\'          => [
                \'type\' => \'long\'
            ],
            \'name\'    => [
                \'type\'            => \'text\',
                \'analyzer\'        => \'ik_max_word\',// 存储时用上的analyzer
                \'search_analyzer\' => \'ik_max_word_synonym\',// 搜索时用上上面自定义的analyzer
                \'fields\'          => [
                    // 定义了最大长度
                    \'keyword\' => [
                        \'type\'         => \'keyword\',
                        \'ignore_above\' => 256
                    ]
                ]
            ],
            \'price\'        => [
                \'type\' => \'float\'
            ],
            \'category\'         => [
                \'type\' => \'keyword\'
            ],
        ];


    /**
     * 分词库设置
     * @return array
     */
    public function getSettings(): array

        return self::$settings;
好了,现在已经定义好了 Mapping 的代码结构,但是要注意的是字段的 Mapping 一旦设置好了是不能重新修改的,只能删了再重新设定。
至于原因是修改字段的类型会导致 ES 索引失效,如果实在需要修改需要通过 Reindex 重建索引,这个需要使用时看下就可以了。
虽然还没用上这个 Mapping 但后续只要接上就可以使用了,再整理一下代码对应的目录结构:

index 目录中存放所有索引信息;
Config.php 用于存放配置信息;
ElasticsearchObj.php 目前用于获取客户端实例以及耦合了插入方法,如果操作方法太多这里可以进行功能性抽离;
index.php 场景类方便测试调用写的代码。
基本操作
现在开始尝试更新索引并完善其它索引操作
之前都是将客户端操作封装到 ElasticsearchObj 对象中,但索引的操作很多的话 ElasticsearchObj 就会越来越臃肿
在 ElasticsearchObj 中新增一个获取客户端实例的方法方便在其它类中调用客户端实例:
    /**
     * 获取ES客户端实例
     *
     * @return Client
     */
    public function getElasticsearchClint(): Client

        return $this->client;


    // 可以通过链式方法获取到客户端实例
    $client = ElasticsearchObj::getInstance()->getElasticsearchClint();
上面在说 Mapping 时就已经将获取索引方法抽象为接口,这里只要面向接口编程即可。
其余的操作都大同小异这里不再多说,都是拼凑出数组参数传给 ES 客户端。
class ElasticsearchIndex

    private $client;

    public function __construct()

        $this->client = ElasticsearchObj::getInstance()->getElasticsearchClint();


    /**
     * 创建索引
     *
     * @param IndexInterface $index
     * @return array
     */
    public function createIndex(IndexInterface $index): array

        $config = [
            \'index\' => $index->getIndexName(), // 索引名
            \'body\'  => [
                \'settings\' => $index->getSettings() ?: [],
                // mappings 对应的字段属性 & 详细字段的分词规则
                \'mappings\' => [
                    \'properties\' => $index->getProperties(),
                ]
            ]
        ];
        return $this->client->indices()->create($config);
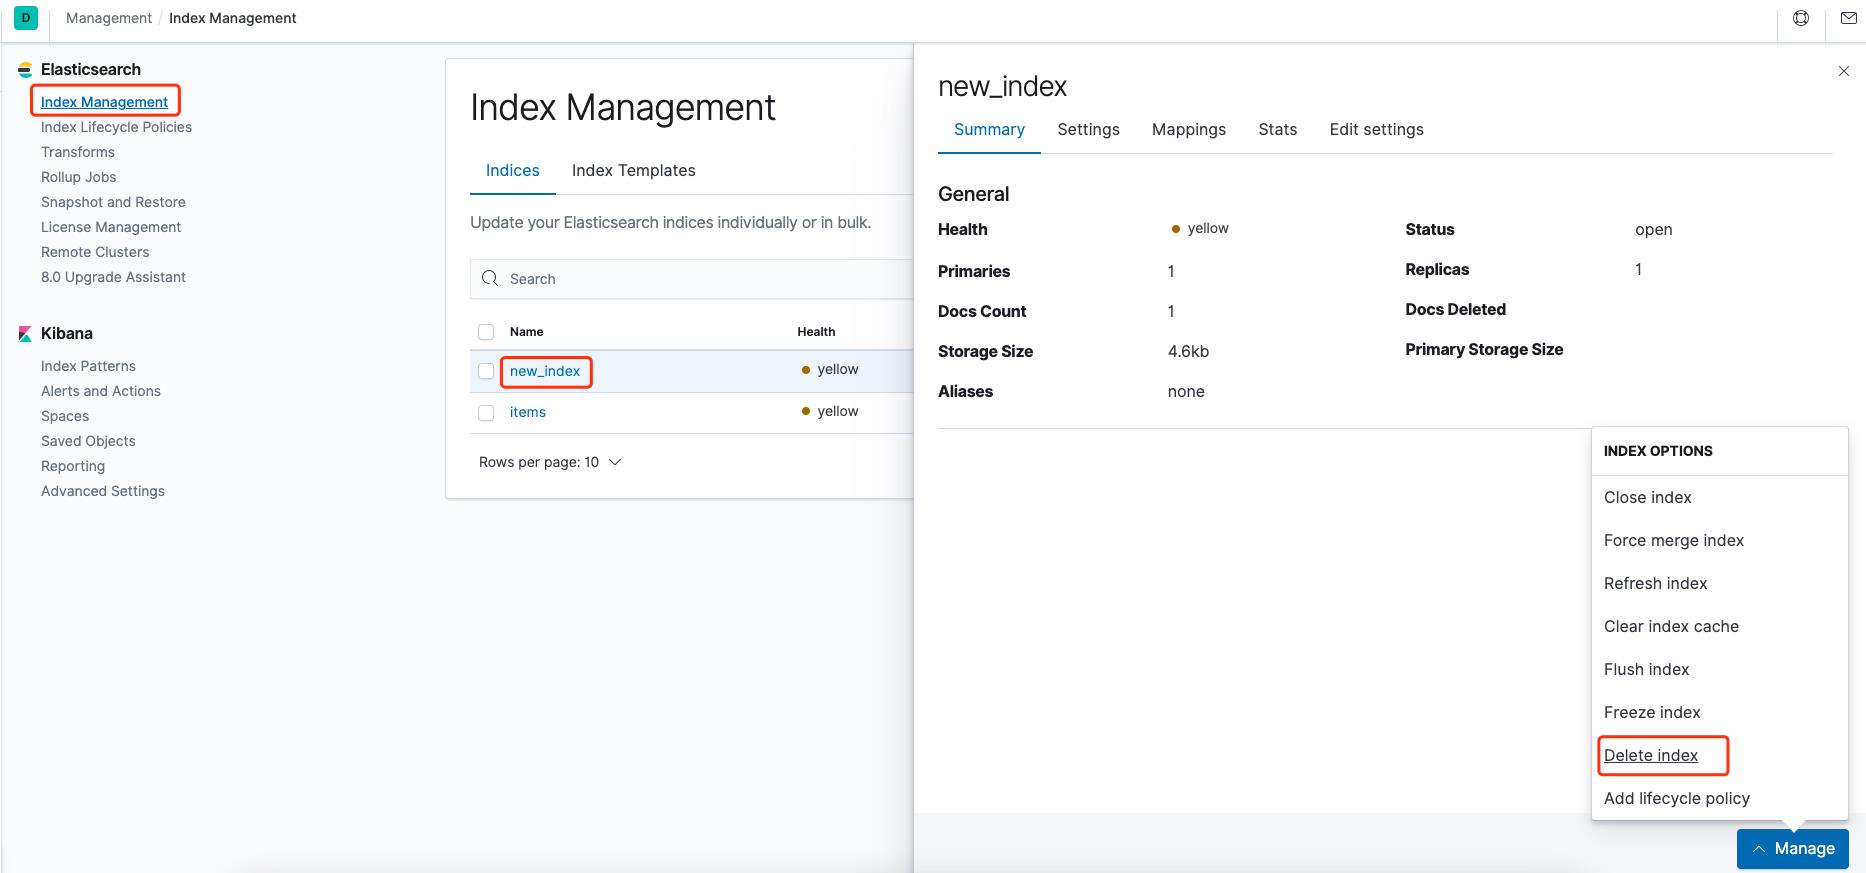
写好的代码当然要拉出来溜溜,现在如果直接执行的话会报 resource_already_exists_exception 因为上面已经创建过这个索引,这里直接去 Kibana 删除即可。
在开发时碰到错误是不能避免的,但只要耐心看下错误提示的意思或者网上查下往往都能找到问题所在。

现在还可以完善一些对文档的增删改操作,对于文档来说相当于数据库的行。
更新与新增操作是可以通过 ID 确定文档的唯一性,同时在通过 PHP 操作时可以公用一个方法。
可以看到每次文档数据的重建,数据的版本都会增一。

下面再新增一些删除方法即可完成增删改操作:
    /**
     * 删除文档
     *
     * @param $index
     * @param $id
     * @return array|callable
     */
    public function delete($index, $id)

        $params = [
            \'index\' => $index,
            \'id\'    => $id
        ];

        return $this->client->delete($params);


    /**
     * 通过ID列表删除文档
     *
     * @param $index
     * @param $idList
     * @return array|callable
     */
    public function deleteByIdList($index, $idList)

        $indexParams = [
            \'index\' => $index,
        ];
        $this->client->indices()->open($indexParams);
        $params = [
            \'body\' => []
        ];
        foreach ($idList as $deleteId)
            $params[\'body\'][] = [
                \'delete\' => [
                    \'_index\' => $index,
                    \'_id\'    => $deleteId
                ]
            ];

        return $this->client->bulk($params);
基本操作
前面的内容完成后其实已经可以自由的对es进行文档的操作了。
是不是还挺简单的,后面的查询操作其实大致也是组合参数再进行查询。
但ES的查询是可以嵌套的,用起来十分灵活。
在写代码之前最少要知道一些必要的基础概念:
match
会先将要查询的内容分词处理,分词处理后再进行搜索查询返回。
match_all
查询所有,等于数据库中 where 后面没有条件。
term
精准查找,不会将查询的内容分词处理,直接使用查询的内容进行搜索查询返回。
match_phrase
同样会分词处理但分词的词汇必须要都匹配上才返回。
详细搜索的内容可以查看 深入搜索
查询条件组合
must
所有的语句都 必须(must)匹配,与 AND 等价。
should
至少有一个语句要匹配,与 OR 等价。
must_not
所有的语句都 不能(must not) 匹配,与 NOT 等价。
详细查看 组合过滤器
在 kibana 中查询内容
在 kibana 上可以在 Dev Tools 中尝试使用上述内容进行查询,可以执行示例代码中的插入数据后尝试查询:
# 查询ID为10的文档
GET /new_index/_search

  "query":
    "bool":
      "must":
        "match":
          "id": 10


# 查询价格低于二十的文档
GET /new_index/_search

  "query":
    "bool":
      "must":
        "range":
          "price":
            "lt": 20


# 价格低于30的肉类
GET /new_index/_search

  "query":
    "bool":
      "must": [

          "match":
            "category": "meat"

        ,

          "range":
            "price":
              "lt": 30


      ]


# 火腿肠或者价格低于十元
GET /new_index/_search

  "query":
    "bool":
      "should": [

          "match":
            "name": "火腿肠"

        ,

          "range":
            "price":
              "lt": 10


      ]
查询功能代码
通过上面内容可以发现搜索的组合是十分灵活的,如果每个业务场景的都要通过拼接数组再去用客户端查询,代码将会十分复杂(想想会有很多 if else 并且不同的场景还不一样)。
所以能不能封装一层,将生成组合条件数组的部分抽离出来,通过链式调用构造查询,保证业务代码和通用代码相分离。
  // 类似这样的查询
  $where = [\'name\' => \'火腿肠\'];
  $list = $model->where($where)->query();
在做这件事之前首先介绍 elastica 这个PHP包,通过包中的方法可以生成查询数组。
后来写完后我翻了一下 elastica 的代码,发现 elastica 不仅可以生成条件数组而且覆盖了对 ES 操作的大部分操作,这个可以后面直接使用这个包来实现一下应该也会很棒。
这里我只是用来生成数组参数来使用了,整个过程也和上述的操作很像,拼凑出一个数组参数,将数组作为参数进行传递。
只要将这个数组作为类的成员变量,通过不同的方法不断的给数组中添加内容,这样就给链式调用的实现带来了可能。
创造类
前面已经将不同的索引通过面向接口方式实现出来了,再通过构造注入方式将实例注入到类中。
下面的代码通过链式调用实现了一些类似分页这样基础的功能。
class ElasticModelService

    private $client;
    private $index;

    private $condition;
    private $search;
    private $fields;

    public function __construct(IndexInterface $index)

        $this->client = ElasticsearchObj::getInstance()->getElasticsearchClint();
        $this->setIndex($index);
        $this->initModel();

        return $this;


    /**
     * 初始化索引模型
     *
     * @throws \\Exception
     */
    private function initModel()

        // 重置条件
        $this->();
        // 索引名
        $this->search[\'index\'] = $this->index->getAliasName();
        // fields
        $mapping = $this->index->getProperties();
        $this->fields = ($mapping);


    /**
     * 重置查询
     *
     * @return $this
     */
    public function (): ElasticModelService

        $this->condition = [];
        $this->search = [];
        return $this;


    /**
     * 设置过滤参数
     *
     * @param array $fields
     * @return $this
     */
    public function fields(array $fields): ElasticModelService

        if (!empty($fields))
            $this->search[\'body\'][\'_source\'] = $fields;

        return $this;


    /**
     * 分页查询参数
     *
     * @param int $page
     * @param int $pageSize
     * @return $this
     */
    public function pagination(int $page, int $pageSize): ElasticModelService

        $this->search[\'size\'] = $pageSize;
        $fromNum = ($page - 1) * $pageSize;
        $this->setFrom((int)$fromNum);
        return $this;


    /**
     * 设置开始查询位置
     *
     * @param int $from
     * @return $this
     */
    public function setFrom(int $from): ElasticModelService

        $this->search[\'from\'] = $from;
        return $this;


    /**
     * 设置查询大小
     *
     * @param int $size
     * @return $this
     */
    public function setSize(int $size): ElasticModelService

        $this->search[\'size\'] = $size;
        return $this;


    /**
     * 设置索引名
     *
     * @param IndexInterface $index
     */
    private function setIndex(IndexInterface $index)

        $this->index = $index;
在上面的基础上可以尝试写一些简单的查询构造方法在类中,如下面代码片段:
    // 传入 [\'name\' => \'火腿肠\'],返回对象方便后面再次用链式调用
    public function where(array $where): ElasticModelService

        // 遍历条件数组
        foreach ($where as $field => $value)
            // 利用 elastica 包生成查询数组
            if (($value))
                $query = new Term();
                $query->setTerm($field, $value);
                $match = $query->toArray();
             else
                $matchQuery = new MatchPhrase();
                $match = $matchQuery->setFieldQuery($field, $value)->toArray();


            if ($match)
                // 更改类中成员变量的数据
                $this->condition[\'must\'][] = $match;


        return $this;
这样实现了简单版的 where 构造方法只要认真看下代码应该不难理解,但后面再加上一些其它操作方法的代码量会累积的很多。
准备进一步拆分,将能够复用的部分代码拆成一部分,根据不同的需要调用这些方法。
并且在 where 方法中加上一些兼容处理。
  public function where(array $where): ElasticModelService

        foreach ($where as $field => $value)
            $realField = $this->getRealField($field);

            if (($realField, $this->fields))
                $match = $this->getFilterMatch($field, $value);
                if ($match)
                    $this->condition[\'must\'][] = $match;


        return $this;


  // 加上一些增加功能如可以传 [\'id|in\' => [1,2,3,4]] 或者 [\'date|gt\' => \'2022-01-01\']
  public function getRealField(string $field): string

        $tempField = $field;
        if (($field, \'|\') !== false)
            $fields = (\'|\', $field);
            $tempField = (string)$fields[0];


        return $tempField;


  public function getFilterMatch($field, $value)

        if (($field, \'|\') !== false)
            // 范围搜索
            $rangeField = (\'|\', $field);
            if (($rangeField) != 2)
                return false;

            switch (($rangeField[1]))
                case \'in\':
                    return $this->_getMatch($rangeField[0], $value);
                case \'notin\':
                    return $this->_getMatch($rangeField[0], $value,\'must_not\');
                default:
                    return $this->_getRangeMatch($rangeField[0], $rangeField[1], $value);

         else
            // 等值查询
            return $this->_getMatch($field, $value);


  private function _getMatch($field, $value, string $operate = \'should\'): array

        $match = [];
        if (($value))
            $matchQuery = new MatchQuery();
            foreach ($value as $valId)
                $match[\'bool\'][$operate][] = $matchQuery->setFieldQuery($field, $valId)->toArray();

            if ($operate == \'should\')
                $match[\'bool\'][\'minimum_should_match\'] = 1;

         else
            if (($value))
                $query = new Term();
                $query->setTerm($field, $value);
                $match = $query->toArray();
             else
                $matchQuery = new MatchPhrase();
                $match = $matchQuery->setFieldQuery($field, $value)->toArray();


        return $match;


  private function _getRangeMatch($field, $operator, $value): array

        $range = new ();
        $range->addField($field, [$operator => $value]);
        $match = [];
        $match[\'bool\'][\'must\'] = $range->toArray();
        return $match;
拆分后代码虽然看起来变更多了,但代码的功能和复用性也增强了。
很容易发现一些基础的方法可以使用 Trait 集中起来以此提高可读性。
其它的功能这里也不再赘述可以看下整体代码。
测试调用
虽然看起来还有很多可以优化的地方,但至少一个简易的 ES 操作代码就完成了。
先跑起来测试一下。
  $itemsIndex = new ItemsIndex();
  $itemModel = new ElasticModelService($itemsIndex);
  $queryList = $itemModel->where([\'id\' => 11])->fields([\'name\', \'id\', \'price\'])->query();
  ($queryList);

文档之间的关联
在实际使用时可能还会出现类似数据库连表的场景,但这并不是 ES 的强项。
这时需要了解嵌套类型 nested 或者 父子文档组合。
nested 是文档中嵌套文档,而父子文档通过 index 之间进行关联。
因为父子文档的性能问题,建议非要使用的话就使用 nested。
详情可以查看文档。
并且 ES 对于 nested 查询是有单独的语法,这个还需要单独处理。
以上是关于PHP使用Elasticsearch简单实践的主要内容,如果未能解决你的问题,请参考以下文章