Spring学习
Posted Kevin看
tags:
篇首语:本文由小常识网(cha138.com)小编为大家整理,主要介绍了Spring学习相关的知识,希望对你有一定的参考价值。
Spring
1.简介
Spring是一个轻量级控制反转(IOC)和面向切面(AOP)的容器框架
spring理念:使现有的技术更加容易使用,整合了现有的技术框架。
优点:
- Spring是一个开源的免费的框架(容器)!
- Spring是一个轻量级的,非入侵式的框架.
- 控制反转(IOC)面向切面编程(AOP)
- 支持事务的处理,对框架整合的支持
其他(先了解):
- Spring Boot 一个快速开发的脚手架,基于Spring Boot可以快速的开发单个微服务(约定大于配置)
- Spring Cloud 是基于Spring Boot实现
2.IOC理论推导
IOC本质: 控制反转IOC是一种设计思想,DI(依赖注入)是实现IOC的一种方法。
控制反转就是获得依赖对象的方式反转。
控制反转是一种通过描述(xml或注解)并通过第三方去生产或获取特定对象的方式。在Spring中实现控制反转的是IOC容器,其实现方法是依赖注入。 依赖注入:就是利用set方法来进行注入的。
Spring只需要在xml的配置而文件中进行修改,对象由Spring来创建、管理、装配!
3.IOC创建对象的方式
- 使用无参构造创建对象,默认!
- 要使用有参构造创建对象。
-
- 下标赋值
<bean id="user" class="com.kevin.pojo.User"> <constructor-arg index="0" value="kevin"/> </bean> - 类型(不推荐)
<constructor-arg type="java.lang.String" value="劳务"/> - 参数名
<constructor-arg name="name" value="kevin"/>
- 下标赋值
总结:在配置文件加载的时候,容器中管理的对象就已经初始化了。
4.Spring配置
4.1 Bean配置
<bean id="user" class="com.kevin.pojo.User" name="user1,user2 user3;user4"/>id:bean的唯一标识符,也相当于我们学过的对象名
class:bean对象所对应的全限定名:包名+类型
name:别名,而且name可以同时取多个别名
4.2 import
可以将多个配置文件,导入合并一个
规范命名: applicationContext.xml
5.依赖注入
5.1 构造器注入 constructor-arg
5.2 Set方式注入【重点】
依赖注入:Set注入
依赖:bean对象的创建依赖于容器
注入:bean对象中的所有属性,由容器来注入!
- 普通注入
<property name="name" value="劳务"/> - Bean注入
<bean id="address" class="com.kevin.pojo.Address"> <property name="address" value="西安"/> </bean> <property name="address" ref="address"/> - 数组
<property name="books"> <array> <value>西游记</value> <value>三国演义</value> <value>红楼梦</value> <value>水浒传</value> </array> </property> - List
<property name="hobbys"> <list> <value>听歌</value> <value>敲代码</value> <value>看电视</value> </list> </property> - Map
<property name="card"> <map> <entry key="身份证" value="7437583248024"/> <entry key="驾驶证" value="437583248024s"/> </map> </property> - Set
<property name="games"> <set> <value>LOL</value> <value>COC</value> <value>BOB</value> </set> </property> - null
<property name="wife"> <null/> </property> - Properties
<property name="info">
    <props>
        <prop key="driver">location</prop>
        <prop key="url">...</prop>
        <prop key="username">root</prop>
        <prop key="password">123456</prop>
    </props>
</property>
5.3 拓展注入
使用p命令空间和c命令空间进行注入
注意点:p命令和c命名空间不能直接使用,需要导入xml约束
xmlns:p="http://www.springframework.org/schema/p"
<bean name="john-modern" class="com.example.Person" p:name="John Doe" p:spouse-ref="jane"/>
xmlns:c="http://www.springframework.org/schema/c"
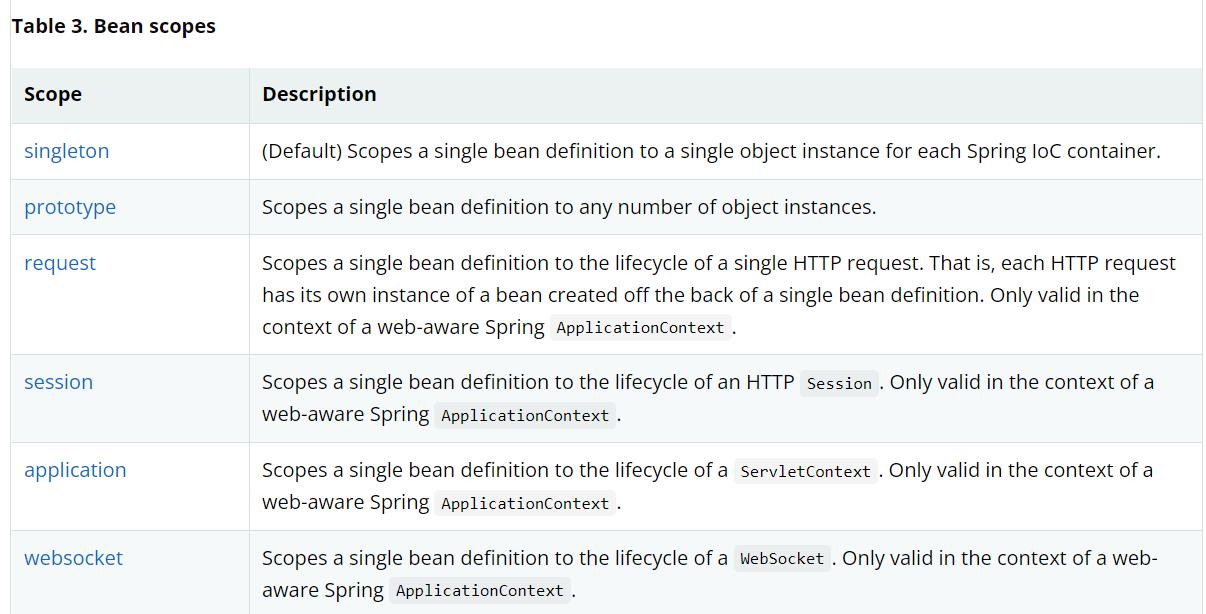
5.4 bean的作用域

- 单例模式(Spring默认机制)
<bean id="user" class="com.kevin.pojo.User" scope="singleton"/> - 原型模式:每次从容器中get的时候,都会产生一个新对象 prototype
- 其余的request、session、application 这些只能在web开发中使用
6.Bean的自动装配
自动装配是Spring满足bean依赖一钟方式
spring会在上下文中自动寻找,并自动给bean装配属性!
6.1 在Spring中有三种装配的方式
- 在xml中显示的设置
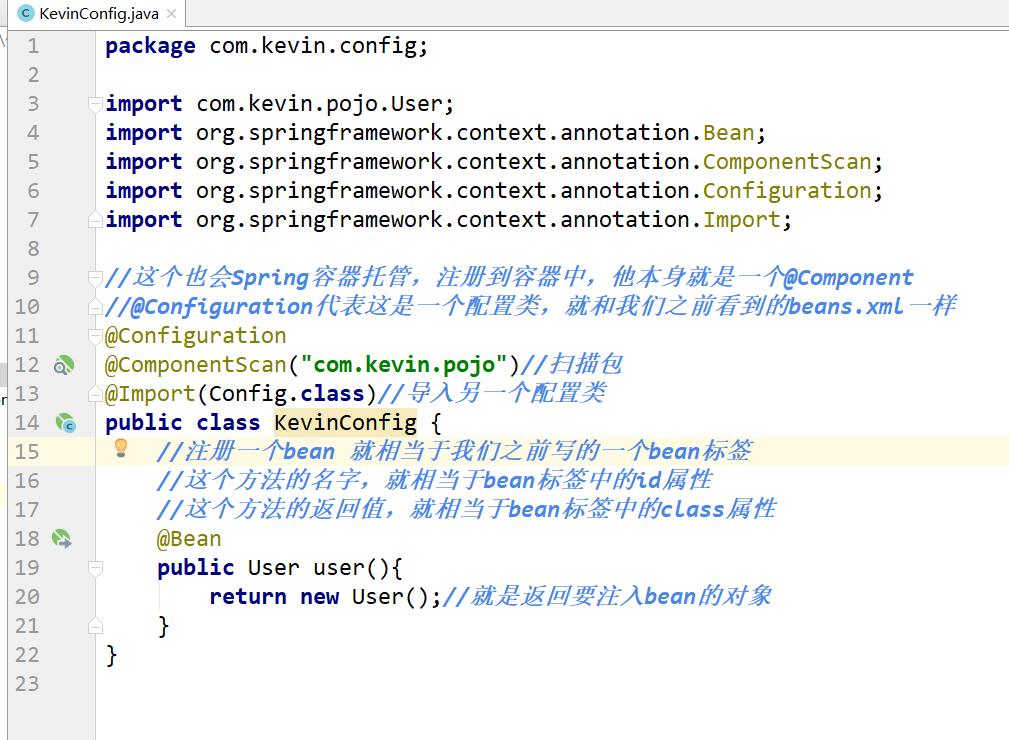
- 在java中显示配置
new AnnotationConfigApplicationContext(KevinConfig.class)
- 隐式的自动装配bean*
-
- bean有个属性autowire
- byName:会自动在容器上下文中查找,和自己对象set方法后面值对应的bean的id(id唯一)
- byType:会自动在容器上下文中查找,和自己对象属性类型相同的bean(class唯一)
6.2 使用注解实现自动装配
- 导入约束:context约束
查看代码
<?xml version="1.0" encoding="UTF-8"?> <beans xmlns="http://www.springframework.org/schema/beans" xmlns:xsi="http://www.w3.org/2001/XMLSchema-instance" xmlns:context="http://www.springframework.org/schema/context" xsi:schemaLocation="http://www.springframework.org/schema/beans https://www.springframework.org/schema/beans/spring-beans.xsd http://www.springframework.org/schema/context https://www.springframework.org/schema/context/spring-context.xsd"> <context:annotation-config/> </beans> - 配置注解支持:<context:annotation-config/>
- 注解说明
-
- @Autowired: 自动装配通过类型或者名字 如果Autowired不能唯一自动装配上属性,则需要通过@Qualifier("xxx");
- @Resource: 自动装配先通过名字后类型
- @Nullable: 字段标记了这个注解,则说明这个字段可以为null
- @Component 组件 等价于 <bean id="user" class="com.kevin.pojo.User"/>
- @Value("xxx") 相当于<property name="name" value="xxx"/>
- @Component有几个衍生注解,我们在web开发中,会按照mvc三层架构分层!
- dao 【@Repository】
- service 【@Service】
- controller(servlet)【@Controller】
- 这四个注解的功能都是一样的,都是代表将某个类注册到Spring中,装配Bean
- @Scope(“xxx”)作用域
<context:annotation-config/>
<!--指定要扫描的包,这个包下的注解会生效-->
<context:component-scan base-package="com.kevin"/>
以上是关于Spring学习的主要内容,如果未能解决你的问题,请参考以下文章