python接口自动化10-excel设计模式实战
Posted 广深-小龙 --扬帆起航!
tags:
篇首语:本文由小常识网(cha138.com)小编为大家整理,主要介绍了python接口自动化10-excel设计模式实战相关的知识,希望对你有一定的参考价值。
前言
一、简介
1.环境准备:python+requests+excel+unittest+ddt,主要安装以下环境,其它一般都有了,没有自行安装:
- pip install xlrd
- pip install xlutils
- pip install ddt
- pip install requests
- HTMLTestRunner

2.目前实现的功能:
- 封装requests请求方法
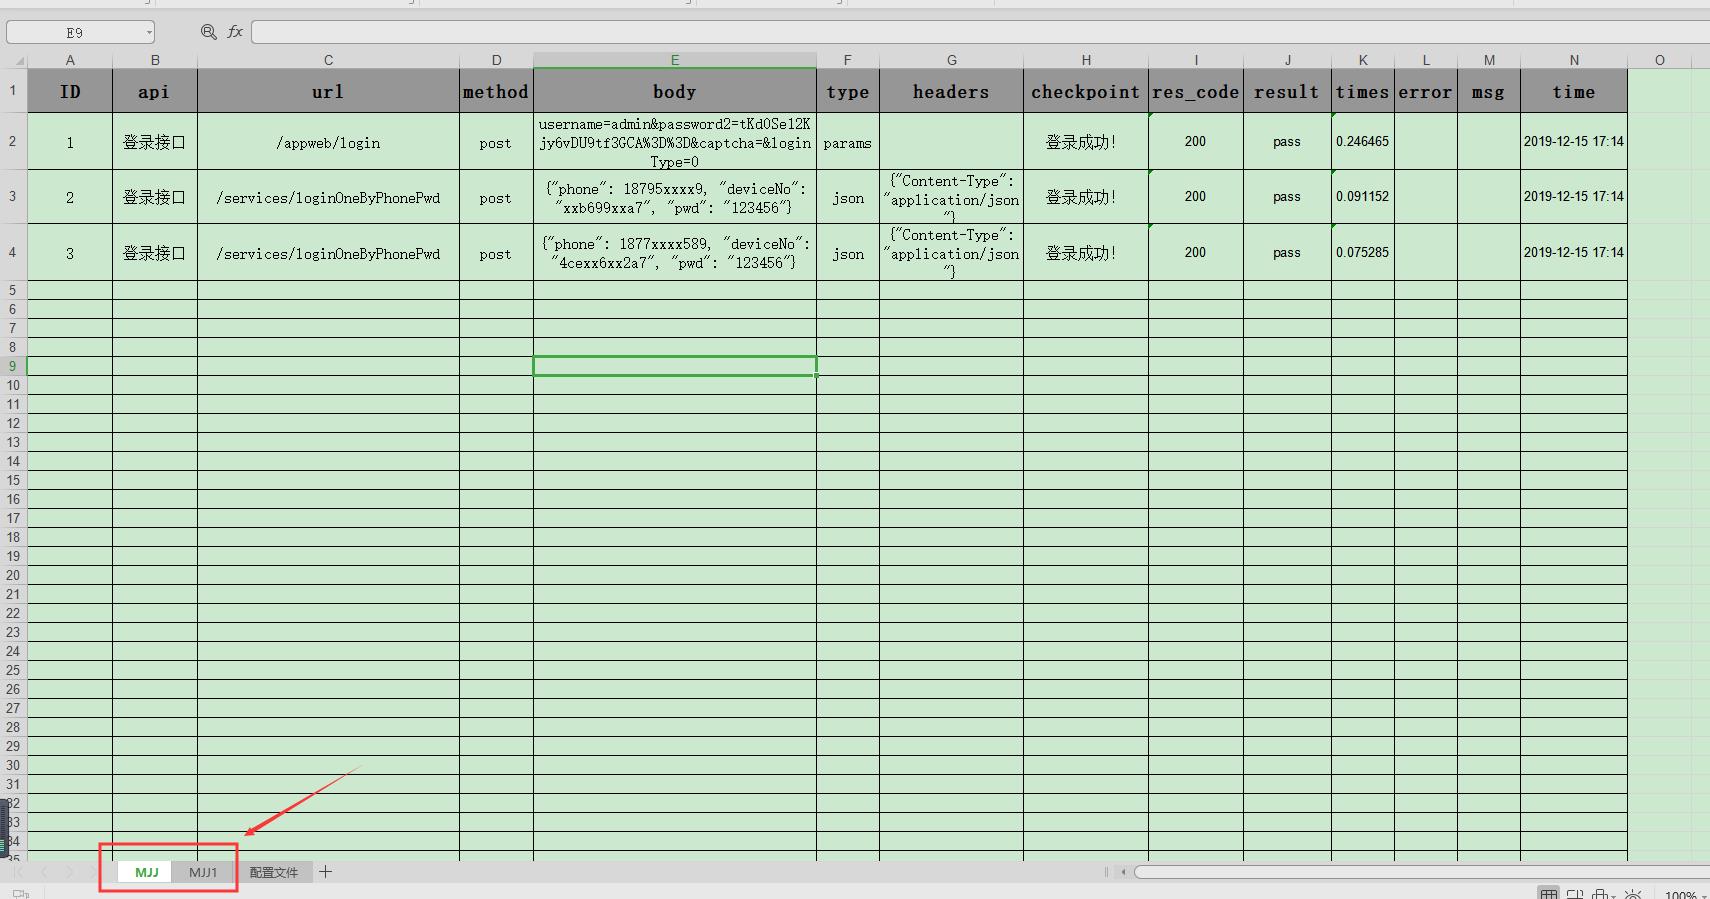
- excel读取接口请求参数,断言结果,支持多个table
- 运行结果新写入一个excel中(很鸡肋,每次看excel报告都要调一下上下居中自动分行等)
- 用unittest+ddt数据驱动模式执行
- HTMLTestRunner生成可视化的html报告
- 用例不通过即发邮件(比较鸡肋,以前用selenium继承下来的)
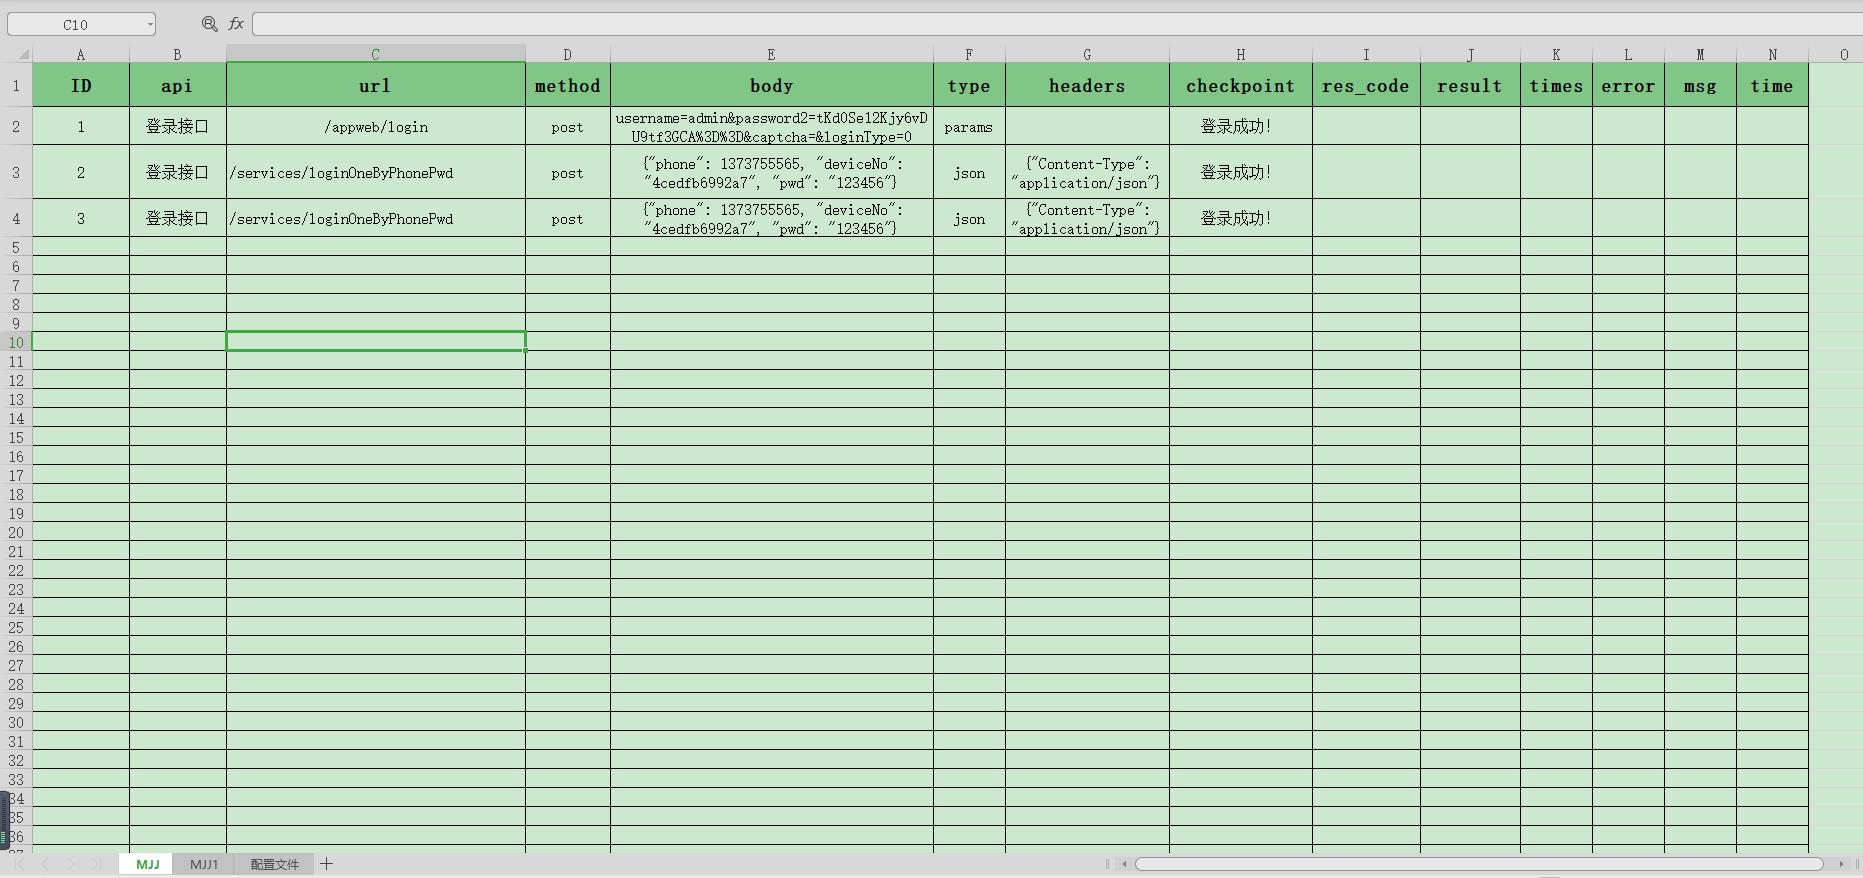
3.excel,格式如下:

二、封装模块
1.读取excel封装
# coding:utf-8
import xlrd
class Excel():
    \'\'\'excelPath= excel 的目录路径,sheetName = 自定义table\'\'\'
    def __init__(self, excelPath, tableName=\'Sheet1\'):
        self.data = xlrd.open_workbook(excelPath)
        self.table = self.data.sheet_by_name(tableName)
        self.keys = self.table.row_values(0)    # 获取第一行作为key值
        self.rowNum = self.table.nrows          # 获取总行数
        self.colNum = self.table.ncols          # 获取总列数

    def dict_data(self):
        if self.rowNum <= 1:
            print("总行数小于1")
        else:
            r = []
            j = 1
            for i in range(self.rowNum-1):
                s = {}
                values = self.table.row_values(j)   # 从第二行取对应values值
                for x in range(self.colNum):
                    s[self.keys[x]] = values[x]
                r.append(s)
                j += 1
            return r

if __name__ == "__main__":
    data = Excel("G:\\\\python_study\\\\study\\\\excel_demo\\\\cases\\\\接口用例.xls", \'MJJ\')
    res = data.dict_data()[0]
    print(res)

2.request封装,和excel写入封装
我这里的‘配置文件’是用例方便切换ip的,看自己的需求。
# coding:utf-8
import json, os, requests,datetime
from xlrd import open_workbook
from xlutils.copy import copy
from study.excel_demo.common.excel import Excel

dir_path = os.path.dirname(os.path.dirname(os.path.realpath(__file__)))  # 获取模块目录
filename = os.path.join(dir_path, "cases", "接口用例.xls")
host_data = Excel(filename, \'配置文件\').dict_data()


def send_requests(excel_data,s=requests.session()):
    \'\'\'封装requests请求\'\'\'
    host = host_data[0][\'host\']
    excel_data = excel_data
    url = excel_data["url"]
    method = excel_data["method"]
    type = excel_data[\'type\']

    # 请求头部headers
    try:
        headers = eval(excel_data["headers"])
    except:
        headers = None

    print("*******正在执行用例:-----  ID: %s" % int(excel_data[\'ID\']))
    print("请求方式:%s, 请求url:%s" % (method, host+url))

    # post请求body内容
    try:
        bodydata = eval(excel_data["body"])

    except:bodydata = excel_data["body"]

    # 判断传data数据还是json
    if type == "json":
        body = json.dumps(bodydata)
    elif type == "params":
        body = bodydata
    else:
        body = bodydata
    if method == "post":
        print("请求类型为:%s ,body参数为:%s" % (type, body))

    res = {}   # 接受返回数据

    r = s.request(method=method,
                  url=host+url,
                  params=body,
                  headers=headers,
                  data=body,)

    print("响应信息为:%s" % r.content.decode("utf-8"))
    res[\'ID\'] = int(excel_data[\'ID\'])
    res["statuscode"] = str(r.status_code)          # 状态码转成str
    res["text"] = str(r.content.decode("utf-8"))
    res["times"] = str(r.elapsed.total_seconds())   # 接口请求时间转str

    if res["statuscode"] != "200":
        res["error"] = res["text"]
    else:
        res["error"] = ""
    res["msg"] = ""
    if excel_data["checkpoint"] in res["text"]:
        res["result"] = "pass"
        print("用例测试结果:  ID: %s---->%s" % (int(excel_data[\'ID\']), res["result"]))
    else:
        res["result"] = "fail"
        res["error"] = res["text"]
    res[\'time\'] = datetime.datetime.now().strftime("%Y-%m-%d %H:%M")
    return res

def wirte_result(res, report_path, tablename):
    \'\'\'
    1.传需要写入的res
    2.report_path:写入的路径
    3.tablename
    \'\'\'

    excel = copy(open_workbook(report_path,
                               formatting_info=True))   # 将xlrd的对象转化为xlwt的对象
    row_nub = res[\'ID\']                                 # 返回结果的行数row_nub
    table = excel.get_sheet(tablename)                          # 获取要操作的sheet
    table.write(row_nub, 8, res[\'statuscode\'])         # 写入返回状态码statuscode,第8列
    table.write(row_nub, 9, res[\'result\'])            # 测试结果 pass 还是fail
    table.write(row_nub, 10, res[\'times\'])             # 耗时
    table.write(row_nub, 11, res[\'error\'])             # 状态码非200时的返回信息
    table.write(row_nub, 12, res[\'msg\'])               # 抛异常
    table.write(row_nub, 13, res[\'time\'])               # 抛异常
    excel.save(report_path)                              # 保存并覆盖文件
3.test_api用例,支持多个excel的table,在全局变量修改tablename即可。
import unittest,ddt, os
from study.excel_demo.common import base
from study.excel_demo.common.excel import Excel
from xlrd import open_workbook
from xlutils.copy import copy

dir_path = os.path.dirname(os.path.dirname(os.path.realpath(__file__)))       # 获取模块路径
report_path = os.path.join(dir_path, "report", "api_excel测试报告.xls")     # 报告生成路径
filename = os.path.join(dir_path, "cases", "接口用例.xls")                   # 获取excel路径
testdata = Excel(filename, \'MJJ\').dict_data()                                 # tablename
excel1 = copy(open_workbook(filename, formatting_info=True))                  # 将xlrd的对象转化为xlwt的对象
excel1.save(report_path)                                                       # 每次执行前复制用例

@ddt.ddt
class Test_api(unittest.TestCase):
    @ddt.data(*testdata)
    def test_login_api(self, data):
        res = base.send_requests(data)
        base.wirte_result(res, report_path, \'MJJ\')   # res写入保存
        check = data["checkpoint"]
        print("检查点---->:%s" % check)            # 检查点 checkpoint
        res_text = res["text"]                      # 返回结果
        self.assertIn(check, res_text)

if __name__ == "__main__":
    unittest.main()
4.run_cases,执行所有用例(发送邮件需申请QQ邮箱或其他邮箱的授权码)
import unittest, time, os, re, sys
# 声明路径,这块声明因为我在linux上的jenkins跑回找不到,也就是python的环境变量
cur_path = os.path.dirname(os.path.dirname(os.path.realpath(__file__)))
print(cur_path)
sys.path.append(cur_path)
from common import HTMLTestRunner
import smtplib                                  # 负责发送邮件
from email.mime.text import MIMEText            # 负责构造邮件的正文
from email.mime.multipart import MIMEMultipart

report_name = u\'API自动化测试报告.html\'         # 报告名称
report_title = u\'API自动化测试\'                  # 报告title名称
report_ename = \'api_report.html\'                # 附件名称
report_path = os.path.join(cur_path, report_name)  # 测试报告目录

def add_case(caseName=\'cases\', rule=\'test*.py\'):
    \'\'\'第一步:加载所有的测试用例\'\'\'
    case_path = os.path.join(cur_path, caseName)
    if not os.path.exists(case_path):os.mkdir(caseName)     # 如果不存在这个cases文件夹,就自动创建一个
    # 定义 discover 方法的参数,返回测试用例列表文件名
    discover = unittest.defaultTestLoader.discover(case_path,
    pattern=rule,
    top_level_dir=None)
    return discover

def run_case(all_case, reportName=\'report\'):
    \'\'\'第二步:执行所有的用例, 把结果写入测试报告\'\'\'
    report_path = os.path.join(cur_path, report_name)           # 测试报告名称
    print(\'生成报告目录在:%s\' % report_path)
    fp = open(report_path, \'wb\')                                     # 加载所有用例,写入测试报告,生成
    runner = HTMLTestRunner.HTMLTestRunner(stream=fp, title=report_title, retry=0)
    runner.run(all_case)    # 执行
    fp.close()

def get_report_html(report_path):
    \'\'\'第三步:获取最新的测试报告\'\'\'
    lists = os.listdir(report_path)                     # 获取report目录下的最新测试报告
    lists.sort(key=lambda fn: os.path.getmtime(os.path.join(report_path, fn)))
    print(u\'\\n最新测试生成的报告: \'+cur_path+lists[-1])
    report_file = os.path.join(report_path, lists[-1])  # 找到最新生成的报告文件
    return report_file

def send_mail(sender, pwd, receiver, smtpserver, report_file, port):
    \'\'\'发送最新的测试报告内容\'\'\'

    with open(report_file, "rb") as f:
        mail_body = f.read()

    # 定义邮件内容
    msg = MIMEMultipart()
    body = MIMEText(mail_body, _subtype=\'html\', _charset=\'utf-8\')
    msg[\'Subject\'] = report_title+u\'报告\'
    msg["from"] = sender
    if isinstance(receiver, str):
        msg["to"] = receiver
    if isinstance(receiver, list):
        msg["to"] = \',\'.join(receiver)

    # 加上时间戳,显示报告的内容
    time.strftime(\'%a, %d %b %Y %H_%M_%S %z\')
    msg.attach(body)

    # 邮箱添加附件
    att = MIMEText(open(report_file, "rb").read(), "base64", "utf-8")
    att["Content-Type"] = "application/octet-stream"
    att["Content-Disposition"] = \'attachment; filename= %s\' % report_ename
    msg.attach(att)

    try:
        smtp = smtplib.SMTP()       # 登录邮箱
        smtp.connect(smtpserver)    # 连接邮箱服务器
        smtp.login(sender, pwd)     # 用户名密码

    except:
        smtp = smtplib.SMTP_SSL(smtpserver, port)
        smtp.login(sender, pwd)                         # 登录
    smtp.sendmail(sender, receiver, msg.as_string())
    smtp.quit()
    print(\'测试报告电子邮件已发送!\')

def read_report():
    \'\'\' 判断是否发送邮件,读取报告判断是否存在:Failure、error、还有可能整个文件是空 \'\'\'
    ret = []
    with open(report_path, \'rb\')as f:
        f = f.read()
        res_Failure = re.findall(b\'class="tj failCase">(.+?)<\', f)
        res_error = (re.findall(b\'errorCase">(.+?)</span>\', f))
        res_null = (re.findall(b\'tj passCase">Pass</span>(.+?)</p>\', f))
        for i in res_error:
            ret.append(i)
        for i in res_Failure:
            ret.append(i)
        for i in res_null:
            try:
                if int(i):
                    return True
            except:pass
    return False

if __name__ == "__main__":
    all = add_case()   # 加载用例
    run_case(all)      # 执行用例

    report_file = get_report_html(os.path.join(cur_path))      # 获取最新测试报告路径

    # 邮箱配置
    sender = \'xxxxxxx@qq.com\'
    pwd = \'rlcfmsgcccgrbejj\'         # SSL授权码登录
    smtp_server = \'smtp.qq.com\'
    port = 465
    receiver = [\'xxxxx@qq.com\']  # 可多个邮箱传list对象

    # 判断报告是否有错误,有错误就发送邮件
    ret = read_report()
    if ret == False:
        send_mail(sender, pwd, receiver, smtp_server, report_file, port)
    elif not ret:
        send_mail(sender, pwd, receiver, smtp_server, report_file, port)
    else:print(\'用例全部通过,不需要发送邮件\')
这张图是1.0版本的了

三、执行结果展示
1.html 测试报告:

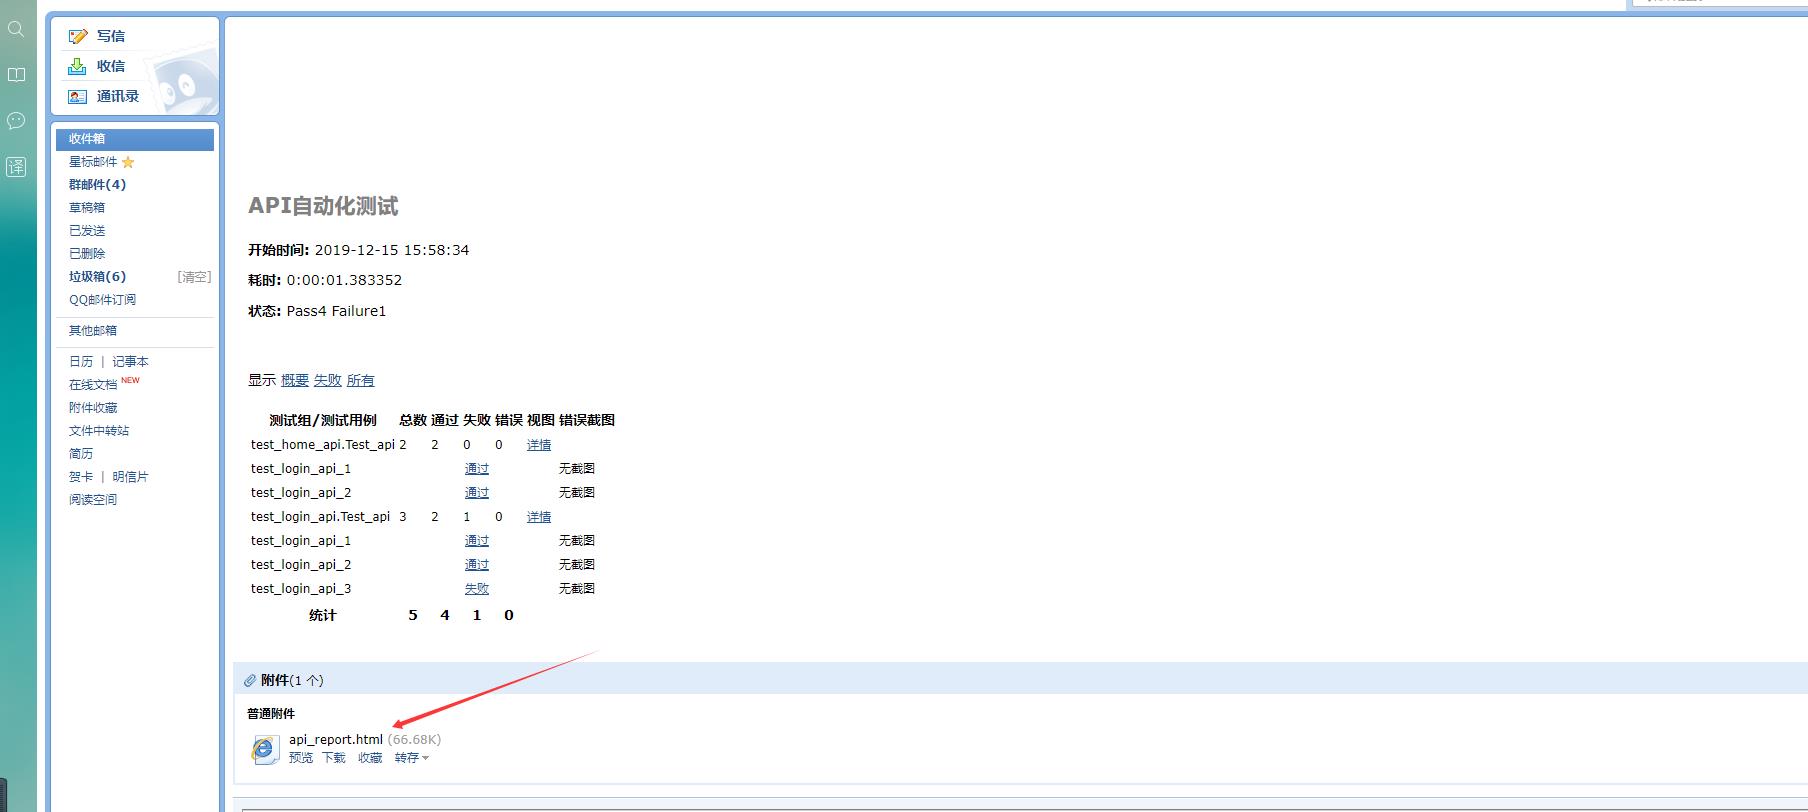
2.失败邮箱接收的报告:

3.excel 测试报告:
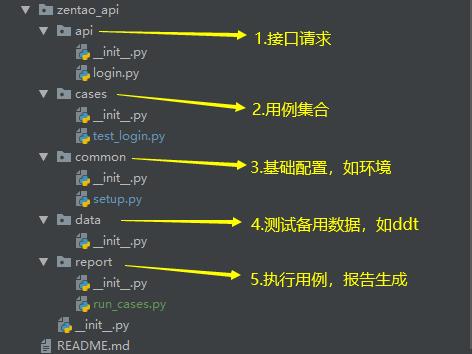
当然也是可以参考Page Object模式,更多的是用在selenium UI 自动化测试上,但是我们的api自动化测试也是可以参照这样的设计模式。
1.api:接口请求,及断言封装模块;
2.cases:用例集合;
3.common:配置文件,如环境,封装sql、读取excel操作等;
4.data:测试数据,如ddt;
5.执行用例,测试报告路径

如果要 token 那么直接封装一个获取 token 的函数,读取接口用例的时候将参数token加入或替换进去即可,实在不行你联系我。
说了那么多,还不如玩api平台呢?这是给点点点手下人用的,创建桌面快捷编辑写excel稳得一匹。
欢迎来大家QQ交流群一起学习:482713805 !!!
以上是关于python接口自动化10-excel设计模式实战的主要内容,如果未能解决你的问题,请参考以下文章
