Python学习第十三天 time datetime random os sysshutil json pickle shelve xml configparser hashlib suprocess
Posted Sundance8866
tags:
篇首语:本文由小常识网(cha138.com)小编为大家整理,主要介绍了Python学习第十三天 time datetime random os sysshutil json pickle shelve xml configparser hashlib suprocess相关的知识,希望对你有一定的参考价值。
https://www.cnblogs.com/yuanchenqi/articles/5732581.html
https://www.cnblogs.com/linhaifeng/articles/6384466.html#_label2
一 time与datetime模块
在Python中,通常有这几种方式来表示时间:
- 时间戳(timestamp):通常来说,时间戳表示的是从1970年1月1日00:00:00开始按秒计算的偏移量。我们运行“type(time.time())”,返回的是float类型。
- 格式化的时间字符串(Format String)
- 结构化的时间(struct_time):struct_time元组共有9个元素共九个元素:(年,月,日,时,分,秒,一年中第几周,一年中第几天,夏令时
import time
#--------------------------我们先以当前时间为准,让大家快速认识三种形式的时间
print(time.time()) # 时间戳:1487130156.419527
print(time.strftime("%Y-%m-%d %X")) #格式化的时间字符串:\'2017-02-15 11:40:53\'

print(time.localtime()) #本地时区的struct_time
print(time.gmtime())    #UTC时区的struct_time


%a    Locale’s abbreviated weekday name.
%A    Locale’s full weekday name.
%b    Locale’s abbreviated month name.
%B    Locale’s full month name.
%c    Locale’s appropriate date and time representation.
%d    Day of the month as a decimal number [01,31].
%H    Hour (24-hour clock) as a decimal number [00,23].
%I    Hour (12-hour clock) as a decimal number [01,12].
%j    Day of the year as a decimal number [001,366].
%m    Month as a decimal number [01,12].
%M    Minute as a decimal number [00,59].
%p    Locale’s equivalent of either AM or PM.    (1)
%S    Second as a decimal number [00,61].    (2)
%U    Week number of the year (Sunday as the first day of the week) as a decimal number [00,53]. All days in a new year preceding the first Sunday are considered to be in week 0.    (3)
%w    Weekday as a decimal number [0(Sunday),6].
%W    Week number of the year (Monday as the first day of the week) as a decimal number [00,53]. All days in a new year preceding the first Monday are considered to be in week 0.    (3)
%x    Locale’s appropriate date representation.
%X    Locale’s appropriate time representation.
%y    Year without century as a decimal number [00,99].
%Y    Year with century as a decimal number.
%z    Time zone offset indicating a positive or negative time difference from UTC/GMT of the form +HHMM or -HHMM, where H represents decimal hour digits and M represents decimal minute digits [-23:59, +23:59].
%Z    Time zone name (no characters if no time zone exists).
%%    A literal \'%\' character.
其中计算机认识的时间只能是\'时间戳\'格式,而程序员可处理的或者说人类能看懂的时间有: \'格式化的时间字符串\',\'结构化的时间\' ,于是有了下图的转换关系
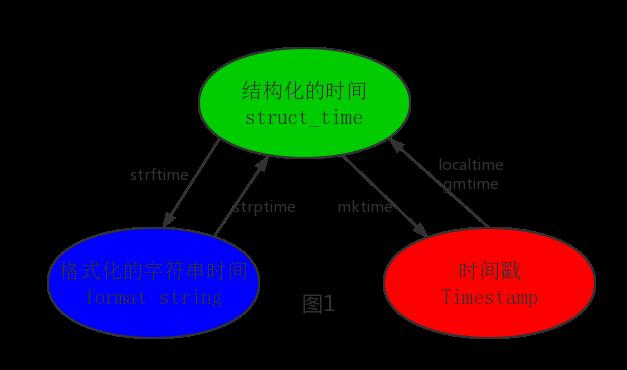
#--------------------------按图1转换时间
# localtime([secs])
# 将一个时间戳转换为当前时区的struct_time。secs参数未提供,则以当前时间为准。
time.localtime()
time.localtime(1473525444.037215)

# gmtime([secs]) 和localtime()方法类似,gmtime()方法是将一个时间戳转换为UTC时区(0时区)的struct_time。

# mktime(t) : 将一个struct_time转化为时间戳。
print(time.mktime(time.localtime()))#1473525749.0


# strftime(format[, t]) : 把一个代表时间的元组或者struct_time(如由time.localtime()和
# time.gmtime()返回)转化为格式化的时间字符串。如果t未指定,将传入time.localtime()。如果元组中任何一个
# 元素越界,ValueError的错误将会被抛出。
print(time.strftime("%Y-%m-%d %X", time.localtime()))#2016-09-11 00:49:56

# time.strptime(string[, format])
# 把一个格式化时间字符串转化为struct_time。实际上它和strftime()是逆操作。
print(time.strptime(\'2011-05-05 16:37:06\', \'%Y-%m-%d %X\'))
#time.struct_time(tm_year=2011, tm_mon=5, tm_mday=5, tm_hour=16, tm_min=37, tm_sec=6,
#  tm_wday=3, tm_yday=125, tm_isdst=-1)
#在这个函数中,format默认为:"%a %b %d %H:%M:%S %Y"。

#--------------------------按图2转换时间
# asctime([t]) : 把一个表示时间的元组或者struct_time表示为这种形式:\'Sun Jun 20 23:21:05 1993\'。
# 如果没有参数,将会将time.localtime()作为参数传入。
print(time.asctime())#Sun Sep 11 00:43:43 2016

# ctime([secs]) : 把一个时间戳(按秒计算的浮点数)转化为time.asctime()的形式。如果参数未给或者为
# None的时候,将会默认time.time()为参数。它的作用相当于time.asctime(time.localtime(secs))。
print(time.ctime())  # Sun Sep 11 00:46:38 2016
print(time.ctime(time.time()))  # Sun Sep 11 00:46:38 2016
1 #--------------------------其他用法
2 # sleep(secs)
3 # 线程推迟指定的时间运行,单位为秒。
# 10 clock()
# 这个需要注意,在不同的系统上含义不同。在UNIX系统上,它返回的是“进程时间”,它是用秒表示的浮点数(时间戳)。
# 而在WINDOWS中,第一次调用,返回的是进程运行的实际时间。而第二次之后的调用是自第一次调用以后到现在的运行
# 时间,即两次时间差。
Python time.clock在Python3.3废弃,在Python3.8中将被移除,使用perf_counter()方法代替
#时间加减
import datetime

# print(datetime.datetime.now()) #返回 2016-08-19 12:47:03.941925
#print(datetime.date.fromtimestamp(time.time()) )  # 时间戳直接转成日期格式 2016-08-19
# print(datetime.datetime.now() )
# print(datetime.datetime.now() + datetime.timedelta(3)) #当前时间+3天
# print(datetime.datetime.now() + datetime.timedelta(-3)) #当前时间-3天
# print(datetime.datetime.now() + datetime.timedelta(hours=3)) #当前时间+3小时
# print(datetime.datetime.now() + datetime.timedelta(minutes=30)) #当前时间+30分


#
# c_time  = datetime.datetime.now()
# print(c_time.replace(minute=3,hour=2)) #时间替换
二 random模块
import random

print(random.random())#(0,1)----float    大于0且小于1之间的小数

print(random.randint(1,3))  #[1,3]    大于等于1且小于等于3之间的整数

print(random.randrange(1,3)) #[1,3)    大于等于1且小于3之间的整数

print(random.choice([1,\'23\',[4,5]]))#1或者23或者[4,5]

print(random.sample([1,\'23\',[4,5]],2))#列表元素任意2个组合

print(random.uniform(1,3))#大于1小于3的小数,如1.927109612082716


item=[1,3,5,7,9]
random.shuffle(item) #打乱item的顺序,相当于"洗牌"
print(item)
生成随机验证码
import random
def make_code(n):
    res=\'\'
    for i in range(n):
        s1=chr(random.randint(65,90))
        s2=str(random.randint(0,9))
        res+=random.choice([s1,s2])
    return res

print(make_code(9))
三 os模块
os模块是与操作系统交互的一个接口
os.getcwd() 获取当前工作目录,即当前python脚本工作的目录路径
os.chdir("dirname")  改变当前脚本工作目录;相当于shell下cd
os.curdir  返回当前目录: (\'.\')
os.pardir  获取当前目录的父目录字符串名:(\'..\')
os.makedirs(\'dirname1/dirname2\')    可生成多层递归目录
os.removedirs(\'dirname1\')    若目录为空,则删除,并递归到上一级目录,如若也为空,则删除,依此类推
os.mkdir(\'dirname\')    生成单级目录;相当于shell中mkdir dirname
os.rmdir(\'dirname\')    删除单级空目录,若目录不为空则无法删除,报错;相当于shell中rmdir dirname
os.listdir(\'dirname\')    列出指定目录下的所有文件和子目录,包括隐藏文件,并以列表方式打印
os.remove()  删除一个文件
os.rename("oldname","newname")  重命名文件/目录
os.stat(\'path/filename\')  获取文件/目录信息
os.sep    输出操作系统特定的路径分隔符,win下为"\\\\",Linux下为"/"
os.linesep    输出当前平台使用的行终止符,win下为"\\t\\n",Linux下为"\\n"
os.pathsep    输出用于分割文件路径的字符串 win下为;,Linux下为:
os.name    输出字符串指示当前使用平台。win->\'nt\'; Linux->\'posix\'
os.system("bash command")  运行shell命令,直接显示
os.environ  获取系统环境变量
os.path.abspath(path)  返回path规范化的绝对路径
os.path.split(path)  将path分割成目录和文件名二元组返回
os.path.dirname(path)  返回path的目录。其实就是os.path.split(path)的第一个元素
os.path.basename(path)  返回path最后的文件名。如何path以/或\\结尾,那么就会返回空值。即os.path.split(path)的第二个元素
os.path.exists(path)  如果path存在,返回True;如果path不存在,返回False
os.path.isabs(path)  如果path是绝对路径,返回True
os.path.isfile(path)  如果path是一个存在的文件,返回True。否则返回False
os.path.isdir(path)  如果path是一个存在的目录,则返回True。否则返回False
os.path.join(path1[, path2[, ...]])  将多个路径组合后返回,第一个绝对路径之前的参数将被忽略
os.path.getatime(path)  返回path所指向的文件或者目录的最后存取时间
os.path.getmtime(path)  返回path所指向的文件或者目录的最后修改时间
os.path.getsize(path) 返回path的大小
在Linux和Mac平台上,该函数会原样返回path,在windows平台上会将路径中所有字符转换为小写,并将所有斜杠转换为饭斜杠。
>>> os.path.normcase(\'c:/windows\\\\system32\\\\\')
\'c:\\\\windows\\\\system32\\\\\'


规范化路径,如..和/
>>> os.path.normpath(\'c://windows\\\\System32\\\\../Temp/\')
\'c:\\\\windows\\\\Temp\'

>>> a=\'/Users/jieli/test1/\\\\\\a1/\\\\\\\\aa.py/../..\'
>>> print(os.path.normpath(a))
/Users/jieli/test1
os路径处理
#方式一:推荐使用
import os
#具体应用
import os,sys
possible_topdir = os.path.normpath(os.path.join(
    os.path.abspath(__file__),
    os.pardir, #上一级
    os.pardir,
    os.pardir
))
sys.path.insert(0,possible_topdir)


#方式二:不推荐使用
os.path.dirname(os.path.dirname(os.path.dirname(os.path.abspath(__file__))))
# 使用文件绝对引用添加环境变量
import os,sys
Base_DIR=os.path.dirname(os.path.dirname(os.path.dirname(os.path.abspath(__file__))))
sys.path.append(Base_DIR)
print(sys.path)
四 sys模块
#进度条, stdout.write相当于print,使用flush刷新
import time,sys
for i in range(100):
    sys.stdout.write("#")
    time.sleep(0.1)
    sys.stdout.flush()
1 sys.argv           命令行参数List,第一个元素是程序本身路径 (python sys_test.py sdf kjk 123  输出结果[\'sys_test.py\', \'sdf\', \'kjk\', \'123\'])
2 sys.exit(n)        退出程序,正常退出时exit(0),代码中退出,命令行下使用ctrl+Z或者exit()退出
3 sys.version        获取Python解释程序的版本信息
4 sys.maxint         最大的Int值
5 sys.path           返回模块的搜索路径,初始化时使用PYTHONPATH环境变量的值
6 sys.platform       返回操作系统平台名称
打印进度条
#=========知识储备==========
#进度条的效果
[#             ]
[##            ]
[###           ]
[####          ]

#指定宽度
print(\'[%-15s]\' %\'#\')
print(\'[%-15s]\' %\'##\')
print(\'[%-15s]\' %\'###\')
print(\'[%-15s]\' %\'####\')

#打印%
print(\'%s%%\' %(100)) #第二个%号代表取消第一个%的特殊意义

#可传参来控制宽度
print(\'[%%-%ds]\' %50) #[%-50s]
print((\'[%%-%ds]\' %50) %\'#\')
print((\'[%%-%ds]\' %50) %\'##\')
print((\'[%%-%ds]\' %50) %\'###\')


#=========实现打印进度条函数==========
import sys
import time

def progress(percent,width=50):
    if percent >= 1:
        percent=1
    show_str=(\'[%%-%ds]\' %width) %(int(width*percent)*\'#\')
    print(\'\\r%s %d%%\' %(show_str,int(100*percent)),file=sys.stdout,flush=True,end=\'\')


#=========应用==========
data_size=1025
recv_size=0
while recv_size < data_size:
    time.sleep(0.1) #模拟数据的传输延迟
    recv_size+=1024 #每次收1024

    percent=recv_size/data_size #接收的比例
    progress(percent,width=70) #进度条的宽度70
五 shutil模块
高级的 文件、文件夹、压缩包 处理模块
shutil.copyfileobj(fsrc, fdst[, length])
将文件内容拷贝到另一个文件中
import shutil

shutil.copyfileobj(open(\'old.xml\',\'r\'), open(\'new.xml\', \'w\'))
shutil.copyfile(src, dst)
拷贝文件
shutil.copyfile(\'f1.log\', \'f2.log\') #目标文件无需存在
shutil.copymode(src, dst)
仅拷贝权限。内容、组、用户均不变
shutil.copymode(\'f1.log\', \'f2.log\') #目标文件必须存在
shutil.copystat(src, dst)
仅拷贝状态的信息,包括:mode bits, atime, mtime, flags
shutil.copystat(\'f1.log\', \'f2.log\') #目标文件必须存在
shutil.copy(src, dst)
拷贝文件和权限
import shutil
shutil.copy(\'f1.log\', \'f2.log\')
shutil.copy2(src, dst)
拷贝文件和状态信息
import shutil
shutil.copy2(\'f1.log\', \'f2.log\')
shutil.ignore_patterns(*patterns)
shutil.copytree(src, dst, symlinks=False, ignore=None)
递归的去拷贝文件夹
import shutil
shutil.copytree(\'folder1\', \'folder2\', ignore=shutil.ignore_patterns(\'*.pyc\', \'tmp*\')) #目标目录不能存在,注意对folder2目录父级目录要有可写权限,ignore的意思是排除
拷贝软连接
import shutil

shutil.copytree(\'f1\', \'f2\', symlinks=True, ignore=shutil.ignore_patterns(\'*.pyc\', \'tmp*\'))

\'\'\'
通常的拷贝都把软连接拷贝成硬链接,即对待软连接来说,创建新的文件
\'\'\'
shutil.rmtree(path[, ignore_errors[, onerror]])
递归的去删除文件
import shutil
shutil.rmtree(\'folder1\')
shutil.move(src, dst)
递归的去移动文件,它类似mv命令,其实就是重命名。
import shutil
shutil.move(\'folder1\', \'folder3\')
shutil.make_archive(base_name, format,...)
创建压缩包并返回文件路径,例如:zip、tar
创建压缩包并返回文件路径,例如:zip、tar
- base_name: 压缩包的文件名,也可以是压缩包的路径。只是文件名时,则保存至当前目录,否则保存至指定路径,
如 data_bak =>保存至当前路径
如:/tmp/data_bak =>保存至/tmp/ - format: 压缩包种类,“zip”, “tar”, “bztar”,“gztar”
- root_dir: 要压缩的文件夹路径(默认当前目录)
- owner: 用户,默认当前用户
- group: 组,默认当前组
- logger: 用于记录日志,通常是logging.Logger对象
#将 /data 下的文件打包放置当前程序目录
import shutil
ret = shutil.make_archive("data_bak", \'gztar\', root_dir=\'/data\')


#将 /data下的文件打包放置 /tmp/目录
import shutil
ret = shutil.make_archive("/tmp/data_bak", \'gztar\', root_dir=\'/data\')
shutil 对压缩包的处理是调用 ZipFile 和 TarFile 两个模块来进行的,详细:
zipfile压缩解压缩
import zipfile

# 压缩
z = zipfile.ZipFile(\'laxi.zip\', \'w\')
z.write(\'a.log\')
z.write(\'data.data\')
z.close()

# 解压
z = zipfile.ZipFile(\'laxi.zip\', \'r\')
z.extractall(path=\'.\')
z.close()
tarfile压缩解压缩
import tarfile

# 压缩
>>> t=tarfile.open(\'/tmp/egon.tar\',\'w\')
>>> t.add(\'/test1/a.py\',arcname=\'a.bak\')
>>> t.add(\'/test1/b.py\',arcname=\'b.bak\')
>>> t.close()


# 解压
>>> t=tarfile.open(\'/tmp/egon.tar\',\'r\')
>>> t.extractall(\'/egon\')
>>> t.close()
六 json&pickle模块
之前我们学习过用eval内置方法可以将一个字符串转成python对象,不过,eval方法是有局限性的,对于普通的数据类型,json.loads和eval都能用,但遇到特殊类型的时候,eval就不管用了,所以eval的重点还是通常用来执行一个字符串表达式,并返回表达式的值。
import json
x="[null,true,false,1]"
print(eval(x)) #报错,无法解析null类型,而json就可以
print(json.loads(x))
什么是序列化?
我们把对象(变量)从内存中变成可存储或传输的过程称之为序列化,在Python中叫pickling,在其他语言中也被称之为serialization,marshalling,flattening等等,都是一个意思。
为什么要序列化?
1:持久保存状态
需知一个软件/程序的执行就在处理一系列状态的变化,在编程语言中,\'状态\'会以各种各样有结构的数据类型(也可简单的理解为变量)的形式被保存在内存中。
内存是无法永久保存数据的,当程序运行了一段时间,我们断电或者重启程序,内存中关于这个程序的之前一段时间的数据(有结构)都被清空了。
在断电或重启程序之前将程序当前内存中所有的数据都保存下来(保存到文件中),以便于下次程序执行能够从文件中载入之前的数据,然后继续执行,这就是序列化。
具体的来说,你玩使命召唤闯到了第13关,你保存游戏状态,关机走人,下次再玩,还能从上次的位置开始继续闯关。或如,虚拟机状态的挂起等。
2:跨平台数据交互
序列化之后,不仅可以把序列化后的内容写入磁盘,还可以通过网络传输到别的机器上,如果收发的双方约定好实用一种序列化的格式,那么便打破了平台/语言差异化带来的限制,实现了跨平台数据交互。
反过来,把变量内容从序列化的对象重新读到内存里称之为反序列化,即unpickling。
如何序列化之json和pickle:
json
如果我们要在不同的编程语言之间传递对象,就必须把对象序列化为标准格式,比如XML,但更好的方法是序列化为JSON,因为JSON表示出来就是一个字符串,可以被所有语言读取,也可以方便地存储到磁盘或者通过网络传输。JSON不仅是标准格式,并且比XML更快,而且可以直接在Web页面中读取,非常方便。
JSON表示的对象就是标准的JavaScript语言的对象,JSON和Python内置的数据类型对应如下:
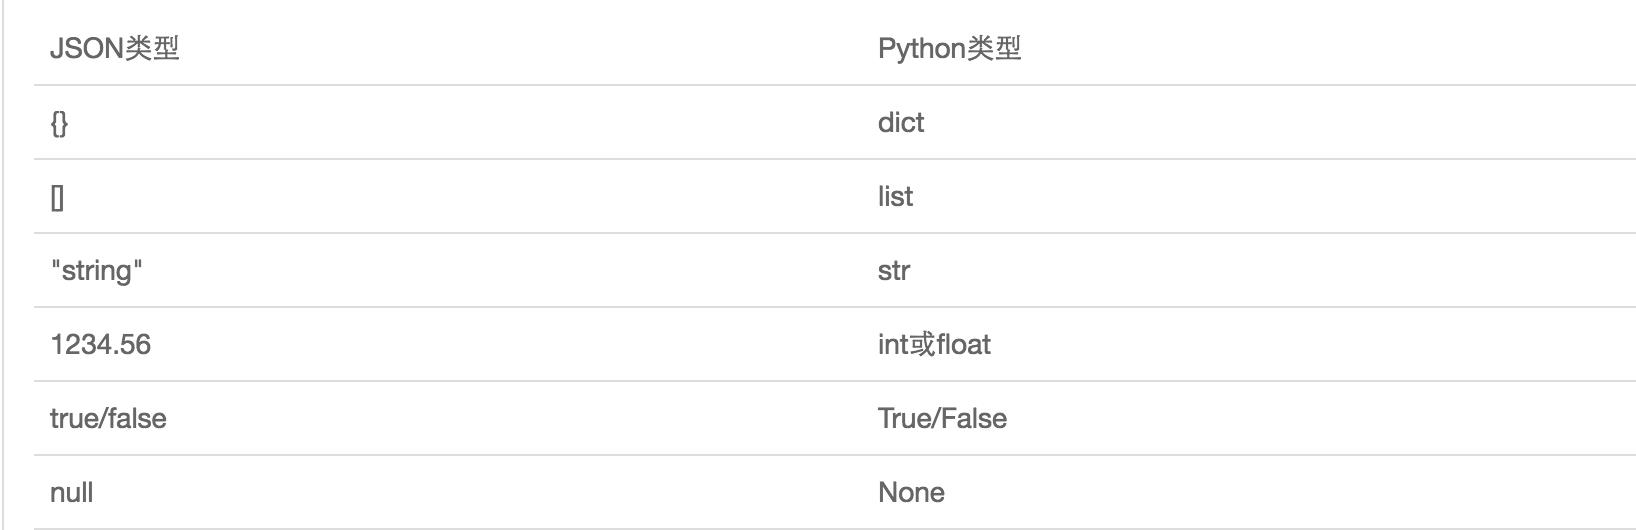

import json

dic={\'name\':\'alvin\',\'age\':23,\'sex\':\'male\'}
print(type(dic))#<class \'dict\'>

j=json.dumps(dic)
print(type(j))#<class \'str\'>


f=open(\'序列化对象\',\'w\')
f.write(j)  #-------------------等价于json.dump(dic,f)
f.close()
#-----------------------------反序列化<br>
import json
f=open(\'序列化对象\')
data=json.loads(f.read())#  等价于data=json.load(f)
 注意点
import json
#dct="{\'1\':111}"#json 不认单引号
#dct=str({"1":111})#报错,因为生成的数据还是单引号:{\'one\': 1}

dct=\'{"1":"111"}\'
print(json.loads(dct))

#conclusion:
#        无论数据是怎样创建的,只要满足json格式,就可以json.loads出来,不一定非要dumps的数据才能loads
了解
# 在python解释器2.7与3.6之后都可以json.loads(bytes类型),但唯独3.5不可以
>>> import json
>>> json.loads(b\'{"a":111}\')
Traceback (most recent call last):
  File "<stdin>", line 1, in <module>
  File "/Users/linhaifeng/anaconda3/lib/python3.5/json/__init__.py", line 312, in loads
    s.__class__.__name__))
TypeError: the JSON object must be str, not \'bytes\'
猴子补丁与ujson
# 一.什么是猴子补丁?
      猴子补丁的核心就是用自己的代码替换所用模块的源代码,详细地如下
  1,这个词原来为Guerrilla Patch,杂牌军、游击队,说明这部分不是原装的,在英文里guerilla发音和gorllia(猩猩)相似,再后来就写了monkey(猴子)。
  2,还有一种解释是说由于这种方式将原来的代码弄乱了(messing with it),在英文里叫monkeying about(顽皮的),所以叫做Monkey Patch。


# 二. 猴子补丁的功能(一切皆对象)
  1.拥有在模块运行时替换的功能, 例如: 一个函数对象赋值给另外一个函数对象(把函数原本的执行的功能给替换了)
class Monkey:
    def hello(self):
        print(\'hello\')

    def world(self):
        print(\'world\')


def other_func():
    print("from other_func")


monkey = Monkey()
monkey.hello = monkey.world
monkey.hello()
monkey.world = other_func
monkey.world()

# 三.monkey patch的应用场景
如果我们的程序中已经基于json模块编写了大量代码了,发现有一个模块ujson比它性能更高,
但用法一样,我们肯定不会想所有的代码都换成ujson.dumps或者ujson.loads,那我们可能
会想到这么做
import ujson as json,但是这么做的需要每个文件都重新导入一下,维护成本依然很高
此时我们就可以用到猴子补丁了
只需要在入口处加上
, 只需要在入口加上:

import json
import ujson

def monkey_patch_json():
    json.__name__ = \'ujson\'
    json.dumps = ujson.dumps
    json.loads = ujson.loads

monkey_patch_json() # 之所以在入口处加,是因为模块在导入一次后,后续的导入便直接引用第一次的成果

#其实这种场景也比较多, 比如我们引用团队通用库里的一个模块, 又想丰富模块的功能, 除了继承之外也可以考虑用Monkey
Patch.采用猴子补丁之后,如果发现ujson不符合预期,那也可以快速撤掉补丁。个人感觉Monkey
Patch带了便利的同时也有搞乱源代码的风险!
pickle

import pickle

dic={\'name\':\'alvin\',\'age\':23,\'sex\':\'male\'}

print(type(dic))#<class \'dict\'>

j=pickle.dumps(dic)
print(type(j))#<class \'bytes\'>


f=open(\'序列化对象_pickle\',\'wb\')#注意是w是写以上是关于Python学习第十三天 time datetime random os sysshutil json pickle shelve xml configparser hashlib suprocess的主要内容,如果未能解决你的问题,请参考以下文章