python3 实现堡垒机功能(并发执行命令及上传下载文件)
Posted
tags:
篇首语:本文由小常识网(cha138.com)小编为大家整理,主要介绍了python3 实现堡垒机功能(并发执行命令及上传下载文件)相关的知识,希望对你有一定的参考价值。
转载请注明出处,欢迎提出宝贵意见,谢谢!
功能介绍:
1、主机分组
登录后显示分组主机及主机数量
选择主机组后显示该主机组下所有主机信息,主机名及IP
显示输入选择:
1、执行命令
利用线程并发组内所有主机同时执行命令,并将结果,返回
格式为:
----------------------host1------------------
----------------------host2------------------
----------------------host3------------------
----------------------host4------------------
2、传输文件
主函数:

#Author by Guangboli
#_*_ coding:utf-8 _*_

import configparser,threading,paramiko,time,os,sys
base_dir = os.path.dirname(os.path.dirname(os.path.abspath(__file__)))
sys.path.append(base_dir)
from core import Color_set
color = Color_set.Colorset()
cf = configparser.ConfigParser()
cf.read(‘config‘,encoding=‘utf-8‘)
secs = cf.sections()
def get_group_info():
    ‘‘‘获取主机组信息‘‘‘
    print("主机组列表:")
    for i in secs:
        opts = cf.options(i)
        quantity = int(len(opts) / 4)
        print(i,‘[%s]‘%quantity)
def get_host_ip_list(group_name,quantity):
    ‘‘‘获取主机ip列表信息‘‘‘
    i = 1
    while i <= quantity:
        print(cf.get(group_name,‘ip%s‘%i))
        i+=1
def cmd_run(ip,username,password,cmd):

    ssh = paramiko.SSHClient()
    ssh.set_missing_host_key_policy(paramiko.AutoAddPolicy())
    try:
        ssh.connect(hostname=ip, port=22, username=username, password=password)
        stdin, stdout, stderr = ssh.exec_command(cmd)  # 执行命令,不可执行类似vim,top watch命令
        result = stdout.read().decode()  # 获取结果
        tips = color.red(‘- - - - - %s - - - - - - ‘.center(20) % ip)
        print(tips)
        print(result,stderr.read().decode())
    except Exception as e:
        print(‘%s 主机发生异常:‘%ip,e)
    ssh.close()
def transport_put_file(ip,username,password,cmd):
    try:
        transport = paramiko.Transport((ip, 22))
        transport.connect(username=username, password=password)
        sftp = paramiko.SFTPClient.from_transport(transport)
        sftp.put(local_file,remote_dir+‘/‘+put_filename)
    except Exception as e:
        print(print(‘%s 主机发生异常:‘%ip,e))
    transport.close()
def transport_get_file(ip,username,password,cmd):
    transport = paramiko.Transport((ip, 22))
    try:
        transport.connect(username=username, password=password)
        sftp = paramiko.SFTPClient.from_transport(transport)
        sftp.get(remote_file,local_dir+‘\\\\‘+ip+‘-‘+get_filename)    #Linux 需要将\\\\改为/
    except Exception as e:
        print(print(‘%s 主机发生异常:‘%ip,e))
    transport.close()
def make_treading(func,quantity,group_name,cmd):
    i = 1
    while i <= quantity:
        ip = cf.get(group_name, ‘ip%s‘ % i)
        username = cf.get(group_name, ‘username%s‘ % i)
        password = cf.get(group_name, ‘password%s‘ % i)
        thread = threading.Thread(target=func,args=(ip,username,password,cmd))
        thread.setDaemon(True)
        thread.start()
        i+=1
def welcome():
    ‘‘‘show group and host ip information ‘‘‘
    get_group_info()
    global opts,quantity,group_name
    while True:
        group_name = input(‘请输入组名(退出请按q or Q):‘).strip().upper()
        if group_name == ‘Q‘:
            print(‘欢迎再次使用,谢谢....‘)
            exit()
        elif group_name not in secs:
            print("Wrong input,please confirm!")
        else:
            break
    print(group_name,‘组下的主机:‘)
    opts = cf.options(group_name)
    quantity = int(len(opts) / 4)       #hosts quantity
    get_host_ip_list(group_name,quantity)
def menu_line2():
    global local_dir,local_file,remote_file,remote_dir,get_filename,put_filename
    print(‘‘‘usage:
          上传文件:put 本地文件 远程目录
          下载文件:get 远程文件 本地目录
          退出输入q or Q
          examples:
          put test.txt /tmp
          get /tmp/test.txt /data
          ‘‘‘)
    while True:
        cmd = input("请输入操作:").strip()
        args = cmd.split()
        if cmd == ‘q‘ or cmd == ‘Q‘:
            menu_line1()

        elif len(args) != 3:
            print("输入有误,请重新输入!")
            menu_line2()
        else:
            if args[0] == ‘put‘:
                local_file = args[1]
                put_filename=args[1].split(‘/‘)[-1]
                remote_dir = args[2]
                func = transport_put_file
                make_treading(func, quantity, group_name, cmd)
                while threading.active_count() != 1:
                    time.sleep(0.1)
                else:
                    continue
            elif args[0] == ‘get‘:
                remote_file = args[1]
                get_filename = args[1].split(‘/‘)[-1]
                local_dir = args[2]
                func = transport_get_file
                make_treading(func, quantity, group_name, cmd)
                while threading.active_count() != 1:
                    time.sleep(0.1)
                else:
                    continue
            else:
                print("输入格式有误,请重新输入!")
                menu_line2()
def menu_line1():
    ‘‘‘commadns menu‘‘‘
    func = cmd_run
    while True:
        print(‘1、执行命令\\n2、传输文件\\n‘)
        choice = input("请选择操作:").strip()
        if choice == ‘1‘:
            cmd = input("请输入命令:").strip()
            print(‘%s 命令执行结果如下:‘ % cmd)
            make_treading(func,quantity,group_name,cmd)
            while threading.active_count() != 1:
                # print(threading.active_count())
                time.sleep(0.1)
            else:
                continue
        elif choice == ‘2‘:
            menu_line2()
        elif choice == ‘q‘ or choice == ‘Q‘:
            welcome()
        else:
            continue
def run():
    ‘‘‘
    main function
    ‘‘‘
    print(‘welcome.....‘)
    welcome()
    menu_line1()

if __name__ == ‘__main__‘:
    run()
config文件:

[GROUP1]
host1 = host1
ip1 = 10.1.2.3
username1 = root
password1 = 123456
host2 = host2
ip2 = 10.1.2.2
username2 = user1
password2 = 123456
host3 = host3
ip3 = 10.1.2.7
username3 = user2
password3 = 123456


[GROUP2]
host1 = host1
ip1 = 10.1.2.1
username1 = root
password1 = 123456
host2 = host2
ip2 = 10.1.2.2
username2 = root
password2 = 123456
host3 = host3
ip3 = 10.1.2.3
username3 = root
password3 = 123456


[GROUP3]
host1 = host1
ip1 = 10.1.2.1
username1 = root
password1 = 123456
host2 = host2
ip2 = 10.1.2.2
username2 = root
password2 = 123456
host3 = host3
ip3 = 10.1.2.3
username3 = root
password3 = 123456
host4 = host4
ip4 = 10.1.2.4
username4 = root
password4 = 123456
host5 = host5
ip5 = 10.1.2.5
username5 = root
password5 = 123456


[GROUP4]
host1 = host1
ip1 = 10.1.2.1
username1 = root
password1 = 123456
host2 = host2
ip2 = 10.1.2.2
username2 = root
password2 = 123456
host3 = host3
ip3 = 10.1.2.3
username3 = root
password3 = 123456
host4 = host4
ip4 = 10.1.2.4
username4 = root
password4 = 123456
host5 = host5
ip5 = 10.1.2.5
username5 = root
password5 = 123456
host6 = host6
ip6 = 10.1.2.6
username6 = root
password6 = 123456
host7 = host7
ip7 = 10.1.2.7
username7 = root
password7 = 123456
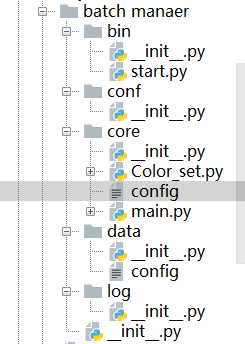
目录结果:

以上是关于python3 实现堡垒机功能(并发执行命令及上传下载文件)的主要内容,如果未能解决你的问题,请参考以下文章
