Python接口测试request
Posted Three legs cat
tags:
篇首语:本文由小常识网(cha138.com)小编为大家整理,主要介绍了Python接口测试request相关的知识,希望对你有一定的参考价值。
requests安装
- 用pip安装requests模块
- pip install requests

一、Get的使用
格式:get(url, params=None, **kwargs)
Get常见查询参数
- req.status_code:响应状态码
- req.raw:原始响应体,使用r.raw.read()读取
- req.content:字节方式的响应体,需要进行解码
- req.text:字符串方式的响应体,会自动更具响应头部的字符编码进行解码
- req.headers:以字典对象储存服务器响应头,但是这个字典比较特殊,字典键不区分大小写,若键不存在,则返回None
- req.json():request中内置的json解码器
- req.raise_for_status():请求失败(非200响应),抛出异常
- req.url:获取请求的url
- req.cookies:获取请求后的cookies
- req.encoding:获取编码
import requests
url = \'https://www.baidu.com/s\'
params = {
    \'Wd\':\'%E6%B5%8B%E8%AF%95\',
    \'prefixsug\':\'ceshi\',
}
header = {
    \'User-Agent\':\'Mozilla/5.0 (Macintosh; Intel Mac OS X 10_15_4) AppleWebKit/537.36 (KHTML, like Gecko) Chrome/80.0.3987.163 Safari/537.36\',
}
cookie = {

}
data = requests.get(url=url,headers=header,params=params,cookies=cookie)
print(data.content.decode(\'utf8\'))
断言:
assert data.json()[\'status\']==False
Post请求参数
格式:post(url,data,json,…)
Post常见查询参数
- url:post请求地址
- data:body为application/x-www-form-urlencoded格式数据时传参入口
- json:body为json格式数据时传参入口
- headers:post请求需要header参数时传参入口
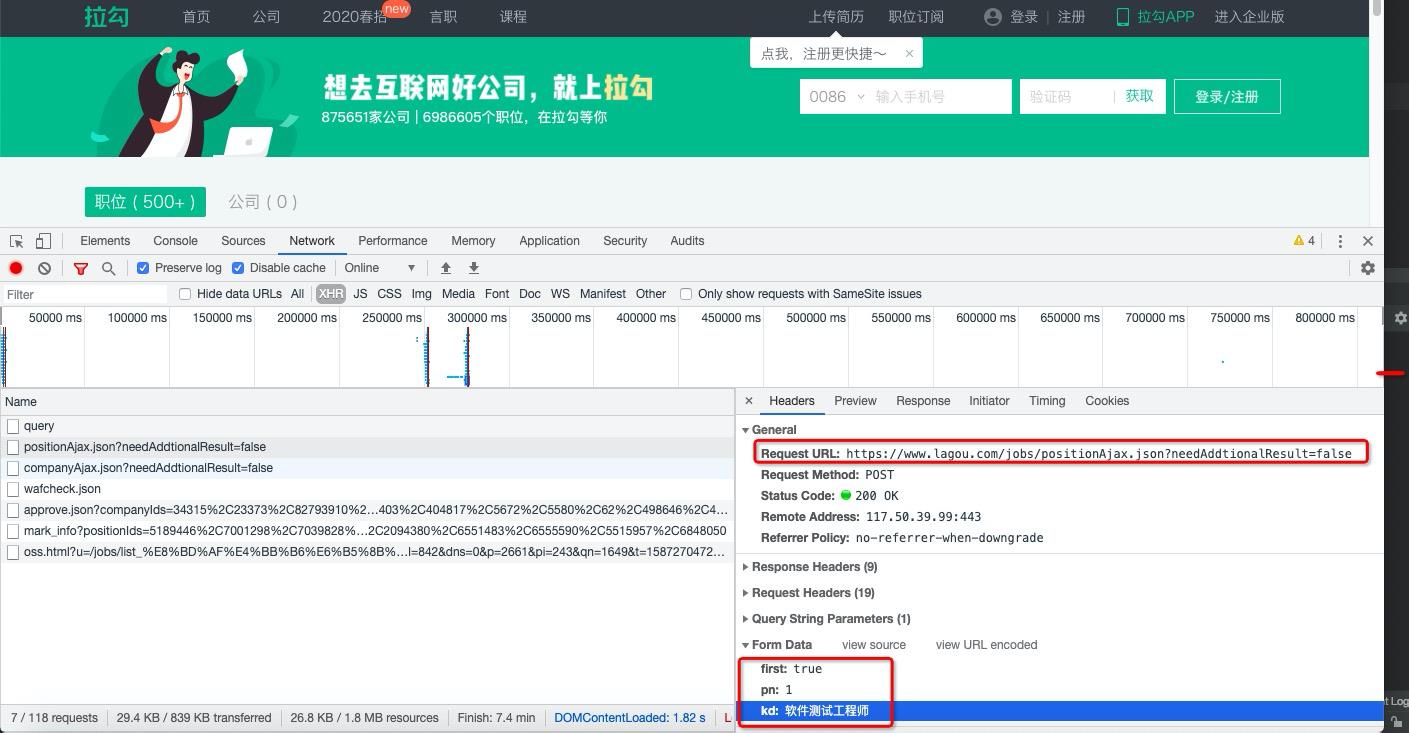
import requests,json

url = \'https://www.lagou.com/jobs/positionAjax.json\'
params = {
    \'needAddtionalResult\':\'false\'
}

header = {
    \'User-Agent\':\'Mozilla/5.0 (Macintosh; Intel Mac OS X 10_15_4) AppleWebKit/537.36 (KHTML, like Gecko) Chrome/80.0.3987.163 Safari/537.36\',
    \'Content-Type\':\'application/x-www-form-urlencoded; charset=UTF-8\'
}

body = {
    \'first\':\'true\',
    \'pn\':\'1\',
    \'kd\':\'软件测试工程师\',
}
# requests 操作  # timeout超时时间2秒   verify 安全证书True要有安全证书,根据浏览器要求   indent 内容做序列化
value = requests.post(url=url,headers=header,params=params,data = body,timeout=2.00,verify=True,indent=True)
print(value.json())
data = value.json()
filename = \'filename\'
x = json.dump(data,open(filename,\'w\'),ensure_ascii=False,indent=True)
y = json.load(open(filename,\'r\'))
print(y)
二、JSON模块
1、json.dumps()
- 用于将dict类型的数据转成str,因为如果直接将dict类型的数据写入json文件中会发生报错,因此在将数据写入时需要用到该函数
2、json.loads()
- json.loads()用于将str类型的数据转成dict。
- 与json.dumps()用法正好反过来。
3、json.dump()
- json.dump()用于将dict类型的数据转成str,并写入到json文件中。下面两种方法都可以将数据写入json文件
4、json.load()
- json.load()用于从json文件中读取数据
JSON数据处理
- import json
- json.dumps(req.json(),indent=True,ensure_ascii=False)
- req.json():json格式数据转换
- indent=True:json格式数据序列化
- ensure_ascii=False:json格式数据中文处理
三、请求超时、安全证书和内容序列化
请求超时 Requests.get中的timeout参数
Verify属性设置为False,安全证书免验证。 req= requests.get(url, verify=False)
内容做序列化 indent=True
# requests 操作  # timeout超时时间2秒   verify 安全证书True要有安全证书,根据浏览器要求   indent 内容做序列化
value = requests.get(url=url,headers=header,params=params,data = body,timeout=2.00,verify=True,indent=True)
四、COOKIE的处理
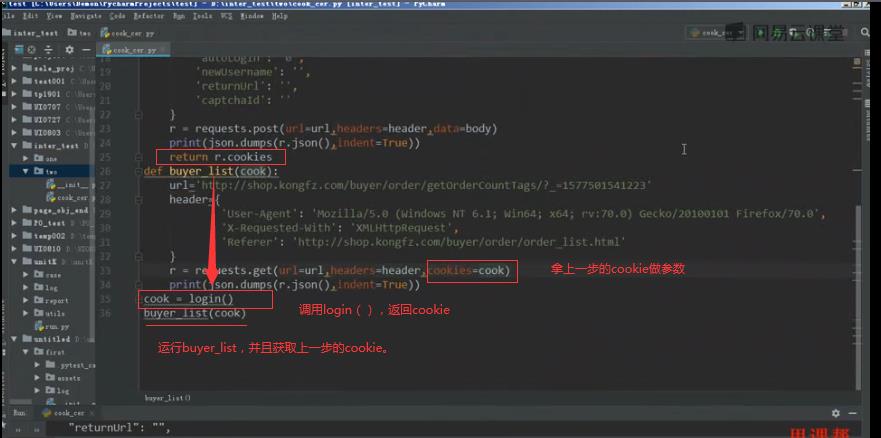
- 请求间的cookie传递。
- 函数间的cookie传递。
- Unittest框架下的cookie传递。
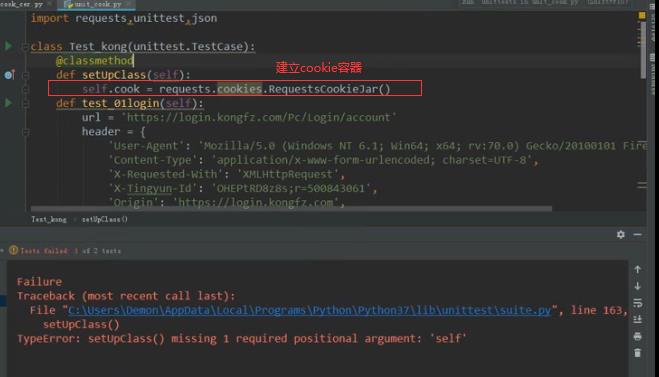
声明cookie容器对象:
- self.cookie = requests.cookies.RequestsCookieJar()
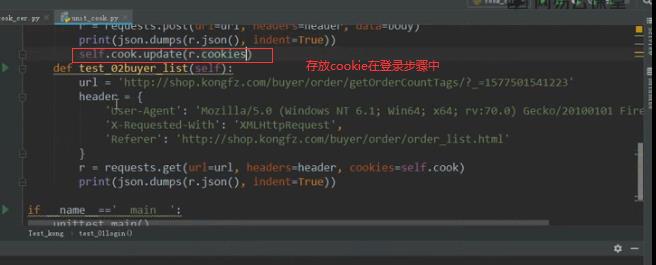
向容器中传递生成cookies:
- self.cookie.update(r.cookies
第一步
第二步
第三步

第四步

import requests,unittest,json

class Test_CDN(unittest.TestCase):
    @classmethod
    def setUpClass(self):
        self.cookie = requests.cookies.RequestsCookieJar()
    def test_01login(self,*args):
        url = \'https://pagead2.googlesyndication.com/getconfig/sodar?sv=200&tid=gda&tv=r20200416&st=env\'
        header = {
            "accept":"*/*",
            "accept-encoding":"gzip,deflate,br",
            "accept-language":"zh-CN,zh;q=0.9,en;q=0.8",
            "cache-control":"no-cache",
            "origin":"https://blog.csdn.net",
            "pragma":"no-cache",
            "referer":"https://blog.csdn.net/weixin_43665351",
            "sec-fetch-dest":"empty",
            "sec-fetch-mode":"cors",
            "sec-fetch-site":"cross-site",
            "user-agent":"Mozilla/5.0 (Macintosh; Intel Mac OS X 10_15_4) AppleWebKit/537.36 (KHTML, like Gecko) Chrome/80.0.3987.163 Safari/537.36",
            "x-client-data":"CK+1yQEIhrbJAQiktskBCMS2yQEIqZ3KAQinoMoBCMuuygEI0K/KAQi8sMoBCJe1ygEI7bXKAQiOusoB"
        }

        req = requests.get(url=url,headers=header)
        print(json.dumps(req.json(),indent=True))
        self.cookie.update(req.cookies)
        return req.cookies

    def test_02input(self):
        url = \'https://me.csdn.net/api/external/user/getUserProfile?username=weixin_43665351\'
        header = {
            "accept":"application / json, text / javascript, * / *; q = 0.01",
            "accept - encoding":"gzip,deflate,br",
            "accept - language":"zh - CN, zh;q = 0.9, en;q = 0.8",
            "cache - control":"no - cache",
            "content - type":"application / json",
            "origin":"https: // blog.csdn.net",
            "pragma":"no - cache",
            "referer":"https: // blog.csdn.net / weixin_43665351",
            "sec - fetch - dest":"empty",
            "sec - fetch - mode":"cors",
            "sec - fetch - site":"same - site",
            "user - agent":"Mozilla / 5.0(Macintosh;Intel Mac OS X 10_15_4) AppleWebKit / 537.36(KHTML, like Gecko) Chrome / 80.0.3987.163Safari / 537.36",
            }
        cookie = self.test_01login()
        print(cookie)
        req = requests.post(url=url,headers = header,cookies = cookie)
        print(json.dumps(req.json(),indent=True))

if __name__ == \'__main__\':
    unittest.main()
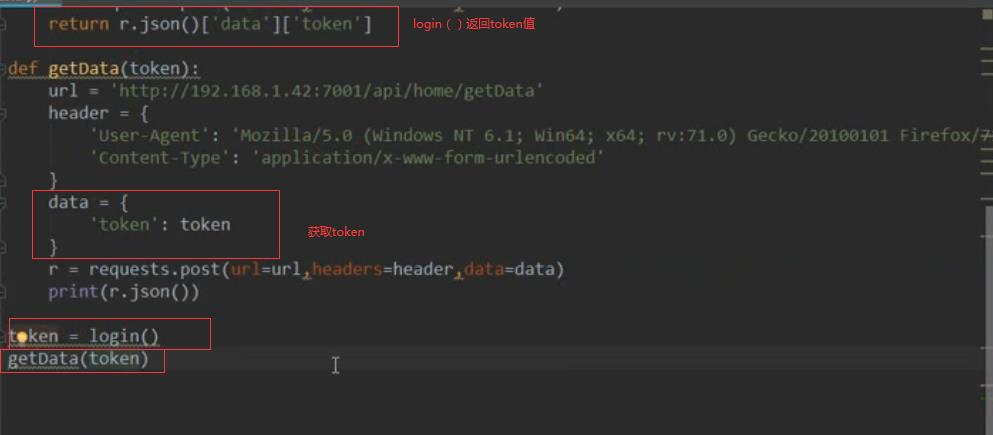
五、Token的处理
1.从响应中提取token值。
2.token值的使用方式。
import requests
key = requests.Session()
file = key.get(\'http://www.baidu.com\')
print(file.cookies)
Requests-html
安装
pip3 install requests-html
导入
from requests_html import HTMLSession
Requests-html
使用
from requests_html import HTMLSession
req = HTMLSession()
params = {\'query\':\'testing\'}
w=r.get("http://www.sogou.com/web",params=params)

六、认证及SESSION的处理
身份认证的定义
- 身份认证是使用用户提供的凭证来识别用户。
- session会话保存,用来保持会话的状态;
- token是对用户进行授权。
- 身份认证和授权的关系:需要先获取身份信息才能进行授权
身份认证的类型
1、基本身份认证
HTTP Basic Auth是HTTP1.0提出的认证方式
客户端对于每一个realm,通过提供用户名和密码来进行认证的方式
当认证失败时,服务器收到客户端请求,返回401 UNAUTHORIZED,同时在HTTP响应头的WWW-Authenticate域说明认证方式及认证域身份认证的类型
import requests
from requests.auth import HTTPBasicAuth
url = \'192.613.001.002\'
# 通过auth输入用户名和用户密码,来通过系统的验证
r = requests.get(url=url,auth=HTTPBasicAuth(\'user\',\'password\'))
print(r.content)
2、netrc 认证
如果认证方法没有收到 auth 参数,Requests 将试图从用户的 netrc 文件中获取 URL 的 hostname 需要的认证身份
3、摘要式身份认证
digest authentication:在HTTP 1.1提出,目的是替代http 1.0提出的基本认证方式
SESSION的处理
1、requests库的session对象能够帮我们跨请求保持某些参数,也会在同一个session实例发出的所有请求之间保持cookies。
2、requests库的session对象还能为我们提供请求方法的缺省数据,通过设置session对象的属性来实现。
import requests
key = requests.Session()
file = key.get(\'http://www.baidu.com\')
print(file.cookies)
以上是关于Python接口测试request的主要内容,如果未能解决你的问题,请参考以下文章
