Vue基础2
Posted zjyao
tags:
篇首语:本文由小常识网(cha138.com)小编为大家整理,主要介绍了Vue基础2相关的知识,希望对你有一定的参考价值。
一 表单控制
# 1 checkebox:
	-单选
    -多选
# 2 radio
	-单选
1.1 checkbox单选
<!DOCTYPE html>
<html lang="en">
<head>
    <meta charset="UTF-8">
    <title>表单控制</title>
    <script src="./js/vue.js"></script>
    <link rel="stylesheet" href="https://cdn.bootcdn.net/ajax/libs/twitter-bootstrap/3.4.1/css/bootstrap.min.css">
</head>
<body>
<div id="app">
    <div class="container">
        <div class="row">
            <div class="col-md-6 col-md-offset-3">
                <h1>checkbox单选</h1>
                <p>用户名:<input type="text" v-model="username"></p>
                <p>密码:<input type="password" v-model="password"></p>
                <p>记住密码:<input type="checkbox" v-model="remember"></p>
                <hr>
                用户名:username ---> 密码:password ---> 记住密码:remember
            </div>
        </div>
    </div>
</div>
</body>
<script>
    var vm = new Vue(
        el: \'#app\',
        data:
            username: \'\',
            password: \'\',
            remember: false,

    )
</script>
</html>
1.2 checkbox多选
<!DOCTYPE html>
<html lang="en">
<head>
    <meta charset="UTF-8">
    <title>表单控制</title>
    <script src="./js/vue.js"></script>
    <link rel="stylesheet" href="https://cdn.bootcdn.net/ajax/libs/twitter-bootstrap/3.4.1/css/bootstrap.min.css">
</head>
<body>
<div id="app">
    <div class="container">
        <div class="row">
            <div class="col-md-6 col-md-offset-3">
                <h1>checkbox多选</h1>
                <p>用户名:<input type="text" v-model="username"></p>
                <p>密码:<input type="password" v-model="password"></p>
                <p>记住密码:<input type="checkbox" v-model="remember"></p>
                <p>爱好:</p>
                <p>篮球:<input type="checkbox" v-model="hobby" value="1"></p>
                <p>足球:<input type="checkbox" v-model="hobby" value="2"></p>
                <p>乒乓球:<input type="checkbox" v-model="hobby" value="3"></p>
                <hr>
                用户名:username ---> 密码:password ---> 记住密码:remember ---> 爱好:hobby
            </div>
        </div>
    </div>
</div>
</body>
<script>
    var vm = new Vue(
        el: \'#app\',
        data:
            username: \'\',
            password: \'\',
            remember: false,
            hobby:[],  // checkbox多选使用数组形式

    )
</script>
</html>
1.3 radio单选
<!DOCTYPE html>
<html lang="en">
<head>
    <meta charset="UTF-8">
    <title>表单控制</title>
    <script src="./js/vue.js"></script>
    <link rel="stylesheet" href="https://cdn.bootcdn.net/ajax/libs/twitter-bootstrap/3.4.1/css/bootstrap.min.css">
</head>
<body>
<div id="app">
    <div class="container">
        <div class="row">
            <div class="col-md-8 col-md-offset-2">
                <h1>radio单选</h1>
                <p>用户名:<input type="text" v-model="username"></p>
                <p>密码:<input type="password" v-model="password"></p>
                <p>记住密码:<input type="checkbox" v-model="remember"></p>
                <p>爱好:</p>
                <p>篮球:<input type="checkbox" v-model="hobby" value="1"></p>
                <p>足球:<input type="checkbox" v-model="hobby" value="2"></p>
                <p>乒乓球:<input type="checkbox" v-model="hobby" value="3"></p>
                <p>性别:
                    男:<input type="radio" v-model="gender" value="1">
                    女:<input type="radio" v-model="gender" value="2">
                    保密:<input type="radio" v-model="gender" value="0">
                </p>
                <hr>
                用户名:username ---> 密码:password ---> 记住密码:remember ---> 爱好:hobby ---> 性别:gender
            </div>
        </div>
    </div>
</div>
</body>
<script>
    var vm = new Vue(
        el: \'#app\',
        data:
            username: \'\',
            password: \'\',
            remember: false,
            hobby: [],  // checkbox多选使用数组形式
            gender: \'\',  // radio单选使用字符串形式

    )
</script>
</html>
二 购物车案例
2.1 基本购物车
补充:js循环
- 基础for循环
- in的循环(不怎么用)
- of循环,循环出value值
- 数组.forEach
- jQuery的循环:$.each()
<script>
    //补充: js循环
    var arr = [63, 5, 25, 9, 2, 4, 28, 0]

    // 1 基础for循环
    for (var i = 0; i < arr.length; i++)
        // i是索引
        console.log(arr[i])

</script>
<script>
    //补充: js循环
    var arr = [63, 5, 25, 9, 2, 4, 28, 0]

    // 2 in的循环(不怎么用),循环出索引
    for (i in arr)
        // console.log(i)  // i是索引
        console.log(arr[i])

</script>
<script>
    //补充: js循环
    var arr = [63, 5, 25, 9, 2, 4, 0, 28]

    // 3 of循环  es6的语法  循环出value值
    for (i of arr)
        console.log(i)

</script>
<script>
    //补充: js循环
    var arr = [63, 5, 25, 9, 2, 4, 0, 28]

    // 4 数组的循环  数组.forEach
    // 先值,再索引
    arr.forEach(function (value, index)
        console.log(index, \'---->\', value)
    )
</script>
forEach的用法:https://www.cnblogs.com/zjyao/p/17331278.html#3个重要的方法
<script>
    //补充: js循环
    var arr = [63, 5, 25, 9, 2, 4, 0, 28]

    // 5 jQuery的循环  $.each()
    $.each(arr, function (index, value)
        console.log(index, \'--->\', value)
    )
</script>
jq对象的each()用法:https://www.cnblogs.com/zjyao/p/17338618.html#each
基本购物车
<!DOCTYPE html>
<html lang="en">
<head>
    <meta charset="UTF-8">
    <title>购物车案例</title>
    <script src="./js/vue.js"></script>
    <link rel="stylesheet" href="https://cdn.bootcdn.net/ajax/libs/twitter-bootstrap/3.4.1/css/bootstrap.min.css">
</head>
<body>
<div id="app">
    <div class="container-fluid">
        <div class="row">
            <div class="col-md-6 col-md-offset-3">
                <h1 class="text-center">购物车</h1>
                <table class="table table-bordered">
                    <thead>
                    <tr>
                        <th>商品id</th>
                        <th>商品名称</th>
                        <th>商品价格</th>
                        <th>商品数量</th>
                        <th>操作</th>
                    </tr>
                    </thead>
                    <tbody>
                    <tr v-for="good in good_list">
                        <th scope="row">good.id</th>
                        <td>good.name</td>
                        <td>good.price</td>
                        <td>good.number</td>
                        <!-- 选择框后,value值定义商品对象, -->
                        <td><input type="checkbox" :value="good" v-model="checkGroup"></td>
                    </tr>
                    </tbody>
                </table>
                <hr>
                选中了:checkGroup
                <h3>总价格:getPrice()</h3>
                <h4>选中了checkbox,checkGroup会发生变化,页面也在变,都会重新刷新页面,函数就会重新执行</h4>
            </div>
        </div>
    </div>
</div>
</body>
<script>
    var vm = new Vue(
        el: \'#app\',
        data:
            good_list: [
                id: 1, name: \'钢笔\', price: 12, number: 2,
                id: 2, name: \'脸盆\', price: 20, number: 20,
                id: 3, name: \'毛笔\', price: 6, number: 9,
                id: 4, name: \'圆珠笔\', price: 8, number: 5,
                id: 5, name: \'铅笔\', price: 1, number: 3,
            ],
            checkGroup: [],
        ,
        methods:
            getPrice()
                // 根据checkGroup选中的对象,计算
                // 使用of 循环checkGroup,拿出价格*数量,累加,最后返回
                var total = 0
                // 这里就可以使用上面5中循环方式的一种
                for (item of this.checkGroup)
                    total += item.number * item.price

                return total


    )
</script>
</html>
2.2 全选全不选
<!DOCTYPE html>
<html lang="en">
<head>
    <meta charset="UTF-8">
    <title>购物车案例</title>
    <script src="./js/vue.js"></script>
    <link rel="stylesheet" href="https://cdn.bootcdn.net/ajax/libs/twitter-bootstrap/3.4.1/css/bootstrap.min.css">
</head>
<body>
<div id="app">
    <div class="container-fluid">
        <div class="row">
            <div class="col-md-6 col-md-offset-3">
                <h1 class="text-center">购物车</h1>
                <table class="table table-bordered">
                    <thead>
                    <tr>
                        <th>商品id</th>
                        <th>商品名称</th>
                        <th>商品价格</th>
                        <th>商品数量</th>
                        <!--设置个checkbox单选框 -->
                        <!--选中checkAll为true,不选中checkAll为false-->
                        <!--绑定change事件,checkGroup变量变满值-->
                        <th>全选/全不选 <input type="checkbox" v-model="checkAll" @change="handleCheckAll"></th>
                    </tr>
                    </thead>
                    <tbody>
                    <tr v-for="good in good_list">
                        <th scope="row">good.id</th>
                        <td>good.name</td>
                        <td>good.price</td>
                        <td>good.number</td>
                        <!-- 选择框后,value值定义商品对象, -->
                        <td><input type="checkbox" :value="good" v-model="checkGroup" @change="handleChangeOne"></td>
                    </tr>
                    </tbody>
                </table>
                <hr>
                选中了:checkGroup
                <br>
                全选/全不选的值:checkAll
                <h3>总价格:getPrice()</h3>
            </div>
        </div>
    </div>
</div>
</body>
<script>
    var vm = new Vue(
        el: \'#app\',
        data:
            good_list: [
                id: 1, name: \'钢笔\', price: 12, number: 2,
                id: 2, name: \'脸盆\', price: 20, number: 20,
                id: 3, name: \'毛笔\', price: 6, number: 9,
                id: 4, name: \'圆珠笔\', price: 8, number: 5,
                id: 5, name: \'铅笔\', price: 1, number: 3,
            ],
            checkGroup: [],
            checkAll: false,
        ,
        methods:
            getPrice()
                // 根据checkGroup选中的对象,计算
                // 使用of 循环checkGroup,拿出价格*数量,累加,最后返回
                var total = 0
                for (item of this.checkGroup)
                    total += item.number * item.price

                return total
            ,
            handleCheckAll()
                // console.log(this.checkAll)  // 布尔值,选中是true,不选中false
                // 全选中:对钩都打上,js中得含义是:checkGroup变量满值
                if (this.checkAll)
                    this.checkGroup = this.good_list  // 全选
                 else
                    this.checkGroup = []  // 全不选

            ,
            // 给每一个循环中的checkbox框,增加一个change事件,只要一个没有选中,就把checkAll的值变为false
            handleChangeOne()
                // 判断 checkGroup的长度,是否等于good_list长度
                if (this.checkGroup.length === this.good_list.length)
                    this.checkAll = true
                 else
                    this.checkAll = false


    )
</script>
</html>
2.3 带加减
<!DOCTYPE html>
<html lang="en">
<head>
    <meta charset="UTF-8">
    <title>购物车案例带加减</title>
    <script src="./js/vue.js"></script>
    <link rel="stylesheet" href="https://cdn.bootcdn.net/ajax/libs/twitter-bootstrap/3.4.1/css/bootstrap.min.css">
</head>
<body>
<div id="app">
    <div class="container-fluid">
        <div class="row">
            <div class="col-md-6 col-md-offset-3">
                <h1 class="text-center">购物车</h1>
                <table class="table table-bordered">
                    <thead>
                    <tr>
                        <th>商品id</th>
                        <th>商品名称</th>
                        <th>商品价格</th>
                        <th>商品数量</th>
                        <!--设置个checkbox单选框 -->
                        <!--选中checkAll为true,不选中checkAll为false-->
                        <!--绑定change事件,checkGroup变量变满值-->
                        <th>全选/全不选 <input type="checkbox" v-model="checkAll" @change="handleCheckAll"></th>
                    </tr>
                    </thead>
                    <tbody>
                    <tr v-for="good in good_list">
                        <th scope="row">good.id</th>
                        <td>good.name</td>
                        <td>good.price</td>
                        <!--数量前后加个按钮-->

                        <td>
                            <!--点击事件需要改变商品数量值,要先把值传入-->
                            <button class="btn" @click="handleReduce(good)">-</button>
                            good.number
                            <!--加个click事件-->
                            <button class="btn link btn-sm" @click="good.number++">+</button>
                        </td>
                        <!-- 选择框后,value值定义商品对象, -->
                        <td><input type="checkbox" :value="good" v-model="checkGroup" @change="handleChangeOne"></td>
                    </tr>
                    </tbody>
                </table>
                <hr>
                选中了:checkGroup
                <br>
                全选/全不选的值:checkAll
                <h3>总价格:getPrice()</h3>
            </div>
        </div>
    </div>
</div>
</body>
<script>
    var vm = new Vue(
        el: \'#app\',
        data:
            good_list: [
                id: 1, name: \'钢笔\', price: 12, number: 2,
                id: 2, name: \'脸盆\', price: 20, number: 20,
                id: 3, name: \'毛笔\', price: 6, number: 9,
                id: 4, name: \'圆珠笔\', price: 8, number: 5,
                id: 5, name: \'铅笔\', price: 1, number: 3,
            ],
            checkGroup: [],
            checkAll: false,
        ,
        methods:
            getPrice()
                // 根据checkGroup选中的对象,计算
                // 使用of 循环checkGroup,拿出价格*数量,累加,最后返回
                var total = 0
                for (item of this.checkGroup)
                    total += item.number * item.price

                return total
            ,
            handleCheckAll()
                // console.log(this.checkAll)  // 布尔值,选中是true,不选中false
                // 全选中:对钩都打上,js中得含义是:checkGroup变量满值
                if (this.checkAll)
                    this.checkGroup = this.good_list  // 全选
                 else
                    this.checkGroup = []  // 全不选

            ,
            // 给每一个循环中的checkbox框,增加一个change事件,只要一个没有选中,就把checkAll的值变为false
            handleChangeOne()
                // 判断 checkGroup的长度,是否等于good_list长度
                if (this.checkGroup.length === this.good_list.length)
                    this.checkAll = true
                 else
                    this.checkAll = false

            ,
            handleReduce(good)
                // 不能减到底,商品数量肯定要大于1
                if (good.number > 1)
                    good.number--
                 else
                    alert(\'太少了,不能再减少了\')


    )
</script>
</html>
2.4 购物车案例带删除
<!DOCTYPE html>
<html lang="en">
<head>
    <meta charset="UTF-8">
    <title>购物车案例带删除</title>
    <script src="./js/vue.js"></script>
    <link rel="stylesheet" href="https://cdn.bootcdn.net/ajax/libs/twitter-bootstrap/3.4.1/css/bootstrap.min.css">
</head>
<body>
<div id="app">
    <div class="container-fluid">
        <div class="row">
            <div class="col-md-6 col-md-offset-3">
                <h1 class="text-center">购物车</h1>
                <table class="table table-bordered">
                    <thead>
                    <tr>
                        <th>商品id</th>
                        <th>商品名称</th>
                        <th>商品价格</th>
                        <th>商品数量</th>
                        <!--设置个checkbox单选框 -->
                        <!--选中checkAll为true,不选中checkAll为false-->
                        <!--绑定change事件,checkGroup变量变满值-->
                        <th>全选/全不选 <input type="checkbox" v-model="checkAll" @change="handleCheckAll"></th>
                        <th>删除操作</th>
                    </tr>
                    </thead>
                    <tbody>
                    <tr v-for="good in good_list">
                        <th scope="row">good.id</th>
                        <td>good.name</td>
                        <td>good.price</td>
                        <!--数量前后加个按钮-->

                        <td>
                            <!--点击事件需要改变商品数量值,要先把值传入-->
                            <button class="btn" @click="handleReduce(good)">-</button>
                            good.number
                            <!--加个click事件-->
                            <button class="btn link btn-sm" @click="good.number++">+</button>
                        </td>
                        <!-- 选择框后,value值定义商品对象, -->
                        <td><input type="checkbox" :value="good" v-model="checkGroup" @change="handleChangeOne"></td>
                        <td><button class="btn btn-danger" @click="handleDelete(good)">删除</button></td>
                    </tr>
                    <tr class="text-left">
                        <td colspan="4">总价:getPrice()</td>
                    </tr>
                    </tbody>
                </table>
                <hr>
                选中了:checkGroup
                <br>
                全选/全不选的值:checkAll
            </div>
        </div>
    </div>
</div>
</body>
<script>
    var vm = new Vue(
        el: \'#app\',
        data:
            good_list: [
                id: 1, name: \'钢笔\', price: 12, number: 2,
                id: 2, name: \'脸盆\', price: 20, number: 20,
                id: 3, name: \'毛笔\', price: 6, number: 9,
                id: 4, name: \'圆珠笔\', price: 8, number: 5,
                id: 5, name: \'铅笔\', price: 1, number: 3,
            ],
            checkGroup: [],
            checkAll: false,
        ,
        methods:
            getPrice()
                // 根据checkGroup选中的对象,计算
                // 使用of 循环checkGroup,拿出价格*数量,累加,最后返回
                var total = 0
                for (item of this.checkGroup)
                    total += item.number * item.price

                return total
            ,
            handleCheckAll()
                // console.log(this.checkAll)  // 布尔值,选中是true,不选中false
                // 全选中:对钩都打上,js中得含义是:checkGroup变量满值
                if (this.checkAll)
                    this.checkGroup = this.good_list  // 全选
                 else
                    this.checkGroup = []  // 全不选

            ,
            // 给每一个循环中的checkbox框,增加一个change事件,只要一个没有选中,就把checkAll的值变为false
            handleChangeOne()
                // 判断 checkGroup的长度,是否等于good_list长度
                if (this.checkGroup.length === this.good_list.length)
                    this.checkAll = true
                 else
                    this.checkAll = false

            ,
            handleReduce(good)
                // 不能减到底,商品数量肯定要大于1
                if (good.number > 1)
                    good.number--
                 else
                    alert(\'太少了,不能再减少了\')

            ,
            handleDelete(good)
                // console.log(this.good_list.indexOf(good))
                this.good_list.splice(this.good_list.indexOf(good), 1)
                // console.log(this.good_list)


    )
</script>
</html>
三 v-model进阶
- v-model的修饰符
- v-model 之 lazy、number、trim
- lazy:等待input框的数据绑定时区焦点之后再变化
- number:数字开头,只保留数字,后面的字母不保留;字母开头,都保留
- trim:去除首位的空格
<!DOCTYPE html>
<html lang="en">
<head>
    <meta charset="UTF-8">
    <title>v-model的修饰符</title>
    <script src="./js/vue.js"></script>
</head>
<body>
<div id="app">
    <h1>lazy修饰符</h1>
    <input type="text" v-model.lazy="username1"> ---> username1

    <h1>number修饰符</h1>
    <div><input type="text" v-model.number="username2"> ---> 先输字母username2</div>
    <div><input type="text" v-model.number="username3"> ---> 先输数字username3</div>

    <h1>trim修饰符</h1>
    <input type="text" v-model.trim="username4">---->username4
</div>
</body>
<script>
    var vm = new Vue(
        el: \'#app\',
        data:
            username1: \'\',
            username2: \'\',
            username3: \'\',
            username4: \'\',

    )
</script>
</html>
vue基础 —— 单网页版的Vue学习 基础
文章目录
1、vue-cli
1.1、什么是vue-cli
vue-cli 是 Vue.js 开发的标准工具。它简化了程序员基于 webpack 创建工程化的 Vue 项目的过程。
1.2、vue-cli 安装
vue-cli 是 npm 上的一个全局包。
使用 npm install 命令,即可方便的把它安装到自己的电脑上:
npm install -g @vue/cli
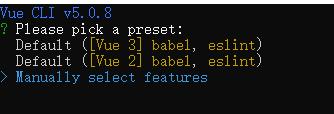
基于 vue-cli 快速生成工程化的 Vue 项目:
vue create 项目的名称
示例:
vue create demo-first



2.、vue 项目结构和运行
2.1、vue 项目目录结构
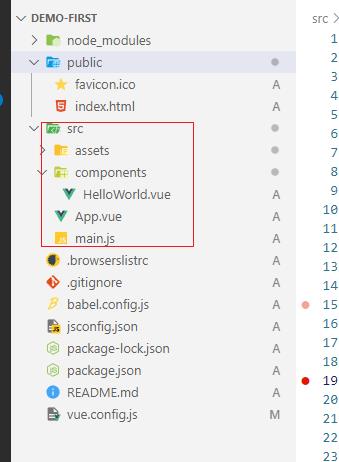
assets 目录:存放项目的静态资源文件,例如:css 、图片资源
components 目录: 程序员封装的、可复用的组件,都要放到components目录下
main.js : 是项目的入口文件,整个项目的运行,要先执行 main.js
App.vue :是项目的根组件
2.2、vue 项目的运行流程
在工程化的项目中,vue 要做的事情很单纯: 通过 main.js 把 App.vue 渲染(内容替换)到 index.html 的 指定区域(id=“app”) 。
其中:
App.vue用来编写待渲染的 模板结构 。index.html中需要预留一个 el区域 。main.js把 App.vue 渲染到 index.html 所指定区域(id=“app”)。
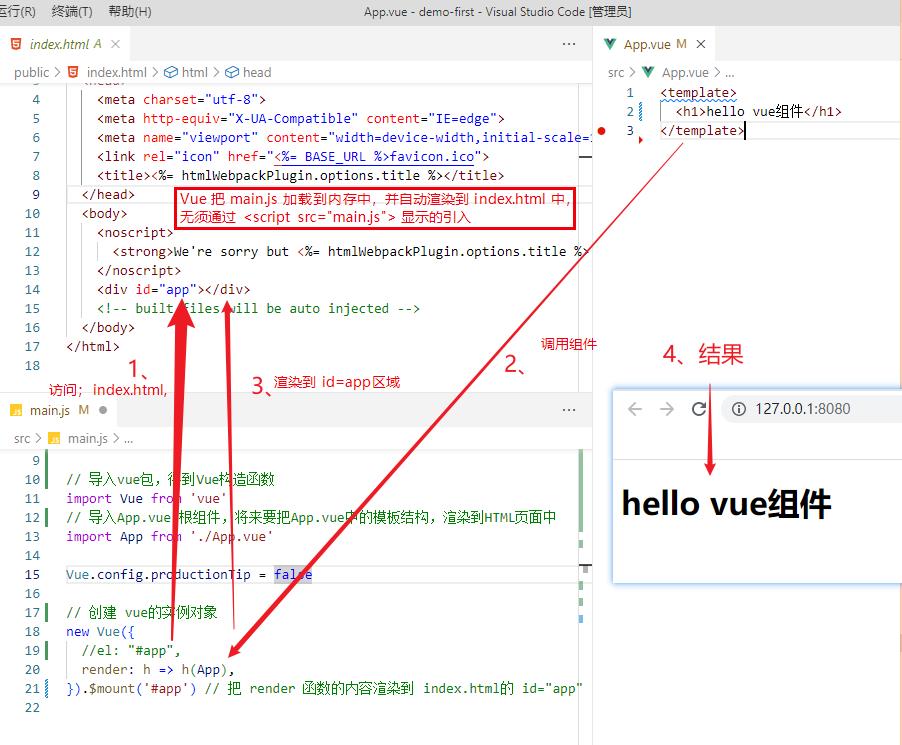
new Vue(
  //el: "#app",
  render: h => h(App),
).$mount('#app') // 把 render 函数的内容渲染到 index.html的 id="app" 的区域中
.$mount('#app') 等价于 el: "#app"
vue 组件由三部分组成
每个.vue组件都由他其个部分构成,分别是
- template : 组件的模板结构
- script :组件的Javascript
- style :组件的样式
一般来部,最上面是 template、中间是script、最下面是style。

.vue 注意事项
template下只允许有一个根节点。script中,export default(), data 必须是函数。style默认只支持css ,若要写less,则增加lang="less"属性。
<template>
    <div>
        <div class="test-box">
            <h3>hello vue组件 ---  username </h3>
            <button @click="changeName">修改用户名</button>
        </div>
        <div>
            XXX
        </div>
    </div>

</template>

<script>
export default
    data()
        return
            username: '张三',

    ,

    methods:
        changeName()
            // 在组件中,this表示当前组件的实例对象
            console.log(this)
            this.username = 'haha'


</script>
<style lang="less" >
    .test-box
        background-color: pink;
        h3
            color: red;


</style>
2.3、运行命令
打开 package.json,内容如下

查看 scripts ,
运行命令 即是 npm run serve ,
打包命令 是 npm run build 。
3、Vue组件(components)
3.1、私有子组件
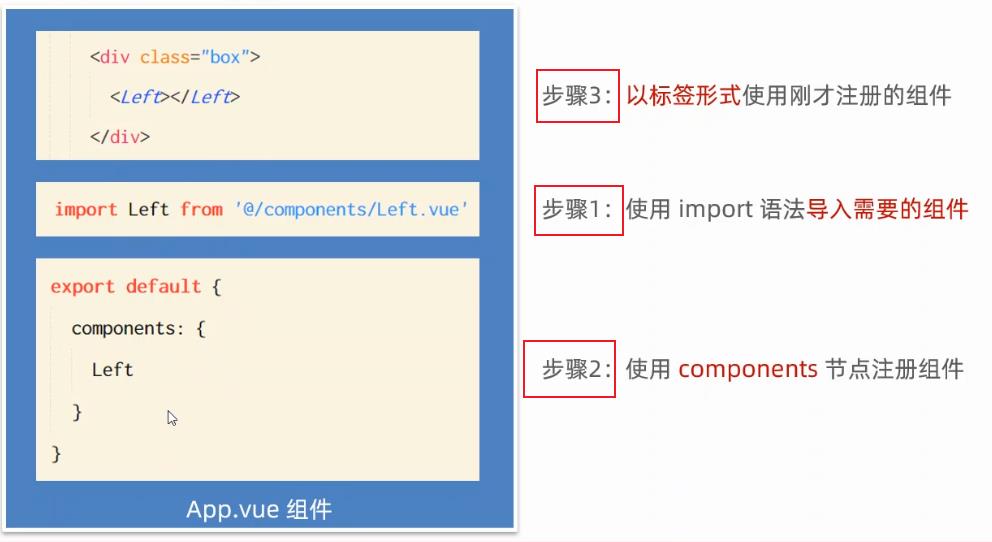
步骤1: 在 scripts 标签内,通过 导入需要的组件:
import Left from '@/components/Left.vue'
步骤2:在 script 的 components 节点注册组件
<script>
// 步骤1
import Left from '@/components/Left.vue'

// 步骤2
export default
	components:
		Left


</script>
步骤3:在 template 中,以标签的形式使用刚才注册的组件。
<template>
	<div>
		<Left></Left>
	</div>
</template>
Left.vue
<template>
    <div class="left">
        <h3>Left vue</h3>
    </div>
</template>

<style>
    .left
        background-color: rgba(20, 20, 241, 0.5);
        height: 200px;


</style>

<script>
    export default

        components:


</script>
App.vue
<template>

   <div class="app-container">
        <h1>App根组件</h1>
        <hr/>
        <div class="box">
            <!-- 步骤3: 以标签形式,使用注册好的组件  -->
            <Left></Left>
        </div>
        <div class="bottom">
            <h2>bottom </h2>
        </div>
   </div>

</template>

<script>
// 步骤1:导入.vue组件
import Left from '@/components/Left.vue'

// 在 components 节点注册组件
export default
  components:
    Left,


</script>

<style lang="less" >
    .app-container
        background-color: red;


    .bottom
        background-color: aqua;
        height: 150px;


</style>
3.2、全局组件
在vue项目的 main.js 入口文件中,通过 Vue.component() 方法 ,可以注册全局组件。
-
步骤1: 导入需要全局注册的组件
示例:
import Count from '@/components/Count.vue' -
使用
Vue.components('MyCount',Count)注册。-
参数1:字符串格式,表示组件的 注册名称
-
参数2:需要被注册的那个组件
-
3.3、单行(一行)方法的简写
<template>
    <div>
        <p>count 的值是: count </p>
        <button @click="add" > +1 </button>
    </div>
</template>

<script>
export default
    data()
        return
            count: 0,

    ,
    methods:
        add()
            this.count+=1


</script>
add() 只有一行代码,所以 add() 可以省略,将这一行代码写到 @click 中,即 @click="count += 1" 。完整代码如下:
<template>
    <div>
        <p>count 的值是: count </p>
        <button @click="count += 1" > +1 </button>
    </div>
</template>
3.3.1、共用组件,在引用时,初始化不同的值
问题描述:Count.vue 是共用组件。其它组件( Left.vue、Right.vue)在引用 Count.vue 组件时,希望 Count.vue 中的 count 变量在初始化为不同的值。
Count.vue 的代码:
<template>
    <div>
        <h5>Count 组件</h5>
        <p>count 的值是: count </p>
        <button @click="count += 1">+1</button>
        <button @click="show">打印 this</button>
    </div>
</template>

<script>
export default
    data()
        return
            // 把 props 中的 init 值,转存到 count 上
            count: 0,

    ,
    methods:
        show()
            console.log(this)


</script>
3.4、组件的 props(自定义属性)
props 是组件的自定义属性,通过 this.属性名 进行属性值的运算处理。
vue规定:组件中封装的自定义属性是只读的,不允许直接修改。
要修改 props 中属性的值,可以把 props 的值转到 data中,因为data中的数据是可读可写的。
<script>
export default
    props: ['init'],
    data()
        return
            count: this.init,

    ,
    methods:
        show()
            console.log(this)


</script>
在 Left.vue 中,:init="9" ,每个组件在引用时,通过这样的方式进行初始化 。
<template>
  <div class="left-container">
    <h3>Left 组件</h3>
    <hr>
    <MyCount init="9"></MyCount>
  </div>
</template>
3.4.1、:propName="9" 与 propName="9" 数字与字符串的传递
上一步,通过下面的代码对 count 初始化。
<MyCount init="9"></MyCount>
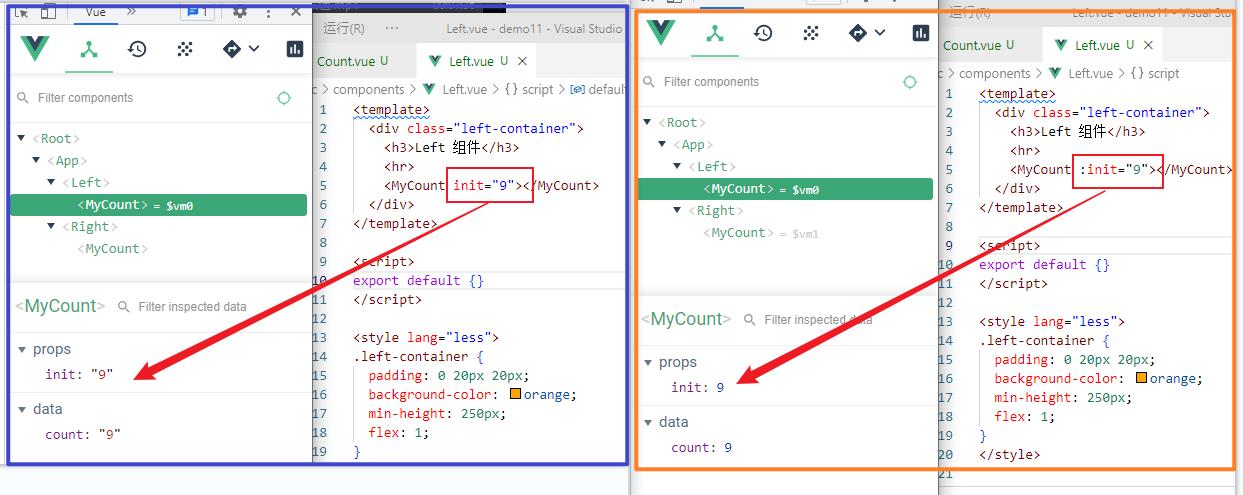
点击 +1 按钮后,发现是不是加1,而是往后面拼接1,如 91、911、9111 … 。
主要原因是 通过 init="9 传值,被默认是字符串,字符串无法直接相加,只是拼接。
如果要将init 的值变为数,则如下:
<MyCount :init="9"></MyCount>
:propName="9" 与 propName="9" 的区别如下:
:propName="9",相当于v-bind:propName="9",这个9是数字。propName="9",这个9是字符串。
总结:
如果props的属值,初始化传递时是字符串,则使用 propName="value" 方式。
如果props的属值,初始化传递时是数字,则 :propName="number" 方式。
3.4.2、props 的默认值
数组格式:
props:['init1' , 'init2']
对象格式:
props:
	init1:
		default: 0,
		required: true,
		type: Number,
	,
如果 不通过 :init=“9” 传值时,有一个默认值。配置如下:
<script>
export default
    props:
        init:
            default:0,

    ,
    data()
        return
            count: this.init,

    ,
    methods:
        show()
            console.log(this)


</script>
3.5、样式(CSS)冲突
在一个vue 定义的样式 会影响到 其它vue中。
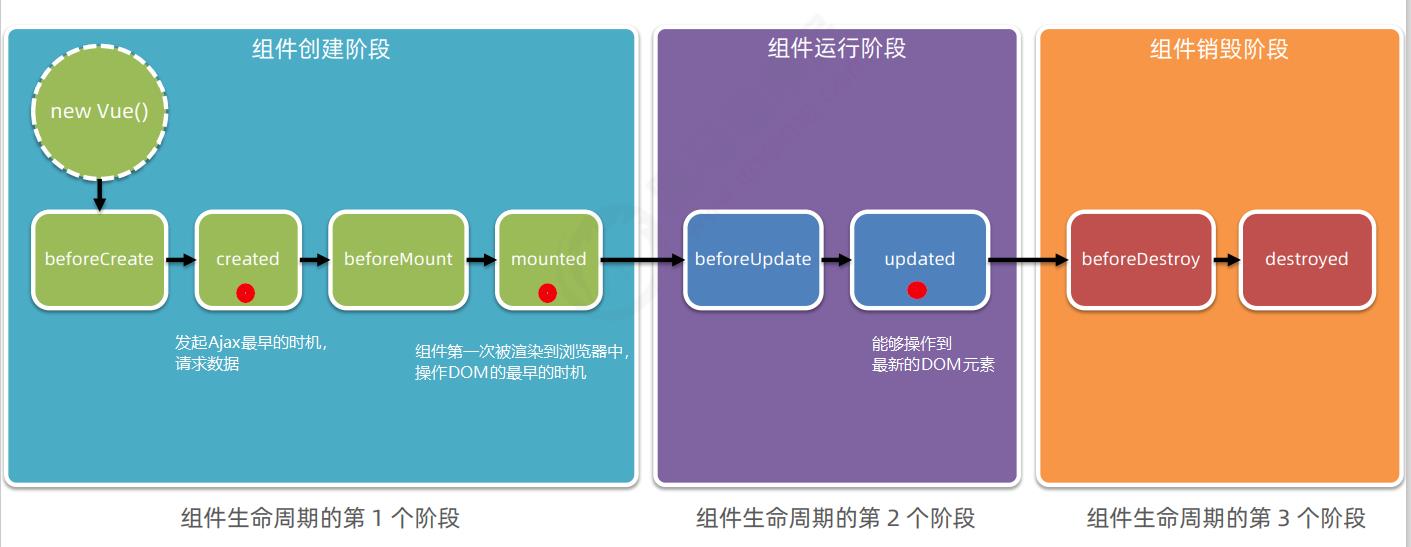
3.6、Vue的生命周期
生命周期(Life Cycle)是指一个组件从 创建 -> 运行 -> 销毁 的整个阶段,强调的是一个时间段。
生命周期函数:是由 vue 框架提供的内置函数,会伴随着组件的生命周期,自动按次序执行。
注意:生命周期强调的是时间段, 生命周期 函数 强调的是时间点。
3.7、组件之间的数据共享
1)父向子传数据
<template>
	<div>
		<Son :msg="message" :info="info" ></Son>
	</div>
 </template>

<script>
import Left Son "@/components/Son.vue";

export default
    data()
        return
            message: "hello parent",
            info:  name: "zhangsan", age: 25 ,
        ;
    ,
    components:
        Son,
    ,
;
</script>
<template>
    <div>
        msg: msg  ,
        info: msg  ,
    </div>
</template>

<script>
export default
    props: ["msg", "info"],
;
</script>
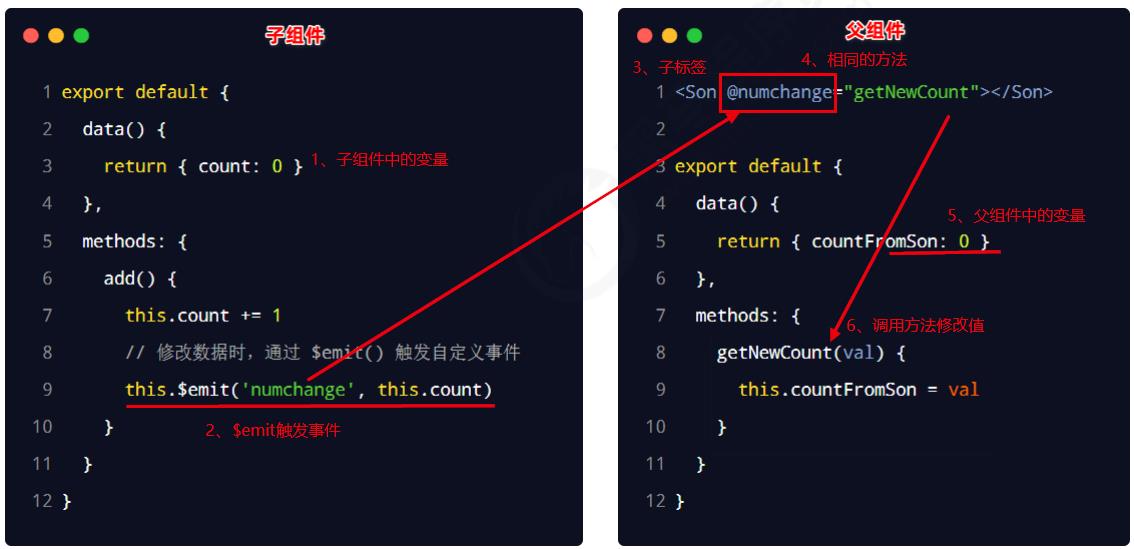
2)子向父传数据
3)兄弟组件之间的数据共享
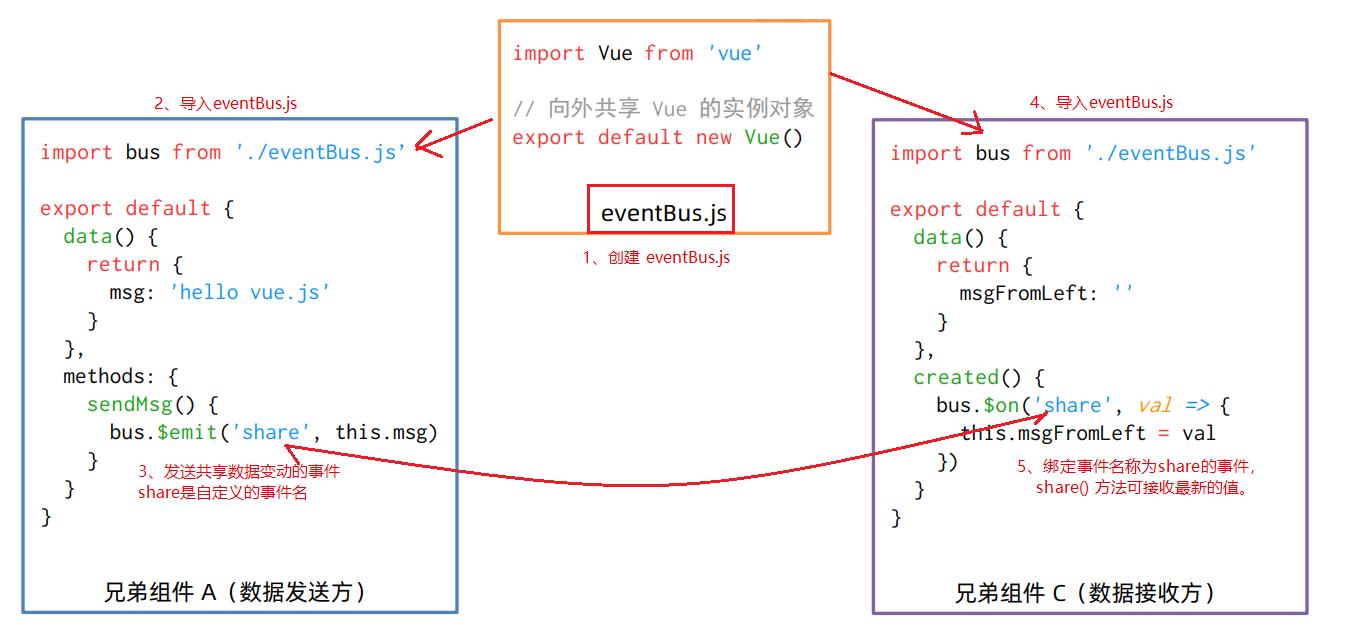
在 vue2.x 中,兄弟组件之间数据共享的方案是 EventBus 。
EventBus 的使用步骤 :
① 创建 eventBus.js 模块,并向外共享一个 Vue 的实例对象 。
② 在数据 发送方,调用 bus.$emit('事件名称', 要发送的数据) 方法触发自定义事件 。
③ 在数据 接收方,调用 bus.$on('事件名称', 事件处理函数) 方法注册一个自定义事件。
3.8、ref 引用
ref 用来辅助开发者在不依赖于 jQuery 的情况下,获取 DOM 元素或组件的引用。
每个 vue 的组件实例上,都包含一个 $refs 对象,里面存储着对应的 DOM 元素或组件的引用。
默认情况下, 组件的 $refs 指向一个空对象。
使用 ref 引用 DOM 元素
<template>
    <div class="app-container">
        <h3 ref="myh13"> ref 学习</h3>
        <button @click="showThis">showThis</button>
    </div>
</template>

<script>
export default
    methods:
        showThis()
            console.log(this)
            this.$refs.myh13.style.color = 'red'


;
</script>
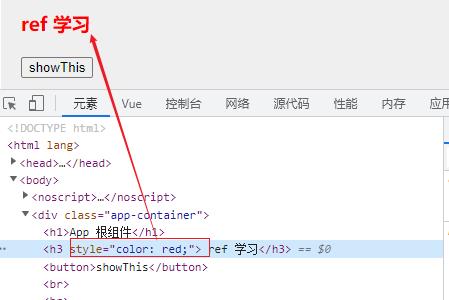
说明: 点击showThis 按钮, 通过 this.$refs.myh13 定位到 h3 dom 对象,然后通过 style.color = 'red' 对其内容进行修改。
效果图如下:
使用 ref 引用组件
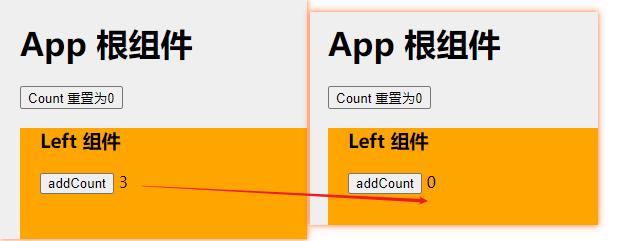
App 是父组件,Left 是子组件, Left中有 count 数据,点击 addCount 按钮可以自增。父组件中有 Count重置为0 的按钮,点击后,可以将 Left中有 count 设置为0。
App.vue 组件:
<template>
    <div class="app-container">
        <h1>App 根组件</h1>

        <button @click="ReCount">Count 重置为0</button>
        <Left ref="comLeft"></Left>
    </div>
</template>
<script>
import Left from '@/components/Left.vue';

export default
    components:
        Left,
    ,
    methods:
        ReCount()
            console.log(this)
            //方法1,定位到Left组件中 count 元素,重置为0
            this.$refs.comLeft.count = 0

           // 方法2,定位到Left组件中resetCount()方法,将count重置为0
           //this.$refs.comLeft.resetCount()
        ,
  以上是关于Vue基础2的主要内容,如果未能解决你的问题,请参考以下文章