python~Flask框架建立web应用
Posted 敢于对过去告一个段落,才有信心掀开新的篇章!
tags:
篇首语:本文由小常识网(cha138.com)小编为大家整理,主要介绍了python~Flask框架建立web应用相关的知识,希望对你有一定的参考价值。
通过python来开发web应用,可以产简化了web开发的流程,功能和函数库也是非常丰富,我们也是开箱即用,目前比较流程的WEB框架就是Flask和django。
根据2020年JetBrains Python开发人员调查,Django和Flask是迄今为止最受欢迎的两个Python Web框架。
考虑到Web开发行业在过去五年左右的时间里一直朝着较小的框架,微服务和“无服务器”平台发展的趋势,
Flask超越了Django成为榜首也就不足为奇了。
Django和Flask具有成熟的社区,得到了广泛的支持和欢迎,并提供了有效的应用程序开发方法,使您可以将时间和精力集中在应用程序的独特部分上,而不是核心支架上。最后,两个框架都用于开发Web应用程序, 关键区别在于他们如何实现这一目标。可以将Django视为汽车,将Flask视为自行车。两者都可以使您从A点到达B点,但是它们的方法却大不相同。每个都有自己的最佳应用场景, Django和Flask也是如此。
相关参考:https://zhuanlan.zhihu.com/p/359280800
依赖包
requirements.txt
Flask==1.1.2
Flask-Docs==0.6.3
安装这个依赖包里的相关组件
pip --default-timeout=100 install --no-cache-dir -r requirements.txt -i https://mirrors.aliyun.com/pypi/simple/
测试用例
import logging

from flask import Flask

app = Flask(__name__)


@app.route("/")
def hello_world():
    logging.info("hello,world");
    return "<p>Hello, World!</p>"

if __name__ == "__main__":
    logging.basicConfig(
        format="[%(levelname)s][%(module)s][%(funcName)s][%(lineno)s] %(message)s", # 日志级别,模块名,函数名,行号,消息
        level=logging.INFO,
    )
    app.run(host="0.0.0.0", port=9010, threaded=True, use_reloader=False)
启动后,我们可以访问http://localhost:9010,这时会把hello,world!返回,并在控制台有日志打印

[Python WEB开发] 使用WSGI开发类Flask框架
WSGI Web服务器网关接口
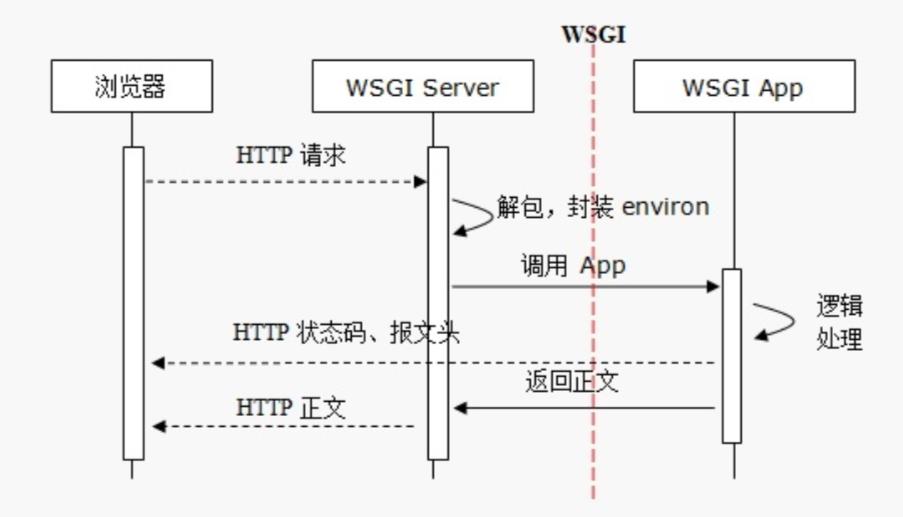
WSGI主要规定了Web服务器如何与Web应用程序进行通信,以及如何将Web应用程序链接在一起来处理一个请求。

wsgiref Python中的WSGI参考模块
一、WSGI 应用程序端:
1、 根据WSGI定义,应用程序应该是可调用对象
2、该可调用对象必须有两个固定参数:environ、start_response
一个是含有服务器环境变量的字典,另一个是可调用对象,该对象使用HTTP状态码和会返回给客户端的HTTP头来初始化响应
environ 变量包含一些熟悉的环境变量,如HTTP_HOST,HTTP_USER_AGENT,REMOTE_ADDR,REQUEST_METHOD,SERVER_PORT,部分如下:
Hello world!

GATEWAY_INTERFACE = \'CGI/1.1\'
HTTP_ACCEPT = \'text/html,application/xhtml+xml,application/xml;q=0.9,image/webp,image/apng,*/*;q=0.8\'
HTTP_ACCEPT_ENCODING = \'gzip, deflate, br\'
HTTP_ACCEPT_LANGUAGE = \'zh-CN,zh;q=0.9,en;q=0.8\'
HTTP_CONNECTION = \'keep-alive\'
HTTP_HOST = \'127.0.0.1:9999\'
HTTP_USER_AGENT = \'Mozilla/5.0 (Macintosh; Intel Mac OS X 10_13_1) AppleWebKit/537.36 (KHTML, like Gecko) Chrome/63.0.3239.84 Safari/537.36\'
QUERY_STRING = \'\'
REMOTE_ADDR = \'127.0.0.1\'
REQUEST_METHOD = \'GET\'
SERVER_PORT = \'9999\'
SERVER_PROTOCOL = \'HTTP/1.1\'
SERVER_SOFTWARE = \'WSGIServer/0.2\'
3、这个可调用对象必须返回一个可迭代对象用于组成响应
res_str = b\'github.com\\n\'

# 函数实现
def application(environ, start_response):
	return [res_str]

# 类实现
class Application:
	def __init__(self, environ, start_response):
		pass
	def __iter__(self):
		yield res_str

# 类实现
class Application:
	def __call__(self, environ, start_response):
		retur [res_str]
wsgiref参考库中有以下几个子模块:
* util -- 一些有用的功能和包装

* headers -- 管理响应头

* handlers -- 为server/gateway实现如何处理的基类

* simple_server -- 实现一个简单的WSGI HTTP服务器

* validate -- 位于应用程序和server之间检测错误的校验包装
二、WSGI HTTP Server端的使用
1. 启动一个简单的WSGI HTTP Server:
# 简单web 1
from wsgiref.simple_server import make_server


def demo_app(environ, start_response): #copy自simple_server模块
    from io import StringIO
    stdout = StringIO()
    print("Hello world!", file=stdout)
    print(file=stdout)
    h = sorted(environ.items())
    for k, v in h:
        print(k, \'=\', repr(v), file=stdout)
    start_response("200 OK", [(\'Content-Type\', \'text/plain; charset=utf-8\')])
    return [stdout.getvalue().encode("utf-8")]


ip = \'127.0.0.1\'
port = 9999
server = make_server(ip, port, demo_app)
server.serve_forever()

server.server_close()
wsgiref.simple_server.make_server(host, port, app, server_class=WSGIServer, handler_class=WSGIRequestHandler)
通过这个函数可以启动一个用于简单访问的WSGI参考服务器,必须传入host, port, app三个参数。
在运行这段程序之后,就已经实现了一个监听在9999端口的webServer,下面是服务端运行状态和浏览器中访问结果:
访问 http://127.0.0.1:9999/

#server端运行状态:
127.0.0.1 - - [26/Dec/2017 15:01:13] "GET / HTTP/1.1" 200 2128
127.0.0.1 - - [26/Dec/2017 15:01:13] "GET /favicon.ico HTTP/1.1" 200 2096


#浏览器访问结果:
Hello world!

Apple_PubSub_Socket_Render = \'/private/tmp/com.apple.launchd.Gx10g4snot/Render\'
CLICOLOR = \'1\'
CONTENT_LENGTH = \'\'
CONTENT_TYPE = \'text/plain\'
GATEWAY_INTERFACE = \'CGI/1.1\'
GREP_OPTIONS = \'--color=auto\'
HOME = \'/Users/ihoney\'
HTTP_ACCEPT = \'text/html,application/xhtml+xml,application/xml;q=0.9,image/webp,image/apng,*/*;q=0.8\'
HTTP_ACCEPT_ENCODING = \'gzip, deflate, br\'
HTTP_ACCEPT_LANGUAGE = \'zh-CN,zh;q=0.9,en;q=0.8\'
HTTP_CONNECTION = \'keep-alive\'
HTTP_HOST = \'127.0.0.1:9999\'
HTTP_UPGRADE_INSECURE_REQUESTS = \'1\'
HTTP_USER_AGENT = \'Mozilla/5.0 (Macintosh; Intel Mac OS X 10_13_1) AppleWebKit/537.36 (KHTML, like Gecko) Chrome/63.0.3239.84 Safari/537.36\'
LC_CTYPE = \'zh_CN.UTF-8\'
......
2. 自定义响应的网页内容:
# 简单web 2
from wsgiref.simple_server import make_server

def application(environ:dict,start_response):
    # print(type(environ),environ)
    html = "<h1>北京欢迎你</h1>"
    # start_response("200 OK", [(\'Content-Type\',\'text/plain; charset=utf-8\')]) #文本格式
    start_response("200 OK", [(\'Content-Type\', \'text/html; charset=utf-8\')]) #html格式

    return [html.encode()]


ip = \'127.0.0.1\'
port =9999
server = make_server(ip,port,application)
server.serve_forever()

server.server_close()


#运行结果:
127.0.0.1 - - [26/Dec/2017 15:38:55] "GET / HTTP/1.1" 200 24
127.0.0.1 - - [26/Dec/2017 15:38:55] "GET /favicon.ico HTTP/1.1" 200 24
浏览器访问结果:

simple_server 只是参考,不可用于生产环境。
三、QUERY_STRING 查询字符串的解析
1. 使用cgi模块:
# 简单web 3 使用cgi模块解析query_string
import cgi
from wsgiref.simple_server import make_server

def application(environ:dict,start_response):
    qstr = environ.get("QUERY_STRING")
    print(qstr)
    # ?id=5&name=ihoney&age=18,19
    print(cgi.parse_qs(qstr)) #字典,value为列表类型
    print(cgi.parse_qsl(qstr)) #二元组列表

    html = "<h1>北京欢迎你</h1>"
    start_response("200 OK", [(\'Content-Type\', \'text/html; charset=utf-8\')])
    return [html.encode()]


ip = \'127.0.0.1\'
port =9999
server = make_server(ip,port,application)
server.serve_forever()

server.server_close()

#浏览器访问http://127.0.0.1:9999/?id=5&name=ihoney&age=18,19
#运行结果:
127.0.0.1 - - [26/Dec/2017 15:51:17] "GET /?id=5&name=ihoney&age=18,19 HTTP/1.1" 200 24
id=5&name=ihoney&age=18,19
{\'age\': [\'18,19\'], \'name\': [\'ihoney\'], \'id\': [\'5\']}
[(\'id\', \'5\'), (\'name\', \'ihoney\'), (\'age\', \'18,19\')]
在写的时候IDE工具就会提示CGI模块已经过期了,建议使用urllib库。
2. 使用urllib库
# 简单web 4 使用urllib模块解析query_string
from urllib import parse
from wsgiref.simple_server import make_server

def application(environ:dict,start_response):
    qstr = environ.get("QUERY_STRING")
    print(qstr)
    # ?id=5&name=ihoney&age=18,19
    print(parse.parse_qs(qstr)) #字典,value为列表类型
    print(parse.parse_qsl(qstr)) #二元组列表

    html = "<h1>北京欢迎你</h1>"
    start_response("200 OK", [(\'Content-Type\', \'text/html; charset=utf-8\')])
    return [html.encode()]


ip = \'127.0.0.1\'
port =9999
server = make_server(ip,port,application)
server.serve_forever()

server.server_close()

#浏览器访问:http://127.0.0.1:9999/?id=5&name=ihoney&age=18,19
#运行结果:
id=5&name=ihoney&age=18,19
{\'id\': [\'5\'], \'age\': [\'18,19\'], \'name\': [\'ihoney\']}
[(\'id\', \'5\'), (\'name\', \'ihoney\'), (\'age\', \'18,19\')]
127.0.0.1 - - [26/Dec/2017 15:58:40] "GET /?id=5&name=ihoney&age=18,19 HTTP/1.1" 200 24
3. 使用第三方库webob
pip3 install webob
第三方库webob可以把环境数据的解析封装成对象,使用时直接调用。
webob.request module:
req.method: 请求方法
req.GET: 返回一个类字典对象,GET请求方式提交的查询字符串的二元组格式。
req.POST: 也返回一个类字典对象,POST请求正文的查询字符串。一般是表单提交
req.params: 一个类字典对象,包括GET和POST的所有查询字符串。
req.body: POST提交的请求正文的内容
req.cookies: 字典格式的所有cookie
req.headers: 包含所有请求头的字典,不区分大小写
web.response module:
response.status: 响应码加描述信息,如"200 OK"
response.status_code: 响应码,只有 "200"
response.headerlist: 所有响应头的列表,如"[(\'Content-Type\', \'text/html\')]"
response.app_iter: 一个可迭代对象(如列表和生成器),用于产生响应的内容
response.content_type: 响应内容的类型,如"text/html","text/plain"
response.charset: 字符集编码类型
response.set_cookie(name=None, value=\'\', max_age=None, path=\'/\', domain=None, secure=False, httponly=False, comment=None, overwrite=False): 为客户端设置一个cookie,max_age控制cookie的有效时长,以秒为单位
response.delete_cookie(key, path=\'/\', domain=None): 从客户端删除一个cookie
response.cache_expires(seconds=0): 设置这个响应的缓存时间,单位为秒,如果seconds为0表示这个响应不缓存
response(environ, start_response): 返回对象是一个WSGI应用程序的响应
3.1 webob.Request
#简单web 5,使用第三方库webob解析
from wsgiref.simple_server import make_server
from webob import Request, Response


def application(environ: dict, start_response):
    request = Request(environ)
    print(request.method)
    print(request.path)
    print(request.GET)
    print(request.POST)
    print(request.params)
    print(request.query_string)

    html = "<h1>北京欢迎你</h1>"
    start_response("200 OK", [(\'Content-Type\', \'text/html; charset=utf-8\')])
    return [html.encode()]


ip = \'127.0.0.1\'
port = 9999
server = make_server(ip, port, application)
server.serve_forever()

server.server_close()

#浏览器访问:http://127.0.0.1:9999/index.html?id=5&name=tom,jerry&age=17&age=18,19
#运行结果:
GET
/index.html
GET([(\'id\', \'5\'), (\'name\', \'tom,jerry\'), (\'age\', \'17\'), (\'age\', \'18,19\')])
<NoVars: Not a form request>
NestedMultiDict([(\'id\', \'5\'), (\'name\', \'tom,jerry\'), (\'age\', \'17\'), (\'age\', \'18,19\')])
id=5&name=tom,jerry&age=17&age=18,19
127.0.0.1 - - [26/Dec/2017 16:51:41] "GET /index.html?id=5&name=tom,jerry&age=17&age=18,19 HTTP/1.1" 200 24
3.2 webob.Resphone
#
from wsgiref.simple_server import make_server
from webob import Request, Response


def application(environ: dict, start_response):
    res = Response("<h1>北京欢迎你</h1>")
    return res(environ,start_response)   #__call__


ip = \'127.0.0.1\'
port = 9999
server = make_server(ip, port, application)
server.serve_forever()

server.server_close()

#浏览器访问:http://127.0.0.1:9999/index.html?id=5&name=tom,jerry&age=17&age=18,19
#运行结果:
127.0.0.1 - - [26/Dec/2017 18:08:03] "GET /index.html?id=5&name=tom,jerry&age=17&age=18,19 HTTP/1.1" 200 24
3.3 MultiDict
MultiDict允许一个key存好几个值。
Request.GET、Request.POST 都是MultiDict字典
# multidict
from webob.multidict import MultiDict

md = MultiDict()
md[1] = \'b\'
md.add(1,\'a\')

print(md.get(1)) #只返回一个值
print(md.getall(1))
# print(md.getone(1)) #要求key的value只能有一个,否则抛KeyError异常
print(md.get(\'c\')) #不存在返回默认值None
#运行结果:
a
[\'b\', \'a\']
None
3.4 webob.dec.wsgify 装饰器
官方文档:https://docs.pylonsproject.org/projects/webob/en/stable/api/dec.html
功能:将一个函数变成一个WSGI应用程序
使用举例:
from webob.dec import wsgify

@wsgify
    def myfunc(req):
        return webob.Response(\'hey there\')
wsgi装饰器装饰的函数应该具有一个参数,这个参数是webob.Request类型,是对字典environ的对象化后的实例。返回值必须是一个webob.Respnose类型,所以在函数中应该创建一个webob.Response类型的实例。
# wsgify
from wsgiref.simple_server import make_server
from webob import Request, Response,dec


def application(environ: dict, start_response):
    res = Response("<h1>北京欢迎你</h1>")
    #200 OK
	#[(\'Content-Type\', \'text/html; charset=UTF-8\'), (\'Content-Length\', \'0\')]
    return res(environ,start_response)   #__call__

@dec.wsgify
def app(request:Request) -> Response:
	return Response("<h1>Welcome to BeiJing</h1>")


ip = \'127.0.0.1\'
port = 9999
# server = make_server(ip, port, application)
server = make_server(ip, port, app)
server.serve_forever()

server.server_close()

#浏览器访问:http://127.0.0.1:9999/index.html?id=5&name=tom,jerry&age=17&age=18,19
#运行结果:
127.0.0.1 - - [26/Dec/2017 20:25:14] "GET /index.html?id=5&name=tom,jerry&age=17&age=18,19 HTTP/1.1" 200 27
127.0.0.1 - - [26/Dec/2017 20:25:14] "GET /favicon.ico HTTP/1.1" 200 27
改进:
from wsgiref.simple_server import make_server
from webob import Request, Response,dec


@dec.wsgify
def app(request:Request) -> Response:
	return Response("<h1>Welcome to BeiJing.</h1>")

if __name__ == "__main__":
	ip = \'127.0.0.1\'
	port = 9999
	server = make_server(ip, port, app)
	try:
		server.serve_forever()
	except KeyBoardInterrupt:
		pass
	finally:
		server.server_close()
3.5 webob.Response SourceCode
    def __call__(self, environ, start_response):
        """
        WSGI application interface
        """
        if self.conditional_response:
            return self.conditional_response_app(environ, start_response)

        headerlist = self._abs_headerlist(environ)

        start_response(self.status, headerlist)
        if environ[\'REQUEST_METHOD\'] == \'HEAD\':
            # Special case here...
            return EmptyResponse(self._app_iter)
        return self._app_iter
Chrome插件Postman POST 提交:

总结:
本文简单介绍了WSGI、WSGI HTTP Server、查询字符串的处理、第三方库webob的一些用法。
以上是关于python~Flask框架建立web应用的主要内容,如果未能解决你的问题,请参考以下文章
