Golang使用Gin-swagger搭建api
Posted 小G同学
tags:
篇首语:本文由小常识网(cha138.com)小编为大家整理,主要介绍了Golang使用Gin-swagger搭建api相关的知识,希望对你有一定的参考价值。
前提是安装好了go环境与vscode环境 并配置过了gin
项目结构

1、先安装swaggo依赖包
//1
go get "github.com/swaggo/files"
//2
go get "github.com/swaggo/gin-swagger"
//3
go get -u github.com/swaggo/swag/cmd/swag
//4
go install github.com/swaggo/swag/cmd/swag
2、创建main.go文件,并如下编写
package main

import (
  "fmt"
  "net/http"
  _ "test20230530/docs"

  "github.com/gin-contrib/cors"
  "github.com/gin-gonic/gin"
  swaggerFiles "github.com/swaggo/files"
  ginSwagger "github.com/swaggo/gin-swagger"
)

// @title goweb project
// @version 1.0
// @description this is goweb server.
// @host 127.0.0.1:2023
// @BasePath /user
func main()
  r := gin.Default()
  r.Use(cors.Default())
  r.GET("/swagger/*any", ginSwagger.WrapHandler(swaggerFiles.Handler))

  userGroup := r.Group("/user")
  userGroup.POST("/login", PostloginHandler)
  userGroup.GET("/getUser", GetUserHandler)
  r.Run(":2023")


// @Summary 用户登录
// @Description 用户登录
// @Accept json
// @Produce json
// @Success 200 string string "success"
// @Router /login [post]
func PostloginHandler(c *gin.Context)
  fullPath := "用户登录:" + c.FullPath()
  writeString, _ := c.Writer.WriteString(fullPath)
  fmt.Println(writeString)


// @Summary 用户查询
// @Description 用户查询
// @Accept json
// @Produce json
// @Success 200 string string "success"
// @Router /getUser [get]
func GetUserHandler(c *gin.Context)
  c.JSON(http.StatusOK, gin.H"code": "200", "message": "testhahaa")
3、初始化文档
swag init -g main.go -o ./docs
执行以上命令,文件下就会自动生成docs文件夹,并生成docs.go、swagger.json、swagger.yaml三个文件
4、运行
go run main.go
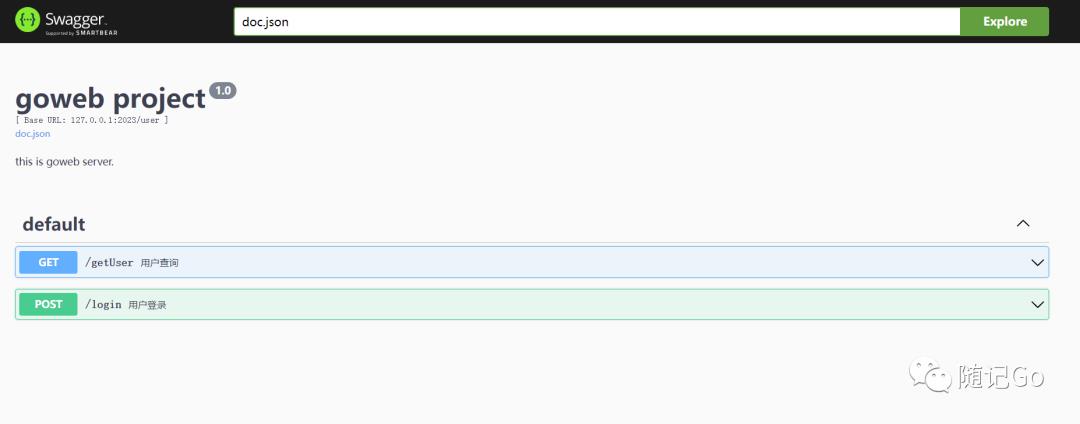
运行后,打开浏览器输入localhost:2023/swagger/index.html或者127.0.0.1:2023/swagger/index.html

测试结果正常

以上为golang Gin-swagger搭建api简单操作方式。
golang gin框架 使用swagger生成api文档
github地址:https://github.com/swaggo/gin-swagger
1、下载swag
$ go get -u github.com/swaggo/swag/cmd/swag
2、在main.go所在目录执行
$ swag init
生成docs/doc.go以及docs/swagger.json,docs/swagger.yaml
3、下载gin-swagger
$ go get -u github.com/swaggo/gin-swagger
$ go get -u github.com/swaggo/files
然后在路由文件引入
import (
	"github.com/gin-gonic/gin"
	swaggerFiles "github.com/swaggo/files"
	"github.com/swaggo/gin-swagger"

	_ "github.com/swaggo/gin-swagger/example/basic/docs" // docs is generated by Swag CLI, you have to import it.
)
并增加swagger访问路由
url := ginSwagger.URL("http://localhost:8080/swagger/doc.json") // The url pointing to API definition
    r.GET("/swagger/*any", ginSwagger.WrapHandler(swaggerFiles.Handler, url))
3、一些注解,编写各API handler方法注释(注解格式传送门)
1)main.go主程序文件注释:
// @title Golang Esign API
// @version 1.0
// @description  Golang api of demo
// @termsOfService http://github.com

// @contact.name API Support
// @contact.url http://www.cnblogs.com
// @contact.email ×××@qq.com

//@host 127.0.0.1:8081
func main()
2)handler方法注释:eg
//CreatScene createScene
// @Summary createScene
// @Description createScene
// @Accept multipart/form-data
// @Produce  json
// @Param app_key formData string true "AppKey"
// @Param nonce_str formData string true "NonceStr"
// @Param time_stamp formData string true "TimeStamp"
// @Success 200 object app.R
// @Failure 500 object app.R
// @Router /dictionaries/createScene [post]
以上是关于Golang使用Gin-swagger搭建api的主要内容,如果未能解决你的问题,请参考以下文章