文档在线预览使用js前端实现wordexcelpdfppt 在线预览
Posted fhey
tags:
篇首语:本文由小常识网(cha138.com)小编为大家整理,主要介绍了文档在线预览使用js前端实现wordexcelpdfppt 在线预览相关的知识,希望对你有一定的参考价值。
@
关于实现文档在线预览的做法,之前文章提到了的两种实现方式:
1、通过将文档转成图片:详见《文档在线预览(一)通过将txt、word、pdf转成图片实现在线预览功能》;
2、将文档转成html:详见《文档在线预览(二)word、pdf文件转html以实现文档在线预览》;
其实除了这两种实现方式之外之外,还有一种常见的做法就是在前端在通过相关的在线预览组件来实现预览
实现方案
在网上的找了一圈实现方案,发现还挺多开源组件可以实现,整理了一下这些开源组件放在了下面的表格里,里面有一些是可以直接通过npm在vue中引入使用。
| 文档格式 | 相关的开源组件 |
|---|---|
| word(docx) | docx-preview、mammoth |
| pdf.js、pdfobject.js、vue-pdf | |
| excel | sheetjs js-xlsx、canvas-datagrid、handsontable、DataTables |
| powerpoint(pptx) | pptxjs |
一、docx文件实现前端预览
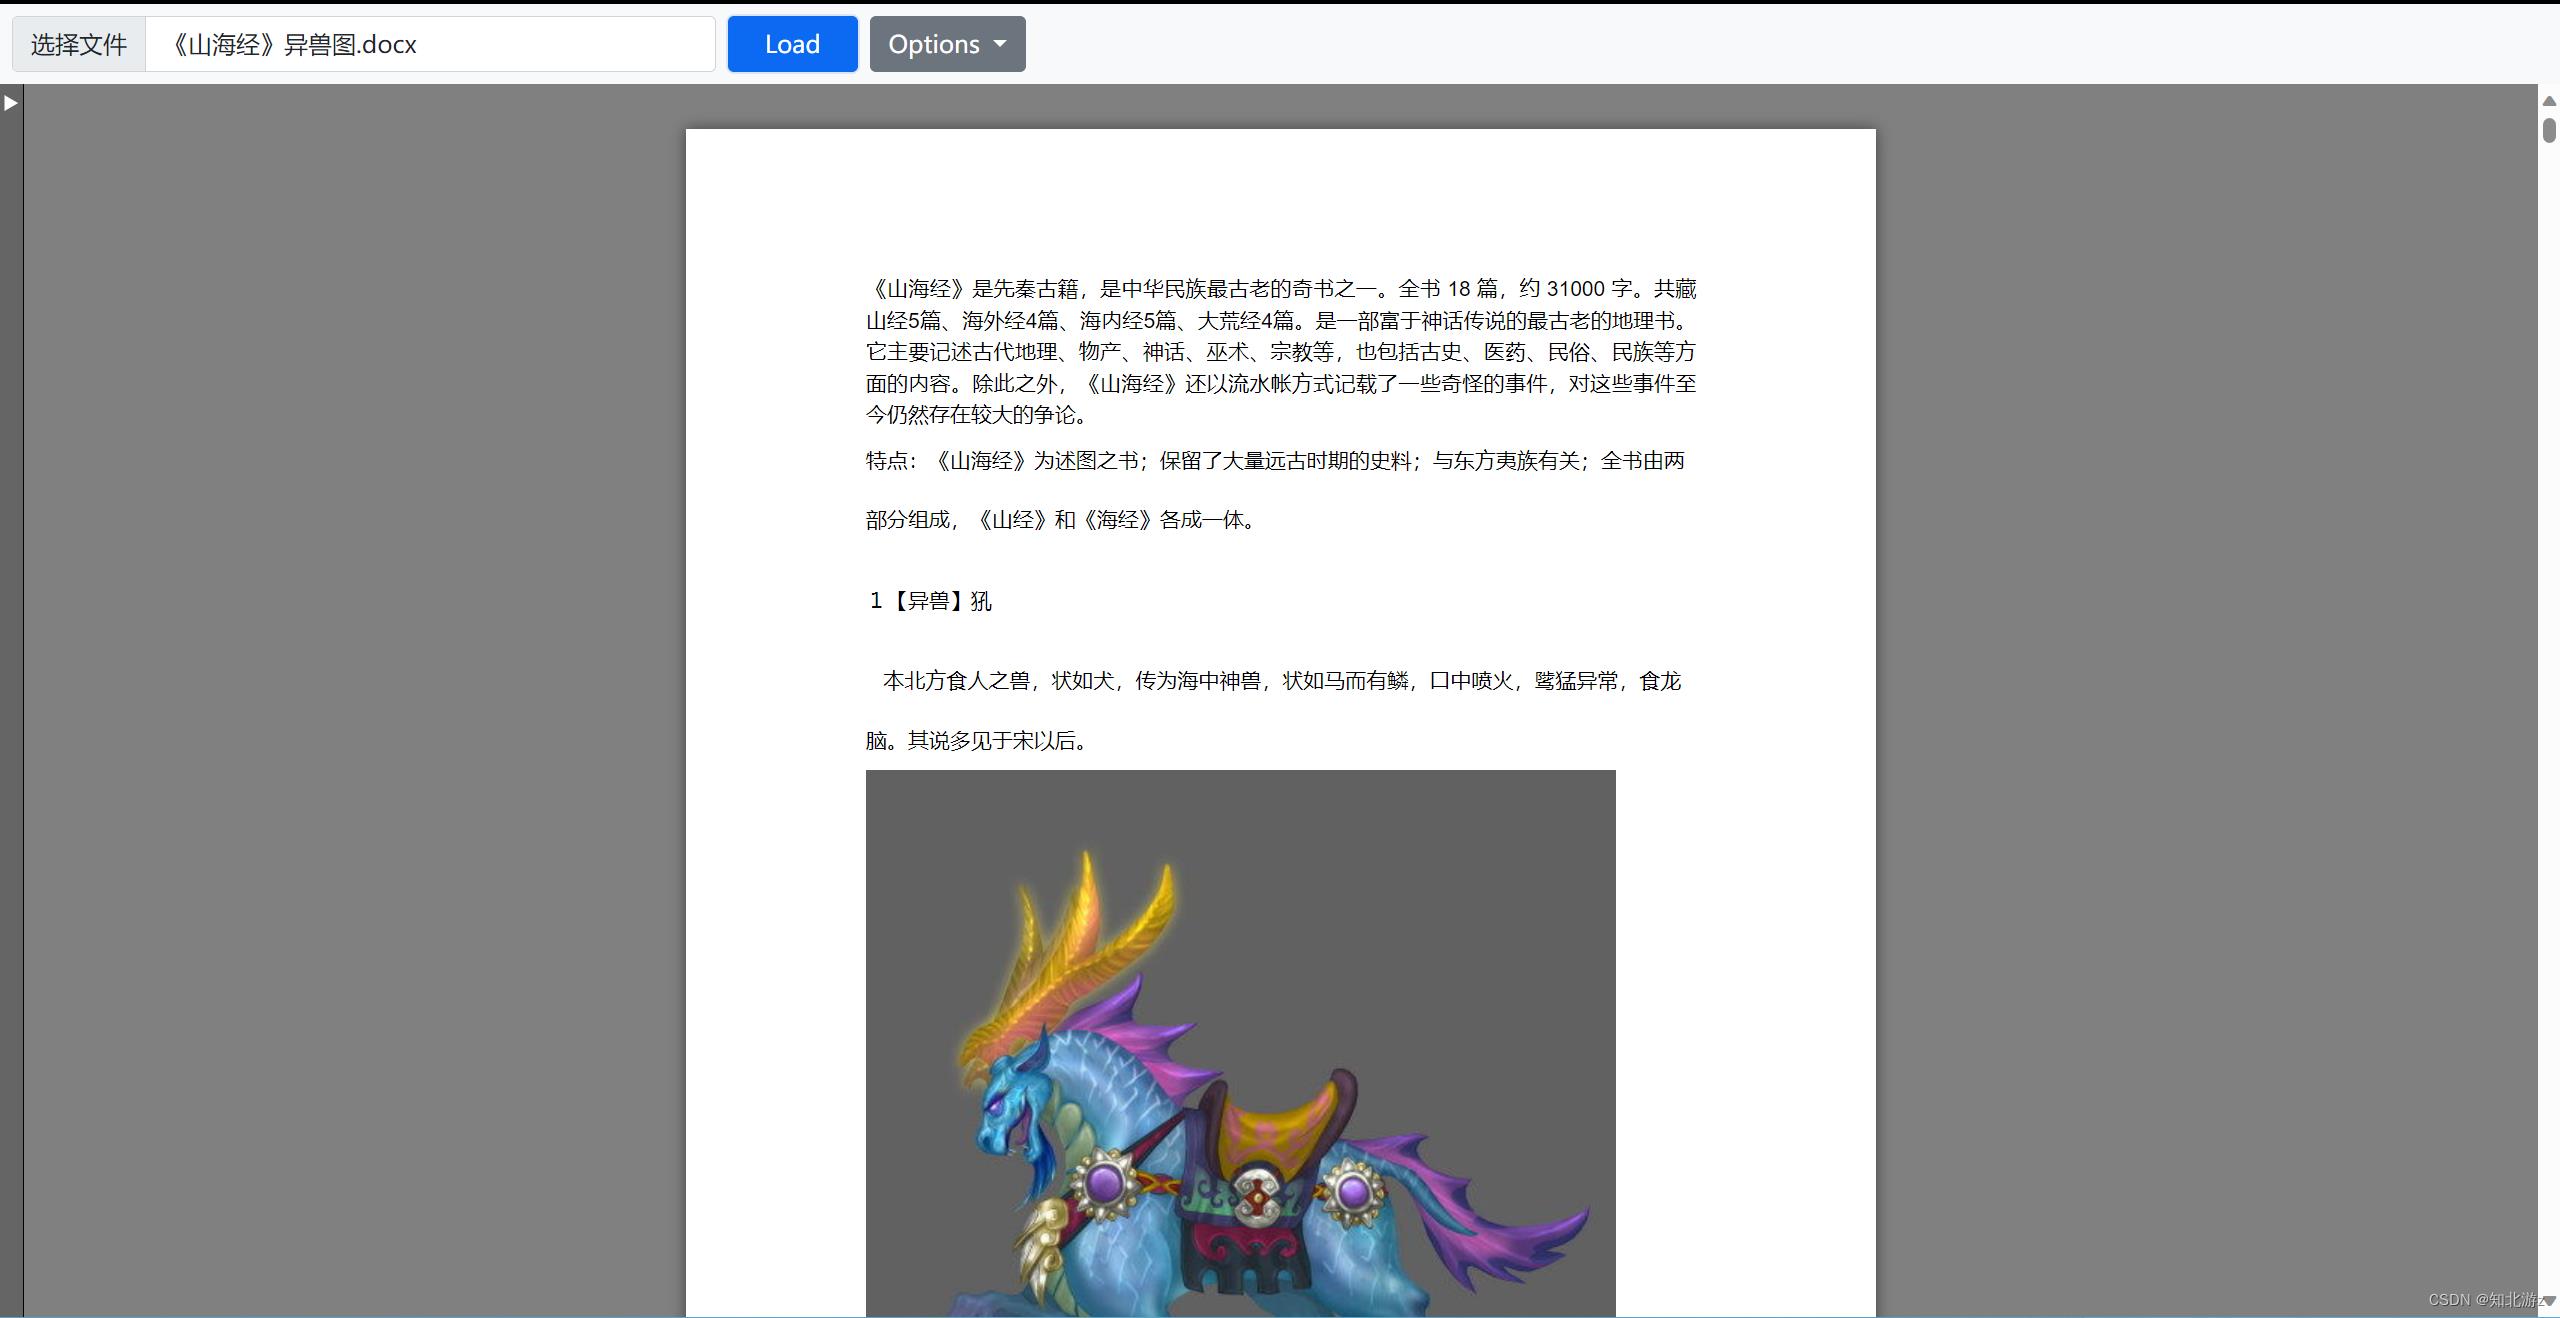
1、docx-preview
是一个 纯前端的JavaScript库,它的优点是可以后端就实现对 .docx 的文件进行在线预览,但是缺点是 不支持.doc(划重点)。
github地址:https://github.com/VolodymyrBaydalka/docxjs
安装:
npm install docx-preview -S
使用效果:
2、Mammoth
Mammoth 原理是将 .docx 文档并将其转换为 HTML。 注意Mammoth 转换过程中复杂样式被忽,居中、首行缩进等,此外同样也只能转换.docx文档。
github地址:https://github.com/mwilliamson/mammoth.js
安装:
npm install mammoth
二、PDF文件实现前端预览
1、pdf.js
pdf.js是一款非常优秀的pdf解析工具,其实火狐浏览器内核自带pdf预览解析器就是pdf.js这个解析器,我们用火狐浏览器打开pdf文件并按F12打开控制台可以看到源码内容。
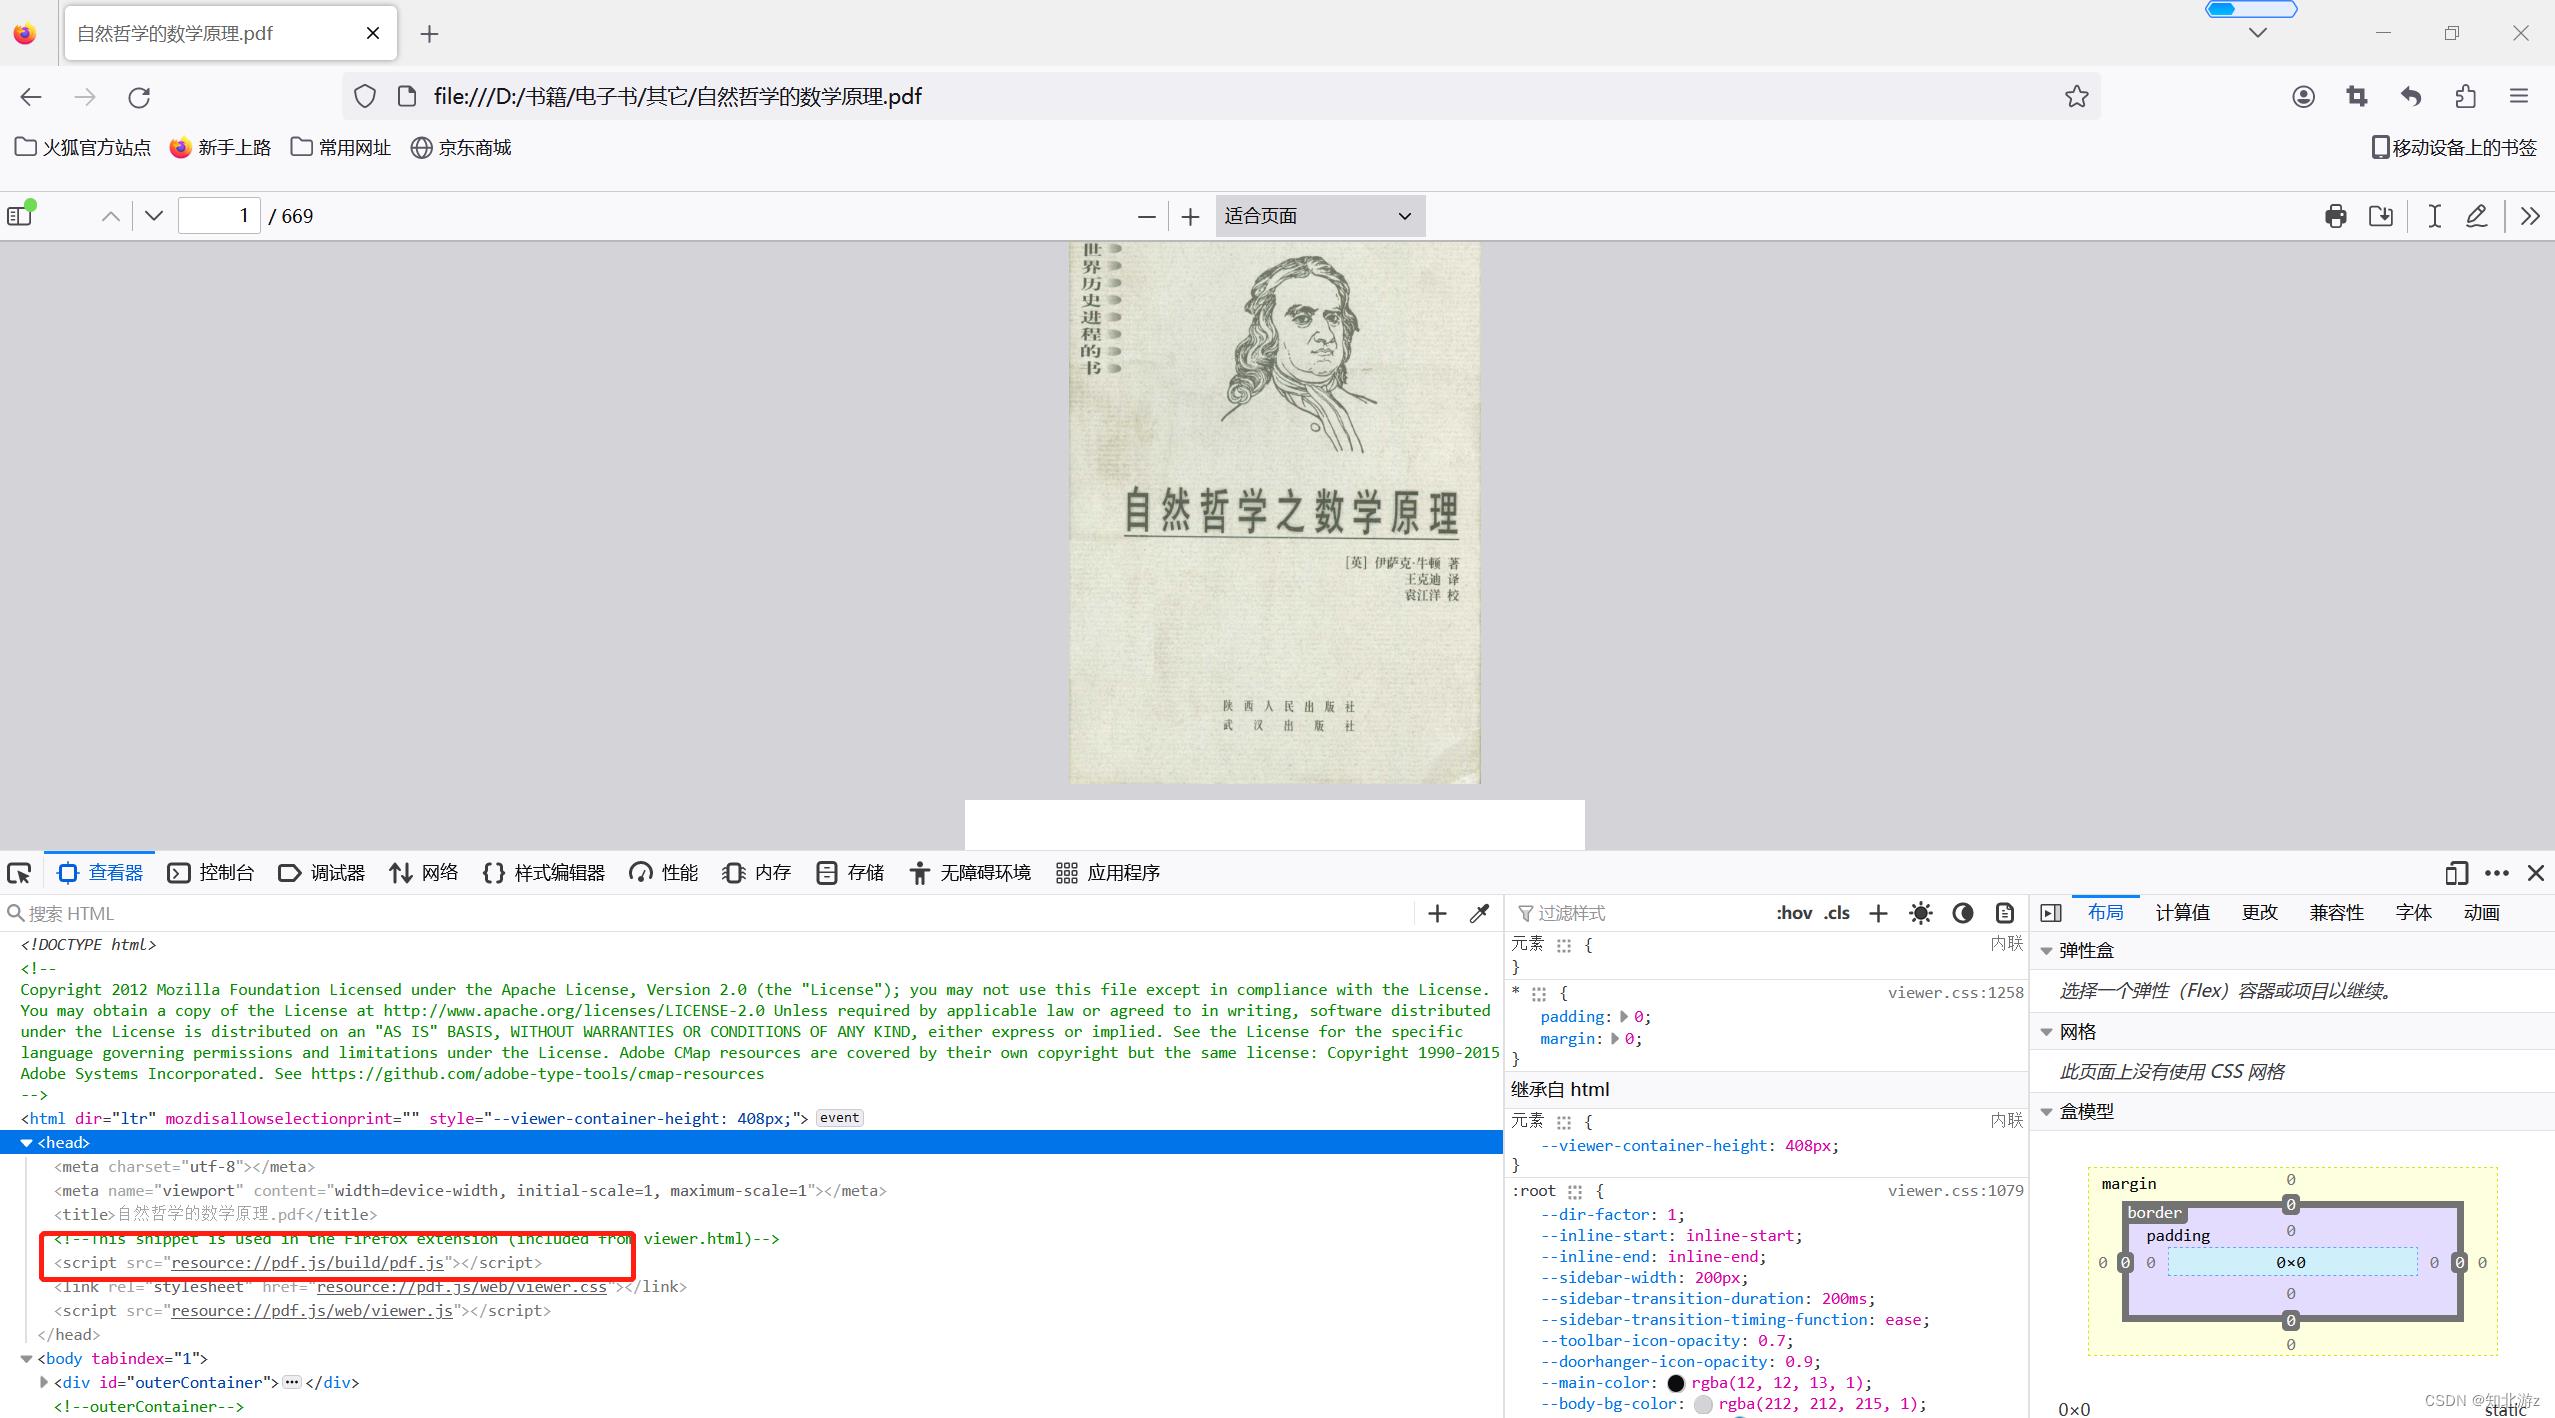
官网地址:http://mozilla.github.io/pdf.js
github地址:https://github.com/mozilla/pdf.js
使用效果:

2、pdfobject.js
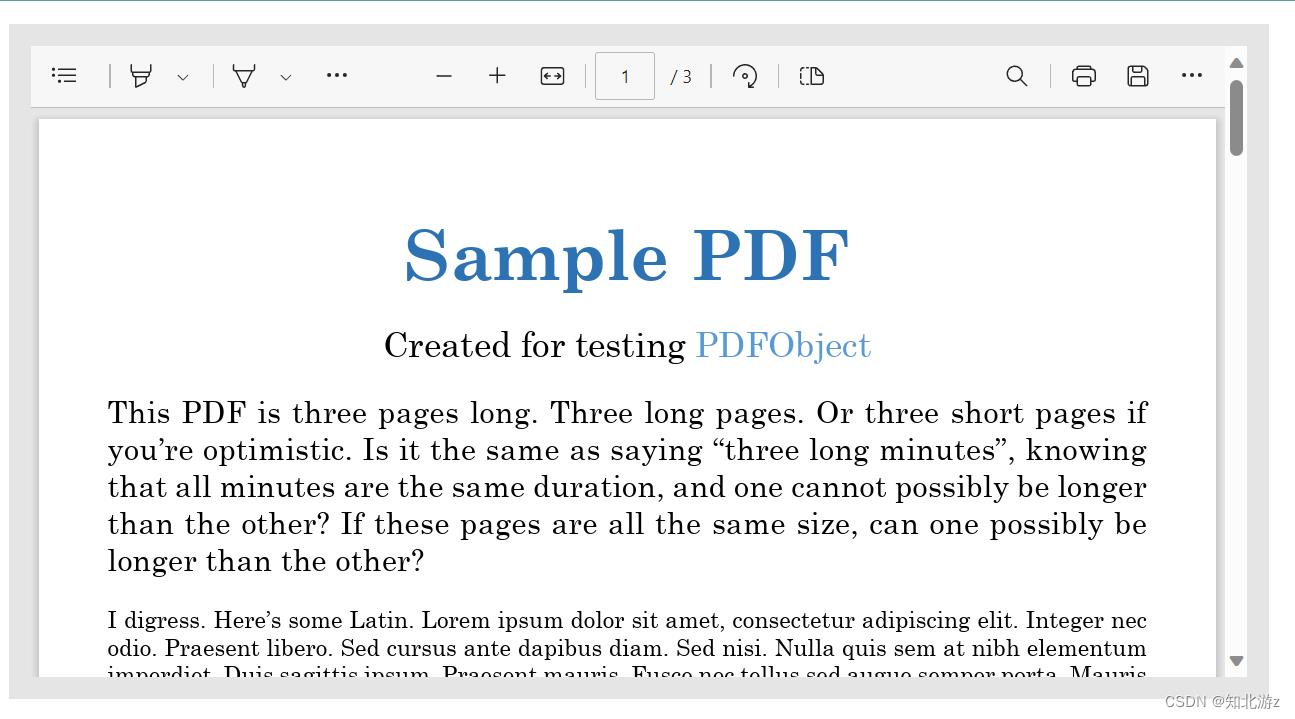
PDFObject.js - 将PDF嵌入到一个div内,而不是占据整个页面,要求浏览器支持显示PDF(主流浏览器都支持),如果浏览器不支持,也可通过配置PDF.js来实现
官网地址: https://pdfobject.com/
github地址:https://github.com/pipwerks/PDFObject
实现效果:
3、vue-pdf
Vue-pdf是通过Vue下基础基于 pdf.js 组件实现PDF文件的展示,操作和生成的组件。
github地址:https://github.com/FranckFreiburger/vue-pdf
安装:
npm install --save vue-pdf
实现效果:

4、iframe / object/ embed
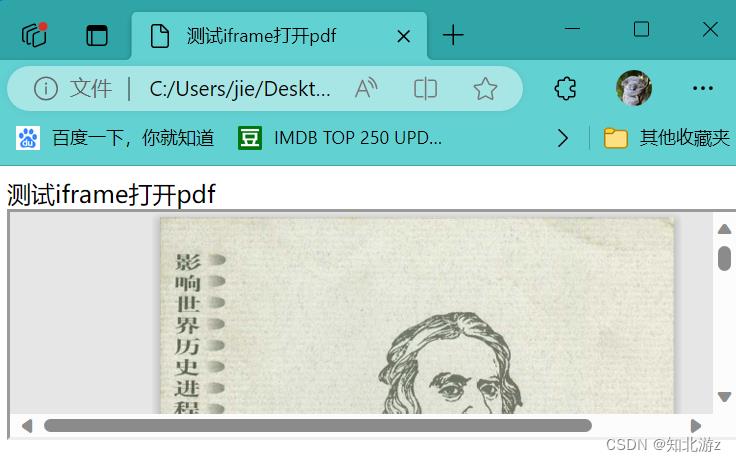
iframe / object / embed 使用方法和效果都同理,即将 pdf 作为插件内嵌在这三个HTML标签内,以下用 iframe 为例,效果就如同直接用链接打开 pdf 文件是一样的,相当于一个新的页面内嵌在当前页面中。
<iframe src="/static/xxx.pdf"></iframe>
实现效果:
三、Excel文件实现前端预览
1、sheetjs js-xlsx
js-xlsx是sheetJS出品的读取和导出各种ecxel的工具库,功能十分强大。
xlsx官方文档:https://www.npmjs.com/package/xlsx
github仓库: https://github.com/SheetJS/sheetjs
安装:
npm install xlsx
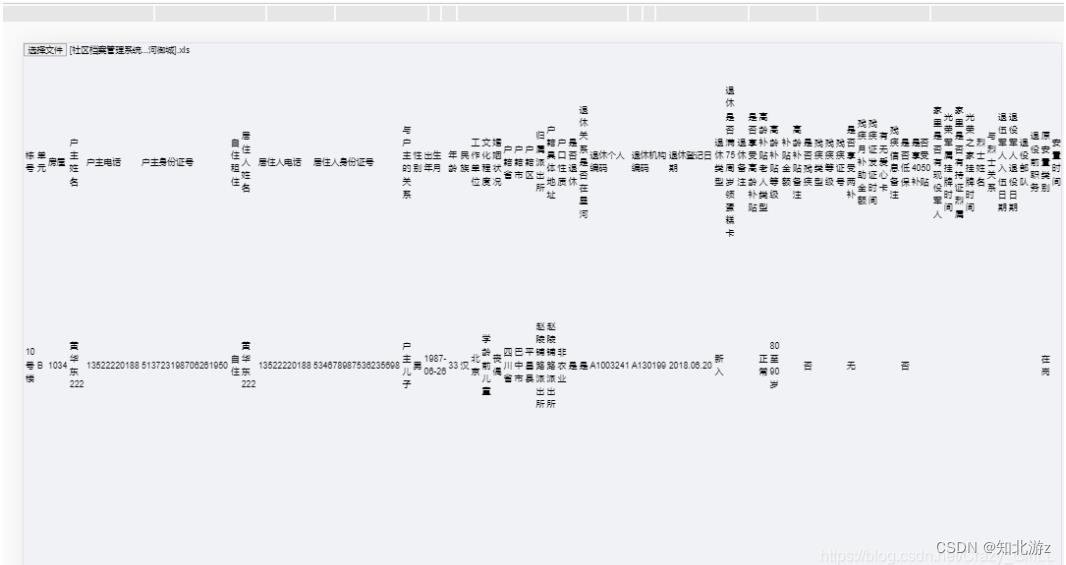
js-xlsx可以用二进制流方式读取得到整份excel表格对象
let workbook = XLSX.read(data,  type: "array" );   //表格对象
let sheetNames = workbook.SheetNames;  //获取到所有表格
let worksheet = workbook.Sheets[sheetNames[0]];  //取第一张表
获取表格数据后再调用js-xlsx提供的方法,直接将表格数据转换为html代码,再将html代码渲染到指定容器就完成了
let html = XLSX.utils.sheet_to_html(worksheet);
实现效果:
2、canvas-datagrid
基于 canvas 来渲染表格,支持表格过滤、数据编辑、自定义操作菜单、大数据场景优化、主题样式修改
github地址:https://github.com/TonyGermaneri/canvas-datagrid
安装:
npm install canvas-datagrid
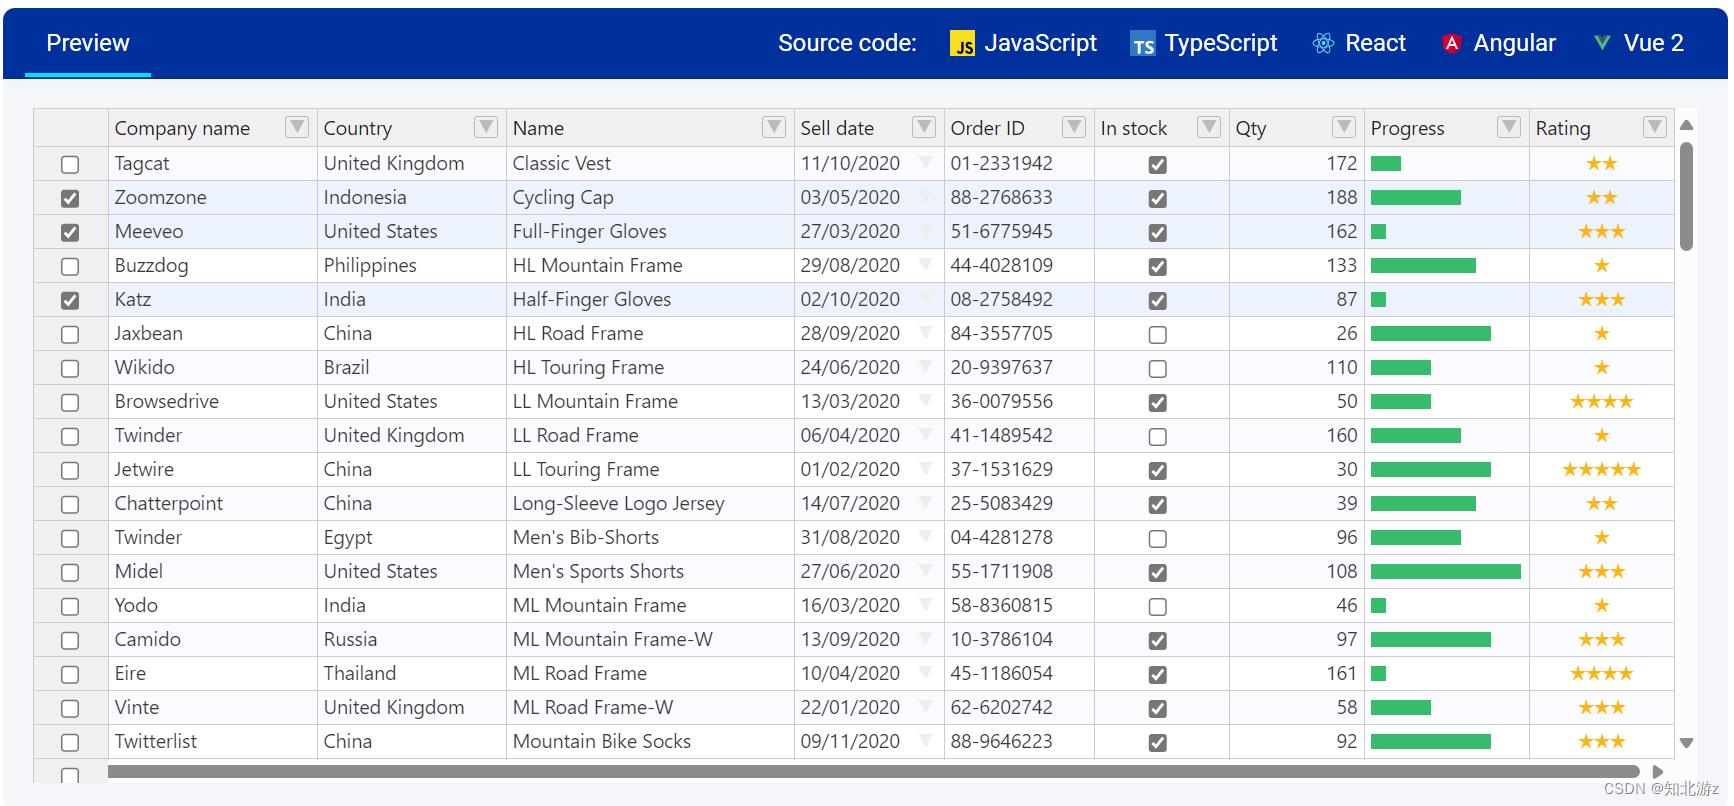
3、 handsontable
handsontable基于 DOM 元素来渲染表格,功能强大,canvas-datagrid` 支持的功能它都支持,并且主题样式扩展更方便
官网地址:https://handsontable.com/docs/7.1.0/tutorial-custom-build.html
github地址:https://github.com/handsontable/handsontable
文档地址:https://handsontable.com/docs/javascript-data-grid
安装:
npm install handsontable @handsontable/vue
实现效果:
4、DataTables
基于Jquery 表格插件DataTables的一个表格插件,还在用Jquery 可以以考虑这个
官网地址:https://www.datatables.net
安装:
官网下载地址,在你的项目中使用 DataTables,只需要引入三个个文件即可,jQuery库,一个DataTables的核心js文件和一个DataTables的css文件。有的时候还需要DataTables样式的一些资源。
<link href="DataTables/datatables.min.css" rel="stylesheet"/>
<script src="DataTables/datatables.min.js"></script>
使用方式:
$(\'#example\').DataTable(
    data: data
 );
四、pptx文件实现前端预览
1、PPTXJS
PPTXJS是jquery的一个插件,她的主要功能是实现pptx转html,用于在线进行展示
官网地址:https://pptx.js.org/index.html
github地址:https://github.com/meshesha/PPTXjs
使用示例:
<div id="slide-resolte-contaniner" ></div>
<script>
  $("#slide-resolte-contaniner").pptxToHtml(
    pptxFileUrl: "Sample_demo1.pptx",
    slidesScale: "50%",
    slideMode: false,
    keyBoardShortCut: false
  );
</script>
实现效果:

总结
本文主要介绍了word、excel、pdf、ppt等文件纯前端实现在线预览的方式,具体实现可以是:
1、前端根据不同文件类型使用对应的在线预览组件进行在线预览。
前端通过判断不同文件类型的使用对应的在线预览组件进行在线预览。 因为不同类型的在线预览组件不一样在使用时预览界面会存在差异,如果需要做的完善一点 最好是把所有用到的组件都统一封装的一个在线预览的UI界面中。
2、后端配合将不同格式的文件转换成pdf,转成统一的文件格式,再由前端实现预览效果
从本文的测试情况来看前端实现预览最好的效果还是PDF,不会出现一些文字错乱和乱码的问题,这样能保留文件的一些样式的效果,同时前端也只用支持一种文件格式的预览,工作量也能大大降低。
以上就是使用js前端实现word、excel、pdf、ppt等文件在线预览的方式的全部内容,感谢大家的阅读!
java实现word转pdf在线预览(前端使用PDF.js;后端使用openofficeaspose)
背景
之前一直是用户点击下载word文件到本地,然后使用office或者wps打开。需求优化,要实现可以直接在线预览,无需下载到本地然后再打开。
随后开始上网找资料,网上资料一大堆,方案也各有不同,大概有这么几种方案:
1.word转html然后转pdf
2.Openoffice + swftools + Flexmapper + jodconverter
3.kkFileView
分析之后最后决定使用Openoffice+PDF.js方式实现
环境搭建
1.安装Openoffice,下载地址:http://www.openoffice.org/download/index.html
安装完成之后,cmd进入安装目录执行命令:soffice "-accept=socket,host=localhost,port=8100;urp;StarOffice.ServiceManager" -nologo -headless -nofirststartwizard

2.PDF.js,下载地址:http://mozilla.github.io/pdf.js/
下载之后解压,目录结构如下:


代码实现
编码方面,分前端后:
后端:java后端使用openoffice把word文档转换成pdf文件,返回流
前端:把PDF.js解压后的文件加到项目中,修改对应路径,PDF.js拿到后端返回的流直接展示
后端
项目使用springboot,pom文件添加依赖
<!-- openoffice word转pdf -->
        <dependency>
            <groupId>com.artofsolving</groupId>
            <artifactId>jodconverter</artifactId>
            <version>2.2.1</version>
        </dependency>
        <dependency>
            <groupId>org.openoffice</groupId>
            <artifactId>jurt</artifactId>
            <version>3.0.1</version>
        </dependency>
        <dependency>
            <groupId>org.openoffice</groupId>
            <artifactId>ridl</artifactId>
            <version>3.0.1</version>
        </dependency>
        <dependency>
            <groupId>org.openoffice</groupId>
            <artifactId>juh</artifactId>
            <version>3.0.1</version>
        </dependency>
        <dependency>
            <groupId>org.openoffice</groupId>
            <artifactId>unoil</artifactId>
            <version>3.0.1</version>
        </dependency>
application.properties配置openoffice服务地址与端口
openoffice.host=127.0.0.1
openoffice.port=8100
doc文件转pdf文件
import java.io.BufferedInputStream;
import java.io.File;
import java.io.FileInputStream;
import java.io.IOException;
import java.io.OutputStream;
import java.net.ConnectException;

import javax.servlet.http.HttpServletResponse;

import org.slf4j.Logger;
import org.slf4j.LoggerFactory;
import org.springframework.beans.factory.annotation.Value;
import org.springframework.stereotype.Controller;
import org.springframework.web.bind.annotation.RequestMapping;

import com.xxx.utils.Doc2PdfUtil;

@Controller
@RequestMapping("/doc2PdfController")
public class Doc2PdfController {
    @Value("${openoffice.host}")
    private String OpenOfficeHost;
    @Value("${openoffice.port}")
    private Integer OpenOfficePort;

    private Logger logger = LoggerFactory.getLogger(Doc2PdfController.class);

    @RequestMapping("/doc2pdf")
    public void doc2pdf(String fileName,HttpServletResponse response){
        File pdfFile = null;
        OutputStream outputStream = null;
        BufferedInputStream bufferedInputStream = null;

        Doc2PdfUtil doc2PdfUtil = new Doc2PdfUtil(OpenOfficeHost, OpenOfficePort);

        try {
            //doc转pdf,返回pdf文件
            pdfFile = doc2PdfUtil.doc2Pdf(fileName);
            outputStream = response.getOutputStream();
            response.setContentType("application/pdf;charset=UTF-8");
            bufferedInputStream = new BufferedInputStream(new FileInputStream(pdfFile));
            byte buffBytes[] = new byte[1024];
            outputStream = response.getOutputStream();
            int read = 0;
            while ((read = bufferedInputStream.read(buffBytes)) != -1) {
                outputStream.write(buffBytes, 0, read);
            }
        } catch (ConnectException e) {
            logger.info("****调用Doc2PdfUtil doc转pdf失败****");
            e.printStackTrace();
        } catch (IOException e) {
            e.printStackTrace();
        }  finally {
            if(outputStream != null){
                try {
                    outputStream.flush();
                    outputStream.close();
                } catch (IOException e) {
                    e.printStackTrace();
                }
            }
            if(bufferedInputStream != null){
                try {
                    bufferedInputStream.close();
                } catch (IOException e) {
                    e.printStackTrace();
                }
            }
        }
    }
}
import java.io.File;
import java.net.ConnectException;

import org.slf4j.Logger;
import org.slf4j.LoggerFactory;

import com.artofsolving.jodconverter.DocumentConverter;
import com.artofsolving.jodconverter.openoffice.connection.OpenOfficeConnection;
import com.artofsolving.jodconverter.openoffice.connection.SocketOpenOfficeConnection;
import com.artofsolving.jodconverter.openoffice.converter.StreamOpenOfficeDocumentConverter;

public class Doc2PdfUtil {
    private String OpenOfficeHost; //openOffice服务地址
    private Integer OpenOfficePort; //openOffice服务端口

    public Doc2PdfUtil(){
    }

    public Doc2PdfUtil(String OpenOfficeHost, Integer OpenOfficePort){
        this.OpenOfficeHost = OpenOfficeHost;
        this.OpenOfficePort = OpenOfficePort;
    }

    private Logger logger = LoggerFactory.getLogger(Doc2PdfUtil.class);

    /**
     * doc转pdf
     * @return pdf文件路径
     * @throws ConnectException
     */
    public File doc2Pdf(String fileName) throws ConnectException{
        File docFile = new File(fileName + ".doc");
        File pdfFile = new File(fileName + ".pdf");
        if (docFile.exists()) {
            if (!pdfFile.exists()) {
                OpenOfficeConnection connection = new SocketOpenOfficeConnection(OpenOfficeHost, OpenOfficePort);
                try {
                    connection.connect();
                    DocumentConverter converter = new StreamOpenOfficeDocumentConverter(connection);
                    //最核心的操作,doc转pdf
                    converter.convert(docFile, pdfFile);
                    connection.disconnect();
                    logger.info("****pdf转换成功,PDF输出:" + pdfFile.getPath() + "****");
                } catch (java.net.ConnectException e) {
                    logger.info("****pdf转换异常,openoffice服务未启动!****");
                    e.printStackTrace();
                    throw e;
                } catch (com.artofsolving.jodconverter.openoffice.connection.OpenOfficeException e) {
                    System.out.println("****pdf转换器异常,读取转换文件失败****");
                    e.printStackTrace();
                    throw e;
                } catch (Exception e) {
                    e.printStackTrace();
                    throw e;
                }
            }
        } else {
            logger.info("****pdf转换异常,需要转换的doc文档不存在,无法转换****");
        }
        return pdfFile;
    }
}
前端
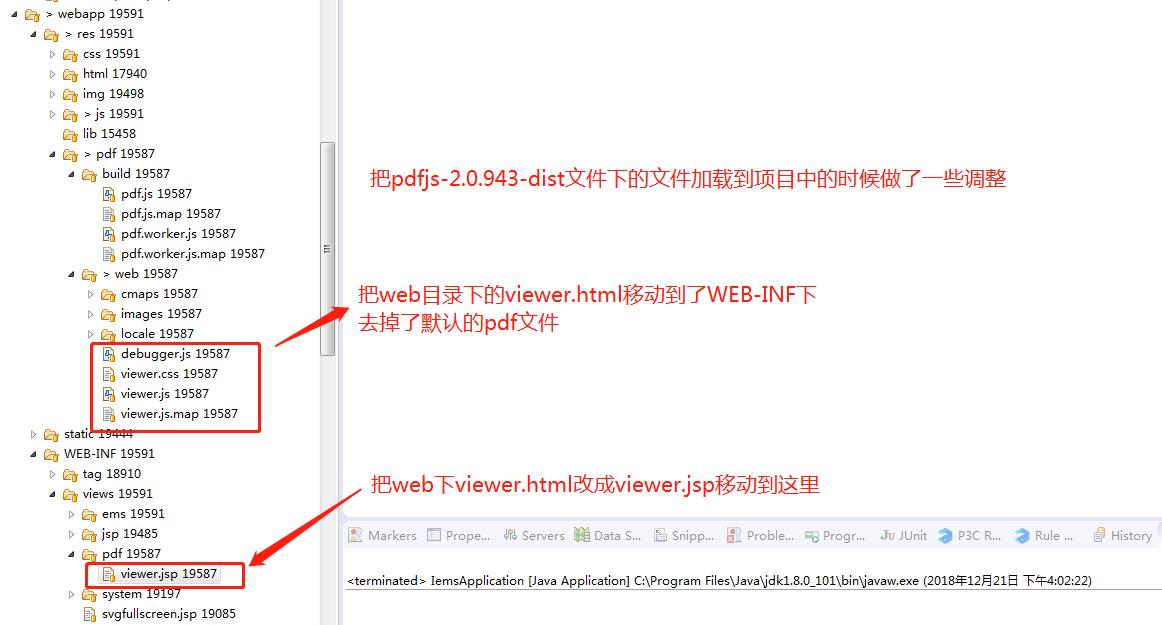
把pdfjs-2.0.943-dist下的两个文件夹build、web整体加到项目中,然后把viewer.html改成viewer.jsp,并调整了位置,去掉了默认的pdf文件compressed.tracemonkey-pldi-09.pdf,将来使用我们生成的文件
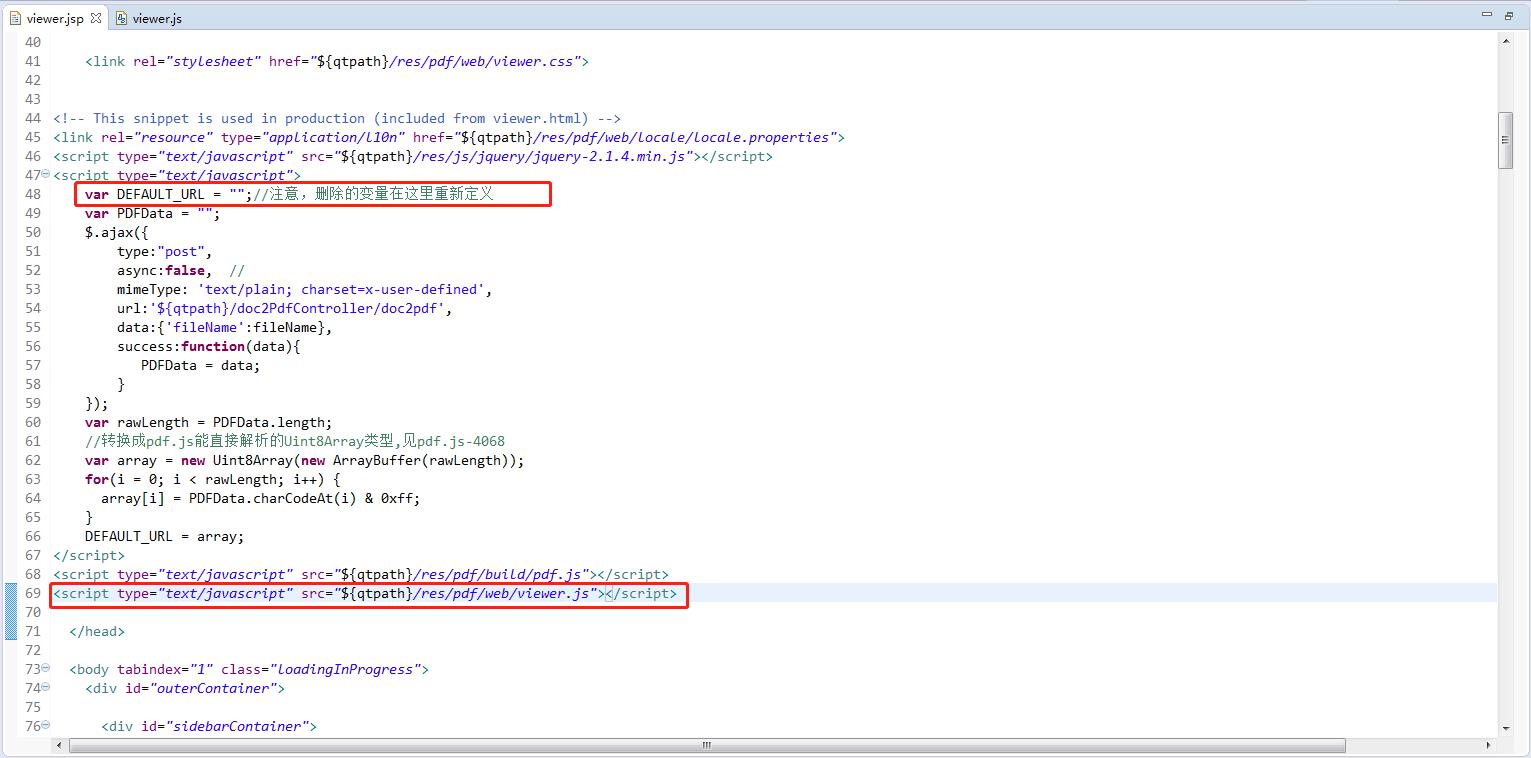
viewer.jsp、viewer.js注意点:
1.引用的js、css路径要修改过来
2.viewer.jsp中调用pdf/web/viewer.js,viewer.js中配置了默认的pdf文件路径,我们要动态生成pdf,因此需要修改,在jsp中定义一个参数DEFAULT_URL,然后在js中使用它
3.jsp中写了一个ajax获取pdf流,之后赋值给DEFAULT_URL,然后再让viewer.js去加载,因此需要把/pdf/web/viewer.js放到ajax方法后面
4.viewer.js中把compressed.tracemonkey-pldi-09.pdf改成我们定义的变量DEFAULT_URL;pdf.worker.js的路径修改成对应路径


<%@ page language="java" contentType="text/html; charset=utf-8"
    pageEncoding="utf-8"%>
<%@ taglib uri="http://java.sun.com/jsp/jstl/core" prefix="c"%>
<!DOCTYPE html>
<!--
Copyright 2012 Mozilla Foundation

Licensed under the Apache License, Version 2.0 (the "License");
you may not use this file except in compliance with the License.
You may obtain a copy of the License at

    http://www.apache.org/licenses/LICENSE-2.0

Unless required by applicable law or agreed to in writing, software
distributed under the License is distributed on an "AS IS" BASIS,
WITHOUT WARRANTIES OR CONDITIONS OF ANY KIND, either express or implied.
See the License for the specific language governing permissions and
limitations under the License.

Adobe CMap resources are covered by their own copyright but the same license:

    Copyright 1990-2015 Adobe Systems Incorporated.

See https://github.com/adobe-type-tools/cmap-resources
-->
<html dir="ltr" mozdisallowselectionprint>
  <head>
    <meta charset="utf-8">
    <meta name="viewport" content="width=device-width, initial-scale=1, maximum-scale=1">
    <meta name="google" content="notranslate">
    <meta http-equiv="X-UA-Compatible" content="IE=edge">
    <c:set var="qtpath" value="${pageContext.request.contextPath}"/>
    <script>
        var qtpath = \'${qtpath}\';
        var fileName = \'${fileName}\';
    </script>

    <title>PDF.js viewer</title>


    <link rel="stylesheet" href="${qtpath}/res/pdf/web/viewer.css">


<!-- This snippet is used in production (included from viewer.html) -->
<link rel="resource" type="application/l10n" href="${qtpath}/res/pdf/web/locale/locale.properties">
<script type="text/javascript" src="${qtpath}/res/js/jquery/jquery-2.1.4.min.js"></script>
<script type="text/javascript">
    var DEFAULT_URL = "";//注意,删除的变量在这里重新定义
    var PDFData = "";
    $.ajax({
        type:"post",
        async:false,  //
        mimeType: \'text/plain; charset=x-user-defined\',
        url:\'${qtpath}/doc2PdfController/doc2pdf\',
        data:{\'fileName\':fileName},
        success:function(data){
           PDFData = data;
        }
    });
    var rawLength = PDFData.length;
    //转换成pdf.js能直接解析的Uint8Array类型,见pdf.js-4068
    var array = new Uint8Array(new ArrayBuffer(rawLength));
    for(i = 0; i < rawLength; i++) {
      array[i] = PDFData.charCodeAt(i) & 0xff;
    }
    DEFAULT_URL = array;
</script>
<script type="text/javascript" src="${qtpath}/res/pdf/build/pdf.js"></script>
<script type="text/javascript" src="${qtpath}/res/pdf/web/viewer.js"></script>

  </head>

  ...
效果

分割线
------------------------------------------------------------------------------------------------------------------------------------------------------------------------------------------------------------------------------------------------------------------------------------------------
本以为完美的实现了doc在线预览,上测试环境后发现了一个大坑,我们的doc文件不是在本地office创建后上传的,是其他同事用freemarker ftl模板生成的,这种生成的doc文件根本不是微软标准的doc,本质是xml数据结构,openoffice拿这种文件去转换pdf文件直接就报错了
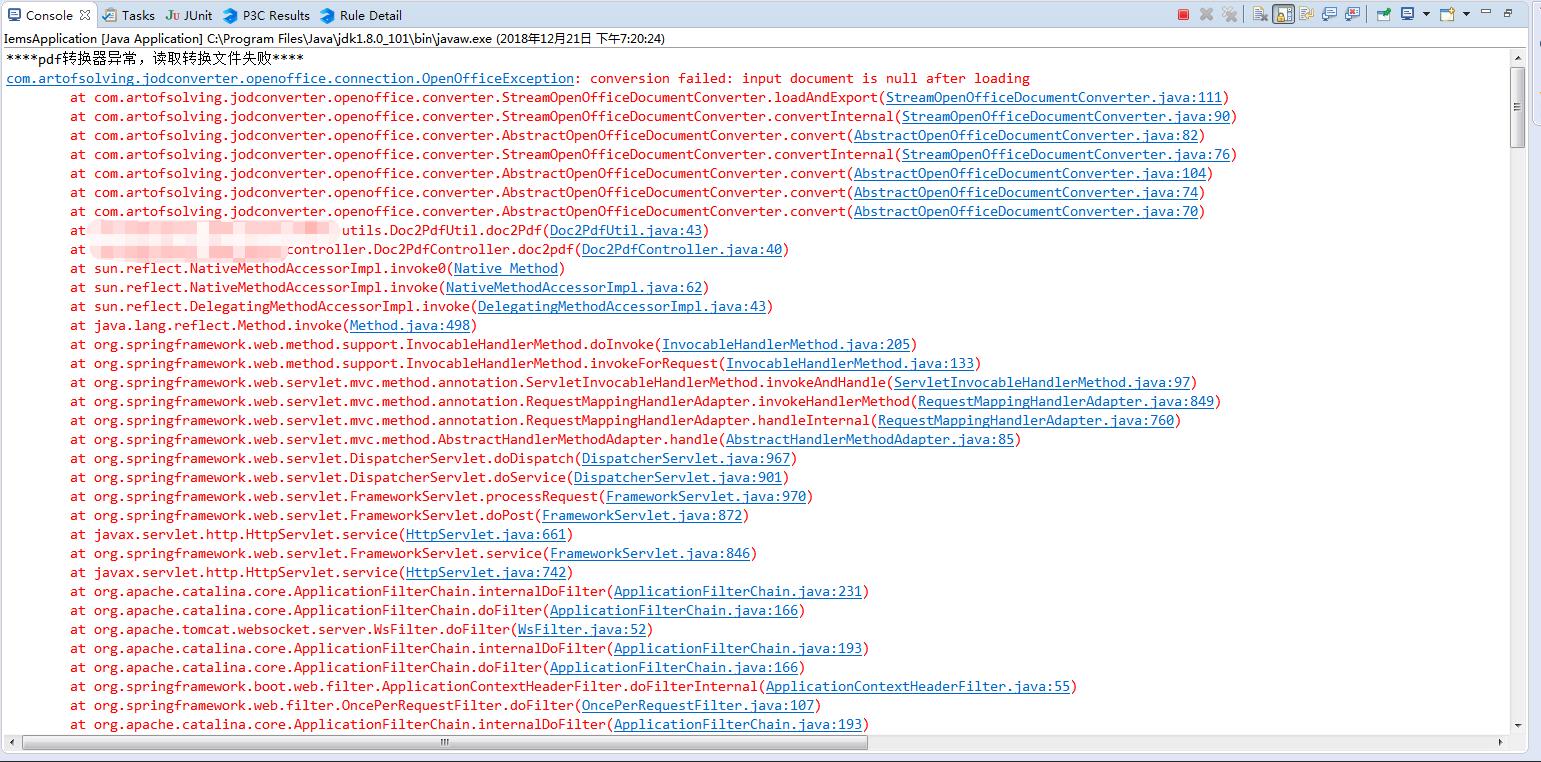
上网查资料查了半天也没找到这种问题的解决方案,想想只能是放弃openoffice改用其他方法了(freemarker ftl生成doc这个肯定是不能动的)
看到一些博客使用word--html--pdf生成pdf,还有的使用freemarker ftl xml 生成pdf感觉还是太繁琐了,我只是想拿现有的doc(虽然是freemarker ftl生成的)转换成pdf啊
继续看博客查资料,看到一种方法,使用aspose把doc转换成pdf,抱着试一试的心态在本地测试了下,没想到竟然成了,感觉太意外了,aspose方法超级简单,只要导入jar包,几行代码就可以搞定,并且转换速度比openoffice要快很多。很是奇怪,这么好用这么简单的工具为什么没在我一开始搜索word转pdf的时候就出现呢
aspose doc转pdf
在maven仓库搜索aspose,然后把依赖加入pom.xml发现jar包下载不下来,没办法,最后在csdn下载aspose jar包,然后mvn deploy到仓库
pom.xml
<!-- word转pdf maven仓库没有需要本地jar包发布到私服 -->
        <dependency>
            <groupId>com.aspose.words</groupId>
            <artifactId>aspose-words-jdk16</artifactId>
            <version>14.9.0</version>
        </dependency>
import java.io.BufferedInputStream;
import java.io.File;
import java.io.FileInputStream;
import java.io.IOException;
import java.io.OutputStream;
import java.net.ConnectException;

import javax.servlet.http.HttpServletResponse;

import org.slf4j.Logger;
import org.slf4j.LoggerFactory;
import org.springframework.stereotype.Controller;
import org.springframework.web.bind.annotation.RequestMapping;

import com.xxx.utils.Doc2PdfUtil;

@Controller
@RequestMapping("/doc2PdfController")
public class Doc2PdfController {

    private Logger logger = LoggerFactory.getLogger(Doc2PdfController.class);

    @RequestMapping("/doc2pdf")
    public void doc2pdf(String fileName,HttpServletResponse response){
        File pdfFile = null;
        OutputStream outputStream = null;
        BufferedInputStream bufferedInputStream = null;
        String docPath = fileName + ".doc";
        String pdfPath = fileName + ".pdf";
        try {
            pdfFile = Doc2PdfUtil.doc2Pdf(docPath, pdfPath);
            outputStream = response.getOutputStream();
            response.setContentType("application/pdf;charset=UTF-8");
            bufferedInputStream = new BufferedInputStream(new FileInputStream(pdfFile));
            byte buffBytes[] = new byte[1024];
            outputStream = response.getOutputStream();
            int read = 0;
            while ((read = bufferedInputStream.read(buffBytes)) != -1) {
                outputStream.write(buffBytes, 0, read);
            }
        } catch (ConnectException e) {
            logger.info("****调用Doc2PdfUtil doc转pdf失败****");
            e.printStackTrace();
        } catch (IOException e) {
            e.printStackTrace();
        }  finally {
            if(outputStream != null){
                try {
                    outputStream.flush();
                    outputStream.close();
                } catch (IOException e) {
                    e.printStackTrace();
                }
            }
            if(bufferedInputStream != null){
                try {
                    bufferedInputStream.close();
                } catch (IOException e) {
                    e.printStackTrace();
                }
            }
        }
    }
}
Doc2PdfUtil.java
import java.io.ByteArrayInputStream;
import java.io.File;
import java.io.FileOutputStream;

import org.slf4j.Logger;
import org.slf4j.LoggerFactory;

import com.aspose.words.License;
import com.aspose.words.SaveFormat;

public class Doc2PdfUtil {

    private static Logger logger = LoggerFactory.getLogger(Doc2PdfUtil.class);

    /**
     * doc转pdf
     * @param docPath doc文件路径,包含.doc
     * @param pdfPath pdf文件路径,包含.pdf
     * @return
     */
    public static File doc2Pdf(String docPath, String pdfPath){
        File pdfFile = new File(pdfPath);
        try {
            String s = "<License><Data><Products><Product>Aspose.Total for Java</Product><Product>Aspose.Words for Java</Product></Products><EditionType>Enterprise</EditionType><SubscriptionExpiry>20991231</SubscriptionExpiry><LicenseExpiry>20991231</LicenseExpiry><SerialNumber>8bfe198c-7f0c-4ef8-8ff0-acc3237bf0d7</SerialNumber></Data><Signature>sNLLKGMUdF0r8O1kKilWAGdgfs2BvJb/2Xp8p5iuDVfZXmhppo+d0Ran1P9TKdjV4ABwAgKXxJ3jcQTqE/2IRfqwnPf8itN8aFZlV3TJPYeD3yWE7IT55Gz6EijUpC7aKeoohTb4w2fpox58wWoF3SNp6sK6jDfiAUGEHYJ9pjU=</Signature></License>";
            ByteArrayInputStream is = new ByteArrayInputStream(s.getBytes());
            License license = new License();
            license.setLicense(is);
            com.aspose.words.Document document = new com.aspose.words.Document(docPath);
            document.save(new FileOutputStream(pdfFile),SaveFormat.PDF);
        } catch (Exception e) {
            logger.info("****aspose doc转pdf异常");
            e.printStackTrace();
        }
        return pdfFile;
    }
}
aspose-words-jdk16-14.9.0.jar下载地址
https://download.csdn.net/download/u013279345/10868189
window下正常,linux下乱码的解决方案
使用com.aspose.words将word模板转为PDF文件时,在开发平台window下转换没有问题,中文也不会出现乱码。但是将服务部署在正式服务器(Linux)上,转换出来的PDF中文就出现了乱码。在网上找了很久,才找到原因,现将解决办法分享给大家。
一、问题原因分析
在window下没有问题但是在linux下有问题,就说明不是代码或者输入输出流编码的问题,根本原因是两个平台环境的问题。出现乱码说明linux环境中没有相应的字体以供使用,所以就会导致乱码的出现。将转换无问题的windos主机中的字体拷贝到linux平台下进行安装,重启服务器后转换就不会出现乱码了。
二、window字体复制到linux环境并安装
按照教程安装完成后重启linux服务器即可搞定乱码问题。
1. From Windows
Windows下字体库的位置为C:\\Windows\\fonts,这里面包含所有windows下可用的字体。
2. To Linux
linux的字体库是 /usr/share/Fonts 。
在该目录下新建一个目录,比如目录名叫 windows(根据个人的喜好,自己理解就行,当然这里是有权限要求的,你可以用sudo来执行)。
然后将 windows 字体库中你要的字体文件复制到新建的目录下(只需要复制*.ttc,和*.ttf的文件).
复制所有字体:
sudo cp *.ttc /usr/share/fonts/windows/
sudo cp *.ttf /usr/share/fonts/windows/
更改这些字体库的权限:
sudo chmod 755 /usr/share/fonts/windows/*
然后进入Linux字体库:
cd /usr/share/fonts/windows/
接着根据当前目录下的字体建立scale文件
sudo mkfontscale
接着建立dir文件
sudo mkfontdir
然后运行
sudo fc-cache
重启 Linux 操作系统就可以使用这些字体了。
linux下乱码问题解决方案转载自:
https://blog.csdn.net/hanchuang213/article/details/64905214
https://blog.csdn.net/shanelooli/article/details/7212812
以上是关于文档在线预览使用js前端实现wordexcelpdfppt 在线预览的主要内容,如果未能解决你的问题,请参考以下文章