KKRT-PSI

Posted Pam

tags:

篇首语:本文由小常识网(cha138.com)小编为大家整理,主要介绍了KKRT-PSI相关的知识,希望对你有一定的参考价值。

KKRT库:https://github.com/osu-crypto/BaRK-OPRF

文章:Efficient Batched Oblivious PRF with Applications to Private Set Intersection-2016

方案

解读论文,参考:Efficient Batched Oblivious PRF -Private Set Intersection

关键词:两方PSI、ORFT、OTE

引言

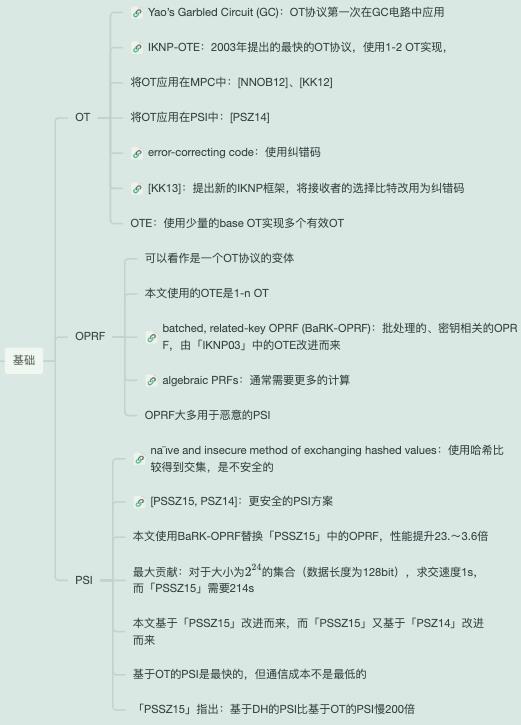
KKRT-PSI方案使用了OTE(OT扩展)、OPRF、Cuckoo哈希等技术,在大集合场景、局域网(带宽20GB/s)下运行效果最好。

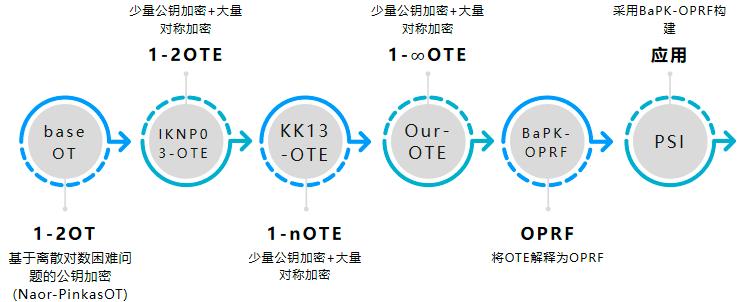
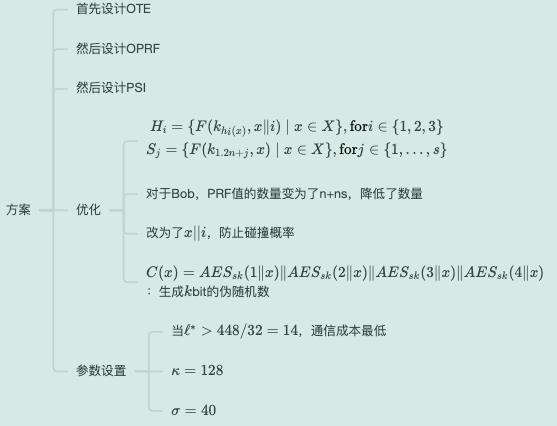
方案构造思路:先设计一个OTE,进而设计一个OPRF,最后设计一个PSI

基础

1-2 OT

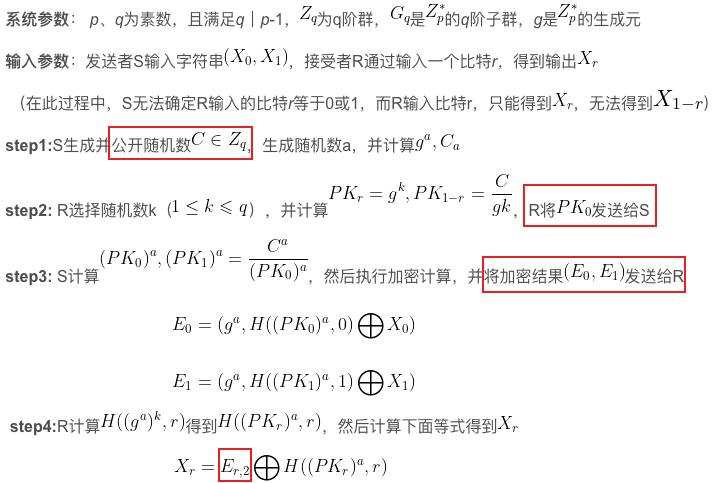
协议功能:Sender不知道Receiver的选择\\(r\\);Receiver只知道\\(X_r\\)

协议实现:有基于RSA的、基于DH的、基于ECC的等。

下面介绍的是Naor-Pinkas-OT,Naor和Pinkas通过三次公钥密码学操作实现了半诚实模型下的1-2 OT:

论文:Efficient oblivious transfer protocols-2001

参考:Naor-Pinkas茫然传输协议

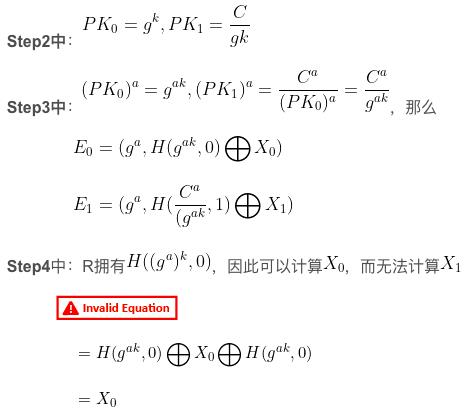
其中\\(E_r,2\\)表示\\(E_r\\)的第二部分,若\\(r=0\\),则:

安全性:Sender根据\\(PK_0\\)不能反推出\\(k\\);Receiver根据\\(g^a\\)不能反推出\\(a\\)

1-2 OTE

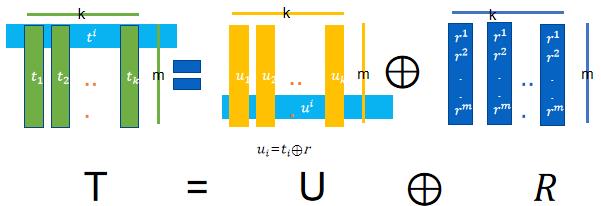
1-2 OT在实际应用中,每次都需使用一次,效率较低,所以下一步采用“固定数量的OT来实现任意数量的OT”,例如下图只需要使用\\(k\\)次1-2OT即可实现,其中\\(k\\)是根据安全参数决定的。

Ishai、Kilian、Nissim和Petrank于2003年提出基于矩阵变化实现少量1-2OT和对称密钥构造大量OT实例的不经意传输扩展协议。

论文:Extending Oblivious Transfers Efficiently-2003

参考:[IKNP03] Extending Oblivious Transfers Efficiently

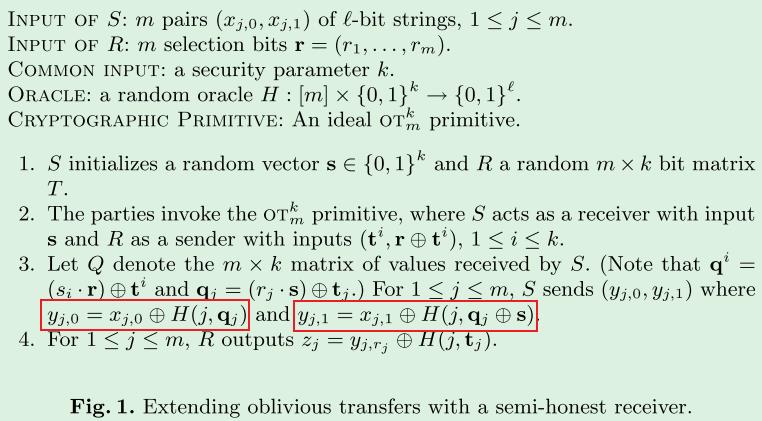
本文提出了一种OT扩展协议,即\\(k\\)次1-2OT实现了\\(m\\)次1-OT,其中\\(k<m\\),,即每次有两种选择。文中给出了两种情况的协议:Receiver半诚实和Receiver恶意,下面介绍Receiver半诚实的协议

分析:

注意:\\(m_i\\)表示列,\\(m^i\\)表示行

  • 输入
    • S:\\(m\\)\\((x_j,0,x_j,1)\\),其中\\(x_j,b\\)是一个\\(l\\)bit的字符串
    • R:选择比特\\(r=(r_1,...,r_m)\\in[0,1]\\)
  • 输出:
    • R:得到\\(m\\)\\(x_j,b\\)
  • 协议:
    • 两方执行\\(OT_m^k\\)协议,S得到一个矩阵\\(Q_m*k\\),其中\\(q^i=(s_i*r)\\oplus t^i,i\\in[1,k]\\)(从列看)
      • 从行看,\\(q_j=(s*r_j)\\oplus t_j=\\left\\\\beginmatrixq_j=t_j,if(r_j=0)\\\\q_i=s\\oplus t_j,if(r_j=1)\\endmatrix\\right.,j\\in[1,m]\\)
      • 从而有:\\(t_j=q_j\\oplus s\\)
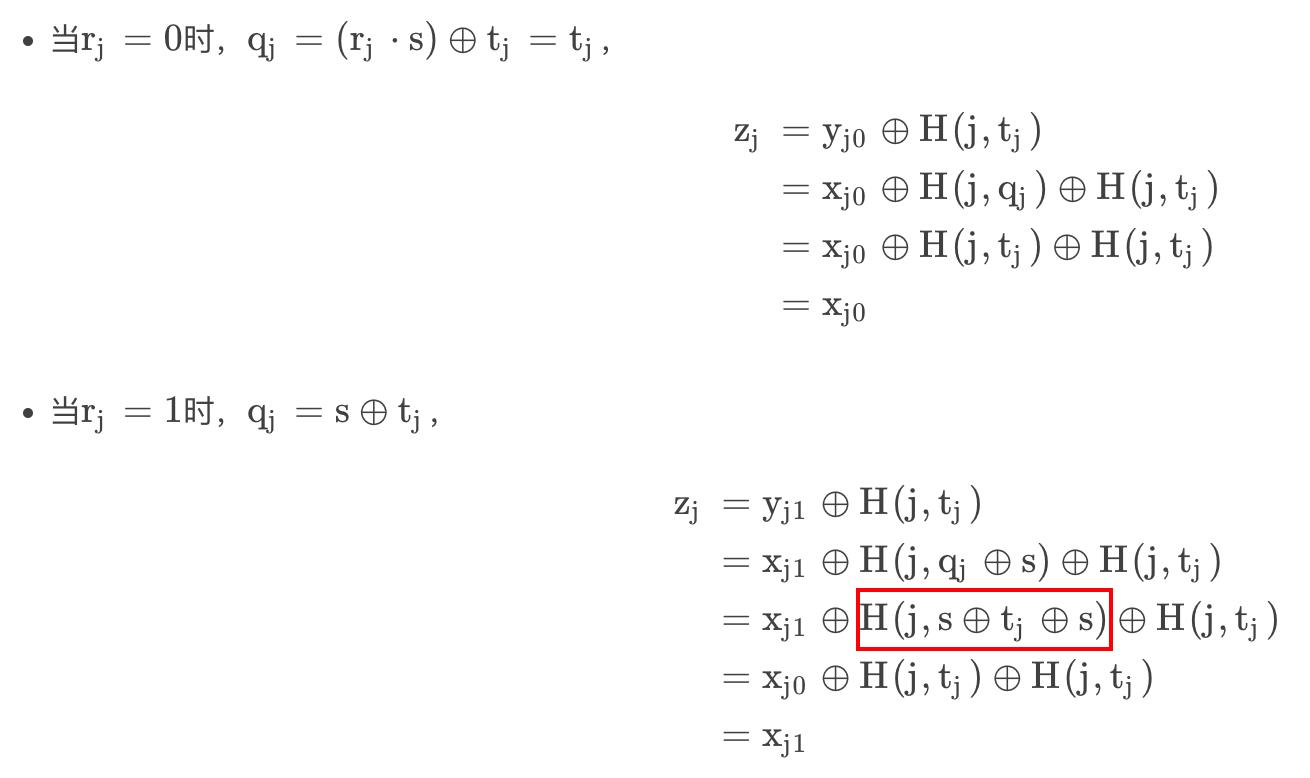
    • S:对于每对\\((x_j,0,x_j,1),j\\in[1,m]\\),计算\\(y_j,0=x_j,0\\oplus H(j,q_j),y_j,1=x_j,1\\oplus H(j,q_j\\oplus s)\\),并发送给R
    • R:计算\\(z_j=y_j,r_j\\oplus H(j,t_j)\\)
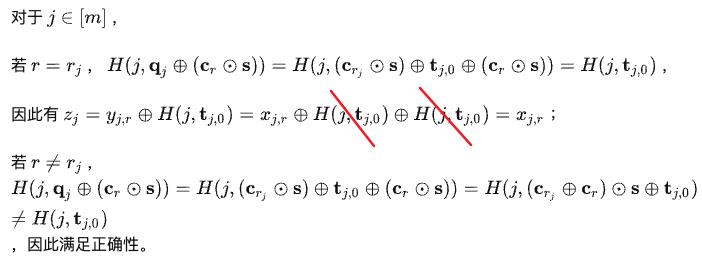
  • 正确性:

1-n OTE

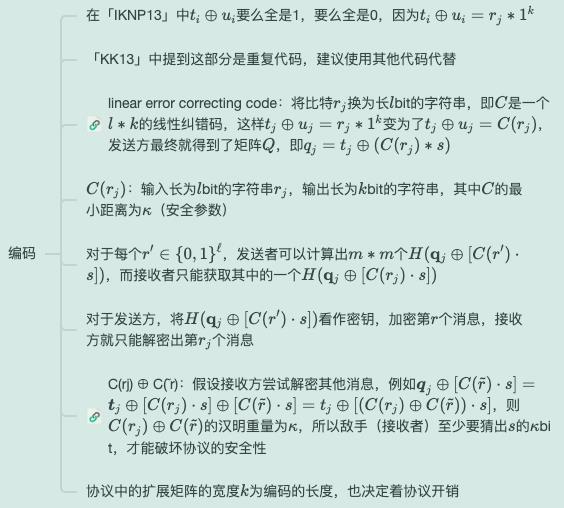
IKN03方案是用\\(k\\)次OT实现了\\(m\\)次1-2OT,其中\\(k<<m\\)。KK13方案将IKN03中的\\(r\\)看作一个矩阵\\(R_m*k\\)(每列都一样),计算\\(T=U \\oplus R\\),无需使用1-2OT实现1-nOT,仅改变了\\(R\\),利用编码技术,实现了\\(1-n\\)OTE。

论文:Improved OT Extension for Transferring Short Secrets-2013

参考:KK13 OTE——Improved OT Extension for Transferring Short Secrets

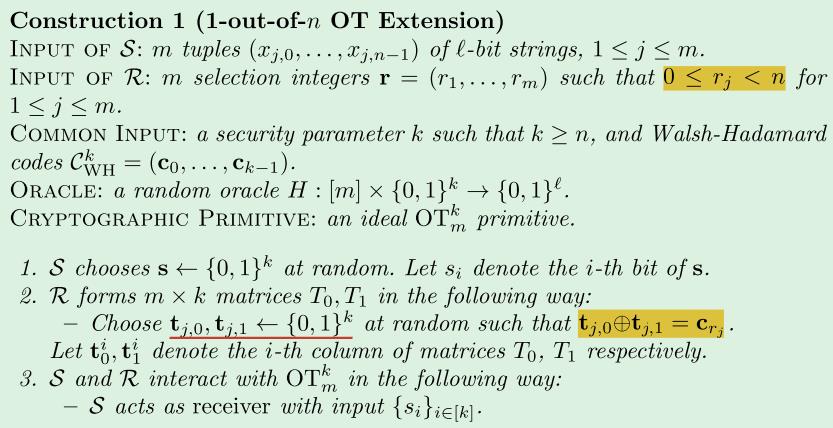
\\(k\\)次1-n OT传递了\\(m\\)个信息,每个消息是\\(lbit\\),且是n个中选1个,其中\\(k>=n\\)

  • ⚠️
    • \\(t_j,0\\)表示矩阵\\(T_0\\)的第\\(j\\)行,有\\(k\\)个数据,每个数据为\\(1bit\\)
    • \\(C_WH^k(a)\\)表示输入一个\\(log^k\\)bit的字符串\\(a\\),输出一个\\(k\\)个字符串\\((c_0,...,c_k-1)\\),每个字符串为\\(kbit\\),即可以看作是一个\\(k*k\\)的比特矩阵。
    • 从行看,\\(t_j,0\\oplus t_j,1=c_r_j\\),即\\(T_1\\)的行等于\\(T_0\\)的行和\\(R\\)中的行。
  • S和R之间进行\\(k\\)次1-nOT,S获得了矩阵\\(Q_m*k\\)
    • 从列看,若\\(s_i=0\\),则\\(q^i=t_0^i\\);若\\(s_i=1\\),则\\(q^i=t_1^i\\),所以\\(q^i=t_s_i^i\\)
    • 从行看,\\(q_j=((t_j,0\\oplus t_j,1)*s)\\oplus t_j,0 \\to q_j=(c_r_j*s)\\oplus t_j,0\\)

  • 证明
    • 最后S计算\\(y_j,r\\),共要计算\\(m*n\\)个,例如\\(j=1\\),则需发送\\(y_1,0,y_1,1,...,y_1,n-1\\),对于R来说,只取\\(y_1,1\\),其他无用。

关于WH编码:

1-$\\infty $ OTE

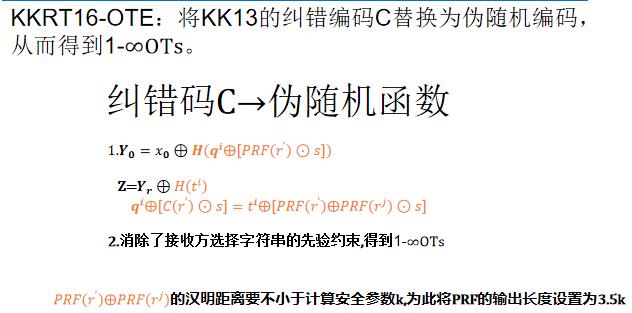
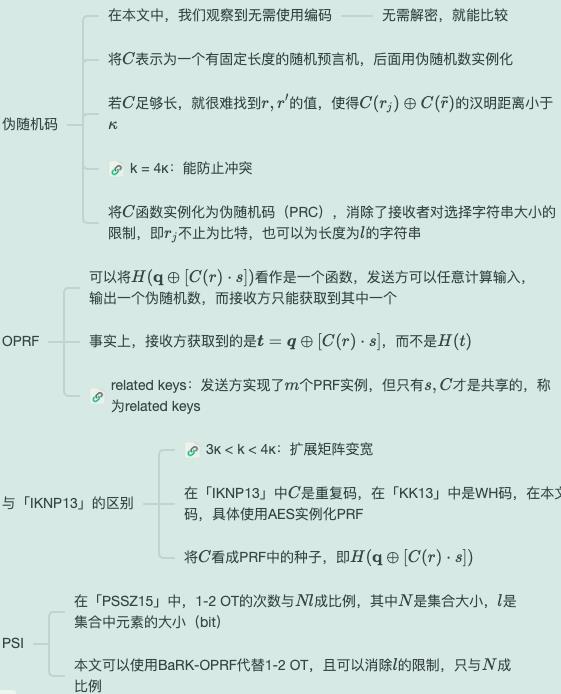
从KK13方案中,知道\\(C_WH^k(a)\\)是一种编码形式,即输入一个\\(log^k\\)bit的字符串\\(a\\),输出一个\\(k\\)个字符串\\((c_0,...,c_k-1)\\),每个字符串为\\(k\\)bit,在进行隐私相等性测试时,即已知\\(C_WH^k(a),C_WH^k(b)\\),如何安全判断\\(a\\)\\(b\\)是否相等,无需解码,只需比较\\(C_WH^k(a),C_WH^k(b)\\)是否相等即可,这里需要保证\\(C_WH^k(a)\\oplus C_WH^k(b)\\)的汉明距离不小于计算安全参数。所以在KKRT16方案中的OTE,无需使用\\(WH\\)编码技术,只需要一个汉明距离不小于计算安全参数的伪随机函数即可

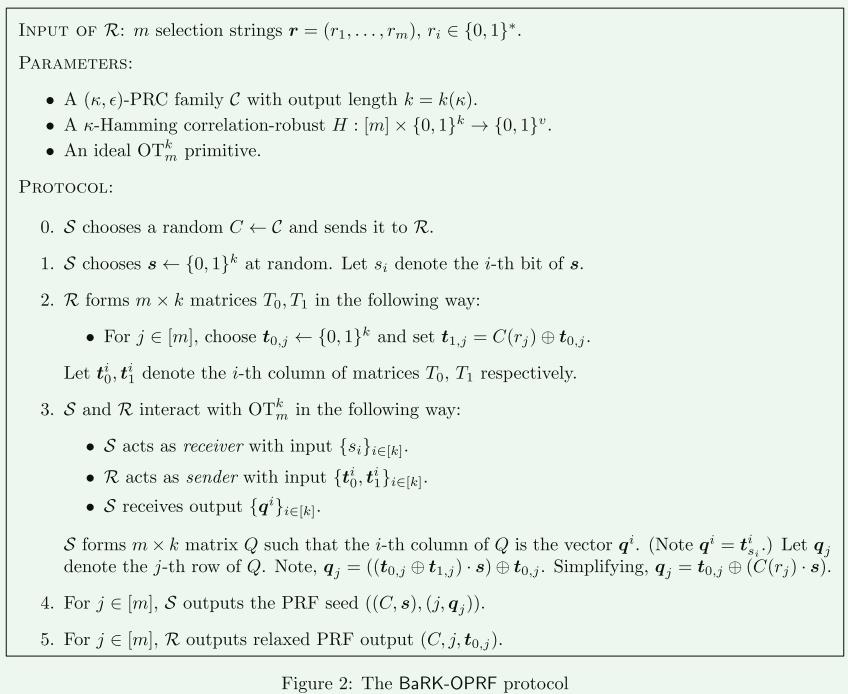
BaRK-OPRF

  • 首先介绍一下OPRF:

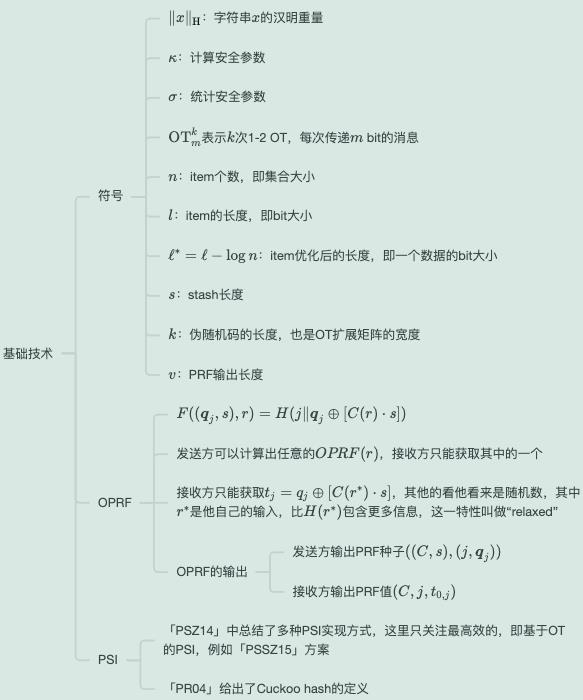
发送方和接收者执行两方OPRF协议,发送方无输入,接收方输入元素\\(x_i\\),发送方输出密钥\\(k\\),接收方输出OPRF值\\(F(k,x_i)\\)

  • 下面介绍如何将KKRT16-OTE解释为一个OPRF协议:

上面提到需使用伪随机函数,这里伪随机函数的功能相当于KK13中的哈希,即\\(F=H(j,\\mathbfq_j\\oplus(\\mathbfc_r\\odot\\mathbfs))\\)。一共有\\(m\\)\\(r_i\\),可以执行\\(m\\)次OPRF。另外在2019年PRTY19和2020年CM20都基于第3个属性对OPRF协议进行了进一步的改进,得到多点OPRF,实现了正常带宽下最快的PSI协议

KKRT167中使用的OPRF由于是Batch、relaxed的,所以叫做BaRK-OPRF。

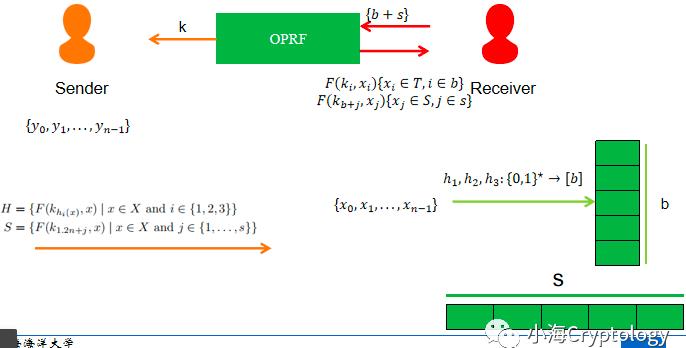
得到一个OPRF协议后,就可以很容易的构造一个PSI协议。例如下图:

  • S与R执行OPRF,R输入隐私集合,输出OPRF值;
  • S输出密钥\\(k\\),可计算任意的OPRF值,\\(S\\)本地计算OPRF值并将其发送给接收方,R通过字符串比较得到交集;

但接收方需要进行\\(O(n^2)\\)次比较。

Cuckoo 哈希

更多参考:https://www.cnblogs.com/pam-sh/p/16155650.html#cuckoo-hash

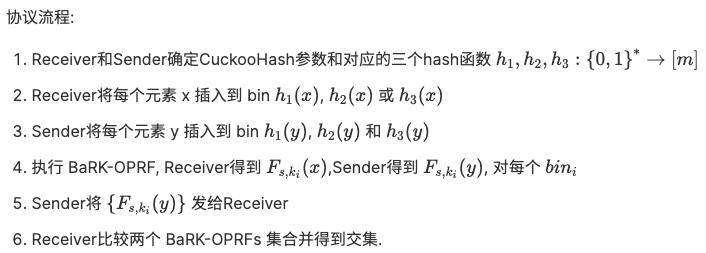
Cuckoo hashing分为两个存储表,一个为Cuchoo哈希表,一个称为堆存储容器。(本文协议采用的这样的容器,之后的文章有采用无堆存储容器的Cuckoo hashing)。

Cuckoo插入元素\\(x\\)的算法如下:

  1. 计算元素\\(x\\)的三个哈希值,寻找对应索引的位置,若至少有一个位置为空则随机插入空位置。若一个位置也没空,则随机选择一个位置替换该元素,然后对该元素执行上述步骤。
  2. 若执行\\(k\\)次后,仍然需要替换,则将该元素存储到堆存储器中!

PSI协议

上述基于一个理想的OPRF构造了一个简单的PSI协议,但效率(计算和通信)较低。

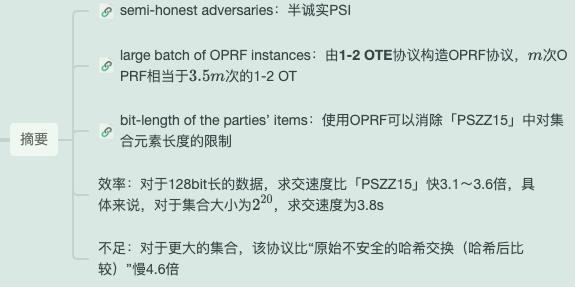
KKRT16-PSI协议遵循了PSZZ15基于KK13-OTE构造PSI的思路,采用Cuckoo hashing算法减少了比较次数。对于128bit的字符串和足够大的集合,求交速度比PSZZ15快3.1~3.6倍,具体说只需3.8s就能求出集合大小为\\(2^20\\)的交集。

「PSZZ15」Phasing: Private set intersection using permutation-based hashing-2015

「PSZ14」Faster private set intersection based on OT extension-2014

总结了PSI协议构造的方法:基于哈希的、基于公钥加密的、基于GC的、基于OT的等。改进了「PSZ14」方案:使用置换哈希减少

bin的位长、使用哈希和安全电路计算,降低电路深度和通信消耗、使用改进的OT协议改进计算和内存消耗。

  • 以PSSZ15的构造方式构造PSI协议,仅将OPRF协议替换为KKRT16-OTE
  1. 接收方随机选择3个hash函数,将集合元素通过布谷鸟hash算法映射到布谷鸟表或堆容器中,最后空余的地方采用虚拟元素填充;
  2. 发送方和接收方执行\\((b+s)\\)次OPRF实例,其中\\(b\\)\\(s\\)分别代表布谷鸟表和堆容器的长度,并将OPRF值和元素\\(x\\)的对应存储位置联系起来;
  3. 发送方拥有密钥\\(K\\),本地计算H和S并将每一行打乱再发送给接收方;
  4. 接收方哈希表每一行的比较次数为3次,堆容器中的每个元素需要比较n次但只有s个元素且s为常量,因此只需要比较(3+s)n次;

  • 优化后,性能提升10%。

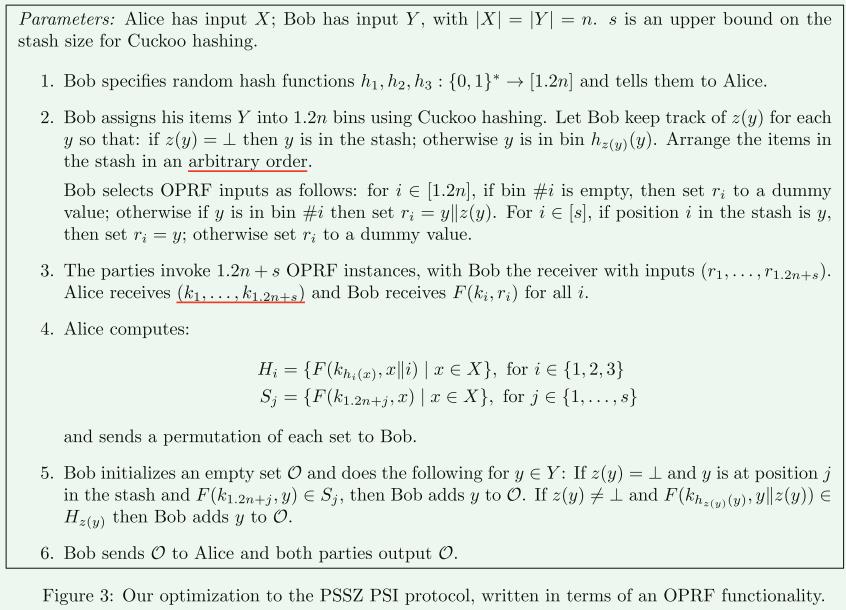
对于在bin中的数据,\\(z\\)表示所用的哈希函数,OPRF的输入为\\(x||z\\),输出为\\(F(k_h_z(x),x||z)\\);对于在stash中的数据,OPRF的输入不变,即\\(x\\),输出为\\(F(k_1.2n+x,x)\\),所以H和S的生成为:\\(\\begingathered H_i =\\F(k_h_t(x),x\\|i)\\mid x\\in X\\,\\textfori\\in\\1,2,3\\ \\\\ S_j =\\F(k_1.2n+j,x)|x\\in X\\,\\textforj\\in\\1,\\ldots,s\\ \\endgathered\\)

这样PRF的值变为了\\(n+ns\\),且降低了OPRF的碰撞概率。

  • 最后方案:

关于\\(K=(k_1,....,k_1.2n+s)\\)的生成没有具体说,待补充。

论文

程序

编译安装

环境:Centos7.6

## 下载
git clone https://github.com/osu-crypto/BaRK-OPRF.git

## 下载依赖库
cd BaRK-OPRF/thirdparty
bash all_linux.get

## 会发现有些问题,需要将makelist中的\'yum -Y\'改为\'yum -y\'

## 编译
cd ..
make

## 会发现mpir安装的有问题,原来是给的下载链接失效了,重新找了一个替换上
## mpir.get文件
wget http://sources.buildroot.net/mpir/mpir-3.0.0.tar.bz2
tar -xjf mpir-3.0.0.tar.bz2 
mv mpir-3.0.0 mpir
rm mpir-3.0.0.tar.bz2 

cp ./mpir_patch/mpirxx.h ./mpir/
cp ./mpir_patch/mpir.h ./mpir/

cd mpir
./configure
make

## 重新编辑,即可
make

## 测试
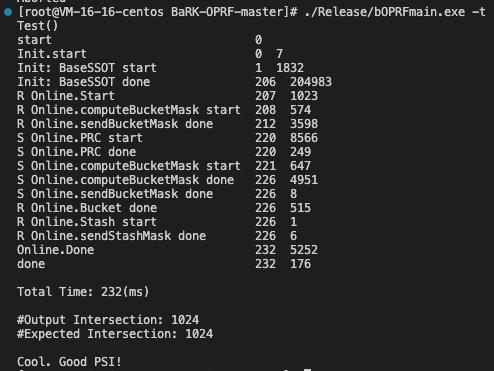
./Release/bOPRFmain.exe -t

测试

单元测试

# 输入数据集规模为2^12,进行测试
./Release/bOPRFmain.exe -t

模拟测试

计算6种情况下的PSI,输入数据规模为(\\(2^8\\)\\(2^12\\)\\(2^16\\)\\(2^20\\)\\(2^24\\))。对于每种情况,运行代码10次来计算PSI。输出包括平均在线/离线/总运行时间(显示在屏幕上)和output.txt文件。

  • 同机器
# Sener
./Release/bOPRFmain.exe -r 0

# Receiver
./Release/bOPRFmain.exe -r 1
  • 不同机器
# Sener
./Release/bOPRFmain.exe -r 0 -ip <ipAdrress:portNumber>

# Receiver
./Release/bOPRFmain.exe -r 1 -ip <ipAdrress:portNumber> 	

解读

基础

  • int main(int argc, char **argv)
//提示函数,其中argv0指向exe
void usage(const char *argv0)

	std::cout << "Error! Please use:" << std::endl;
	std::cout << "\\t 1. For unit test: " << argv0 << " -t" << std::endl;
	std::cout << "\\t 2. For simulation (2 terminal): " << std::endl;
	;
	std::cout << "\\t\\t Sender terminal (localhost): " << argv0 << " -r 0" << std::endl;
	std::cout << "\\t\\t Receiver terminal (localhost): " << argv0 << " -r 1" << std::endl;

	std::cout << "\\t\\t Sender terminal (with ip input): " << argv0 << " -r 0 -ip <ip:port>" << std::endl;
	std::cout << "\\t\\t Receiver terminal (with ip input): " << argv0 << " -r 1 -ip <ip:port>" << std::endl;


int main(int argc, char **argv)


	//有两个参数,第一个为exe,第二个为“-t”,其中第二个参数argv[1][0] == \'-\',argv[1][1] == \'t\'
	if (argc == 2 && argv[1][0] == \'-\' && argv[1][1] == \'t\')
	
		BopTest();
	
	//有三个参数,第一个为exe,第二个为“-r”,第三个为“0”,另外atoi()能把字符串转换成整型数
	else if (argc == 3 && argv[1][0] == \'-\' && argv[1][1] == \'r\' && atoi(argv[2]) == 0)
	
		BopSender("localhost:1213");
	
	//有三个参数,第一个为exe,第二个为“-r”,第三个为“1”
	else if (argc == 3 && argv[1][0] == \'-\' && argv[1][1] == \'r\' && atoi(argv[2]) == 1)
	
		BopRecv("localhost:1213");
	
	else if (argc == 5 && argv[1][0] == \'-\' && argv[1][1] == \'r\' && atoi(argv[2]) == 0 && argv[3][0] == \'-\' && argv[3][1] == \'i\' && argv[3][2] == \'p\')
	
		//获取ip
		string ipAddr = argv[4];
		BopSender(ipAddr);
	
	else if (argc == 5 && argv[1][0] == \'-\' && argv[1][1] == \'r\' && atoi(argv[2]) == 1 && argv[3][0] == \'-\' && argv[3][1] == \'i\' && argv[3][2] == \'p\')
	
		string ipAddr = argv[4];
		BopRecv(ipAddr);
	
	else
	
		//跳转提示
		usage(argv[0]);
	

	return 0;

int main(int argc, char** argv)主函数中的argc代表的是参数的数量,至少为1(argv[0]即.exe文件的路径)。argv指针表示的参数,argv[0]表示第一个参数,argv[1]表示第二个参数,以此类推。

预处理

待补充

应用

隐语

参考:隐私集合求交

[KKRT16] 是半诚实 OT-based PSI协议,基于 OT Extension, BaRK-OPRF 和 CuckooHash。 [KKRT16] 是第一个在千万( 224224)规模,长度(128 bits)数据集上,求交时间在1分钟之内的PSI协议.

隐语 SPU PSI 中使用了 [PSZ18] 提到的 3-way stash-less CuckooHash:

pytest-18-配置文件pytest.ini

pytest配置文件可以改变pytest的运行方式,它是一个固定的文件pytest.ini文件,读取配置信息,按指定的方式去运行。

ini配置文件

pytest里面有些文件是非test文件

  • pytest.ini pytest的主配置文件,可以改变pytest的默认行为
  • conftest.py 测试用例的一些fixture配置
  • __init__.py 识别该文件夹为python的package包
  • tox.ini 与pytest.ini类似,用tox工具时候才有用
  • setup.cfg 也是ini格式文件,影响setup.py的行为

ini文件基本格式

# 保存为pytest.ini文件

[pytest]

addopts = -rsxX
xfail_strict = true

使用pytest --help指令可以查看pytest.ini的设置选项

[pytest] ini-options in the first pytest.ini|tox.ini|setup.cfg file found:

  markers (linelist)       markers for test functions
  empty_parameter_set_mark (string) default marker for empty parametersets
  norecursedirs (args)     directory patterns to avoid for recursion
  testpaths (args)         directories to search for tests when no files or dire

  console_output_style (string) console output: classic or with additional progr

  usefixtures (args)       list of default fixtures to be used with this project

  python_files (args)      glob-style file patterns for Python test module disco

  python_classes (args)    prefixes or glob names for Python test class discover

  python_functions (args)  prefixes or glob names for Python test function and m

  xfail_strict (bool)      default for the strict parameter of 
  addopts (args)           extra command line options
  minversion (string)      minimally required pytest version

--rsxX 表示pytest报告所有测试用例被跳过、预计失败、预计失败但实际被通过的原因

mark标记

如下案例,使用了2个标签:webtest和hello,使用mark标记功能对于以后分类测试非常有用处

# content of test_mark.py
import pytest

@pytest.mark.webtest
def test_send_http():
    print("mark web test")

def test_something_quick():
    pass

def test_another():
    pass

@pytest.mark.hello
class TestClass:
    def test_01(self):
        print("hello :")

    def test_02(self):
        print("hello world!")

if __name__ == "__main__":
    pytest.main(["-v", "test_mark.py", "-m=hello"])

运行结果

============================= test session starts =============================
platform win32 -- Python 3.6.0, pytest-3.6.3, py-1.5.4, pluggy-0.6.0 -- D:softpython3.6python.exe
cachedir: .pytest_cache
metadata: {‘Python‘: ‘3.6.0‘, ‘Platform‘: ‘Windows-7-6.1.7601-SP1‘, ‘Packages‘: {‘pytest‘: ‘3.6.3‘, ‘py‘: ‘1.5.4‘, ‘pluggy‘: ‘0.6.0‘}, ‘Plugins‘: {‘metadata‘: ‘1.7.0‘, ‘html‘: ‘1.19.0‘, ‘allure-adaptor‘: ‘1.7.10‘}, ‘JAVA_HOME‘: ‘D:\\soft\\jdk18\\jdk18v‘}
rootdir: D:YOYO, inifile:
plugins: metadata-1.7.0, html-1.19.0, allure-adaptor-1.7.10
collecting ... collected 5 items / 3 deselected

test_mark.py::TestClass::test_01 PASSED                                  [ 50%]
test_mark.py::TestClass::test_02 PASSED                                  [100%]

=================== 2 passed, 3 deselected in 0.11 seconds ====================

有时候标签多了,不容易记住,为了方便后续执行指令的时候能准确使用mark的标签,可以写入到pytest.ini文件

# pytest.ini
[pytest]

markers =
  webtest:  Run the webtest case
  hello: Run the hello case

标记好之后,可以使用pytest --markers查看到

$ pytest --markers

D:YOYO>pytest --markers
@pytest.mark.webtest:  Run the webtest case

@pytest.mark.hello: Run the hello case

@pytest.mark.skip(reason=None): skip the given test function with an optional re
ason. Example: skip(reason="no way of currently testing this") skips the test.

@pytest.mark.skipif(condition): skip the given test function if eval(condition)
results in a True value.  Evaluation happens within the module global context. E
xample: skipif(‘sys.platform == "win32"‘) skips the test if we are on the win32
platform. see http://pytest.org/latest/skipping.html

@pytest.mark.xfail(condition, reason=None, run=True, raises=None, strict=False):
 mark the test function as an expected failure if eval(condition) has a True val
ue. Optionally specify a reason for better reporting and run=False if you don‘t
even want to execute the test function. If only specific exception(s) are expect
ed, you can list them in raises, and if the test fails in other ways, it will be
 reported as a true failure. See http://pytest.org/latest/skipping.html

@pytest.mark.parametrize(argnames, argvalues): call a test function multiple tim
es passing in different arguments in turn. argvalues generally needs to be a lis
t of values if argnames specifies only one name or a list of tuples of values if
 argnames specifies multiple names. Example: @parametrize(‘arg1‘, [1,2]) would l
ead to two calls of the decorated test function, one with arg1=1 and another wit
h arg1=2.see http://pytest.org/latest/parametrize.html for more info and example
s.

@pytest.mark.usefixtures(fixturename1, fixturename2, ...): mark tests as needing
 all of the specified fixtures. see http://pytest.org/latest/fixture.html#usefix
tures

@pytest.mark.tryfirst: mark a hook implementation function such that the plugin
machinery will try to call it first/as early as possible.

@pytest.mark.trylast: mark a hook implementation function such that the plugin m
achinery will try to call it last/as late as possible.

最上面两个就是刚才写入到pytest.ini的配置了

禁用xpass

设置xfail_strict = true可以让那些标记为@pytest.mark.xfail但实际通过的测试用例被报告为失败

什么叫标记为@pytest.mark.xfail但实际通过,这个比较绕脑,看以下案例

# content of test_xpass.py
import pytest

def test_hello():
    print("hello world!")
    assert 1

@pytest.mark.xfail()
def test_yoyo1():
    a = "hello"
    b = "hello world"
    assert a == b

@pytest.mark.xfail()
def test_yoyo2():
    a = "hello"
    b = "hello world"
    assert a != b

if __name__ == "__main__":
    pytest.main(["-v", "test_xpass.py"])

测试结果

collecting ... collected 3 items

test_xpass.py::test_hello PASSED    [ 33%]
test_xpass.py::test_yoyo1 xfail     [ 66%]
test_xpass.py::test_yoyo2 XPASS     [100%]

=============== 1 passed, 1 xfailed, 1 xpassed in 0.27 seconds ================

test_yoyo1和test_yoyo2这2个用例一个是a == b一个是a != b,两个都标记失败了,我们希望两个用例不用执行全部显示xfail。实际上最后一个却显示xpass.为了让两个都显示xfail,那就加个配置
xfail_strict = true

# pytest.ini
[pytest]

markers =
  webtest:  Run the webtest case
  hello: Run the hello case

xfail_strict = true

再次运行,结果就变成

collecting ... collected 3 items

test_xpass.py::test_hello PASSED        [ 33%]
test_xpass.py::test_yoyo1 xfail         [ 66%]
test_xpass.py::test_yoyo2 FAILED        [100%]

================================== FAILURES ===================================
_________________________________ test_yoyo2 __________________________________
[XPASS(strict)] 
================ 1 failed, 1 passed, 1 xfailed in 0.05 seconds ================

这样标记为xpass的就被强制性变成failed的结果

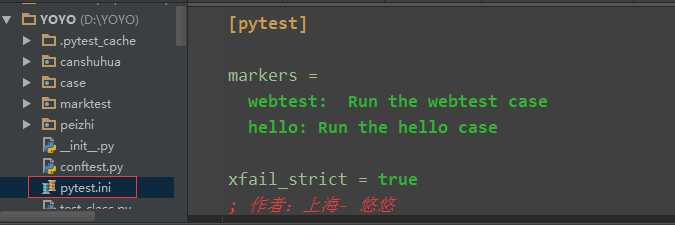
配置文件如何放

一般一个工程下方一个pytest.ini文件就可以了,放到顶层文件夹下
技术分享图片

addopts

addopts参数可以更改默认命令行选项,这个当我们在cmd输入指令去执行用例的时候,会用到,比如我想测试完生成报告,指令比较长

$ pytest -v --rerun 1 --html=report.html --self-contained-html

每次输入这么多,不太好记住,于是可以加到pytest.ini里

# pytest.ini
[pytest]

markers =
  webtest:  Run the webtest case
  hello: Run the hello case

 xfail_strict = true

 addopts = -v --rerun 1 --html=report.html --self-contained-html

这样我下次打开cmd,直接输入pytest,它就能默认带上这些参数了

以上是关于KKRT-PSI的主要内容,如果未能解决你的问题,请参考以下文章