一步步开发AI运动小程序六人体骨骼图绘制
Posted Alphaair
tags:
篇首语:本文由小常识网(cha138.com)小编为大家整理,主要介绍了一步步开发AI运动小程序六人体骨骼图绘制相关的知识,希望对你有一定的参考价值。
随着人工智能技术的不断发展,阿里体育等IT大厂,推出的“乐动力”、“天天跳绳”AI运动APP,让云上运动会、线上运动会、健身打卡、AI体育指导等概念空前火热。那么,能否将这些在APP成功应用的场景搬上小程序,分享这些概念的红利呢?本系列文章就带您一步一步从零开始开发一个AI运动小程序,本系列文章将使用“云智AI运动识别小程序插件”,请先行在微信服务市场或官网了解详情。
一、骨骼图绘制原理
人体骨骼图的绘制,是通过在camera组件上附一个同等大小的透明canvas组件,在上面绘制关键点达到与人体图像重合的目的。
二、绘制代码
<template>
	<view class="human-detection">
		<camera id="preview" class="preview" : flash="off" :device-position="deviceKey"
			resolution="high" frame-size="low" @initdone="onCameraReady">
		</camera>
		<canvas v-if="poseDrawEnabled" class="preview graphs" type="2d" id="graphics" :></canvas>
	</view>
</template>

<script>

	const AiSports = requirePlugin("aiSport");
	const PoseGraphs = AiSports.PoseGraphs;
	const humanDetection = AiSports.humanDetection;

	export default
		data()
			return
				zoom: 1,
				deviceKey: "back",
				previewWidth: 480,
				previewHeight: 640,
				previewRate: 1,

				frameWidth: 480,
				frameHeight: 640,
				status: \'unknown\',
				fps: 0,
				poseFps: 0,

				isHumanBody: false
			;
		,
		computed:
			videoStyles()
				const style = `width:$this.previewWidthpx;height:$this.previewHeightpx;`;

				return style;

		,
		mounted()
			this.autoFitPreview(480, 640);
			this.initCanvas();
		,
		methods:
			autoFitPreview(width, height)
				const sifno = uni.getSystemInfoSync();
				let rate = sifno.windowWidth / width;

				this.previewWidth = width * rate;
				this.previewHeight = height * rate;
				this.previewRate = rate;
				this.frameWidth = width;
				this.frameHeight = height;
			,
			initCanvas()

				const that = this;
				const query = uni.createSelectorQuery().in(that);
				query.select(\'#graphics\')
					.fields(
						node: true,
						size: true
					)
					.exec((res) =>

						if (utils.isEmptyArray(res))
							return;

						const canvas = res[0].node;
						const ctx = canvas.getContext(\'2d\');
						const dpr = uni.getSystemInfoSync().pixelRatio;
						canvas.width = res[0].width * dpr;
						canvas.height = res[0].height * dpr;
						ctx.scale(dpr, dpr);

						that.canvas = canvas;
						that.ctx = ctx;

						that.poseGraphs = new PoseGraphs(ctx, canvas.width, canvas.height, 1);
						that.poseGraphs.lineColor = "#FF8E148C";//线条颜色

					);
			,

			async detection(frame)

				const human = await humanDetection.detectionAsync(frame);
				//无结果
				if (!human)
					this.poseGraphs.clear();
				else
					this.poseGraphs.drawing(human.keypoints);

			,

			initVideo()

				if (this.camera)
					return;

				const that = this;
				this.camera = new CameraDevice();
				this.camera.onFrame = frame =>

					that.fps = that.camera.fps;

					//重新自适应
					if (frame.width != that.frameWidth || frame.height != that.frameHeight)
						that.autoFitPreview(frame.width, frame.height);
						that.initCanvas();


					that.detection(frame);
				;


</script>

<style lang="scss">
	.human-detection
		width: auto;
		height: auto;

		.preview
			margin: auto;
			width: 480px;
			height: 640px;


		.graphs
			position: absolute;
			top: 0;
			left: 0;
			z-index: 9999;
			box-shadow: 0 0 14.4928rpx #CCC;
			background-color: rgba(0, 0, 0, 0.01);


</style>
三、注意事项
小程序的抽帧图像大小与camera实时图像可能不一致(https://developers.weixin.qq.com/miniprogram/dev/component/camera.html#Bug-Tip),所以camera和canvas组件必须保持与帧图像保持同比缩放,否则可能导致骨骼与实时图像不一致。
下篇我们将为您介绍如何进行运动分析,敬请期待...

提供信息系统、公众号、小程序、APP订制开发服务
QQ:316455841
欢迎通过各种渠道咨询了解,免费提供信息系统建设咨询服务。
Python 飞桨PaddleHub AI皮影戏学习笔记
文章目录
前言
本篇笔记主要参考这篇文章:
使用飞桨PaddleHub实现皮影戏创作,传承正在消失的艺术
首先梳理一下这篇文章实现AI皮影戏的思路,通过PaddleHub提供的人体骨骼关键点检测预训练模型来获取图片中人物的骨骼关键点模型,例如大脑、躯干、左右手、左右腿,然后对这些关键点进行拼接,形成了人体姿态,之后将皮影素材映射到人体姿态上,就形成了单张皮影戏。
要形成动态皮影戏就需要对视频的每一帧画面进行人体姿态拼接处理,之后将处理过的每一帧皮影戏合成,就形成了动态皮影戏。
一、环境配置
本文使用的是Python3.7,需要安装PaddlePaddle和PaddleHub
安装命令:
PaddlePaddle
python -m pip install paddlepaddle==2.0.2 -i https://mirror.baidu.com/pypi/simple
PaddleHub
pip install PaddleHub
其他版本的安装请参考官网:
https://www.paddlepaddle.org.cn/install/quick?docurl=/documentation/docs/zh/install/pip/windows-pip.html
安装完后就可以通过PaddleHub来安装人体骨骼关键点检测模型human_pose_estimation_resnet50_mpii。
hub install human_pose_estimation_resnet50_mpii==1.1.1
二、目录与资源
创建Python项目,在该项目下创建work目录
-
work/imgs 是存放你所使用的图片素材
-
work/output_pose 是人体骨骼关键点识别后存放的图片目录
-
work/shadow_play_material 是皮影的素材图片,这里是皮影素材的下载地址:https://aistudio.baidu.com/aistudio/projectdetail/764130
-
work/mp4_img 是视频导出的图片
-
work/mp4_img_analysis 是视频每一帧图片的分析结果
-
work/background.jpg 是皮影戏的背景文件
下载地址同上
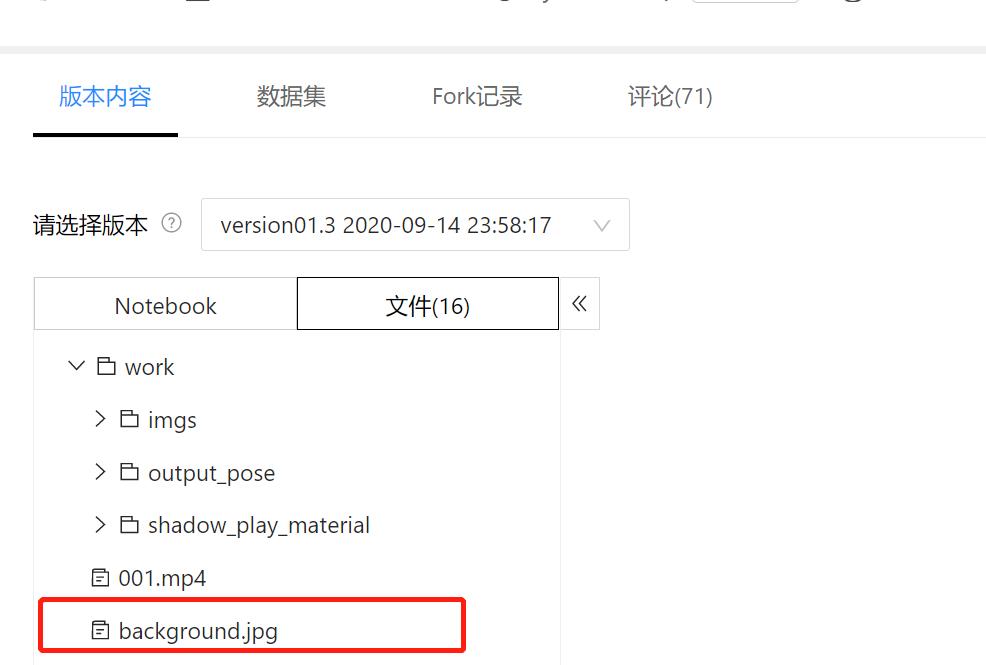
-
处理合成之后的视频将会保存在work目录下
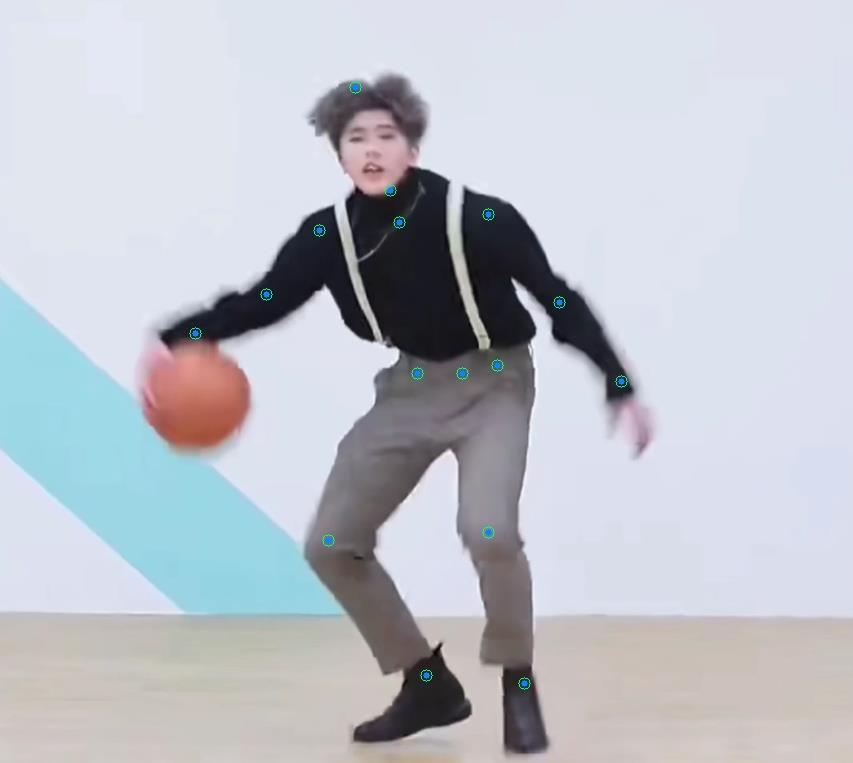
三、查看单张图片的人体骨骼关键点检测效果
import os
import cv2
import paddlehub as hub
import matplotlib.pyplot as plt
from matplotlib.image import imread
import numpy as np

def show_img(img_path, size=8):
    '''
        文件读取图片显示
    '''
    im = imread(img_path)
    plt.figure(figsize=(size,size))
    plt.axis("off")
    plt.imshow(im)


def img_show_bgr(image,size=8):
    '''
        cv读取的图片显示
    '''
    image=cv2.cvtColor(image,cv2.COLOR_BGR2RGB)
    plt.figure(figsize=(size,size))
    plt.imshow(image)

    plt.axis("off")
    plt.show()

pose_estimation = hub.Module(name="human_pose_estimation_resnet50_mpii")
#注意图片素材的输入路径
result = pose_estimation.keypoint_detection(paths=['work/imgs/01.jpg'], visualization=True, output_dir="work/output_pose/")
result

show_img('work/output_pose/01.jpg')
运行,查看输出结果:
四、将单张人体骨骼检测结果与皮影素材拼接:
import os
import cv2
import paddlehub as hub
import matplotlib.pyplot as plt
from matplotlib.image import imread
import numpy as np
def show_img(img_path, size=8):
'''
文件读取图片显示
'''
im = imread(img_path)
plt.figure(figsize=(size,size))
plt.axis("off")
plt.imshow(im)
def img_show_bgr(image,size=8):
'''
cv读取的图片显示
'''
image=cv2.cvtColor(image,cv2.COLOR_BGR2RGB)
plt.figure(figsize=(size,size))
plt.imshow(image)
plt.axis("off")
plt.show()
pose_estimation = hub.Module(name="human_pose_estimation_resnet50_mpii")
def get_true_angel(value):
'''
转转得到角度值
'''
return value/np.pi*180
def get_angle(x1, y1, x2, y2):
'''
计算旋转角度
'''
dx = abs(x1- x2)
dy = abs(y1- y2)
result_angele = 0
if x1 == x2:
if y1 > y2:
result_angele = 180
else:
if y1!=y2:
the_angle = int(get_true_angel(np.arctan(dx/dy)))
if x1 < x2:
if y1>y2:
result_angele = -(180 - the_angle)
elif y1<y2:
result_angele = -the_angle
elif y1==y2:
result_angele = -90
elif x1 > x2:
if y1>y2:
result_angele = 180 - the_angle
elif y1<y2:
result_angele = the_angle
elif y1==y2:
result_angele = 90
if result_angele<0:
result_angele = 360 + result_angele
return result_angele
def rotate_bound(image, angle, key_point_y):
'''
旋转图像,并取得关节点偏移量
'''
#获取图像的尺寸
(h,w) = image.shape[:2]
#旋转中心
(cx,cy) = (w/2,h/2)
# 关键点必须在中心的y轴上
(kx,ky) = cx, key_point_y
d = abs(ky - cy)
#设置旋转矩阵
M = cv2.getRotationMatrix2D((cx,cy), -angle, 1.0)
cos = np.abs(M[0,0])
sin = np.abs(M[0,1])
# 计算图像旋转后的新边界
nW = int((h*sin)+(w*cos))
nH = int((h*cos)+(w*sin))
# 计算旋转后的相对位移
move_x = nW/2 + np.sin(angle/180*np.pi)*d
move_y = nH/2 - np.cos(angle/180*np.pi)*d
# 调整旋转矩阵的移动距离(t_x, t_y)
M[0,2] += (nW/2) - cx
M[1,2] += (nH/2) - cy
return cv2.warpAffine(image,M,(nW,nH)), int(move_x), int(move_y)
def get_distences(x1, y1, x2, y2):
return ((x1-x2)**2 + (y1-y2)**2)**0.5
def append_img_by_sk_points(img, append_img_path, key_point_y, first_point, second_point, append_img_reset_width=None,
append_img_max_height_rate=1, middle_flip=False, append_img_max_height=None):
'''
将需要添加的肢体图片进行缩放
'''
append_image = cv2.imdecode(np.fromfile(append_img_path, dtype=np.uint8), cv2.IMREAD_UNCHANGED)
# 根据长度进行缩放
sk_height = int(get_distences(first_point[0], first_point[1], second_point[0], second_point[1])*append_img_max_height_rate)
# 缩放制约
if append_img_max_height:
sk_height = min(sk_height, append_img_max_height)
sk_width = int(sk_height/append_image.shape[0]*append_image.shape[1]) if append_img_reset_width is None else int(append_img_reset_width)
if sk_width <= 0:
sk_width = 1
if sk_height <= 0:
sk_height = 1
# 关键点映射
key_point_y_new = int(key_point_y/append_image.shape[0]*append_image.shape[1])
# 缩放图片
append_image = cv2.resize(append_image, (sk_width, sk_height))
img_height, img_width, _ = img.shape
# 是否根据骨骼节点位置在 图像中间的左右来控制是否进行 左右翻转图片
# 主要处理头部的翻转, 默认头部是朝左
if middle_flip:
middle_x = int(img_width/2)
if first_point[0] < middle_x and second_point[0] < middle_x:
append_image = cv2.flip(append_image, 1)
# 旋转角度
angle = get_angle(first_point[0], first_point[1], second_point[0], second_point[1])
append_image, move_x, move_y = rotate_bound(append_image, angle=angle, key_point_y=key_point_y_new)
app_img_height, app_img_width, _ = append_image.shape
zero_x = first_point[0] - move_x
zero_y = first_point[1] - move_y
(b, g, r) = cv2.split(append_image)
for i in range(0, r.shape[0]):
for j in range(0, r.shape[1]):
if 230>r[i][j]>200 and 0<=zero_y+i<img_height and 0<=zero_x+j<img_width:
img[zero_y+i][zero_x+j] = append_image[i][j]
return img
body_img_path_map =
"right_hip" : "work/shadow_play_material/right_hip.jpg",
"right_knee" : "work/shadow_play_material/right_knee.jpg",
"left_hip" : "work/shadow_play_material/left_hip.jpg",
"left_knee" : "work/shadow_play_material/left_knee.jpg",
"left_elbow" : "work/shadow_play_material/left_elbow.jpg",
"left_wrist" : "work/shadow_play_material/left_wrist.jpg",
"right_elbow" : "work/shadow_play_material/right_elbow.jpg",
"right_wrist" : "work/shadow_play_material/right_wrist.jpg",
"head" : "work/shadow_play_material/head.jpg",
"body" : "work/shadow_play_material/body.jpg"
def get_combine_img(img_path, pose_estimation=pose_estimation, body_img_path_map=body_img_path_map, backgroup_img_path= 'work/background.jpg'):
'''
识别图片中的关节点,并将皮影的肢体进行对应,最后与原图像拼接后输出
'''
result = pose_estimation.keypoint_detection(paths=[img_path])
image=cv2.imread(img_path)
# 背景图片
backgroup_image = cv2.imread(backgroup_img_path)
image_flag = cv2.resize(backgroup_image, (image.shape[1], image.shape[0]))
# 最小宽度
min_width = int(get_distences(result[0]['data']['head_top'][0], result[0]['data']['head_top'][1],
result[0]['data']['upper_neck'][0], result[0]['data']['upper_neck'][1])/3)
#右大腿
append_img_reset_width = max(int(get_distences(result[0]['data']['pelvis'][0], result[0]['data']['pelvis'][1],
result[0]['data']['left_hip'][0], result[0]['data']['right_hip'][1])*1.6), min_width)
image_flag = append_img_by_sk_points(image_flag, body_img_path_map['right_hip'], key_point_y=10, first_point=result[0]['data']['right_hip'],
second_point=result[0]['data']['right_knee'], append_img_reset_width=append_img_reset_width)
# 右小腿
append_img_reset_width = max(int(get_distences(result[0]['data']['pelvis'][0], result[0]['data']['pelvis'][1],
result[0]['data']['left_hip'][0], result[0]['data']['right_hip'][1])*1.5), min_width)
image_flag = append_img_by_sk_points(image_flag, body_img_path_map['right_knee'], key_point_y=10, first_point=result[0]['data']['right_knee'],
second_point=result[0]['data']['right_ankle'], append_img_reset_width=append_img_reset_width)
# 左大腿
append_img_reset_width = max(int(get_distences(result[0]['data']['pelvis'][0], result[0]['data']['pelvis'][1],
result[0]['data']['left_hip'][0], result[0]['data']['left_hip'][1])*1.6), min_width)
image_flag = append_img_by_sk_points(image_flag, body_img_path_map['left_hip'], key_point_y=0, first_point=result[0]['data']['left_hip'],
second_point=result[0]['data']['left_knee'], append_img_reset_width=append_img_reset_width)
# 左小腿
append_img_reset_width = max(int(get_distences(result[0]['data']['pelvis'][0], result[0]['data']['pelvis'][1],
result[0]['data']['left_hip'][0], result[0]['data']['left_hip'][1])*1.5), min_width)
image_flag = append_img_by_sk_points(image_flag, body_img_path_map['left_knee'], key_point_y=10, first_point=result[0]['data']['left_knee'],
second_point=result[0]['data']['left_ankle'], append_img_reset_width=append_img_reset_width)
# 右手臂
image_flag = append_img_by_sk_points(image_flag, body_img_path_map['left_elbow'], key_point_y=25, first_point=result[0]['data']['right_shoulder'],
second_point=result[0]['data']['right_elbow'], append_img_max_height_rate=1.2)
# 右手肘
append_img_max_height = int(get_distences(result[0]['data']['right_shoulder'][0], result[0]['data']['right_shoulder'][1