<!DOCTYPE html>
<html lang="en">

<head>
  <meta charset="UTF-8" />
  <link rel="icon" type="image/svg+xml" href="/vite.svg" />
  <meta name="viewport" content="width=device-width, initial-scale=1.0" />
  <title>Vite + TS</title>
</head>

<body>
  <div id="app">
  </div>

  <script type="module" src="/src/main.ts"></script>
</body>

</html>
  "name": "webgpu_learn_typescript",
  "private": true,
  "version": "0.0.0",
  "type": "module",
  "scripts":
    "dev": "vite",
    "build": "tsc && vite build",
    "preview": "vite preview"
  ,
  "devDependencies":
    "typescript": "^5.0.2",
    "vite": "^4.3.2"
  ,
  "dependencies":
    "@types/node": "^20.1.7",
    "@webgpu/types": "^0.1.32",
    "ts-shader-loader": "^2.0.2"
  "compilerOptions":
    "target": "ES2020",
    "useDefineForClassFields": true,
    "module": "ESNext",
    "lib": ["ES2020", "DOM", "DOM.Iterable"],
    "skipLibCheck": true,

    /* Bundler mode */
    "moduleResolution": "bundler",
    "allowImportingTsExtensions": true,
    "resolveJsonModule": true,
    "isolatedModules": true,
    "noEmit": true,

    /* Linting */
    "strict": true,
    "noUnusedLocals": true,
    "noUnusedParameters": true,
    "noFallthroughCasesInSwitch": true,
    // type
    "types": ["@webgpu/types"],
    // js
    "allowJs": true
  ,
  "include": ["src"]
/Users/song/Code/webgpu_learn/webgpu-for-beginners/webgpu_learn_typescript/src_04_渐变颜色的矩形/main.ts
async function main()
  const adapter = await navigator.gpu?.requestAdapter();

  const device = await adapter?.requestDevice()!;

  if (!device)
    console.log("need a browser that supports WebGPU");
    return;


  // Get a WebGPU context from the canvas and configure it
  const canvas = document.createElement("canvas");
  canvas.style.width = "500px";
  canvas.style.height = "300px";
  canvas.style.border = "1px solid red";

  const context = canvas.getContext("webgpu")!;

  const presentationFormat = navigator.gpu.getPreferredCanvasFormat();

  context.configure(
    device,
    format: presentationFormat,
  );

  //
  const module = device.createShaderModule(
    label: "our hardcoded rgb triangle shaders",
    code: `
      struct OurVertexShaderOutput
        @builtin(position) position: vec4f,
        @location(0) color: vec4f,
      ;

      @vertex fn vs(
        @builtin(vertex_index) vertexIndex : u32
      ) -> OurVertexShaderOutput
        // 位置
        var pos = array<vec2f, 6>(
          // 第一个三角形的坐标
          vec2f(0.0, 0.0),  //  0
          vec2f(1.0, 0.0),  //  1

          vec2f(1.0, 1.0),  //  2
          vec2f(1.0, 1.0),  //  3
          vec2f(0.0, 1.0),  //  4

          vec2f(0.0, 0.0),  //  5
        );
        // 颜色
        var color = array<vec4f, 6>(
          vec4f(1, 0, 0, 1),
          vec4f(1, 0, 0, 1),

          vec4f(0, 1, 0, 1),
          vec4f(0, 1, 0, 1),
          vec4f(0, 1, 0, 1),

          vec4f(1, 0, 0, 1),
        );

        var vsOutput: OurVertexShaderOutput;
        vsOutput.position = vec4f(pos[vertexIndex], 0.0, 1.0);
        // 渐变颜色的矩形
        vsOutput.color = color[vertexIndex];
        return vsOutput;


      @fragment fn fs(fsInput: OurVertexShaderOutput) -> @location(0) vec4f
        return fsInput.color;

    `,
  );

  const pipeline = device.createRenderPipeline(
    label: "hardcoded rgb triangle pipeline",
    layout: "auto",
    vertex:
      module,
      entryPoint: "vs",
    ,
    fragment:
      module,
      entryPoint: "fs",
      targets: [ format: presentationFormat ],
    ,
  );

  const renderPassDescriptor =
    label: "our basic canvas renderPass",
    colorAttachments: [

        // view: <- to be filled out when we render
        clearValue: [1.0, 1.0, 1.0, 1],
        loadOp: "clear",
        storeOp: "store",
      ,
    ],
  ;

  function render()
    // Get the current texture from the canvas context and
    // set it as the texture to render to.
    renderPassDescriptor.colorAttachments[0].view = context
      .getCurrentTexture()
      .createView();

    const encoder = device.createCommandEncoder(
      label: "render triangle encoder",
    );
    const pass = encoder.beginRenderPass(
      renderPassDescriptor as GPURenderPassDescriptor
    );
    pass.setPipeline(pipeline);
    pass.draw(6); // call our vertex shader 3 times
    pass.end();

    const commandBuffer = encoder.finish();
    device.queue.submit([commandBuffer]);


  render();

  document.body.appendChild(canvas);


main();
/Users/song/Code/webgpu_learn/webgpu-for-beginners/webgpu_learn_typescript/src_02_三角形/main.ts
async function main()
  const adapter = await navigator.gpu?.requestAdapter();

  const device = await adapter?.requestDevice()!;

  if (!device)
    fail("need a browser that supports WebGPU");
    return;


  // Get a WebGPU context from the canvas and configure it
  const canvas = document.createElement("canvas");
  canvas.style.width = "500px";
  canvas.style.height = "300px";

  // const canvas = document.querySelector("canvas");
  const context = canvas.getContext("webgpu")!;

  const presentationFormat = navigator.gpu.getPreferredCanvasFormat();

  context.configure(
    device,
    format: presentationFormat,
  );

  //

  const module = device.createShaderModule(
    label: "our hardcoded rgb triangle shaders",
    code: `
      struct OurVertexShaderOutput
        @builtin(position) position: vec4f,
        @location(0) color: vec4f,
      ;

      @vertex fn vs(
        @builtin(vertex_index) vertexIndex : u32
      ) -> OurVertexShaderOutput
        // 位置
        var pos = array<vec2f, 3>(
          vec2f(0.0, 0.0),  // top center
          vec2f(1.0, 0.0),  // bottom left
          vec2f(0.5, 1.0)   // bottom right
        );
        // 颜色
        var color = array<vec4f, 3>(
          vec4f(1, 0, 0, 1), // red
          vec4f(0, 1, 0, 1), // green
          vec4f(0, 0, 1, 1), // blue
        );

        var vsOutput: OurVertexShaderOutput;
        vsOutput.position = vec4f(pos[vertexIndex], 0.0, 1.0);
        vsOutput.color = color[vertexIndex];
        return vsOutput;


      @fragment fn fs(fsInput: OurVertexShaderOutput) -> @location(0) vec4f
        return fsInput.color;

    `,
  );

  const pipeline = device.createRenderPipeline(
    label: "hardcoded rgb triangle pipeline",
    layout: "auto",
    vertex:
      module,
      entryPoint: "vs",
    ,
    fragment:
      module,
      entryPoint: "fs",
      targets: [ format: presentationFormat ],
    ,
  );

  const renderPassDescriptor =
    label: "our basic canvas renderPass",
    colorAttachments: [

        // view: <- to be filled out when we render
        clearValue: [0.3, 0.3, 0.3, 1],
        loadOp: "clear",
        storeOp: "store",
      ,
    ],
  ;

  function render()
    // Get the current texture from the canvas context and
    // set it as the texture to render to.
    renderPassDescriptor.colorAttachments[0].view = context
      .getCurrentTexture()
      .createView();

    const encoder = device.createCommandEncoder(
      label: "render triangle encoder",
    );

    const pass = encoder.beginRenderPass(
      renderPassDescriptor as GPURenderPassDescriptor
    );

    pass.setPipeline(pipeline);
    pass.draw(3); // call our vertex shader 3 times
    pass.end();

    const commandBuffer = encoder.finish();
    device.queue.submit([commandBuffer]);


  const observer = new ResizeObserver((entries) =>
    for (const entry of entries)
      const canvas = entry.target;
      const width = entry.contentBoxSize[0].inlineSize;
      const height = entry.contentBoxSize[0].blockSize;
      (canvas as HTMLCanvasElement).width = Math.min(
        width,
        device.limits.maxTextureDimension2D
      );
      (canvas as HTMLCanvasElement).height = Math.min(
        height,
        device.limits.maxTextureDimension2D
      );
      // re-render
      render();

  );
  observer.observe(canvas);

  document.body.appendChild(canvas);


function fail(msg: string)
  // eslint-disable-next-line no-alert
  alert(msg);


main();
/Users/song/Code/webgpu_learn/webgpu-for-beginners/webgpu_learn_typescript/src_06_红色三角形_郭隆帮老师/main.ts
import  vertexShader, fragmentShader  from "./shader";

async function main()
  // 获取适配器
  const adapter = await navigator.gpu?.requestAdapter();
  // 获取gpu设备对象
  const device = await adapter?.requestDevice()!;
  if (!device)
    fail("need a browser that supports WebGPU");
    return;


  // Get a WebGPU context from the canvas and configure it
  // 创建canvas画布,配置gpu上下文,将该元素作为webgpu的画布
  const canvas = document.createElement("canvas");
  canvas.style.width = "500px";
  canvas.style.height = "300px";

  const context = canvas.getContext("webgpu")!;
  const presentationFormat = navigator.gpu.getPreferredCanvasFormat();
  context.configure(
    device, // gpu设备对象
    format: presentationFormat, //gpu渲染器使用的颜色格式,比如说rgba bgra,这里默认就好
  );

  const vertexArray = new Float32Array([
    // 三角形三个顶点坐标的x、y、z值
    0.0,
    0.0,
    0.0, //顶点1坐标

    1.0,
    0.0,
    0.0, //顶点2坐标

    0.0,
    1.0,
    0.0, //顶点3坐标
  ]);

  // 定点缓冲区
  const vertexBuffer = device.createBuffer(
    size: vertexArray.byteLength, //顶点数据的字节长度
    //usage设置该缓冲区的用途(作为顶点缓冲区|可以写入顶点数据)
    usage: GPUBufferUsage.VERTEX | GPUBufferUsage.COPY_DST,
  );
  // 将顶点信息写入缓冲器
  device.queue.writeBuffer(vertexBuffer, 0, vertexArray);

  const pipeline = device.createRenderPipeline(
    layout: "auto",
    vertex:
      //顶点相关配置
      buffers: [
        // 顶点所有的缓冲区模块设置

          //其中一个顶点缓冲区设置
          arrayStride: 3 * 4, //一个顶点数据占用的字节长度,该缓冲区一个顶点包含xyz三个分量,每个数字是4字节浮点数,3*4字节长度
          attributes: [

              // 顶点缓冲区属性
              shaderLocation: 0, //GPU显存上顶点缓冲区标记存储位置
              format: "float32x3", //格式:loat32x3表示一个顶点数据包含3个32位浮点数
              offset: 0, //arrayStride表示每组顶点数据间隔字节数,offset表示读取改组的偏差字节数,没特殊需要一般设置0
            ,
          ],
        ,
      ],
      module: device.createShaderModule(
        label: "triangle vertex",
        code: vertexShader,
      ),
      entryPoint: "main",
    ,
    fragment:
      module: device.createShaderModule(
        label: "fragment vertex",
        code: fragmentShader,
      ),
      entryPoint: "main", //指定入口函数
      targets: [

          format: presentationFormat, //和WebGPU上下文配置的颜色格式保持一致
        ,
      ],
    ,
    primitive:
      topology: "triangle-list", //绘制三角形
      // topology: "point-list", //绘制三角形
      // topology: "line-list", //绘制三角形
    ,
  );

  // 创建GPU命令编码器对象
  const commandEncoder = device.createCommandEncoder();

  const renderPass = commandEncoder.beginRenderPass(
    label: "our basic canvas renderPass",
    // 给渲染通道指定颜色缓冲区,配置指定的缓冲区
    colorAttachments: [

        // 指向用于Canvas画布的纹理视图对象(Canvas对应的颜色缓冲区)
        // 该渲染通道renderPass输出的像素数据会存储到Canvas画布对应的颜色缓冲区(纹理视图对象)
        view: context.getCurrentTexture().createView(),
        storeOp: "store", //像素数据写入颜色缓冲区
        loadOp: "clear",
        clearValue:  r: 0.5, g: 0.5, b: 0.5, a: 1.0 , //背景颜色
      ,
    ],
  );

  // 关联顶点缓冲区数据和渲染管线
  renderPass.setVertexBuffer(0, vertexBuffer);
  renderPass.setPipeline(pipeline);
  renderPass.draw(3); // call our vertex shader 3 times
  renderPass.end();

  // 命令缓冲器
  const commandBuffer = commandEncoder.finish();
  device.queue.submit([commandBuffer]);

  document.body.appendChild(canvas);


function fail(msg: string)
  // eslint-disable-next-line no-alert
  alert(msg);


main();
// 顶点着色器代码
const vertexShader = /* wgsl */ `
@vertex
fn main(@location(0) pos: vec3<f32>) -> @builtin(position) vec4<f32>
    return vec4<f32>(pos,1.0);

`;

// 片元着色器代码
const fragmentShader = /* wgsl */ `
@fragment
fn main() -> @location(0) vec4<f32>
    return vec4<f32>(1.0, 0.0, 0.0, 1.0);//片元设置为红色

`;

export  vertexShader, fragmentShader ;
/Users/song/Code/webgpu_learn/webgpu-for-beginners/webgpu_learn_typescript/src_01_测试是否支持webgpu/main.ts
const oApp = document.getElementById("app")!;

if (navigator.gpu)
  oApp.innerHTML = "web gpu ok";
 else
  oApp.innerHTML = "web gpu not ok";
/Users/song/Code/webgpu_learn/webgpu-for-beginners/webgpu_learn_typescript/src_05_两倍数组/main.ts
async function main()
  const adapter = await navigator.gpu?.requestAdapter();
  const device = await adapter?.requestDevice();
  if (!device)
    console.log("need a browser that supports WebGPU");
    return;


  const module = device.createShaderModule(
    label: "doubling compute module",
    code: `
      @group(0) @binding(0) var<storage, read_write> data: array<f32>;

      @compute @workgroup_size(1) fn computeSomething(
        @builtin(global_invocation_id) id: vec3<u32>
      )
        let i = id.x;
        data[i] = data[i] * 2.0;

    `,
  );

  const pipeline = device.createComputePipeline(
    label: "doubling compute pipeline",
    layout: "auto",
    compute:
      module,
      entryPoint: "computeSomething",
    ,
  );

  const input = new Float32Array([1, 3, 5]);

  // create a buffer on the GPU to hold our computation
  // input and output
  const workBuffer = device.createBuffer(
    label: "work buffer",
    size: input.byteLength,
    usage:
      GPUBufferUsage.STORAGE |
      GPUBufferUsage.COPY_SRC |
      GPUBufferUsage.COPY_DST,
  );
  // Copy our input data to that buffer
  device.queue.writeBuffer(workBuffer, 0, input);

  // create a buffer on the GPU to get a copy of the results
  const resultBuffer = device.createBuffer(
    label: "result buffer",
    size: input.byteLength,
    usage: GPUBufferUsage.MAP_READ | GPUBufferUsage.COPY_DST,
  );

  // Setup a bindGroup to tell the shader which
  // buffer to use for the computation
  const bindGroup = device.createBindGroup(
    label: "bindGroup for work buffer",
    layout: pipeline.getBindGroupLayout(0),
    entries: [ binding: 0, resource:  buffer: workBuffer  ],
  );

  // Encode commands to do the computation
  const encoder = device.createCommandEncoder(
    label: "doubling encoder",
  );
  const pass = encoder.beginComputePass(
    label: "doubling compute pass",
  );
  pass.setPipeline(pipeline);
  pass.setBindGroup(0, bindGroup);
  pass.dispatchWorkgroups(input.length);
  pass.end();

  // Encode a command to copy the results to a mappable buffer.
  encoder.copyBufferToBuffer(workBuffer, 0, resultBuffer, 0, resultBuffer.size);

  // Finish encoding and submit the commands
  const commandBuffer = encoder.finish();
  device.queue.submit([commandBuffer]);

  // Read the results
  await resultBuffer.mapAsync(GPUMapMode.READ);

  // const result = new Float32Array(
  //   (resultBuffer.getMappedRange() as any).slice()
  // );
  const result = new Float32Array(resultBuffer.getMappedRange().slice(0));
  resultBuffer.unmap();

  console.log("input", input);
  console.log("result", result);


main();
/Users/song/Code/webgpu_learn/webgpu-for-beginners/webgpu_learn_typescript/src_03_纯红色三角形/main.ts
async function main()
  const adapter = await navigator.gpu?.requestAdapter();

  const device = await adapter?.requestDevice()!;

  if (!device)
    fail("need a browser that supports WebGPU");
    return;


  // Get a WebGPU context from the canvas and configure it
  const canvas = document.createElement("canvas");
  canvas.style.width = "500px";
  canvas.style.height = "300px";
  canvas.style.border = "1px solid red";

  // const canvas = document.querySelector("canvas");
  const context = canvas.getContext("webgpu")!;

  const presentationFormat = navigator.gpu.getPreferredCanvasFormat();

  context.configure(
    device,
    format: presentationFormat,
  );

  //

  const module = device.createShaderModule(
    label: "our hardcoded rgb triangle shaders",
    code: `
      struct OurVertexShaderOutput
        @builtin(position) position: vec4f,
        @location(0) color: vec4f,
      ;

      @vertex fn vs(
        @builtin(vertex_index) vertexIndex : u32
      ) -> OurVertexShaderOutput
        // 位置
        var pos = array<vec2f, 3>(
          vec2f(0.0, 0.0),  // top center
          vec2f(1.0, 0.0),  // bottom left
          vec2f(0.0, 1.0)   // bottom right
        );
        // 颜色
        var color = array<vec4f, 3>(
          vec4f(1, 0, 0, 1), // red
          vec4f(0, 1, 0, 1), // green
          vec4f(0, 0, 1, 1), // blue
        );

        var vsOutput: OurVertexShaderOutput;
        vsOutput.position = vec4f(pos[vertexIndex], 0.0, 1.0);
        // 纯红色的三角形
        // vsOutput.color = color[vertexIndex];
        vsOutput.color = vec4f(1, 0, 0, 0.5);
        return vsOutput;


      @fragment fn fs(fsInput: OurVertexShaderOutput) -> @location(0) vec4f
        return fsInput.color;

    `,
  );

  const pipeline = device.createRenderPipeline(
    label: "hardcoded rgb triangle pipeline",
    layout: "auto",
    vertex:
      module,
      entryPoint: "vs",
    ,
    fragment:
      module,
      entryPoint: "fs",
      targets: [ format: presentationFormat ],
    ,
  );

  const renderPassDescriptor =
    label: "our basic canvas renderPass",
    colorAttachments: [

        // view: <- to be filled out when we render
        clearValue: [1.0, 1.0, 1.0, 1],
        loadOp: "clear",
        storeOp: "store",
      ,
    ],
  ;

  function render()
    // Get the current texture from the canvas context and
    // set it as the texture to render to.
    renderPassDescriptor.colorAttachments[0].view = context
      .getCurrentTexture()
      .createView();

    const encoder = device.createCommandEncoder(
      label: "render triangle encoder",
    );
    const pass = encoder.beginRenderPass(
      renderPassDescriptor as GPURenderPassDescriptor
    );
    pass.setPipeline(pipeline);
    pass.draw(3); // call our vertex shader 3 times
    pass.end();

    const commandBuffer = encoder.finish();
    device.queue.submit([commandBuffer]);


  const observer = new ResizeObserver((entries) =>
    for (const entry of entries)
      const canvas = entry.target;
      const width = entry.contentBoxSize[0].inlineSize;
      const height = entry.contentBoxSize[0].blockSize;
      (canvas as HTMLCanvasElement).width = Math.min(
        width,
        device.limits.maxTextureDimension2D
      );
      (canvas as HTMLCanvasElement).height = Math.min(
        height,
        device.limits.maxTextureDimension2D
      );
      // re-render
      render();

  );
  observer.observe(canvas);

  document.body.appendChild(canvas);


function fail(msg: string)
  // eslint-disable-next-line no-alert
  alert(msg);


main();
/Users/song/Code/webgpu_learn/webgpu-for-beginners/webgpu_learn_typescript/src/main.ts
import  vertexShader, fragmentShader  from "./shader";

async function main()
  // 获取适配器
  const adapter = await navigator.gpu?.requestAdapter();
  // 获取gpu设备对象
  const device = await adapter?.requestDevice()!;
  if (!device)
    fail("need a browser that supports WebGPU");
    return;


  // Get a WebGPU context from the canvas and configure it
  // 创建canvas画布,配置gpu上下文,将该元素作为webgpu的画布
  const canvas = document.createElement("canvas");
  canvas.style.width = "500px";
  canvas.style.height = "300px";

  const context = canvas.getContext("webgpu")!;
  const presentationFormat = navigator.gpu.getPreferredCanvasFormat();
  context.configure(
    device, // gpu设备对象
    format: presentationFormat, //gpu渲染器使用的颜色格式,比如说rgba bgra,这里默认就好
  );

  const vertexArray = new Float32Array([
    // 三角形三个顶点坐标的x、y、z值
    0.0,
    0.0,
    0.0, //顶点1坐标

    1.0,
    0.0,
    0.0, //顶点2坐标

    0.0,
    1.0,
    0.0, //顶点3坐标
  ]);

  // 定点缓冲区
  const vertexBuffer = device.createBuffer(
    size: vertexArray.byteLength, //顶点数据的字节长度
    //usage设置该缓冲区的用途(作为顶点缓冲区|可以写入顶点数据)
    usage: GPUBufferUsage.VERTEX | GPUBufferUsage.COPY_DST,
  );
  // 将顶点信息写入缓冲器
  device.queue.writeBuffer(vertexBuffer, 0, vertexArray);

  const pipeline = device.createRenderPipeline(
    layout: "auto",
    vertex:
      //顶点相关配置
      buffers: [
        // 顶点所有的缓冲区模块设置

          //其中一个顶点缓冲区设置
          arrayStride: 3 * 4, //一个顶点数据占用的字节长度,该缓冲区一个顶点包含xyz三个分量,每个数字是4字节浮点数,3*4字节长度
          attributes: [

              // 顶点缓冲区属性
              shaderLocation: 0, //GPU显存上顶点缓冲区标记存储位置
              format: "float32x3", //格式:loat32x3表示一个顶点数据包含3个32位浮点数
              offset: 0, //arrayStride表示每组顶点数据间隔字节数,offset表示读取改组的偏差字节数,没特殊需要一般设置0
            ,
          ],
        ,
      ],
      module: device.createShaderModule(
        label: "triangle vertex",
        code: vertexShader,
      ),
      entryPoint: "main",
    ,
    fragment:
      module: device.createShaderModule(
        label: "fragment vertex",
        code: fragmentShader,
      ),
      entryPoint: "main", //指定入口函数
      targets: [

          format: presentationFormat, //和WebGPU上下文配置的颜色格式保持一致
        ,
      ],
    ,
    primitive:
      topology: "triangle-list", //绘制三角形
      // topology: "point-list", //绘制三角形
      // topology: "line-list", //绘制三角形
    ,
  );

  // 创建GPU命令编码器对象
  const commandEncoder = device.createCommandEncoder();

  const renderPass = commandEncoder.beginRenderPass(
    label: "our basic canvas renderPass",
    // 给渲染通道指定颜色缓冲区,配置指定的缓冲区
    colorAttachments: [

        // 指向用于Canvas画布的纹理视图对象(Canvas对应的颜色缓冲区)
        // 该渲染通道renderPass输出的像素数据会存储到Canvas画布对应的颜色缓冲区(纹理视图对象)
        view: context.getCurrentTexture().createView(),
        storeOp: "store", //像素数据写入颜色缓冲区
        loadOp: "clear",
        clearValue:  r: 0.5, g: 0.5, b: 0.5, a: 1.0 , //背景颜色
      ,
    ],
  );

  // 关联顶点缓冲区数据和渲染管线
  renderPass.setVertexBuffer(0, vertexBuffer);
  renderPass.setPipeline(pipeline);
  renderPass.draw(3); // call our vertex shader 3 times
  renderPass.end();

  // 命令缓冲器
  const commandBuffer = commandEncoder.finish();
  device.queue.submit([commandBuffer]);

  document.body.appendChild(canvas);


function fail(msg: string)
  // eslint-disable-next-line no-alert
  alert(msg);


main();
// 顶点着色器代码
const vertexShader = /* wgsl */ `
@vertex
fn main(@location(0) pos: vec3<f32>) -> @builtin(position) vec4<f32>
    return vec4<f32>(pos,1.0);

`;

// 片元着色器代码
const fragmentShader = /* wgsl */ `
@fragment
fn main() -> @location(0) vec4<f32>
    return vec4<f32>(1.0, 0.0, 0.0, 1.0);//片元设置为红色

`;

export  vertexShader, fragmentShader ;
大家好,本文学习MSAA以及在WebGPU中的实现。
上一篇博文
WebGPU学习(二): 学习“绘制一个三角形”示例
下一篇博文
WebGPU学习(四):Alpha To Coverage
学习MSAA
介绍
MSAA(多重采样抗锯齿),是硬件实现的抗锯齿技术
动机
参考深入剖析MSAA :
具体到实时渲染领域中,走样有以下三种:
1.几何体走样(几何物体的边缘有锯齿),几何走样由于对几何边缘采样不足导致。
2.着色走样,由于对着色器中着色公式(渲染方程)采样不足导致。比较明显的现象就是高光闪烁。
3.时间走样,主要是对高速运动的物体采样不足导致。比如游戏中播放的动画发生跳变等。
这里讨论几何体走样。
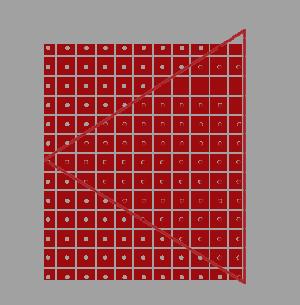
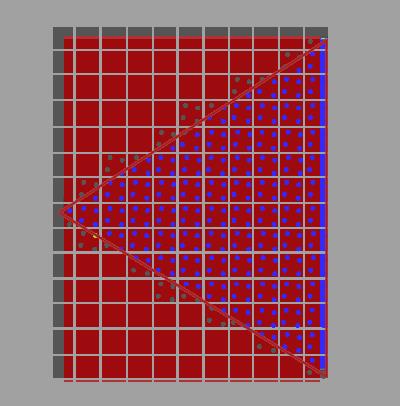
如上图所示,我们要绘制一个三角形。它由三个顶点组成,红线范围内的三角形是片元primitive覆盖的区域。
primitive会被光栅化为fragment,而一个fragment最终对应屏幕上的一个像素,如图中的小方块所示。
gpu会根据像素中心的采样点是否被pritimive覆盖来判断是否生成该fragment和执行对应的fragment shader。
图中红色的点是被覆盖的采样点,它所在的像素会被渲染。
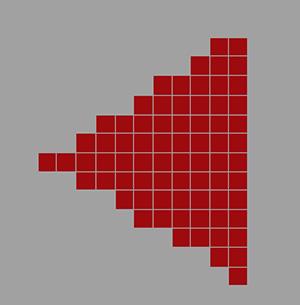
下图是最终渲染的结果,我们看到三角形边缘产生了锯齿:
原理
MSAA通过增加采样点来减轻几何体走样。
它包括4个步骤:
1.针对采样点进行覆盖检测
2.每个被覆盖的fragment执行一次fragment shader
3.针对采样点进行深度检测和模版检测
4.解析(resolve)
下面以4X MSAA为例(每个像素有4个采样点),说明每个步骤:
1.针对采样点进行覆盖检测
gpu会计算每个fragment的coverage(覆盖率),从而得知对应像素的每个采样点是否被覆盖的信息。
coverage相关知识可以参考WebGPU学习(四):Alpha To Coverage -> 学习Alpha To Coverage -> 原理
这里为了简化,我们只考虑通过“检测每个像素有哪些采样点被primitive覆盖”来计算coverager:
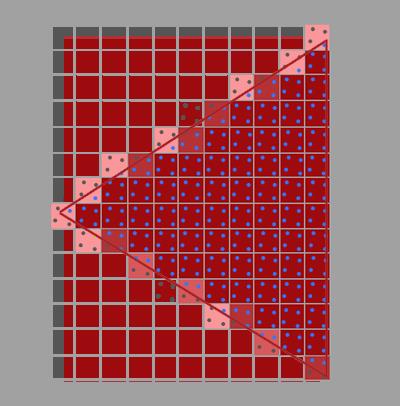
如上图所示,蓝色的采样点是在三角形中,是被覆盖的采样点。
2.每个被覆盖的fragment执行一次fragment shader
如果一个像素至少有一个采样点被覆盖,那么会执行一次它对应的fragment(注意,只执行一次哈,不是执行4次)(它所有的输入varying变量都是针对其像素中心点而言的,所以计算的输出的颜色始终是针对该栅格化出的像素中心点而言的),输出的颜色保存在color buffer中(覆盖的采样点都要保存同一个输出的颜色)
3.针对采样点进行深度检测和模版检测
所有采样点的深度值和模版值都要存到depth buffer和stencil buffer中(无论是否被覆盖)。
被覆盖的采样点会进行深度检测和模版检测,通过了的采样点会进入“解析”步骤。
那为什么要保存所有采样点的深度和模版值了(包括没有被覆盖的)?因为它们在深度检测和模版检测阶段决定所在的fragment是否被丢弃:
那是因为之后需要每个sample(采样点)都执行一下depth-test,以确定整个fragment是否要流向(通往缓冲区输出的)流水线下一阶段——只有当全部fragment-sample的Depth-Test都Fail掉的时候,才决定抛弃掉这个fragment(蒙版值stencil也是这样的,每个sample都得进行Stencil-Test)。
4.解析
什么是解析?
根据深入剖析MSAA 的说法:
像超采样一样,过采样的信号必须重新采样到指定的分辨率,这样我们才可以显示它。
这个过程叫解析(resolving)。
根据乱弹纪录II:Alpha To Coverage 的说法:
在把所有像素输出到渲染缓冲区前执行Resolve以生成单一像素值。
。。。。。。
也该是时候谈到一直说的“计算输出的颜色”是怎么一回事了。MultiSample的Resolve阶段,如果是屏幕输出的话这个阶段会发生在设备的屏幕输出直前;如果是FBO输出,则是发生在把这个Multisample-FBO映射到非multisample的FBO(或屏幕)的时候(见[多重采样(MultiSample)下的FBO反锯齿] )。Resolve,说白了就是把MultiSample的存储区域的数据,根据一定法则映射到可以用于显示的Buffer上了(这里的输出缓冲区包括了Color、Depth或还有Stencil这几个)。Depth和Stencil前面已经提及了法则了,Color方面其实也简单,一般的显卡的默认处理就是把sample的color取平均了。注意,因为depth-test等Test以及Coverage mask的影响下,有些sample是不参与计算的(被摒弃),例如4XMSAA下上面的0101,就只有两个sample,又已知各sample都对应的只是同一个颜色值,所以输出的颜色 = 2 * fragment color / 4 = 0.5 * fragment color。也就是是说该fragemnt最终显示到屏幕(或Non-MS-FBO)上是fragment shader计算出的color值的一半——这不仅是颜色亮度减半还包括真·透明度值的减半。
我的理解:
“解析”是把每个像素经过上述步骤得到的采样点的颜色值,取平均值,得到这个像素的颜色值。
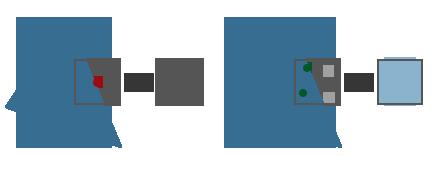
如上图右边所示,像素的2个采样点进入了“解析”,最终该像素的颜色值为 0.5(2/4) * 原始颜色值
经过上述所有步骤后,最终的渲染结果如下:
总结
MSAA能减轻几何体走样,但会增加color buffer、depth buffer、stencil buffer开销。
参考资料
深入剖析MSAA
乱弹纪录II:Alpha To Coverage
Anti Aliasing
WebGPU实现MSAA
有下面几个要点:
目前我没找到查询的方法,但至少支持4个采样点
参考 Investigation: Multisampled Render Targets and Resolve Operations:
We can say that 4xMSAA is guaranteed on all WebGPU implementations, and we need to provide APIs for queries on whether we can create a multisampled texture with given format and sample count.
dictionary GPURenderPipelineDescriptor : GPUPipelineDescriptorBase {
...
    unsigned long sampleCount = 1;
...
};
dictionary GPUTextureDescriptor : GPUObjectDescriptorBase {
...
    unsigned long sampleCount = 1;
...
};
我们在WebGPU 规范中看到render pipeline descriptor和texture descriptor可以设置sampleCount。
在“解析”步骤中,需要重新采样到指定的分辨率:
过采样的信号必须重新采样到指定的分辨率,这样我们才可以显示它
所以我们应该设置color的resolveTarget(depth、stencil不支持resolveTarget),它包含“分辨率”的信息。
我们来看下WebGPU 规范:
dictionary GPURenderPassColorAttachmentDescriptor {
    required GPUTextureView attachment;
    GPUTextureView resolveTarget;

    required (GPULoadOp or GPUColor) loadValue;
    GPUStoreOp storeOp = "store";
};
resolveTarget在render pass colorAttachment descriptor中设置,它的类型是GPUTextureView。
而GPUTextureView是从GPUTexture得来的,我们来看下GPUTexture的descriptor的定义:
dictionary GPUExtent3DDict {
    required unsigned long width;
    required unsigned long height;
    required unsigned long depth;
};
typedef (sequence<unsigned long> or GPUExtent3DDict) GPUExtent3D;

dictionary GPUTextureDescriptor : GPUObjectDescriptorBase {
...
  required GPUExtent3D size;
...
};
GPUTextureDescriptor的size属性有width和height属性,只要texture对应了屏幕大小,我们就能获得屏幕“分辨率”的信息(depth设为1,因为分辨率只有宽、高,没有深度)。
实现sample
我们对应到sample来看下。
打开webgpu-samplers->helloTriangleMSAA.ts文件。
代码基本上与我们上篇文章学习的webgpu-samplers->helloTriangle.ts差不多,
我们看下创建render pipeline代码
    const sampleCount = 4;

    const pipeline = device.createRenderPipeline({
    ...
      sampleCount,
    });
这里设置了sample count为4
我们看下frame函数->render pass descrptor代码
      const renderPassDescriptor: GPURenderPassDescriptor = {
        colorAttachments: [{
          attachment: attachment,
          resolveTarget: swapChain.getCurrentTexture().createView(),
          ...
        }],
      };
- 设置attachment为多重采样的texture的view
该texture的创建代码为:
    const texture = device.createTexture({
      size: {
        width: canvas.width,
        height: canvas.height,
        depth: 1,
      },
      sampleCount,
      format: swapChainFormat,
      usage: GPUTextureUsage.OUTPUT_ATTACHMENT,
    });
    const attachment = texture.createView();
注意:texture的sampleCount应该与render pipeline的sampleCount一样,都是4
- 设置resolveTarget为swapChain对应的view
swapChain.getCurrentTexture()获得的texture的大小是与屏幕相同,所以它包含了屏幕分辨率的信息。
参考资料
helloTriangleMSAA.ts
Investigation: Multisampled Render Targets and Resolve Operations


