WPF 入门笔记
Posted BoiledYakult
tags:
篇首语:本文由小常识网(cha138.com)小编为大家整理,主要介绍了WPF 入门笔记相关的知识,希望对你有一定的参考价值。

WPF 入门笔记之布局
一、布局原则:
1. 不应显示的设定元素的尺寸,反而元素可以改变它的尺寸,并适应它们的内容
2. 不应使用平布的坐标,指定元素的位置。
3. 布局容器和它的子元素是共享可以使用的空间
4. 可以嵌套的使用布局容器
二、布局容器
2.1 StackPanel:堆栈面板
堆栈面板的Orientation="Vertical"属性和子元素HorizontalAlignment属性一起使用,反之Orientation="Vertical"属性和子元素HorizontalAlignment一起使用


前者Orientation="Vertical"垂直排列,后者Orientation="Horizontal"水平排列
<Window x:Class="Haos.WPF.Case.Layout.StackPanelWindow"
        xmlns="http://schemas.microsoft.com/winfx/2006/xaml/presentation"
        xmlns:x="http://schemas.microsoft.com/winfx/2006/xaml"
        xmlns:d="http://schemas.microsoft.com/expression/blend/2008"
        xmlns:mc="http://schemas.openxmlformats.org/markup-compatibility/2006"
        xmlns:local="clr-namespace:Haos.WPF.Case.Layout"
        mc:Ignorable="d"
        Title="堆栈面板" Height="120" Width="300">
    <!--Orientation="Horizontal"-->
    <StackPanel Height="auto" Orientation="Vertical">
        <Button Content="button" Name="btn_1" HorizontalAlignment="Left"></Button>
        <Button Content="button" Name="btn_2" HorizontalAlignment="Center"></Button>
        <Button Content="button" Name="btn_3" HorizontalAlignment="Right"></Button>
        <Button Content="button" Name="btn_4" HorizontalAlignment="Stretch"></Button>
    </StackPanel>
</Window>
2.2 WrapPanel:一行或一列进行排列


前者Orientation="Horizontal"水平排列,后者Orientation="Vertical"垂直排列.
<Window x:Class="Haos.WPF.Case.Layout.WrapPanelWindow"
        xmlns="http://schemas.microsoft.com/winfx/2006/xaml/presentation"
        xmlns:x="http://schemas.microsoft.com/winfx/2006/xaml"
        xmlns:d="http://schemas.microsoft.com/expression/blend/2008"
        xmlns:mc="http://schemas.openxmlformats.org/markup-compatibility/2006"
        xmlns:local="clr-namespace:Haos.WPF.Case.Layout"
        mc:Ignorable="d"
        Title="WrapPanel" Height="300" Width="300">
    <!--Orientation="Vertical"-->
    <WrapPanel Orientation="Horizontal">
        <!--HorizontalAlignment="Left"-->
        <Button Content="button" Name="btn_1" VerticalAlignment="Top"></Button>
        <Button Content="button" Height="100" Name="btn_2" VerticalAlignment="Center"></Button>
        <Button Content="button" Name="btn_3" VerticalAlignment="Stretch"></Button>
        <Button Content="button" Name="btn_4" VerticalAlignment="Bottom"></Button>
    </WrapPanel>
</Window>
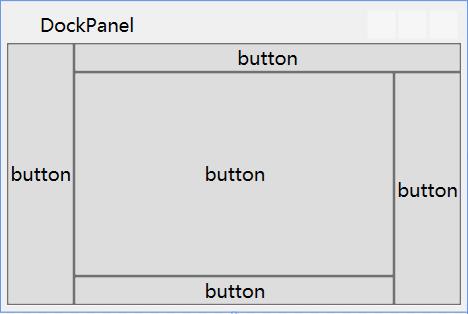
2.3 DockPanel:顺着外边缘来拉伸所包含的控件

LastChildFill = "True"表示最后一个子元素是否填充满剩余区域
<Window x:Class="Haos.WPF.Case.Layout.DockPanelWindow"
        xmlns="http://schemas.microsoft.com/winfx/2006/xaml/presentation"
        xmlns:x="http://schemas.microsoft.com/winfx/2006/xaml"
        xmlns:d="http://schemas.microsoft.com/expression/blend/2008"
        xmlns:mc="http://schemas.openxmlformats.org/markup-compatibility/2006"
        xmlns:local="clr-namespace:Haos.WPF.Case.Layout"
        mc:Ignorable="d"
        Title="DockPanel" Height="200" Width="300">
    <DockPanel LastChildFill="True">
        <Button Content="button" Name="btn_1" DockPanel.Dock="Left"></Button>
        <Button Content="button" Name="btn_2" DockPanel.Dock="Top"></Button>
        <Button Content="button" Name="btn_3" DockPanel.Dock="Right"></Button>
        <Button Content="button" Name="btn_4" DockPanel.Dock="Bottom"></Button>
        <Button Content="button" Name="btn_5"></Button>
    </DockPanel>
</Window>
2.4 Grid:网格布局(WPF中功能最强大的布局容器)
2.4.1 Grid 的使用

ShowGridLines="True" 开启Grid的分格线
Grid.Row="0" 设置子元素在那一行
Grid.Column="4" 设置子元素在那一列
Grid.RowSpan="2" 设置子元素占用几行
Grid.ColumnSpan="2" 设置子元素占用几列
UseLayoutRounding="True 布局舍入,当在网络放入一个图片,如果不是一个整数像素的宽度,图形边缘会变的模糊。开启布局舍入可以解决这个问题
SharedSizeGroup:共享尺寸组
<Window x:Class="Haos.WPF.Case.Layout.GridPanelWindow"
        xmlns="http://schemas.microsoft.com/winfx/2006/xaml/presentation"
        xmlns:x="http://schemas.microsoft.com/winfx/2006/xaml"
        xmlns:d="http://schemas.microsoft.com/expression/blend/2008"
        xmlns:mc="http://schemas.openxmlformats.org/markup-compatibility/2006"
        xmlns:local="clr-namespace:Haos.WPF.Case.Layout"
        mc:Ignorable="d"
        Title="Grid" Height="300" Width="300">
    <!--ShowGridLines="True" 开启Grid的分格线-->
    <!--UseLayoutRounding="True 布局舍入-->
    <Grid ShowGridLines="True" UseLayoutRounding="True">
        <!--分行-->
        <Grid.RowDefinitions>
            <RowDefinition></RowDefinition>
            <RowDefinition></RowDefinition>
            <RowDefinition></RowDefinition>
            <RowDefinition></RowDefinition>

        </Grid.RowDefinitions>
        <!--分列-->
        <Grid.ColumnDefinitions>
            <!--设置列宽的方法-->
            <ColumnDefinition Width="50"></ColumnDefinition>
            <ColumnDefinition Width="Auto"></ColumnDefinition>
            <ColumnDefinition Width="*"></ColumnDefinition>
            <ColumnDefinition Width="2*"></ColumnDefinition>
            <ColumnDefinition Width="3*"></ColumnDefinition>
            <ColumnDefinition></ColumnDefinition>
            <ColumnDefinition></ColumnDefinition>
        </Grid.ColumnDefinitions>
        <!--把子元素这只指定网格中 Grid.Row="0" Grid.Column="0"-->
        <Button Content="btn_1" Name="btn_1" Grid.Row="0" Grid.Column="0"></Button>
        <Button Content="btn_2" Name="btn_2" Grid.Row="3" Grid.Column="6"></Button>
        <!--设置子元素占用多个网络  Grid.Column="4" Grid.ColumnSpan="2"-->
        <Button Content="btn_3" Name="btn_3" Grid.Row="0" Grid.Column="4" Grid.ColumnSpan="2"></Button>
        <Button Content="btn_4" Name="btn_4" Grid.Row="1" Grid.Column="1" Grid.RowSpan="2"></Button>
        <Button Content="btn_5" Name="btn_5" Grid.Row="2" Grid.Column="3" Grid.RowSpan="2" Grid.ColumnSpan="2"></Button>

    </Grid>
</Window>
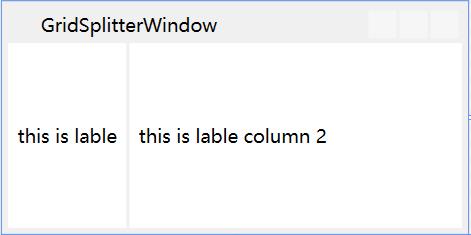
2.4.2 GridSplitter:分割线

<Window x:Class="Haos.WPF.Case.Layout.GridSplitterWindow"
        xmlns="http://schemas.microsoft.com/winfx/2006/xaml/presentation"
        xmlns:x="http://schemas.microsoft.com/winfx/2006/xaml"
        xmlns:d="http://schemas.microsoft.com/expression/blend/2008"
        xmlns:mc="http://schemas.openxmlformats.org/markup-compatibility/2006"
        xmlns:local="clr-namespace:Haos.WPF.Case.Layout"
        mc:Ignorable="d"
        Title="GridSplitterWindow" Height="150" Width="300">
    <Grid>
        <Grid.RowDefinitions>
            <RowDefinition></RowDefinition>
        </Grid.RowDefinitions>
        <Grid.ColumnDefinitions>
            <ColumnDefinition Width="auto"></ColumnDefinition>
            <ColumnDefinition Width="auto"></ColumnDefinition>
            <ColumnDefinition Width="auto"></ColumnDefinition>
        </Grid.ColumnDefinitions>
        <Label Content="this is lable" HorizontalContentAlignment="Center" VerticalContentAlignment="Center" Grid.Column="0"></Label>
        <Label Content="this is lable column 2" HorizontalContentAlignment="Center" VerticalContentAlignment="Center" Grid.Column="2"></Label>
        <GridSplitter Grid.Column="1" Width="2"></GridSplitter>
    </Grid>
</Window>
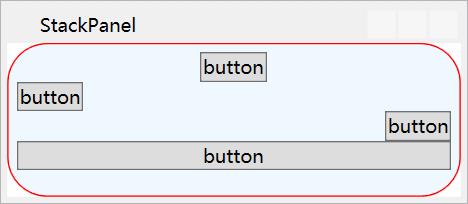
2.5 布局控件常和Border控件一起使用
a.Background:背景色
b.BorderBrush:前景色(边框颜色)
c.BorderThickness:边框大小
d.CornerRadius:圆角角度

<Border Background="AliceBlue" BorderBrush="Red" BorderThickness="1" CornerRadius="25" Padding="5">
        <StackPanel Height="auto" Orientation="Vertical">
            <!--VerticalAlignment="Center"-->
            <Button Content="button" Name="btn_2" HorizontalAlignment="Center"></Button>
            <Button Content="button" Name="btn_1" HorizontalAlignment="Left"></Button>
            <Button Content="button" Name="btn_3" HorizontalAlignment="Right"></Button>
            <Button Content="button" Name="btn_4" HorizontalAlignment="Stretch"></Button>
        </StackPanel>
</Border>
2.6 共有常用属性
Margin:0,0,0,0 外边距分别(左,上,右,下)
Padding:0,0,0,0 内边距分别(左,上,右,下)
子元素->HorizontalAlignment:父布局容器垂直排列时,子元素位置
子元素->VerticalAlignment:父布局容器水平排列时,子元素位置
以上是关于WPF 入门笔记的主要内容,如果未能解决你的问题,请参考以下文章