python使用rabbitMQ介绍四(路由模式)
Posted Stitch
tags:
篇首语:本文由小常识网(cha138.com)小编为大家整理,主要介绍了python使用rabbitMQ介绍四(路由模式)相关的知识,希望对你有一定的参考价值。
一、模式介绍
路由模式,与发布-订阅模式一样,消息发送到exchange中,消费者把队列绑定到exchange上。
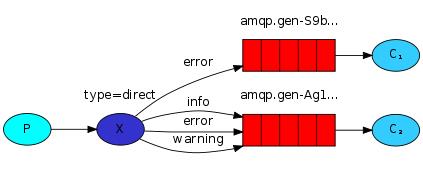
这种模式在exchange上添加添加了一个路由键(routing-key),生产者发布消息的时候添加路由键(routing-key),消费者绑定队列到交换机时添加键值(routing-key),这样就可以接收到对应的消息。
路由模式的direct exchange。
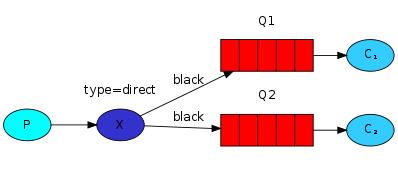
队列模型:


与发布-订阅模式不同的是,每个消费者队列接收的消息不同,根据消息的routing-key把消息发送到不同的队列中。
当所有的消费队列绑定的routing-key一样时,路由模式行为与发布-订阅模式一样。
二、代码示意
发布者:不再创建队列,发送消息到exchange(交换机)中。exchange_type为direct。
 1 import pika
 2 import sys
 3
 4 connection = pika.BlockingConnection(pika.ConnectionParameters(host=\'localhost\'))
 5 channel = connection.channel()
 6
 7 channel.exchange_declare(exchange=\'direct_logs\',
 8                          exchange_type=\'direct\')
 9
10 severity = [\'info\', \'warning\', \'error\']
11 for i in range(20):
12     message = \'{} Hello World! {}\'.format(i, severity[i % 3])
13     channel.basic_publish(exchange=\'direct_logs\',
14                           routing_key=severity[i % 3],
15                           body=message)
16     print(" [x] Sent: {}".format(message))
17 connection.close()
每个消费者绑定的队列定义不同的routing-key,接收到不同的消息。
以info为示例:
 1 import pika
 2 import sys
 3
 4 connection = pika.BlockingConnection(pika.ConnectionParameters(host=\'localhost\'))
 5 channel = connection.channel()
 6
 7 channel.exchange_declare(exchange=\'direct_logs\',
 8                          exchange_type=\'direct\')
 9
10 result = channel.queue_declare(exclusive=True)
11 queue_name = result.method.queue
12
13 channel.queue_bind(exchange=\'direct_logs\',
14                    queue=queue_name,
15                    routing_key=\'info\')
16
17 print(\' [*] Waiting for logs. To exit press CTRL+C\')
18
19 def callback(ch, method, properties, body):
20     print(" [x] %r:%r" % (method.routing_key, body))
21
22 channel.basic_consume(callback,
23                       queue=queue_name,
24                       no_ack=True)
25
26 channel.start_consuming()
执行结果输出:
发布者:
[x] Sent: 0 Hello World! info
 [x] Sent: 1 Hello World! warning
 [x] Sent: 2 Hello World! error
 [x] Sent: 3 Hello World! info
 [x] Sent: 4 Hello World! warning
 [x] Sent: 5 Hello World! error
 [x] Sent: 6 Hello World! info
 [x] Sent: 7 Hello World! warning
 [x] Sent: 8 Hello World! error
 [x] Sent: 9 Hello World! info
 [x] Sent: 10 Hello World! warning
 [x] Sent: 11 Hello World! error
 [x] Sent: 12 Hello World! info
 [x] Sent: 13 Hello World! warning
 [x] Sent: 14 Hello World! error
 [x] Sent: 15 Hello World! info
 [x] Sent: 16 Hello World! warning
 [x] Sent: 17 Hello World! error
 [x] Sent: 18 Hello World! info
 [x] Sent: 19 Hello World! warning
Info输出:
[*] Waiting for logs. To exit press CTRL+C
 [x] \'info\':b\'0 Hello World! info\'
 [x] \'info\':b\'3 Hello World! info\'
 [x] \'info\':b\'6 Hello World! info\'
 [x] \'info\':b\'9 Hello World! info\'
 [x] \'info\':b\'12 Hello World! info\'
 [x] \'info\':b\'15 Hello World! info\'
 [x] \'info\':b\'18 Hello World! info\'
Warning输出:
[*] Waiting for logs. To exit press CTRL+C
 [x] \'warning\':b\'1 Hello World! warning\'
 [x] \'warning\':b\'4 Hello World! warning\'
 [x] \'warning\':b\'7 Hello World! warning\'
 [x] \'warning\':b\'10 Hello World! warning\'
 [x] \'warning\':b\'13 Hello World! warning\'
 [x] \'warning\':b\'16 Hello World! warning\'
 [x] \'warning\':b\'19 Hello World! warning\'
Error输出:
[*] Waiting for logs. To exit press CTRL+C
 [x] \'error\':b\'2 Hello World! error\'
 [x] \'error\':b\'5 Hello World! error\'
 [x] \'error\':b\'8 Hello World! error\'
 [x] \'error\':b\'11 Hello World! error\'
 [x] \'error\':b\'14 Hello World! error\'
 [x] \'error\':b\'17 Hello World! error\'
可以看到,不同的消费者收到不同级别的日志信息。
三、队列信息
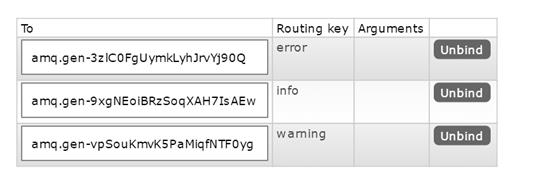
管理页面,exchange页面,点击“direct_logs”上查看队列情况,可以看到三个不同routing_key的队列
routing key列展示了对应的key。

以上是关于python使用rabbitMQ介绍四(路由模式)的主要内容,如果未能解决你的问题,请参考以下文章