实验4
Posted nettj666
tags:
篇首语:本文由小常识网(cha138.com)小编为大家整理,主要介绍了实验4相关的知识,希望对你有一定的参考价值。
1.实验任务1
task1.py
程序源代码:
 print(sum)
 sum = 42
 print(sum)

 def inc(n):
     sum = n+1
     print(sum)
     return sum

 sum = inc(7) + inc(7)
 print(sum)
运行程序截图:

关于问题回答:
2.实验任务2
task2-2.py
程序源代码:
list1 = [1,9,8,4]

print(sorted(list1))
print(sorted(list1,reverse = True))
print(sorted(list1,True))
运行程序截图:

关于问题的回答:
task2-3.py
程序源代码:
 def func(a,b,c,/,*,d,e,f):
     return( [a,b,c,d,e,f] )

 print(func(1,2,3,d=4,e=5,f=6))
运行程序截图:

3.实验任务3
task3.py
程序源代码:
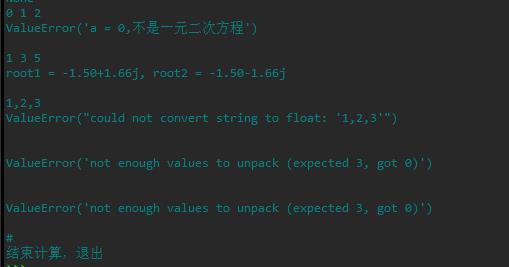
 def solve(a,b,c):
     delta = b*b -4*a*c
     delta_sqrt = abs(delta)**0.5
     p1 = -b/2/a
     p2 = delta_sqrt/2/a

     if delta >=0:
         root1 = p1+p2
         root2 = p1-p2
     else:
         root1 = complex(p1,p2)
         root2 = complex(p1,-p2)

     return root1,root2

 print(solve.__doc__)
 while True:
     try:
         t = input()
         if t==\'#\':
             print(\'结束计算,退出\')
             break
         a,b,c = map(float,t.split())
         if a ==0:
             raise ValueError(\'a = 0,不是一元二次方程\')
     except ValueError as e:
         print(repr(e))
         print()
     except:
         print(\'有其它错误发生\\n\')
     else:
         root1,root2 = solve(a,b,c)
         print(f\'root1 = root1:.2f, root2 = root2:.2f\')
         print()
运行程序截图:
4.实验任务4
task4.py
运行源代码:
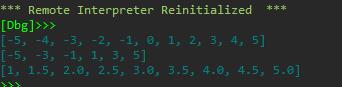
 def list_generator(*n):
     if len(n)==2:
         a = n[0]
         b = n[1]
         return (list(range(a,b+1)))
     else:
         a = n[0]
         b = n[1]
         c = n[2]
         if c ==int(c):
             return (list(range(a,b+1,c)))
         else:
             ls = [a]
             while a<b:
                 a = a+c
                 ls.append(a)
             return ls

 list1 = list_generator(-5,5)
 print(list1)

 list2 = list_generator(-5,5,2)
 print(list2)

 list3 = list_generator(1,5,0.5)
 print(list3)
程序运行截图:
5.实验任务5
task5.py
实验源代码:
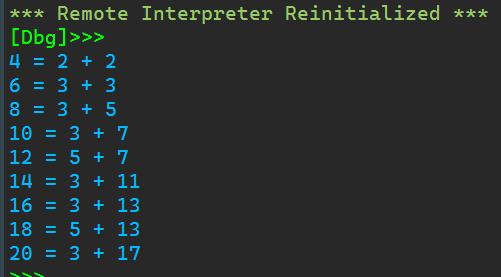
def is_prime(n):
    if n ==1:
        return False
    elif n ==2:
        return True
    else:
        for i in range(2,n):
            if n%i==0:
                break
                return False
            else:
                if i ==n-1:
                    return True
for i in range(4,21,2):
    print(\' = \'.format(i),end =\'\')
    t1 = 2
    t2 = i-t1
    while t2>=t1:
        if is_prime(t1) and is_prime(t2):
            print(\' + \'.format(t1,t2))
            break
        else:
            t1+=1
            t2-=1
运行程序截图:
6.实验任务6
task6.py
程序源代码:
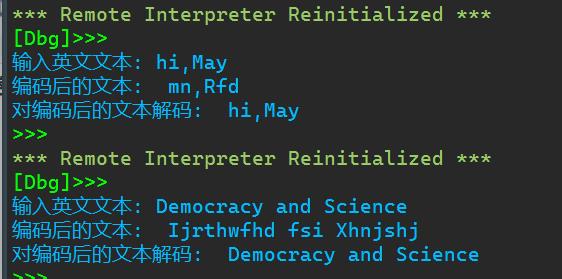
 def encoder(n):
     ans = \'\'
     for i in n:
         if ord(i)>117:
             t = 97+5-123+ord(i)
             ans = ans + chr(t)
         elif ord(i)>=97 and ord(i)<=117:
             t = ord(i) + 5
             ans = ans + chr(t)
         elif ord(i)<97 and ord(i)>85:
             t = 65+5-123+ord(i)
             ans = ans + chr(t)
         elif ord(i)<=85 and ord(i)>=65:
             t = ord(i) + 5
             ans = ans + chr(t)
         else:
             ans = ans +i
     return ans


 def decoder(n):
     ans = \'\'
     for i in n:
         if ord(i)<102 and ord(i)>=97:
             t = 122-5+ord(i)-96
             ans = ans + chr(t)
         elif ord(i)>=102 and ord(i)<=122:
             t = ord(i) - 5
             ans = ans + chr(t)
         elif ord(i)<70 and ord(i)>=65:
             t = 90+5-ord(i)+65
             ans = ans + chr(t)
         elif ord(i)>=70 and ord(i)<=90:
             t = ord(i) - 5
             ans = ans + chr(t)
         else:
             ans = ans +i
     return ans

 text = input(\'输入英文文本: \')
 encoded_text = encoder(text)
 print(\'编码后的文本: \', encoded_text)
 decoded_text = decoder(encoded_text)
 print(\'对编码后的文本解码: \', decoded_text)
运行程序截图:
7.实验任务7
task7.py
程序源代码:
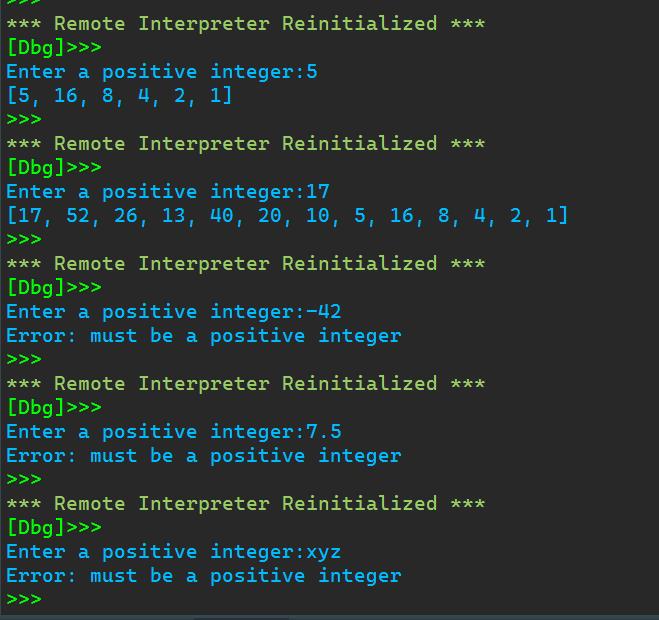
 def collatz(n):
     ans = [n]
     while n !=1:
         if n%2 == 0:
             n = int(n/2)
             ans.append(n)
         else:
             n = n*3+1
             ans.append(n)
     return ans

 while True:
     try:
         t = input(\'Enter a positive integer:\')
         if t.isdigit():
             t = int(t)
             print(collatz(t))
             break
         else:
             raise ValueError(\'Error: must be a positive integer\')
     except ValueError as f:
         print(f)
         break
运行程序截图:
8.实验任务8
task8.1.py
程序源代码:
运行程序截图:
task8.2.py
程序源代码:
运行程序截图:
大数据Hadoop实验报告
文章目录
实验一 熟悉常用的Linux操作和Hadoop操作
1.实验目的
Hadoop运行在Linux系统上,因此,需要学习实践一些常用的Linux命令。本实验旨在熟悉常用的Linux操作和Hadoop操作,为顺利开展后续其他实验奠定基础。
2.实验平台
- 操作系统:Linux;
- Hadoop版本:2.7.1。
3.实验内容和要求
(一)熟悉常用的Linux操作
请按要求上机实践如下linux基本命令。
cd命令:切换目录
(1)切换到目录 /usr/local

(2)切换到当前目录的上一级目录

(3)切换到当前登录Linux系统的用户的自己的主文件夹

ls命令:查看文件与目录
(4)查看目录/usr下所有的文件

mkdir命令:新建新目录
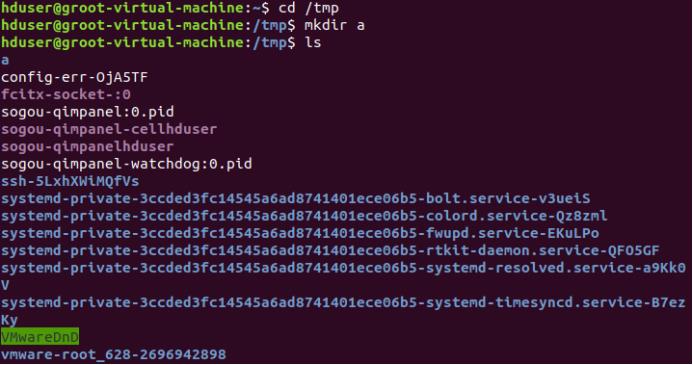
(5)进入“/tmp”目录,创建一个名为“a”的目录,并查看“/tmp”目录下已经存在哪些目录
(6)进入“/tmp”目录,创建目录“a1/a2/a3/a4”

rmdir命令:删除空的目录
(7)将上面创建的目录a(在“/tmp”目录下面)删除

(8)删除上面创建的目录“a1/a2/a3/a4” (在“/tmp”目录下面),然后查看“/tmp”目录下面存在哪些目录

cp命令:复制文件或目录
(9)将当前用户的主文件夹下的文件.bashrc复制到目录“/usr”下,并重命名为bashrc1

(10)在目录“/tmp”下新建目录test,再把这个目录复制到“/usr”目录下

mv命令:移动文件与目录,或更名字
(11)将“/usr”目录下的文件bashrc1移动到“/usr/test”目录下

(12)将“/usr”目录下的test目录重命名为test2

rm命令:移除文件或目录
(13)将“/usr/test2”目录下的bashrc1文件删除
$ sudo rm /usr/test2/bashrc1

(14)将“/usr”目录下的test2目录删除
$ sudo rm –r /usr/test2

cat命令:查看文件内容
(15)查看当前用户主文件夹下的.bashrc文件内容

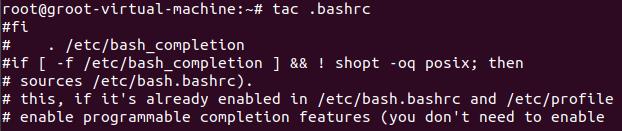
tac命令:反向查看文件内容
(16)反向查看当前用户主文件夹下的.bashrc文件的内容
more命令:一页一页翻动查看
(17)翻页查看当前用户主文件夹下的.bashrc文件的内容

head命令:取出前面几行
(18)查看当前用户主文件夹下.bashrc文件内容前20行

(19)查看当前用户主文件夹下.bashrc文件内容,后面50行不显示,只显示前面几行

tail命令:取出后面几行
(20)查看当前用户主文件夹下.bashrc文件内容最后20行

(21) 查看当前用户主文件夹下.bashrc文件内容,并且只列出50行以后的数据

touch命令:修改文件时间或创建新文件
(22)在“/tmp”目录下创建一个空文件hello,并查看文件时间

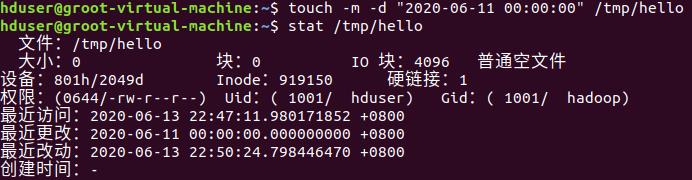
(23)修改hello文件,将文件时间整为5天前
chown命令:修改文件所有者权限
(24)将hello文件所有者改为root帐号,并查看属性

find命令:文件查找
(25)找出主文件夹下文件名为.bashrc的文件

tar命令:压缩命令
(26)在根目录“/”下新建文件夹test,然后在根目录“/”下打包成test.tar.gz

(27)把上面的test.tar.gz压缩包,解压缩到“/tmp”目录
$ sudo tar -zxv -f /test.tar.gz -C /tmp

grep命令:查找字符串
(28)从“~/.bashrc”文件中查找字符串’examples’

(29)请在“~/.bashrc”中设置,配置Java环境变量
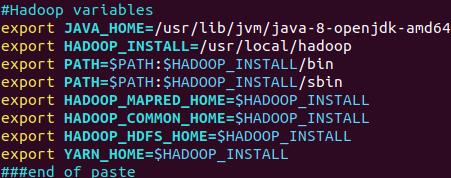
(30)查看JAVA_HOME变量的值

(二)熟悉常用的Hadoop操作
(31)使用hadoop用户登录Linux系统,启动Hadoop(Hadoop的安装目录为“/usr/local/hadoop”),为hadoop用户在HDFS中创建用户目录“/user/hadoop”

(32)接着在HDFS的目录“/user/hadoop”下,创建test文件夹,并查看文件列表

(33)将Linux系统本地的“~/.bashrc”文件上传到HDFS的test文件夹中,并查看test

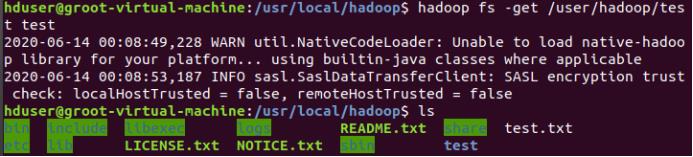
(34)将HDFS文件夹test复制到Linux系统本地文件系统的“/usr/local/hadoop”目录下
实验二 熟悉常用的HDFS操作
1.实验目的
- 理解HDFS在Hadoop体系结构中的角色;
- 熟练使用HDFS操作常用的Shell命令;
2.实验平台
- 操作系统:Linux(建议Ubuntu16.04);
- Hadoop版本:2.7.1;
- JDK版本:1.7或以上版本;
- Java IDE:Eclipse。
3.实验步骤
(一)编程实现以下功能,并利用Hadoop提供的Shell命令完成相同任务:
(1)向HDFS中上传任意文本文件,如果指定的文件在HDFS中已经存在,则由用户来指定是追加到原有文件末尾还是覆盖原有的文件;
Shell命令:
追加到末尾
hadoop fs -appendToFile /usr/local/hadoop/test.txt /user/text.txt
覆盖原文件
hadoop fs -copyFromLocal -f /usr/local/hadoop/test.txt /user/text.txt
Java代码:
import org.apache.hadoop.conf.Configuration;
import org.apache.hadoop.fs.*;
import java.io.*;
public class HDFSApi
      public static boolean test(Configuration conf, String path) throws IOException          FileSystem fs = FileSystem.get(conf);
          return fs.exists(new Path(path));

        public static void copyFromLocalFile(Configuration conf, String localFilePath, String remoteFilePath) throws IOException
        FileSystem fs = FileSystem.get(conf);
        Path localPath = new Path(localFilePath);
        Path remotePath = new Path(remoteFilePath);             fs.copyFromLocalFile(false, true, localPath, remotePath);
   fs.close();

  public static void appendToFile(Configuration conf, String  localFilePath, String remoteFilePath) throws IOException
        FileSystem fs = FileSystem.get(conf);
        Path remotePath = new Path(remoteFilePath);
        FileInputStream in = new FileInputStream(localFilePath);
        FSDataOutputStream out = fs.append(remotePath);
   byte[] data = new byte[1024];
   int read = -1;
while ( (read = in.read(data)) > 0 )           	out.write(data, 0, read);

out.close();         in.close();         fs.close();

public static void main(String[] args)
 	 	Configuration conf = new Configuration();     conf.set("fs.default.name","hdfs://localhost:9000");
 	 	String localFilePath = "/home/hadoop/text.txt";
 	 	String remoteFilePath = "/user/hadoop/text.txt";
 	 	String choice = "append";
	 	String choice = "overwrite";
 	 	try
Boolean fileExists = false;
if (HDFSApi.test(conf, remoteFilePath))
fileExists = true;
 System.out.println(remoteFilePath + " 已存在.");
 	  else
 	 	 	 	System.out.println(remoteFilePath + " 不存在.");

 	 	 	if ( !fileExists)  // 文件不存在,则上传
 	 	 	 	HDFSApi.copyFromLocalFile(conf, localFilePath, remoteFilePath);
 	 	 	 	System.out.println(localFilePath + " 已上传至 " + remoteFilePath);
 	 	 	 else if ( choice.equals("overwrite") )     // 选择覆盖
 	 	 	 	HDFSApi.copyFromLocalFile(conf, localFilePath, remoteFilePath);
 	 	 	 	System.out.println(localFilePath + " 已覆盖 " + remoteFilePath);
	 	 else if ( choice.equals("append") )    // 选择追加
 	 	 	 	HDFSApi.appendToFile(conf, localFilePath, remoteFilePath);
 	 	 	 	System.out.println(localFilePath + " 已追加至 " + remoteFilePath);

 	 	 catch (Exception e)
 	 	 	e.printStackTrace();
(2)从HDFS中下载指定文件,如果本地文件与要下载的文件名称相同,则自动对下载的文件重命名;
Shell命令:
if $(hadoop fs -test -e /usr/local/hadoop/test.txt);
then $(hadoop fs -copyToLocal /user/test.txt /usr/local/hadoop/test.txt);
else $(hadoop fs -copyToLocal /user/test.txt /usr/local/hadoop/test2.txt);
Java代码:
Import org.apache.hadoop.conf.Configuration;
import org.apache.hadoop.fs.*;
import java.io.*;
public class HDFSApi
public 	static 	void 	copyToLocal(Configuration 	conf, 	String 	remoteFilePath, localFilePath) throws IOException
      FileSystem fs = FileSystem.get(conf);
        Path remotePath = new Path(remoteFilePath);
        File f = new File(localFilePath);
if(f.exists())
         	System.out.println(localFilePath + " 已存在.");
Integer i = 0;
while (true)
f = new File(localFilePath + "_" + i.toString());
if (!f.exists())
localFilePath = localFilePath + "_" + i.toString();
         break;


System.out.println("将重新命名为: " + localFilePath); ());
         Path localPath = new Path(localFilePath);
 fs.copyToLocalFile(remotePath, localPath);
 fs.close();

 	public static void main(String[] args)
 	 	Configuration conf = new Configuration();     conf.set("fs.default.name","hdfs://localhost:9000");
 	 String localFilePath = "/home/hadoop/text.txt";
String remoteFilePath = "/user/hadoop/text.txt";
try
 	HDFSApi.copyToLocal(conf, remoteFilePath, localFilePath);
 	System.out.println("下载完成");
 catch (Exception e)
 	e.printStackTrace();
(3)将HDFS中指定文件的内容输出到终端中;
Shell命令:
hadoop fs -cat text.txt
Java代码:
import org.apache.hadoop.conf.Configuration; import org.apache.hadoop.fs.*; import java.io.*;

public class HDFSApi
    /**
     * 读取文件内容
     */
    public static void cat(Configuration conf, String remoteFilePath) throws IOException
        FileSystem fs = FileSystem.get(conf);
        Path remotePath = new Path(remoteFilePath);
        FSDataInputStream in = fs.open(remotePath);
        BufferedReader d = new BufferedReader(new InputStreamReader(in));         String line = null;
        while ( (line = d.readLine()) != null )
         	System.out.println(line);

       d.close();        in.close();        fs.close();

 	public static void main(String[] args)
 	 	Configuration conf = new Configuration();     conf.set("fs.default.name","hdfs://localhost:9000");
String remoteFilePath = "/user/local/hadoop/text.txt";    // HDFS 路径
try
 	System.out.println("读取文件: " + remoteFilePath);
 	HDFSApi.cat(conf, remoteFilePath);
 	System.out.println("\\n 读取完成");
 catch (Exception e)
 	e.printStackTrace();
(4)显示HDFS中指定的文件的读写权限、大小、创建时间、路径等信息;
Shell命令:
hadoop fs -ls -h /user/test.txt
Java代码:
import org.apache.hadoop.conf.Configuration; import org.apache.hadoop.fs.*; import java.io.*; import java.text.SimpleDateFormat;
public class HDFSApi
    public static void ls(Configuration conf, String remoteFilePath) throws IOException
        FileSystem fs = FileSystem.get(conf);
        Path remotePath = new Path(remoteFilePath);         FileStatus[] fileStatuses = fs.listStatus(remotePath);         for (FileStatus s : fileStatuses)
         	System.out.println("路径: " + s.getPath().toString());
         	System.out.println("权限: " + s.getPermission().toString());
         	System.out.println("大小: " + s.getLen());
         	/* 返回的是时间戳,转化为时间日期格式 */
         	Long timeStamp = s.getModificationTime();
         	SimpleDateFormat format =  new SimpleDateFormat("yyyy-MM-dd HH:mm:ss");
         	String date = format.format(timeStamp);
   	System.outprintln("时间: " + date);          fs.close();

public static void main(String[] args)   	 	Configuration conf = new Configuration();     conf.set("fs.default.name","hdfs://localhost:9000");
 	 	String remoteFilePath = "/user/hadoop/text.txt";
 	 	try
 	 	 	System.out.println("读取文件信息: " + remoteFilePath);
	 	 	HDFSApi.ls(conf, remoteFilePath);
	                          System.out.println("\\n 读取完成");
 catch (Exception e)
 	 	 	e.printStackTrace();
(5)给定HDFS中某一个目录,输出该目录下的所有文件的读写权限、大小、创建时间、路径等信息,如果该文件是目录,则递归输出该目录下所有文件相关信息;
Shell命令:
hadoop fs -ls -R -h /user
Java代码
import org.apache.hadoop.conf.Configuration; import org.apache.hadoop.fs.*; import java.io.*;
import java.text.SimpleDateFormat;

public class HDFSApi
    /**
     * 显示指定文件夹下所有文件的信息(递归)
     */
    public static void lsDir(Configuration conf, String remoteDir) throws IOException
        FileSystem fs = FileSystem.get(conf);
        Path dirPath = new Path(remoteDir);
        /* 递归获取目录下的所有文件 */
        RemoteIterator<LocatedFileStatus> remoteIterator = fs.listFiles(dirPath, true);
        /* 输出每个文件的信息 */
        while (remoteIterator.hasNext())
         	FileStatus s = remoteIterator.next();
            System.out.println("路径: " + s.getPath().toString());
            System.out.println("权限: " + s.getPermission().toString());
            System.out.println("大小: " + s.getLen());
         	/* 返回的是时间戳,转化为时间日期格式 */
         	Long timeStamp = s.getModificationTime();
         	SimpleDateFormat format =  new SimpleDateFormat("yyyy-MM-dd HH:mm:ss");
         	String date = format.format(timeStamp);
         	System.out.println("时间: " + date);
         	System.out.println();
                 fs.close();


 	/**
 	 * 主函数
 	 */
 	public static void main以上是关于实验4的主要内容,如果未能解决你的问题,请参考以下文章