记录--axios和loading不得不说的故事
Posted 林恒
tags:
篇首语:本文由小常识网(cha138.com)小编为大家整理,主要介绍了记录--axios和loading不得不说的故事相关的知识,希望对你有一定的参考价值。
这里给大家分享我在网上总结出来的一些知识,希望对大家有所帮助
loading的展示和取消可以说是每个前端对接口的时候都要关心的一个问题。这篇文章将要帮你解决的就是如何结合axios更加简洁的处理loading展示与取消的逻辑。
首先在我们平时处理业务的时候loading一般分为三种:按钮loading,局部loading,还有全局loading。
按钮loading
其实想写这篇博客的诱因也是因为这个按钮loading ,在大多数时候我们写按钮loading业务的时候是这样写的。
const loading = ref(false)
try
    loading.value = true
    const data = await axios.post(`/api/data`)

finally
    loading.value = false
或者这样的写的
const loading = ref(false)
loading.value = true
axios.post(`/api/data`)
    .then(data =>
        //do something
    )
    .finally(() =>
        loading.value = false
    )
可以看到 我们总要处理loading的开始与结束状态。而且好多接口都要这么写。这样太繁琐了,那我们可不可以这样呢?
vue3版本
const loading = ref(false)
const data = await axios.post(`/api/data`,loading:loading)
把loading的状态给axios统一处理。这样代码是不是就简洁多了呢?处理方式也很简单。
// 请求拦截器
axios.interceptors.request.use(config = >
    if (config.loading)
      config.loading.value = true

)
// 响应拦截器
axios.interceptors.response.use(
    response =>
        if (response.config.loading)
            res.config.loading.value = false

    ,
    error =>
        if (error.config.loading)
            config.loading.value = false


)
我们只需要在axios的拦截器中改变loading的值就可以,注意一定要传入一个ref类的值。这种写法也仅适用于vue3。vue2是不行的。
vue2版本
在vue2里面我们可能会想到这样写。
<template> <a-button loading="loading.value"> 保存 </a-button> </template> <script> export default data () return loading: value: false , , mounted () const data = await axios.post(`/api/data`,loading:this.loading) , </script> //拦截器和vue3写法一样
但是很遗憾这样是无法生效的。原因如下
//接口调用
axios.post(接口地址,配置项)
//拦截器
axios.interceptors.request.use(配置项 => )
在axios中我们接口调用传入的配置项 和 拦截器返回的配置项 并不是同一个内存地址。axios做了深拷贝处理。所以传入的loading对象和返回的loading对象并不是同一个对象。所以我们在拦截器中修改是完全没有用的。
可是vue3为什么可以呢?因为ref返回的对象是RefImpl类的实例 并不是一个普通的对象,axios在做深拷贝的时候没有处理这种实例对象。 所以我们就可以从这里出发来改造一下我们的axios写法。代码如下:
axios代码:
const _axios = axios.create( method: `post`, baseURL: process.env.VUE_APP_BASE_URL, ) //注意:拦截器中比vue3多了个loading!!! // 请求拦截器 _axios.interceptors.request.use(config = > if (config.loading) config.loading.loading.value = true ) // 响应拦截器 _axios.interceptors.response.use( response => if (response.config.loading) res.config.loading.loading.value = false , error => if (error.config.loading) config.loading.loading.value = false ) export const post = (url, params, config) => if (config?.loading) class Loading loading = config.loading config.loading = new Loading() return _axios.post(url, params, config)
使用方式:
<template> <a-button loading="loading.value"> 保存 </a-button> </template> <script> import post from \'@api/axios\' export default data () return //这里的loading可以取任意名字。但是里面必须有value loading: value: false , , mounted () const data = await post(`/api/data`,loading:this.loading) , </script>
可以看到实现的原理也很简单。我们在axios里面把出传入的config中的loading对象也变成一个实例对象就好了。在实例对象中记录我们传入的对象,也是以为这里我们会比vue3的写法多一个loading,从而实现响应式。
高阶函数版本
以上的方案看起来还是很不友好。如果我们不拘泥于在拦截器中封装呢?
axios代码如下:
const _axios = axios.create( method: `post`, baseURL: import.meta.env.VITE_BASE_URL, ) // 请求拦截器 _axios.interceptors.request.use() // 响应拦截器 _axios.interceptors.response.use() async setRequest (callBack, url, params, config) //添加按钮的loading if (config.loading) config.loading.value = true try return await callBack(url, params, config) catch (error) return Promise.reject(error) finally //关闭按钮的loading状态 if (config.loading) config.loading.value = false export const post = (url, params, config) => return setRequest(_axios.post,url, params, config)
以上代码仅仅是个代码思路。我们可以使用高阶函数二次封装 axios的post函数。get等函数也是一样的,这里就不一一举例了。
局部loading
局部loading的添加有两种方式:
- 使用自定义指令 传入true和false 。这样的缺陷是不够灵活,组件内的元素就很难局部添加了, 只能全组件添加。值得一提的是,改变true和false的逻辑就可以用我们上述的按钮loading方法。具体的实现方式这里就不再讲述了,如果需要的话可以评论区留言。
- 在axios中封装。每次调用接口的时候传入需要添加loading的dom。接口调用完毕删除dom。实现方法如下。
这里是vue3 + antdV3 技术栈的一个封装。这里用hooks把设置删除loading的逻辑给拆了出去。
axios代码:
const _axios = axios.create( method: `post`, baseURL: import.meta.env.VITE_BASE_URL, ) const setLoading, deleteLoading = useAxiosConfig() // 请求拦截器 _axios.interceptors.request.use(config = > setLoading(config) ) // 响应拦截器 _axios.interceptors.response.use( response => deleteLoading(res.config) , error => deleteLoading(res.config) ) //这里也可以 不拘泥于拦截器。使用上述高阶函数的方式。 export const post = (url, params, config) => return _axios.post(url, params, config)
hooks代码
import createApp from \'vue\' import QSpin from \'@/components/qSpin/QSpin.vue\' import type RequestConfig, AxiosError from \'@/types/services/http\' export default function () /** 使用WeakMap类型的数据 键名所指向的对象可以被垃圾回收 避免dom对象的键名内存泄漏 */ const loadingDom = new WeakMap() /** * 添加局部loading * @param config */ const setLoading = (config: RequestConfig) => const loadingTarget = config.dom if (loadingTarget === undefined) return const loadingDomInfo = loadingDom.get(loadingTarget) if (loadingDomInfo) loadingDomInfo.count++ else const appExample = createApp(QSpin) const loadingExample = appExample.mount(document.createElement(`div`)) as InstanceType<typeof QSpin> loadingTarget.appendChild(loadingExample.$el) loadingExample.show(loadingTarget) loadingDom.set(loadingTarget, count: 1, //记录当前dom的loading次数 appExample, ) /** * 删除局部loading * @param config */ const deleteLoading = (config: RequestConfig) => const loadingTarget = config.dom if (loadingTarget === undefined) return const loadingDomInfo = loadingDom.get(loadingTarget) if (loadingDomInfo) if (--loadingDomInfo.count === 0) loadingDom.delete(loadingTarget) loadingDomInfo.appExample.unmount() return setLoading, deleteLoading
基础逻辑,很简单。只需要接口请求的时候的添加loading ,接口响应完成的时候删除loading。但是随之而来的就有一个问题,如果多个接口同时请求 或者 一个接口频繁请求需要覆盖的都是同一个dom,这样我们添加的loading就会有很多个相同的,相互覆盖。因此上述代码定义了一个loadingDom 记录当前正在loading的dom有哪些,如果有一样的进来的 就把count加一 ,结束后就把count减一。如果count为零则删除loading。
使用实例代码:
<template> <div> <div ref="head_dom">我是头部数据</div> <a-card ref="card_dom">我是卡片内容</a-card> </div> </template> <script setup lang="ts"> import post from \'@api/axios\' import ref, onMounted from \'vue\' const head_dom = ref() const card_dom = ref() //这边写了两个是为了演示下 直接在html标签上面绑定ref拿到的就是dom。在组件上面拿到的是组件实例要$el一下 onMounted(async () => const data1 = await post(`/api/head`, dom: head_dom.value ) const data2 = await post(`/api/card`, dom: card_dom.value.$el ) ) </script>
下面简单解释下hooks代码中QSpin组件的代码。
<template> <div v-show="visible" class="q-spin"> <spin tip="加载中" /> </div> </template> <script setup lang="ts"> import Spin from \'ant-design-vue\' import ref from \'vue\' const visible = ref(false) const show = (dom: HTMLElement) => visible.value = true dom.style.transform = dom.style.transform || `translate(0)` defineExpose( show ) </script> <style scoped lang="less"> .q-spin position: fixed; z-index: 999; top: 0; bottom: 0; left: 0; right: 0; display: flex; flex-direction: column; justify-content: center; align-items: center; background-color: rgb(0 0 0 / 10%); </style>
这里是对antdv3的Spin组件做了一个简单的二次封装。主要讲解的就是一个loading覆盖传入dom的方法。
大多数地方使用的方式都是 relative 和 absolute 定位组合的方式,但是这里采用了transform 和 fixed定位组合的方式。因为我们的项目中可能出现这样一种情况
  <div >
    <div ref="div_dom">
      <div >我是内容</div>
    </div>
  </div>
假如 我们要给中间的的div添加loading, 使用relative 和 absolute 定位组合的方式。那么中间的div就会在样式表种添加一个position: relative的属性,这样代码就会变成这样
 <div >
    <div  ref="div_dom">
      <div >我是内容</div>
    </div>
  </div>
很明显 我们第三层div定位的根节点就从第一层变成了第二层,这样就会有可能导致我们样式的错乱。因此笔者采用了transform 和 fixed定位组合的方式。虽然上述的情况可能还会出现 但是会大大减少出现的可能性。
全局loading
这个就很简单了。如果你封装好了局部的loading 直接在配置项的dom中传入document.body即可!
本文转载于:
https://juejin.cn/post/7215424335719923772
如果对您有所帮助,欢迎您点个关注,我会定时更新技术文档,大家一起讨论学习,一起进步。
thinkphp5和nginx不得不说的故事
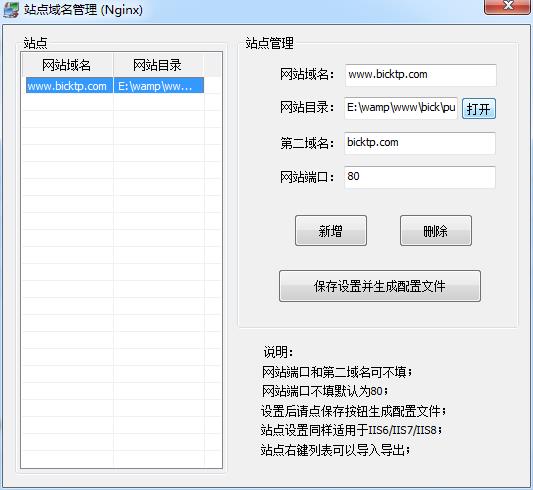
由于之前学习用的都是apsche,所以对ngnix一窍不通,在这里写给正在学习的同行,希望可以帮助到你们:
如果你不会用apache部署tp5的可以查看我之前发布的文章,里面有提到
phpstudy
参考:https://blog.csdn.net/qq_33862644/article/details/78174041
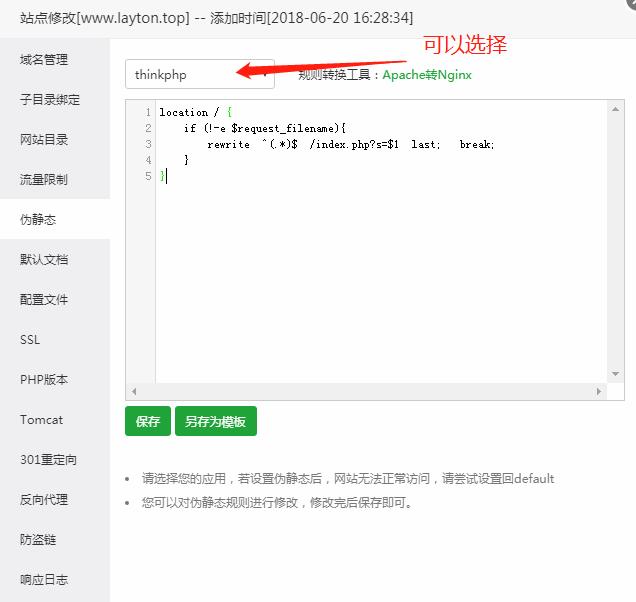
你切换ngnix之后,你只能访问tp5的首页,这时候点击其他事不能访问的到的,会报403错误,是因为你的pathinfo没有设置,这时候就需要伪静态了。
在“打开配置文件”中找到vhsts.conf,打开,然后配置伪静态的代码:
server {
        listen       80;
        server_name  www.bicktp.com bicktp.com;
        root   "E:\\wamp\\www\\bick\\public";
        location / {
            index  index.html index.htm index.php;
            autoindex  on;
            #伪静态配置
            if (!-e $request_filename){
           rewrite  ^(.*)$  /index.php?s=$1  last;
                break;
         }
        }
        location ~ \\.php(.*)$ {
            fastcgi_pass   127.0.0.1:9000;
            fastcgi_index  index.php;
            fastcgi_split_path_info  ^((?U).+\\.php)(/?.+)$;
            fastcgi_param  SCRIPT_FILENAME  $document_root$fastcgi_script_name;
            fastcgi_param  PATH_INFO  $fastcgi_path_info;
            fastcgi_param  PATH_TRANSLATED  $document_root$fastcgi_path_info;
            include        fastcgi_params;
        }
}
我有写注释的,你自己看着写吧。

然后在linux系统上部署也是一样的。
参考:https://www.cnblogs.com/fangziffff123/p/7588782.html
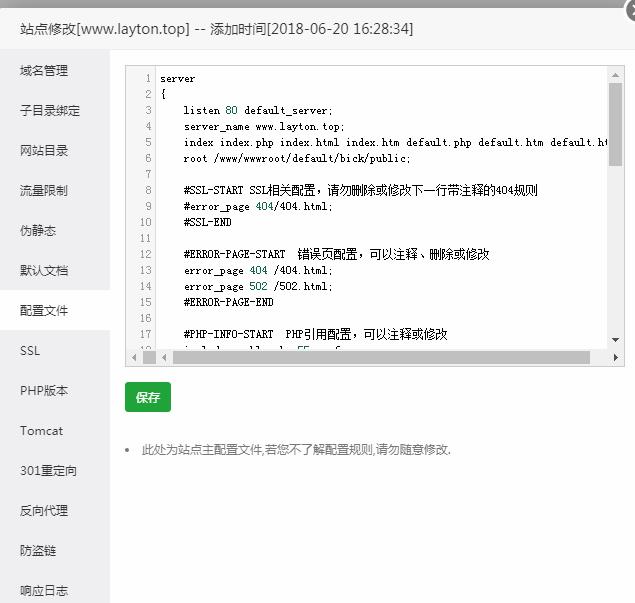
我用最原始的方法自己写不知道为什么运行不了,可能是某些代码缺失了吧,所以我是了第三方工具帮我配置->宝塔面板


那个配置文件基本不用谢,只写伪静态就可以了!!!
你们好,还是我,今天使用了thinkphp5.1,搭建环境是nginx,然后发现现在新版本的tp框架好像不用写伪静态都可以跑了,只是要写多一个index.php才能跑起来,这个让我有点不爽,很不雅观的好不好,万一这样让外人看见了,他们想上我什么办,于是我就去查了一下资料:
来源:
https://xieye.iteye.com/blog/2436835
主要加上try_files 指令就好,不多说,上代码:
server {
        listen       80;
        server_name  layton.com;
        root   "F:/phpstudy_pro/WWW/layton/public";
        location / {
            try_files  $uri  /index.php$uri$is_args$args;


            index index.php index.html /error/index.html;
            error_page  400  /error/400.html;
            error_page  403  /error/403.html;
            error_page  404  /error/404.html;
            error_page  500  /error/500.html;
            error_page  501  /error/501.html;
            error_page  502  /error/502.html;
            error_page  503  /error/503.html;
            error_page  504  /error/504.html;
            error_page  505  /error/505.html;
            error_page  506  /error/506.html;
            error_page  507  /error/507.html;
            error_page  508  /error/508.html;
            error_page  509  /error/509.html;
            error_page  510  /error/510.html;
            autoindex  off;
        }
        location ~ \\.php(.*)$ {
            fastcgi_pass   127.0.0.1:9000;
            fastcgi_index  index.php;
            fastcgi_split_path_info  ^((?U).+\\.php)(/?.+)$;
            fastcgi_param  SCRIPT_FILENAME  $document_root$fastcgi_script_name;
            fastcgi_param  PATH_INFO  $fastcgi_path_info;
            fastcgi_param  PATH_TRANSLATED  $document_root$fastcgi_path_info;
            include        fastcgi_params;
        }
}
以上是关于记录--axios和loading不得不说的故事的主要内容,如果未能解决你的问题,请参考以下文章
Visual Studio 20周年,我和VS不得不说的故事(内含福利)

