转载环境搭建docker+nginx部署PHP
Posted panbin_2006
tags:
篇首语:本文由小常识网(cha138.com)小编为大家整理,主要介绍了转载环境搭建docker+nginx部署PHP相关的知识,希望对你有一定的参考价值。
目的
使用docker容器完成nginx的安装以及部署PHP网页
步骤
一、 安装nginx
1. 拉取Nginx镜像
docker pull nginx       //拉取镜像
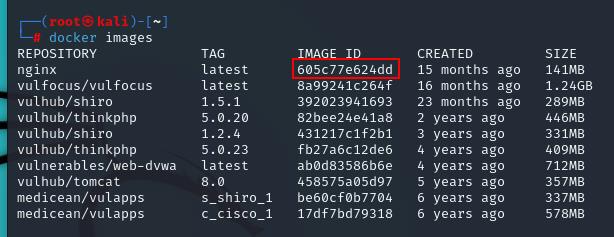
docker images           //查看本地镜像
这里注意需要记一下nginx的IMAGE ID,我这里的ID是605c

2. 创建Nginx容器
docker run --name nginx-test -p 80:80 -d nginx
- docker run : 是创建一个新容器并运行一个命令
- --name : 给容器起一个名字,指的是 nginx-test
- -p : 指定宿主机与容器内部端口的映射关系,-p [宿主机端口]:[容器内部端口],
- -d : 设置容器在在后台一直运行
- 最后面的 nginx 是镜像名称,也可以是镜像ID,例如上面提到的 “605c”
创建容器后使用docker ps即可查看正在运行的容器,这里我的容器ID是 902f

访问这台机器的ip加上端口号,如果返回Welcom to nginx则成功(如果设置映射的端口是80则可以不加端口)
3. 挂载文件
我们可以使用docker exec -it 902f /bin/bash进入容器内部进行配置文件的管理(容器就是一台linux机器),但是比较麻烦,我们可以将这台容器的文件挂载到我们本机,这样我们只要在本机修改文件即可。
容器内部的文件路径如下
/etc/nginx //配置文件目录
/usr/share/nginx/html //默认html文件目录
/var/log/nginx //日志文件
在合适的路径下新建nginx目录,这里我选择在/home/kali/下创建,进入/home/kali/nginx,然后将容器内的nginx.conf与default.conf分别复制到/home/kali/nginx和/home/kali/nginx/conf
docker cp 902f:/etc/nginx/nginx.conf ./
docker cp 902f:/etc/nginx/conf.d/default.conf ./conf/
注意容器ID不要填错,然后停止并删除这个容器,重新新建一个容器
docker stop 902f     //停止容器
docker rm 902f      //删除容器
新建容器,注意以下冒号前面的路径是刚才自己在本地新建的路径,冒号后面的是容器内的路径
docker run --name nginx-config -p 80:80 -v /home/kali/nginx/nginx.conf:/etc/nginx/nginx.conf -v /home/kali/nginx/logs:/var/log/nginx -v /home/kali/nginx/html:/usr/share/nginx/html -v /home/kali/nginx/conf:/etc/nginx/conf.d \\
--privileged=true -d 605c                 //这里的605c是镜像ID
-v:挂载目录,-v[宿主机路径]:[容器内路径]
完成后本机的nginx路径下会有如下文件,说明成功

更改nginx文件夹的权限chmod -R 777 ./nginx
在/home/kali/nginx/html目录下添加网页即可访问,到此Nginx的安装已经结束,删除此容器
docker stop 916
docker rm 916
二、 安装PHP
1. 拉取PHP镜像
docker pull php:7.4-fpm         //拉取PHP镜像
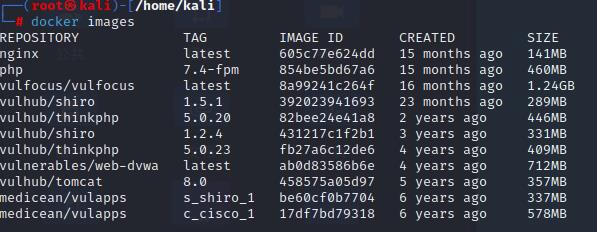
docker images                   //查看本地镜像

记下PHP的IMAGE ID是 854
2. 创建PHP容器同时挂载文件
docker run --name php-test -v /home/kali/nginx/html:/www -p 9000:9000 -d 854
--name:给容器起名为php-test
-v :挂载目录
docker run --name nginx-test -p 80:80 -v /home/kali/nginx/nginx.conf:/etc/nginx/nginx.conf -v /home/kali/nginx/logs:/var/log/nginx -v /home/kali/nginx/html:/usr/share/nginx/html -v /home/kali/nginx/conf:/etc/nginx/conf.d \\
--privileged=true --link php-test:php -d 605c               //这里的605c是镜像ID
--link:把 php-test 容器的网络并入 nginx,并通过修改 nginx 的 /etc/hosts,把域名 php 映射成 127.0.0.1,让 nginx 通过 php:9000 访问 php-test
修改/home/kali/nginx/conf/default.conf为以下内容
server
    listen       80;
    server_name  localhost;

    location /
        root   /www;
        index  index.html index.htm index.php;


    error_page   500 502 503 504  /50x.html;
    location = /50x.html
        root   /www;


    location ~ \\.php$
        fastcgi_pass   php:9000;
        fastcgi_index  index.php;
        fastcgi_param  SCRIPT_FILENAME  /www$fastcgi_script_name;
        include        fastcgi_params;
用docker restart [container_id]重启容器,在html文件夹中添加php文件访问即可
转载自【环境搭建】docker+nginx部署PHP - Mr_Soap - 博客园 (cnblogs.com)
docker部署lnmp环境
Dokcer部署php项目
一,LNMP环境搭建
1,网段规划:172.18.10.0/24
| 172.18.10.10 | Nginx容器 |
|---|---|
| 172.18.10.20 | MySQL容器 |
| 172.18.10.30 | php容器 |
| 172.18.10.40 | crawl容器 |
2,镜像版本选择
Nginx : nginx:latest
mysql : mysql:latest
PHP   : php:7.3-fpm
python: python:3.7
3,拉取镜像
docker pull nginx
docker pull mysql
docker pull php:7.3-fpm
docker pull python:3.7
4,设置网络
创建一个自定义桥接网络
docker network create -d bridge --subnet 172.18.10.0/24 --gateway 172.18.10.1 LNMP
5,nginx容器配置
# 运行一个测试容器
docker run  -itd --name  test-nginx nginx

# 拷贝配置文件
docker cp test-nginx:/etc/nginx /data/ngx_config
# 拷贝网站目录
docker cp test-nginx:/usr/share/nginx/html /data/ngx_www

# 删除测试容器
docker rm -f test-nginx

# 运行nginx容器
docker run -itd --name nginx-01 -v /data/ngx_config:/etc/nginx -v /data/ngx_www:/code -v /data/ngx_logs:/var/log/nginx -p 80:80 -p 8080:8080 --network LNMP  --ip 172.18.10.10 nginx:latest
6,MySQL容器配置
# 运行测试MySQL容器
docker run -itd --name test-mysql -e MYSQL_ROOT_PASSWORD=1QAZ2WSX_www mysql:latest

# 拷贝MySQL配置文件
docker cp test-mysql:/etc/mysql/conf.d /data/sql_config

# 删除测试容器
docker rm -f test-mysql

# 运行MySQL容器
docker run -it -d -p3306:3306 -v /data/sql_config:/etc/mysql/conf.d -v /data/sql_data:/var/lib/mysql -v /etc/localtime:/etc/localtime --name mysql-01 -e MYSQL_ROOT_PASSWORD=1QAZ2WSX_www --network LNMP --ip 172.18.10.20 mysql:latest
7,Dockerfile构建php镜像
[root@docker project]# cat dockerfile-php
# 从官方基础版本构建
FROM php:7.3-fpm

RUN docker-php-ext-install -j$(nproc) gettext sockets pdo mysqli pcntl pdo_mysql iconv

RUN apt-get update  && apt-get install -y zlib1g-dev libicu-dev g++ telnet vim iputils-ping net-tools  libfreetype6-dev libjpeg62-turbo-dev  libpng-dev

# mysqli扩展
RUN cd /usr/local/bin/ \\
    && ./docker-php-ext-install gd mysqli \\
    && ./docker-php-ext-enable gd mysqli

# GD 扩展
#RUN rm -r /var/lib/apt/lists/* \\
#    && docker-php-ext-configure gd --with-jpeg=/usr/include/ --with-freetype=/usr/include/ \\
#    && docker-php-ext-install -j$(nproc) gd

# insl 扩展
RUN docker-php-ext-configure intl && docker-php-ext-install intl

# imagick 扩展
#RUN export CFLAGS="$PHP_CFLAGS" CPPFLAGS="$PHP_CPPFLAGS" LDFLAGS="$PHP_LDFLAGS" \\
#    && apt-get install -y --no-install-recommends libmagickwand-dev \\
#    && rm -r /var/lib/apt/lists/* \\
#    && pecl install imagick-3.4.4 \\
#    && docker-php-ext-enable imagick

# mcrypt 扩展
#RUN apt-get install -y --no-install-recommends libmcrypt-dev \\
#    && rm -r /var/lib/apt/lists/* \\
#    && pecl install mcrypt-1.0.2 \\
#    && docker-php-ext-enable mcrypt

# redis 扩展
RUN pecl install redis && docker-php-ext-enable redis

# xdebug 扩展
RUN pecl install xdebug && docker-php-ext-enable xdebug

# yaf 扩展
RUN pecl install yaf-3.1.4 && docker-php-ext-enable yaf

# swoole 扩展
#RUN pecl install swoole-4.4.0 && docker-php-ext-enable swoole

# opcache 扩展
#RUN docker-php-ext-configure opcache --enable-opcache && docker-php-ext-install opcache


# 镜像信息
LABEL Author="xiaoxu"
LABEL Version="2021.6"
LABEL Description="PHP 7.4-fpm"


$(构建php镜像)
docker build -f dockerfile-php -t myphp .
# 创建测试容器
docker run -itd --name test-php php:7.3-fpm
# 拷贝php配置文件
docker cp test-php:/usr/local/ /data/php_config/
# 删除测试容器
docker rm -f test-php

# 运行php容器
docker run -itd --name  php-01 -p 9000:9000 -v /data/ngx_www:/code -v /data/php_config:/usr/local/ -v /etc/localtime:/etc/localtime --network LNMP  --ip 172.18.10.30 php:v1
7,配置nginx连接php
# vim /data/ngx_config/conf.d/default.conf
index  index.php index.html index.htm; #添加文件类型

    location ~ \\.php$
        root   /usr/share/nginx/html; #修改请求文件路径
        fastcgi_pass   172.18.10.30:9000;
        fastcgi_index  index.php;
        fastcgi_param  SCRIPT_FILENAME /usr/share/nginx/html$fastcgi_script_name;
        include        fastcgi_params;


# 测试nginx和php连接
echo "LNMP" > /data/ngx_www/index.html
cat > /data/ngx_www/test.php << EOF
<?php
    phpinfo();
?>
EOF

# 重启nginx容器
docker restart nginx-01
9,搭建wordpress
# 下载并解压到代码发布目录
wget https://wordpress.org/latest.zip && unzip -d /data/ngx_www/ latest.zip

# 修改网站配置文件
vim /data/ngx_config/conf.d/default.conf
    location /
        root   /code/wordpress;
        index  index.html index.htm index.php;

    location ~ \\.php$
        fastcgi_pass   172.18.10.30:9000;
        fastcgi_index  index.php;
        fastcgi_param  SCRIPT_FILENAME  /code/wordpress$fastcgi_script_name;
        include        fastcgi_params;


# 重启nginx
docker restart nginx-01

# 数据库授权用户
docker exec -it mysql-01 /bin/bash
mysql -uroot -p1QAZ2WSX_www
create database wordpress charset utf8mb4;
create user 'wp'@'%' identified by '1QAZ2WSX_www';
GRANT ALL PRIVILEGES ON wordpress.* TO 'wp'@'%' WITH GRANT OPTION;
ALTER USER 'wp'@'%' IDENTIFIED WITH mysql_native_password BY '1QAZ2WSX_www';
ALTER USER 'root'@'%' IDENTIFIED WITH mysql_native_password BY '1QAZ2WSX_www';
flush privileges;


# 修改wordpress连接数据库代码
cd /data/ngx_www/wordpress/ && cp wp-config-sample.php wp-config.php && vim wp-config.php

/** The name of the database for WordPress */
define( 'DB_NAME', 'wordpress' );
/** MySQL database username */
define( 'DB_USER', 'wp' );
/** MySQL database password */
define( 'DB_PASSWORD', '1QAZ2WSX_www' );
/** MySQL hostname */
define( 'DB_HOST', '172.18.10.20' );
/** Database Charset to use in creating database tables. */
define( 'DB_CHARSET', 'utf8mb4' );


# 修改文件
sed -i "s/mysql_connect/mysqli_connect/g" /data/ngx_www/wordpress/wp-includes/wp-db.php
10,测试php连接数据库
# vim /data/ngx_www/wordpress/test.php
<?php
    $servername = "172.18.10.20";
    $username = "wp";
    $password = "1QAZ2WSX_www";
    // 创建连接
    $conn = mysqli_connect($servername, $username, $password);
    // 检测连接
    if (!$conn)
         die("Connection failed: " . mysqli_connect_error());

    echo "php连接MySQ成功...";
?>

<img style='width:100%;height:100%;'src=https://blog.driverzeng.com/zenglaoshi/php_mysql.png>
以上是关于转载环境搭建docker+nginx部署PHP的主要内容,如果未能解决你的问题,请参考以下文章