SpringBoot+MyBatis+MySQL电脑商城项目实战用户注册—控制层
Posted shionlingfan
tags:
篇首语:本文由小常识网(cha138.com)小编为大家整理,主要介绍了SpringBoot+MyBatis+MySQL电脑商城项目实战用户注册—控制层相关的知识,希望对你有一定的参考价值。
5 注册-控制层
5.1 创建响应
状态码、状态码描述信息、数据。这部分功能封装到一个类中,将这类作为方法返回值,返回给前端浏览器。
package com.cy.store.util;

import java.io.Serializable;


/**
 * Json格式的数据进行响应
 */
public class JsonResult<E> implements Serializable
    //状态码
    private Integer state;
    //描述信息
    private String message;
    //数据类型不确定,声明称泛型
    private E data;

    public JsonResult()


    public JsonResult(Integer state)
        this.state = state;

    public JsonResult(Throwable e)
        this.message = e.getMessage();


    public JsonResult(Integer state, E data)
        this.state = state;
        this.data = data;


    public Integer getState()
        return state;


    public void setState(Integer state)
        this.state = state;


    public String getMessage()
        return message;


    public void setMessage(String message)
        this.message = message;


    public E getData()
        return data;


    public void setData(E data)
        this.data = data;
5.2 设计请求
依据当前的业务功能模块进行请求的设计。
请求路径:/users/reg
请求参数:User user
请求类型:敏感类型用POST,没有用GET
响应结果:JsonResult
5.3 处理请求
- 创建一个控制层对应的类UserController类。依赖于业务层的接口。
package com.cy.store.controller;

import com.cy.store.entity.User;
import com.cy.store.service.IUserService;
import com.cy.store.service.ex.InsertException;
import com.cy.store.service.ex.UsernameDuplicatedException;
import com.cy.store.util.JsonResult;
import org.springframework.beans.factory.annotation.Autowired;
import org.springframework.stereotype.Controller;
import org.springframework.web.bind.annotation.RequestMapping;
import org.springframework.web.bind.annotation.ResponseBody;
import org.springframework.web.bind.annotation.RestController;

// @Controller
@RestController //controller+ResponseBody
@RequestMapping("users")
public class UserController

    @Autowired
    private IUserService userService;
    @RequestMapping("reg")
    // @ResponseBody //表示此方法的响应结果以json格式进行数据的相应给到前端,为了防止在所有方法上添加,在类上使用注解 @RestController
    public JsonResult<Void> reg(User user)
        // 创建响应结果对象
        JsonResult<Void> result = new JsonResult<>();
        try
            userService.reg(user);
            result.setState(200);
            result.setMessage("注册成功");
         catch (UsernameDuplicatedException e)
            result.setState(400);
            result.setMessage("用户名被占用");
        catch (InsertException e)
            result.setState(500);
            result.setMessage("注册时产生未知的异常");

        return result;
- 启动服务,在浏览器输入访问地址,可以看到成功输出信息

再次访问该地址,报用户名占用异常

去数据库查看生成的用户名信息

5.4 控制层优化设计
在控制层抽离一个父类,在这个父类中统一的去处理关于异常的相关操作,编写一个BaseController类,统一处理异常。
package com.cy.store.controller;

import com.cy.store.service.ex.InsertException;
import com.cy.store.service.ex.ServiceException;
import com.cy.store.service.ex.UsernameDuplicatedException;
import com.cy.store.util.JsonResult;
import org.springframework.web.bind.annotation.ExceptionHandler;

/**
 * 控制层类的基类
 */
public class BaseController
    /**
     * 操作成功的状态
     */
    public static  final int OK = 200;

    //请求处理方法,这个方法的返回值就是需要传递给前端的数据
    //自动将异常对象传递给此方法的参数列表上
    //当前项目中产生了异常,会被统一拦截到此方法中,这个方法此时就充当的是请求处理方法,方法的返回值直接给到前端。
    @ExceptionHandler(ServiceException.class)  //用于统一处理抛出的异常
    public JsonResult<Void> handleException(Throwable e)
            JsonResult<Void> result = new JsonResult<>(e);
            if (e instanceof UsernameDuplicatedException)
                result.setState(4000);
                result.setMessage("用户名已经被占用");
             else if (e instanceof InsertException)
                result.setState(5000);
                result.setMessage("注册时产生未知的异常");

            return result;
重新构建了reg()方法
// @Controller
@RestController //controller+ResponseBody
@RequestMapping("users")
public class UserController extends BaseController

    @Autowired
    private IUserService userService;
    @RequestMapping("reg")
    // @ResponseBody //表示此方法的响应结果以json格式进行数据的相应给到前端,为了防止在所有方法上添加,在类上使用注解 @RestController
    public JsonResult<Void> reg(User user)
        userService.reg(user);
        return  new JsonResult<>(OK);
springboot+mybatis+Druid配置多数据源(mysql+postgre)
引入pom依赖
设置application多数据源
config配置
db1config配置(主数据库配置)
db2config配置(其他数据库)
事务处理
mapper层
springboot+mybatis+Druid配置多数据源(mysql+postgre)
参考资料:
第八章 springboot + mybatis + 多数据源
springboot + mybatis + druid + 多数据源
springBoot 动态数据源以及Mybatis多数据源
springboot - mybatis连接多数据源(动态)
引入pom依赖
<dependency>
    <groupId>org.mybatis.spring.boot</groupId>
    <artifactId>mybatis-spring-boot-starter</artifactId>
    <version>1.3.1</version>
</dependency>
        <!--阿里druid数据库链接依赖-->
        <dependency>
            <groupId>com.alibaba</groupId>
            <artifactId>druid-spring-boot-starter</artifactId>
            <version>1.1.9</version>
        </dependency>
        <!--事务管理:原子性,一致性,隔离性,持久性-->
        <dependency>
            <groupId>org.springframework.boot</groupId>
            <artifactId>spring-boot-starter-jdbc</artifactId>
        </dependency>
         <!--mysql数据库-->
        <dependency>
            <groupId>mysql</groupId>
            <artifactId>mysql-connector-java</artifactId>
            <scope>runtime</scope>
        </dependency>
        <!--postgresql数据库-->
        <dependency>
            <groupId>org.postgresql</groupId>
            <artifactId>postgresql</artifactId>
        </dependency>
设置application多数据源
只是在原有的数据库配置外层添加了db1,db2,用来区分数据库;
注意:url使用的是jdbc的
jdbc-urldurid无需改变
spring:
  datasource:
    db1: #配置数据源1:此处配置的mysql数据库
      driverClassName: com.mysql.jdbc.Driver
      username: root
      password: 123456
      # spring2.0此处为jdbc-url
      jdbc-url: jdbc:mysql://127.0.0.1:3306/aa?useUnicode=true&characterEncoding=UTF-8&allowMultiQueries=true
      type: com.alibaba.druid.pool.DruidDataSource
    db2: #配置数据源2,此处配置的是postgre数据库
      jdbc-url: jdbc:postgresql://127.0.0.1:5432/test1
      username: postgres
      password: 123456
      driverClassName: org.postgresql.Driver
  #    platform: postgres
      type: com.alibaba.druid.pool.DruidDataSource
      initialization-mode: always
    # ============================== druid ============================== #
    druid:
      #最大活跃数
      maxActive: 20
      #初始化数量
      initialSize: 1
      #最大连接等待超时时间
      maxWait: 60000
      #打开PSCache,并且指定每个连接PSCache的大小
      poolPreparedStatements: true
      maxPoolPreparedStatementPerConnectionSize: 20
      #通过connectionProperties属性来打开mergeSql功能;慢SQL记录
      #connectionProperties: druid.stat.mergeSql=true;druid.stat.slowSqlMillis=5000
      minIdle: 1
      timeBetweenEvictionRunsMillis: 60000
      minEvictableIdleTimeMillis: 300000
      validationQuery: select 1 from dual
      testWhileIdle: true
      testOnBorrow: false
      testOnReturn: false
      #配置监控统计拦截的filters,去掉后监控界面sql将无法统计,\'wall\'用于防火墙
      filters: stat, wall, log4j
config配置
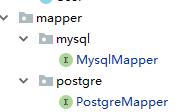
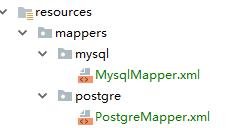
注意:两个数据库的xml文件和mapper文件需要分开放置
db1config配置(主数据库配置)
注意:db1设置为了主数据库,则需要配置注解
@Primary
import javax.sql.DataSource;

import org.apache.ibatis.session.SqlSessionFactory;
import org.mybatis.spring.SqlSessionFactoryBean;
import org.mybatis.spring.SqlSessionTemplate;
import org.mybatis.spring.annotation.MapperScan;
import org.springframework.beans.factory.annotation.Qualifier;
import org.springframework.boot.context.properties.ConfigurationProperties;
import org.springframework.boot.jdbc.DataSourceBuilder;
import org.springframework.context.annotation.Bean;
import org.springframework.context.annotation.Configuration;
import org.springframework.context.annotation.Primary;
import org.springframework.core.io.support.PathMatchingResourcePatternResolver;
import org.springframework.jdbc.datasource.DataSourceTransactionManager;

/**主数据源mysql配置(需要加@Primary)
* mysql data source config
*
* @author 荆世玉
* @date 2019/2/26 9:07:16
* @description postgresql data source config
*/
@Configuration
//注入mapper
@MapperScan(basePackages = "net.cc.commons.mapper.mysql.**", sqlSessionTemplateRef = "db1SqlSessionTemplate")
public class DataSource1Config {

    @Bean
    @Primary
    @ConfigurationProperties(prefix = "spring.datasource.db1")//设置配置
    public DataSource db1DataSource() {
        return DataSourceBuilder.create().build();
    }

    @Bean
    @Primary
    public SqlSessionFactory db1SqlSessionFactory(@Qualifier("db1DataSource") DataSource dataSource) throws Exception {
        SqlSessionFactoryBean bean = new SqlSessionFactoryBean();
        bean.setDataSource(dataSource);
        //设置对应的xml文件位置
        bean.setMapperLocations(new PathMatchingResourcePatternResolver().getResources("classpath*:mappers/mysql/*.xml"));
        return bean.getObject();
    }

    @Bean
    @Primary
    public DataSourceTransactionManager db1TransactionManager(@Qualifier("db1DataSource") DataSource dataSource) {
        return new DataSourceTransactionManager(dataSource);
    }

    @Bean
    @Primary
    public SqlSessionTemplate db1SqlSessionTemplate(@Qualifier("db1SqlSessionFactory") SqlSessionFactory sqlSessionFactory) throws Exception {
        return new SqlSessionTemplate(sqlSessionFactory);
    }

}
db2config配置(其他数据库)
注意:
1.虽然数据库不同,但是配置相同,只是其他数据库不需要添加
@Primary注解;2.bean的名字不能重复
import javax.sql.DataSource;

import org.apache.ibatis.session.SqlSessionFactory;
import org.mybatis.spring.SqlSessionFactoryBean;
import org.mybatis.spring.SqlSessionTemplate;
import org.mybatis.spring.annotation.MapperScan;
import org.springframework.beans.factory.annotation.Qualifier;
import org.springframework.boot.context.properties.ConfigurationProperties;
import org.springframework.boot.jdbc.DataSourceBuilder;
import org.springframework.context.annotation.Bean;
import org.springframework.context.annotation.Configuration;
import org.springframework.core.io.support.PathMatchingResourcePatternResolver;
import org.springframework.jdbc.datasource.DataSourceTransactionManager;

/**
* postgresql 配置(无需@Primary)
*
* @author 荆世玉
* @date 2019/2/26 9:07:16
* @description postgresql data source config
*/
@Configuration
//注入mapper
@MapperScan(basePackages = "net.cc.commons.mapper.postgre.**", sqlSessionTemplateRef = "db2SqlSessionTemplate")
public class DataSource2Config {

    @Bean
    @ConfigurationProperties(prefix = "spring.datasource.db2")
    public DataSource db2DataSource() {
        return DataSourceBuilder.create().build();
    }

    @Bean
    public SqlSessionFactory db2SqlSessionFactory(@Qualifier("db2DataSource") DataSource dataSource) throws Exception {
        SqlSessionFactoryBean bean = new SqlSessionFactoryBean();
        bean.setDataSource(dataSource);
        bean.setMapperLocations(new PathMatchingResourcePatternResolver().getResources("classpath*:mappers/postgre/*.xml"));
        return bean.getObject();
    }

    @Bean
    public DataSourceTransactionManager db2TransactionManager(@Qualifier("db2DataSource") DataSource dataSource) {
        return new DataSourceTransactionManager(dataSource);
    }

    @Bean
    public SqlSessionTemplate db2SqlSessionTemplate(@Qualifier("db2SqlSessionFactory") SqlSessionFactory sqlSessionFactory) throws Exception {
        return new SqlSessionTemplate(sqlSessionFactory);
    }
}
事务处理
注入事务的时候需要标明对应数据库(主数据库可以不用设置)
如:db2的数据库的事务"
@Transactional(value = "db2TransactionManager")mapper层
不同数据库的mapper文件不能载同一个包中,config在注入时会注入错误;
使用时,与单数据源时一致
    @Select("select * from table_1 ")
    public List<Table1> all();
    public List<Table1> all2();
<?xml version="1.0" encoding="UTF-8"?>
<!DOCTYPE mapper PUBLIC "-//mybatis.org//DTD Mapper 3.0//EN" "http://mybatis.org/dtd/mybatis-3-mapper.dtd">
<mapper namespace="net.cc.commons.mapper.mysql.MysqlMapper">
<select id="all2" resultType="net.cc.commons.entity.Table1">
select * from table_1
</select>
</mapper>[{"id1":1,"id2":23,"id3":2222},{"id1":2,"id2":2222,"id3":111}]以上是关于SpringBoot+MyBatis+MySQL电脑商城项目实战用户注册—控制层的主要内容,如果未能解决你的问题,请参考以下文章

