head first python选读
Posted 葡萄美酒夜光杯
tags:
篇首语:本文由小常识网(cha138.com)小编为大家整理,主要介绍了head first python选读相关的知识,希望对你有一定的参考价值。
python web 开发
犯了低级错误,这本书看了一半了才知道书名应为《head first python》,不是hand first..
现在开始一个web应用。
总算是熟悉的内容了。但项目的总体的配置还是有些麻烦的。
考虑到Kelly教练的不断变更的需求,现在需要开发一个网站。包括:
- 欢迎页面
- 选择选手
- 显示时间
MVC模式和架构
- M 模型:数据储存。你需要一个model模块,用一个函数比如set把txt文件读出来,变成一个pickle,所有数据放到一个字典里
- V 视图:前端界面
- C 控制:业务代码。用一个get方法把数据取出来!返回一个数据字典。
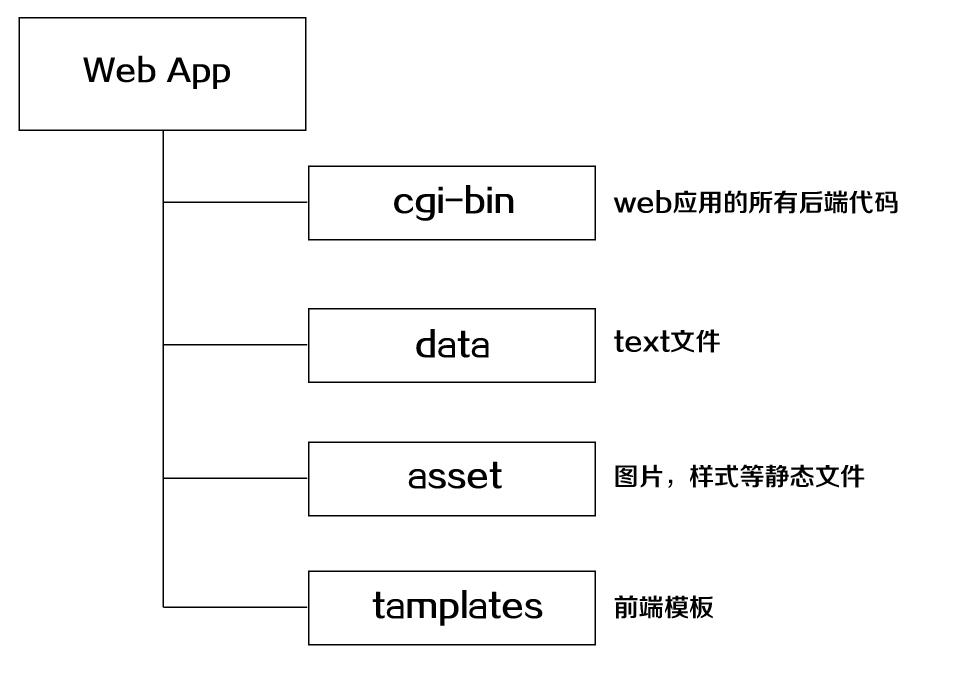
现在来思考架构吧:

在根目录下以下代码可在本地运行一个基于python的简单的http服务器
# app.py
from http.server import HTTPServer, CGIHTTPRequestHandler

port = 8080

httpd = HTTPServer((\'\', port), CGIHTTPRequestHandler)
print("Starting simple_httpd on port: " + str(httpd.server_port))
httpd.serve_forever()
这个app.py是所有文件的入口。因此所有的文件都依靠这个文件进行交互。路径以根目录为主。
看到这个就显示成功了

添加index.html可完成欢迎页的开发.
模型
模型有两个文件
# athletelist.py
def sanitize(score):
    splitter = \'.\'
    if \'-\' in score:
        splitter = \'-\'
    if \':\' in score:
        splitter = \':\'
    elif \'.\' in splitter:
        return score
    (mins , sec) = score.split(splitter)
    return mins+\'.\'+sec

class AthleteList(list):
    def __init__(self, a_name, a_birth=None, a_scores=[]):
        list.__init__(list([]))
        self.name = a_name
        self.birth = a_birth
        self.extend(a_scores)
    def top3(self):
        return sorted(set([sanitize(score) for score in self]))[0:3]
然后把逻辑写好
# athleteModal.py
import pickle
from athletelist import AthleteList

def get(filename):
    try:
        with open(filename) as data:
            line = data.readline()
            scores = line.split(\',\')
            return AthleteList(scores.pop(0), scores.pop(0), scores)
    except IOError as err:
        print(\'file error.\'+str(err))


# 把读取的数据转化为二进制文件,提供一个文件名列表作为参数
def set_data(file_list):
    all_athletes={}
    for item in file_list:
        with open(item) as data:
            ath=get(item)
            all_athletes[ath.name]=ath
    try:
        pickle.dump(all_athletes,open(\'db\',\'wb\'))
    except IOError as ioerr:
        print(\'file err:\'+str(ioerr))
    print(\'set_data finished.\')
    return all_athletes

# 从二进制文件中读取数据,
def get_from_store():
    all_athletes={}
    data=pickle.load(open(\'db\',\'rb\'))
    all_athletes=data
    print(all_athletes)
    return all_athletes

set_data([\'james.txt\',\'julie.txt\',\'sarah.txt\',\'mickey.txt\'])

看到了熟悉的JSON!
模板引擎
模板引擎会用到一些新的方法,在此需要读懂。
from string import Template
# 从内置的string库导入Template类,可支持字符串替换模板
def start_response(resp="text/html"):
return(\'Content-type: \' + resp + \'\\n\\n\')
# 创建一个content-type:缺省为text-html
def include_header(the_title):
with open(\'templates/header.html\') as headf:
head_text = headf.read()
header = Template(head_text)
return(header.substitute(title=the_title))
# 打开header.html,设置网站标题
def include_footer(the_links):
with open(\'templates/footer.html\') as footf:
foot_text = footf.read()
link_string = \'\'
for key in the_links:
link_string += \'<a href="\' + the_links[key] + \'">\' + key + \'</a> \'
footer = Template(foot_text)
return(footer.substitute(links=link_string))
# 打开 footer文件,渲染脚部链接
def start_form(the_url, form_type="POST"):
return(\'<form action="\' + the_url + \'" method="\' + form_type + \'">\')
# 生成一个post表单,表单跳转action
def end_form(submit_msg="Submit"):
return(\'<p></p><input type=submit value="\' + submit_msg + \'"></form>\')
# 提交按钮
def radio_button(rb_name, rb_value):
return(\'<input type="radio" name="\' + rb_name +\'" value="\' + rb_value + \'"> \' + rb_value + \'<br />\')
# 渲染单选框
def u_list(items):
u_string = \'<ul>\'
for item in items:
u_string += \'<li>\' + item + \'</li>\'
u_string += \'</ul>\'
return(u_string)
# 渲染无序列表
def header(header_text, header_level=2):
return(\'<h\' + str(header_level) + \'>\' + header_text +
\'</h\' + str(header_level) + \'>\')
# 渲染标题
def para(para_text):
return(\'<p>\' + para_text + \'</p>\')
#渲染内容
前端模板怎么响应这个cgi呢?简单写一下吧。用$表示变量。
header:
<html>
<head>
<title>$title</title>
<link type="text/css" rel="stylesheet" href="/coach.css" />
</head>
<body>
<h1>$title</h1>
footer:
<p>
$links
</p>
</body>
</html>
创建列表逻辑
现在创建一个gen_liust.py,要求执行选手时,生成一个选择选手的页面。你所要做的就是阅读模板引擎文档。
# gen_list.py
# 创建选手列表
import athletemodel
import fe
import glob
# glob可向操作系统查询一个文件名列表

# 查询,返回列表
data_files=glob.glob(\'data/*.txt\')

#读取数据
athletemodel.set_data(data_files)
athletes=athletemodel.get_from_store()

print(fe.start_response())
print(fe.include_header(\'web_app\'))
print(fe.start_form(\'http://www.baidu.com\'))
print(fe.para(\'Select a athlete\'))
for athlete in athletes:
    print(fe.radio_button(\'select_athlete\',athletes[athlete].name))
print(fe.end_form())


print(fe.include_footer({\'home\':\'/index.html\'}))
在首页文件中,a标签为<a href="cgi-bin/gen_list.py">
即可跳转相应的页面。

创建数据界面
显示某人的计时数据和快捷链接。
获取post上传数据L
import cgi
form_data=cgi
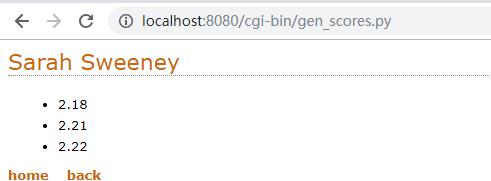
剩下的很好做了:
import cgi
import fe
import athletemodel

athletes=athletemodel.get_from_store()

#获取表单数据并放到一个字典中
form_data=cgi.FieldStorage()
athlete_name=form_data[\'name\'].value


# 渲染页面
print(fe.start_response())
print(fe.include_header(athlete_name))
print(fe.u_list(athletes[athlete_name].top3()))

print(fe.include_footer({\'home\':\'/index.html\',\'back\':\'gen_list.py\'}))

表单校验,错误记录
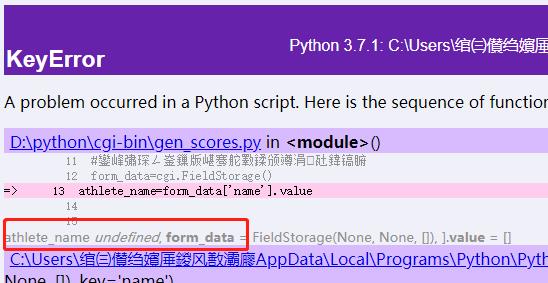
如果我在表单啥子也不填就提交。就很难跟踪错误所在.
实际开发过程中,调bug会花费很多时间。应该想办法在web服务器上友好地显示错误信息。
import cgitb
cgitb.enable()

显然就可以找到原因所在了。
以上是关于head first python选读的主要内容,如果未能解决你的问题,请参考以下文章