Matplotlib.pyplot.plot 绘图
Posted VipSoft
tags:
篇首语:本文由小常识网(cha138.com)小编为大家整理,主要介绍了Matplotlib.pyplot.plot 绘图相关的知识,希望对你有一定的参考价值。
Matplotlib.pyplot 创建图形、在图形中创建创建一个绘图区域、在绘图区域中你那个绘制一些线、在图形中添加标签之类
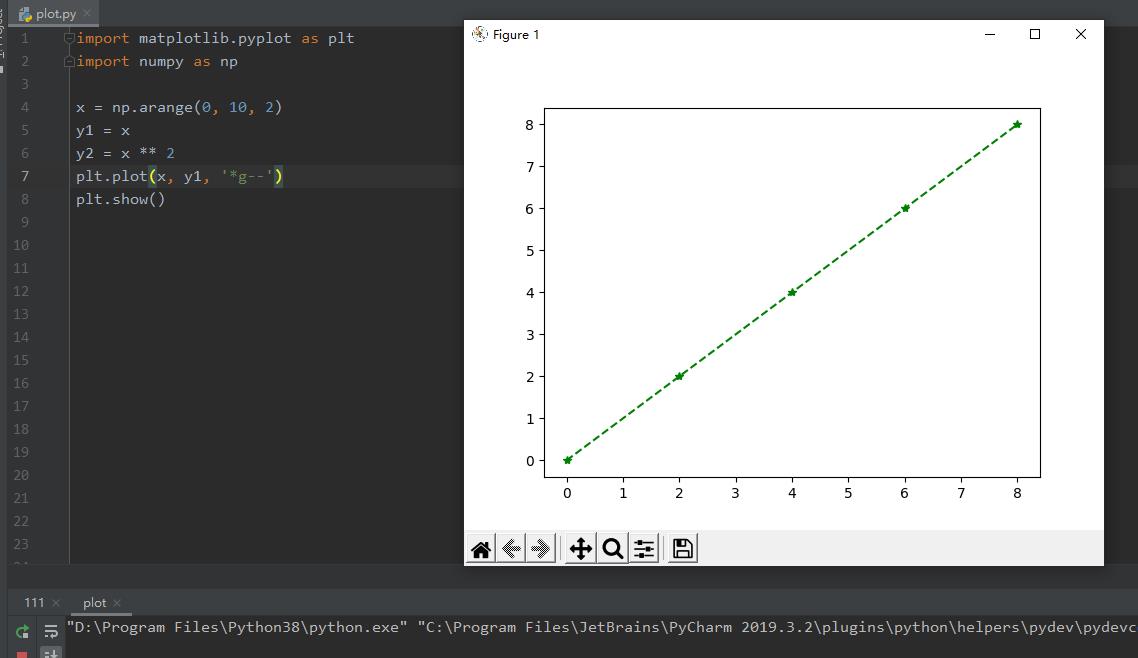
画二维平面图
x = np.arange(0, 10, 2)
y1 = x
y2 = x ** 2
plt.plot(x, y1, \'*g--\') #g 表示颜色
plt.show()
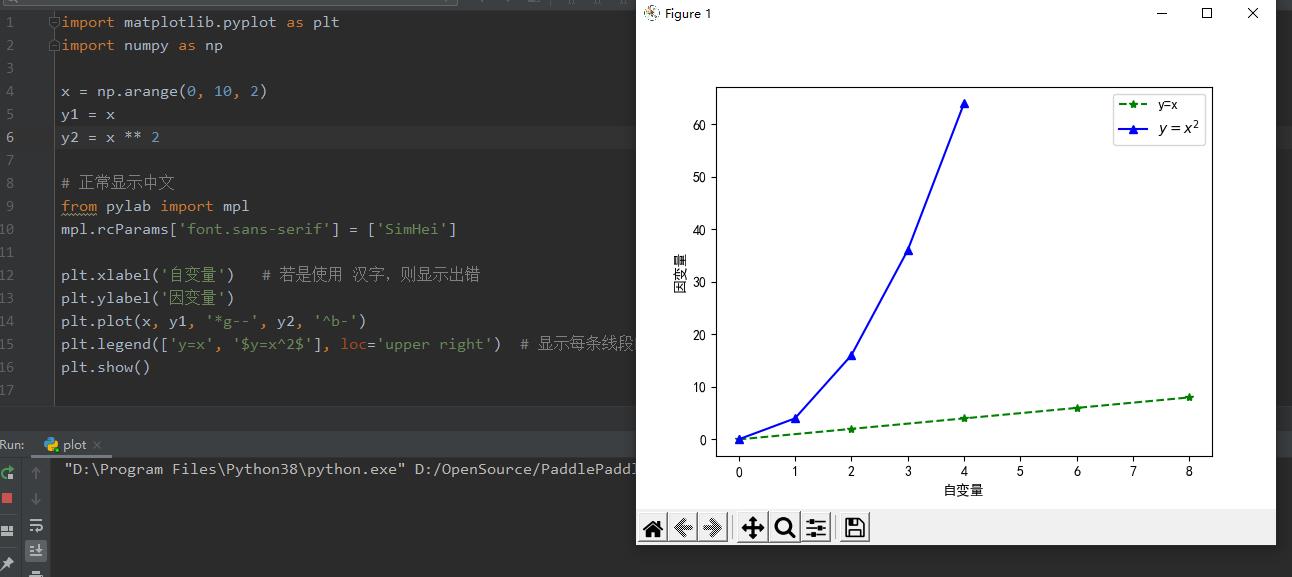
同一个坐标系里画多条线段
import matplotlib.pyplot as plt
import numpy as np

x = np.arange(0, 10, 2)
y1 = x
y2 = x ** 2

# 正常显示中文
from pylab import mpl
mpl.rcParams[\'font.sans-serif\'] = [\'SimHei\']

plt.xlabel(\'自变量\')   # 若是使用 汉字,则显示出错
plt.ylabel(\'因变量\')
plt.plot(x, y1, \'*g--\', y2, \'^b-\')
plt.legend([\'y=x\', \'$y=x^2$\'], loc=\'upper right\')  # 显示每条线段的解释, $$ 里是 LaTeX语句
# 保存图片
plt.savefig(\'./Big Title.png\')
# 防止图片部分缺失 方法一 增大画布
fig = plt.figure(figsize=(8,4))
# 防止图片部分缺失 方法一 紧致布局
plt.tight_layout()
#增大分辨率
plt.savefig(\'./Big Title.png\', dpi=400)
plt.show()
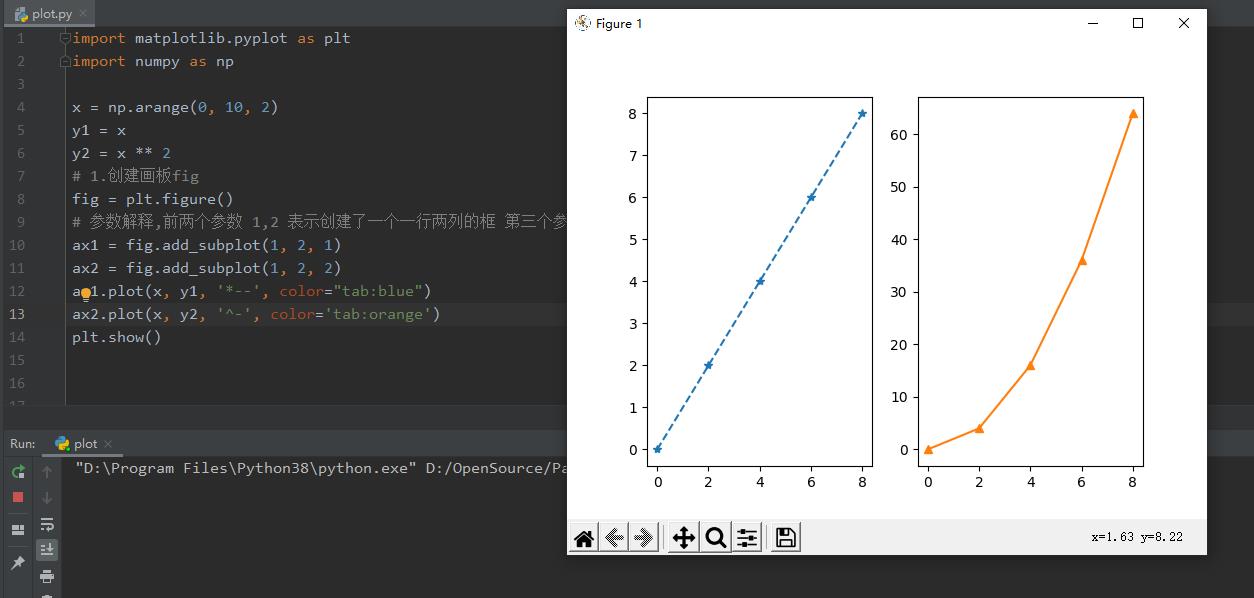
分别放两个框中
import matplotlib.pyplot as plt
import numpy as np

x = np.arange(0, 10, 2)
y1 = x
y2 = x ** 2
# 1.创建画板fig
fig = plt.figure()
# 参数解释,前两个参数 1,2 表示创建了一个一行两列的框 第三个参数表示当前所在的框
ax1 = fig.add_subplot(1, 2, 1)
ax2 = fig.add_subplot(1, 2, 2)
ax1.plot(x, y1, \'*--\', color="tab:blue")
ax2.plot(x, y2, \'^-\', color=\'tab:orange\')
plt.show()
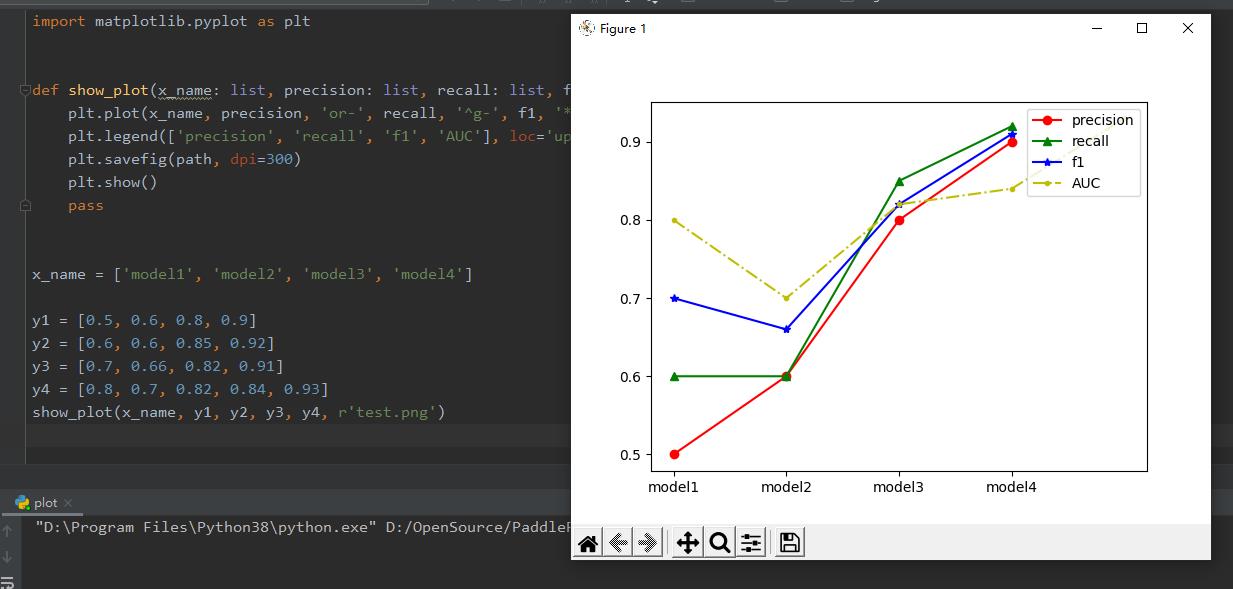
函数封装
import matplotlib.pyplot as plt

def show_plot(x_name: list, precision: list, recall: list, f1: list, AUC: list, path):
    plt.plot(x_name, precision, \'or-\', recall, \'^g-\', f1, \'*b-\', AUC, \'.y-.\')
    plt.legend([\'precision\', \'recall\', \'f1\', \'AUC\'], loc=\'upper right\')
    plt.savefig(path, dpi=300)
    plt.show()
    pass

x_name = [\'model1\', \'model2\', \'model3\', \'model4\']

y1 = [0.5, 0.6, 0.8, 0.9]
y2 = [0.6, 0.6, 0.85, 0.92]
y3 = [0.7, 0.66, 0.82, 0.91]
y4 = [0.8, 0.7, 0.82, 0.84, 0.93]
show_plot(x_name, y1, y2, y3, y4, r\'test.png\')
画多条曲线
import numpy as np
import matplotlib.pyplot as plt

fig1 = plt.figure(num=1, figsize=(7, 5))
x = np.linspace(0.0, np.pi * 2, 20)
y = np.sin(x)

plt.plot(x, y, \'rx-\', x, 2 * x, \'go-.\')  # 每条都指定x轴数据

fig2 = plt.figure(num=2)
plt.plot(x, y, \'rx-\', 2 * x, \'go-.\')  # 一条指定x轴数据,其他不指定

fig2 = plt.figure(num=3)
plt.plot(y, \'rx-\', 2 * x, \'go-.\')  # 都不指定
plt.show()
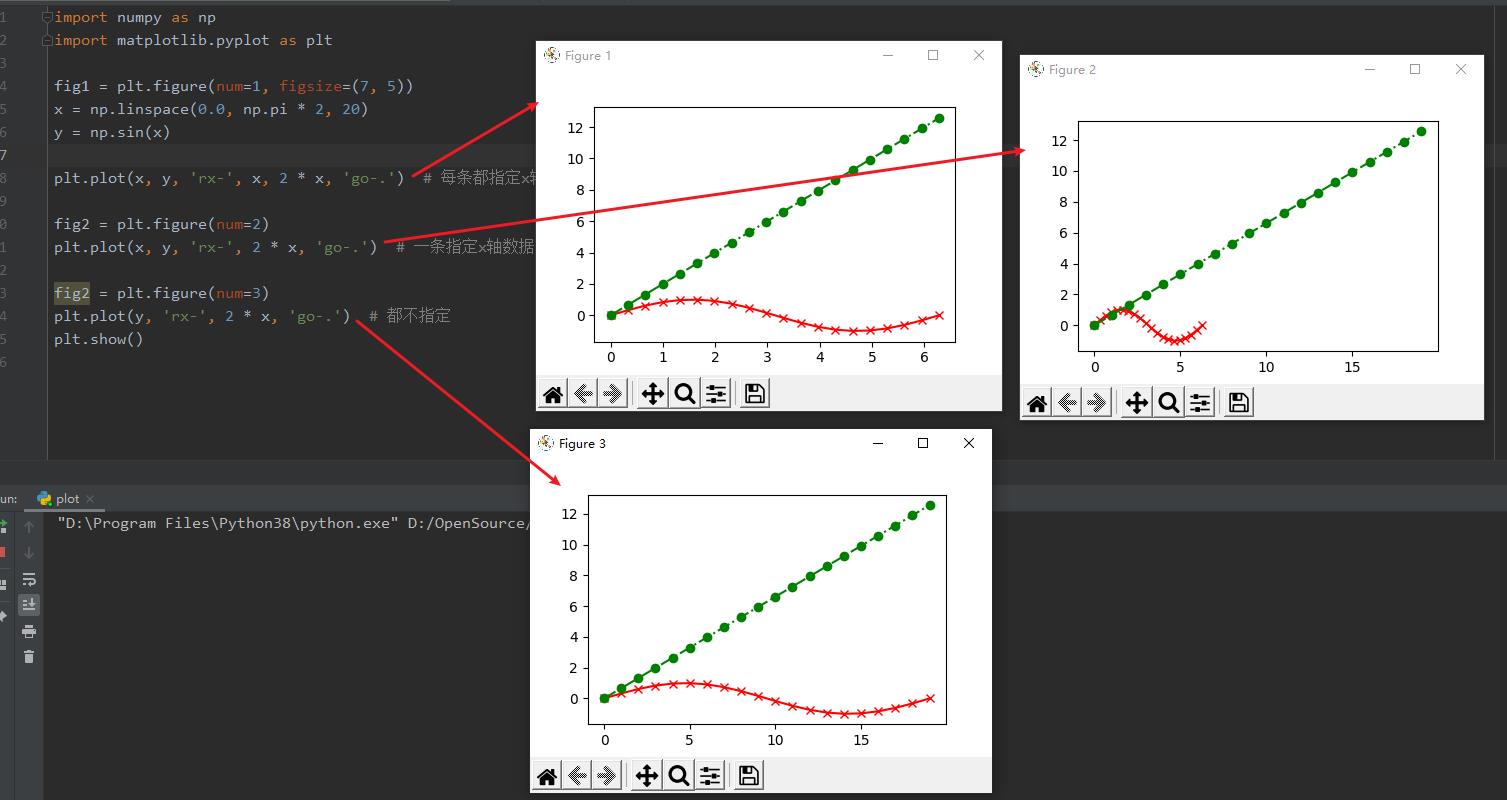
说明
format_string 控制曲线的格式字符串,可选,由颜色字符、风格字符和标记字符组成
颜色
| 字符 | 说明 | 字符 | 说明 | 字符 | 说明 |
|---|---|---|---|---|---|
| \'r\' | 红色 | \'g\' | 绿色 | \'b\' | 蓝色 |
| \'c\' | 青绿色 | \'k\' | 黑色 | \'y\' | 黄色 |
| \'w\' | 白色 | \'m\' | 洋红色 |
风格
| 字符 | 说明 | 字符 | 说明 | 字符 | 说明 | 字符 | 说明 |
|---|---|---|---|---|---|---|---|
| \'-\' | 实线 | \'–\' | 破折线 | \'-.\' | 点画线 | \':\' | 虚线 |
风格
| 字符 | 说明 | 字符 | 说明 | 字符 | 说明 |
|---|---|---|---|---|---|
| \'.\' | 点标记 | \',\' | 像素标记 | \'o\' | 实心圈标记 |
| \'v\' | 倒三角标记 | \'^\' | 上三角标记 | \'>\' | 右三角标记 |
| \'<\' | 左三角标记 | \'h\' | 竖六边形标记 | \'H\' | 横六边形标记 |
| \'+\' | 十字标记 | \'x\' | x标记 | \'D\' | 菱形标记 |
| \'d\' | 瘦菱形标记 | \'|\' | 垂直线标记 | \'*\' | 星形标记 |
| \'p\' | 实心五角标记 | \'s\' | 实心方形标记 | \'4\' | 右花三角标记 |
| \'3\' | 左花三角标记 | \'2\' | 上花三角标记 | \'1\' | 下花三角标记 |
使用方法
plt.plot(x, y,\'g\')
plt.plot(x, y,color=\'green\')

plt.plot(x, y,\'go\')
plt.plot(x, y,color=\'green\',marker = \'o\')

plt.plot(x, y,\'go-.\')
matplotlib.pyplot.plot详解
参考资料:
https://blog.csdn.net/baidu_41902768/article/details/80686608
之前的随笔也有说过,matplotlib是python中一个非常常用的用来作图的库,pyplot是其中的一个包,主要是用来作2D图的,涉及的画布,图例,标签等一系列作图常规操作。这篇文章分析的是pyplot这个包下面的一个最常用的函数plot,所以使用的时候我们经常是:
import matplotlib.pyplot as plt
plt.plot()
其中把pyplot简写成plt已经成为一种习惯。因为经常会用到这个函数作图,又看了matplotlib的文档,写的非常好。所以就想学习一下记录在此。参考资料那篇文章其实做的是一样的事情,但是为了自己熟悉一遍还是一步步学习一下。
函数定义:(Plot y versus x as lines and/or markers 说的很清楚很局限,这个函数就是绘制2D图 x versus y的,线图或者点图,别的干不了。)
matplotlib.pyplot.plot(*args, scalex=True, scaley=True, data=None, **kwargs)
plot([x], y, [fmt], *, data=None, **kwargs)
plot([x], y, [fmt], [x2], y2, [fmt2], ..., **kwargs)
上面的[fmt]其实就是一个字符串,方便你格式化作图。比如‘bo‘=‘blue circle‘,蓝色圆点。‘r--‘就是红色的短线图。上面的第三行就是一次性同时画两个图时的用法。
>>> plot(x, y)        # plot x and y using default line style and color
>>> plot(x, y, ‘bo‘)  # plot x and y using blue circle markers
>>> plot(y)           # plot y using x as index array 0..N-1
>>> plot(y, ‘r+‘)     # ditto, but with red plusses
还可以使用关键字参数,可以和fmt共存,当fmt和关键字冲突时,关键字优先:
>>> plot(x, y, ‘go--‘, linewidth=2, markersize=12)
>>> plot(x, y, color=‘green‘, marker=‘o‘, linestyle=‘dashed‘,
...      linewidth=2, markersize=12)
带标签的数据作图:(Plotting labelled data):原文是这样的There‘s a convenient way for plotting objects with labelled data (i.e. data that can be accessed by index obj[‘y‘]). Instead of giving the data in x and y, you can provide the object in the data parameter and just give the labels for x and y:
plot(‘xlabel‘, ‘ylabel‘, data=obj)
带索引的对象可以是dict,pandas.DataFame,structured numpy array.个人理解这个用法的作用就是:当你有一个表格,其中有很多列,每一个列有一个标签。当你想使用其中的两列作图的时候,将表格整体传入,但是只要你指定了标签,这个函数就会帮你把这两列取出来作图。不妨用支持的最简单类型dict做个试验。
>>>A = {‘1‘:[1,2,3,4,5] , ‘2‘:[1,2,3,4,5] ,‘3‘:[2,3,4,5,6]}
>>>plt.plot(‘1‘,‘2‘,‘r‘,data=A)
和预想的一样,结果就是取出字典中key为‘1‘和‘2‘的两个列表分别为x和y进行作图。
多组数据作图:一共有三种方法
1.最直接,多次调用plot函数:
>>> plot(x1, y1, ‘bo‘)
>>> plot(x2, y2, ‘go‘)
2.如果数据已经是2d array,可以直接传入。例:一个数组,第一列代表x values ,其他多个列代表y values。
>>> plot(a[0], a[1:])
3.明确指定多个数据集:这种情况下关键字参数将用于所有的数据集。
>>> plot(x1, y1, ‘g^‘, x2, y2, ‘g-‘)
Notes:有关作图格式的一些信息。
Format Strings
A format string consists of a part for color, marker and line:
fmt = ‘[marker][line][color]‘
Each of them is optional. If not provided, the value from the style cycle is used. Exception: If line is given, but no marker, the data will be a line without markers.
Other combinations such as [color][marker][line] are also supported, but note that their parsing may be ambiguous.
Markers
| character | description |
|---|---|
‘.‘ |
point marker |
‘,‘ |
pixel marker |
‘o‘ |
circle marker |
‘v‘ |
triangle_down marker |
‘^‘ |
triangle_up marker |
‘<‘ |
triangle_left marker |
‘>‘ |
triangle_right marker |
‘1‘ |
tri_down marker |
‘2‘ |
tri_up marker |
‘3‘ |
tri_left marker |
‘4‘ |
tri_right marker |
‘s‘ |
square marker |
‘p‘ |
pentagon marker |
‘*‘ |
star marker |
‘h‘ |
hexagon1 marker |
‘H‘ |
hexagon2 marker |
‘+‘ |
plus marker |
‘x‘ |
x marker |
‘D‘ |
diamond marker |
‘d‘ |
thin_diamond marker |
‘|‘ |
vline marker |
‘_‘ |
hline marker |
Line Styles
| character | description |
|---|---|
‘-‘ |
solid line style |
‘--‘ |
dashed line style |
‘-.‘ |
dash-dot line style |
‘:‘ |
dotted line style |
Example format strings:
‘b‘    # blue markers with default shape
‘or‘   # red circles
‘-g‘   # green solid line
‘--‘   # dashed line with default color
‘^k:‘  # black triangle_up markers connected by a dotted line
ColorsThe supported color abbreviations are the single letter codes
| character | color |
|---|---|
‘b‘ |
blue |
‘g‘ |
green |
‘r‘ |
red |
‘c‘ |
cyan |
‘m‘ |
magenta |
‘y‘ |
yellow |
‘k‘ |
black |
‘w‘ |
white |
and the ‘CN‘ colors that index into the default property cycle.
If the color is the only part of the format string, you can additionally use any matplotlib.colors spec, e.g. full names (‘green‘) or hex strings (‘#008000‘).
以上是关于Matplotlib.pyplot.plot 绘图的主要内容,如果未能解决你的问题,请参考以下文章