在ASP.NET Core中轻松使用JwtBeare进行身份验证
Posted .NET100
tags:
篇首语:本文由小常识网(cha138.com)小编为大家整理,主要介绍了在ASP.NET Core中轻松使用JwtBeare进行身份验证相关的知识,希望对你有一定的参考价值。
JwtBearer简介
首先要搞清楚什么是JwtBearer,JwtBearer是ASP.NET Core的OAuth 2.0 JWT Bearer身份验证提供程序。它提供了对JWT令牌进行验证的功能,然后允许将令牌中包含的声明(claims)用于用户身份验证和授权控制。
Json Web Token (JWT)是一种Web标准,用于在不同系统间传输数据。JWT是一种可验证的和安全的方式,用于在各种应用程序之间传递信息。JWT具有一定的安全性,因为它是通过密钥对JWT进行签名的,以确保意味着不能进行篡改或伪造。
JWT由三个部分组成,分别为:“Header”、“Payload”和“Signature” 。其中,“header”表示JWT的元数据(元信息),用于描述加密信息和算法;“payload”表示JWT的指令部分,用于承载用户状态或授权相关的信息;“signature”表示JWT的签名信息,用于验证JWT的有效性。
JwtBearer首先使用“header”中声明的算法对JWT进行身份验证,以确保其未被篡改。然后,它将使用密钥根据“payload”中的信息生成令牌,以在用户请求中将其传递。
JwtBearer提供了配置选项,以允许您使用自定义的密钥和算法生成和验证JWT令牌。它还允许您配置应用程序特定的声明,以在用户的身份验证和授权管理中使用。
在.NET Core中使用
1)、首先新建一个APS.NET Core项目,然后在项目中添加JwtBearer包,可以用nuget包管理器添加,也可以使用nuget命令添加,命令如下:
dotnet add package Microsoft.AspNetCore.Authentication.JwtBearer
2)新建一个JwtConfig类,用了存储token相关数据。
public class JwtConfig

        public string Key  get; set;  //key
        public int Expres  get; set;  //过期时间(单位秒)
        public string Issuer  get; set;
        public string Audience  get; set;
3)、在appsettings.json中配置jwt密钥
//配置文件appsettings.json

  "Logging":
    "LogLevel":
      "Default": "Information",
      "Microsoft.AspNetCore": "Warning"

  ,
  "AllowedHosts": "*",
  //JWT的配置内容
  "JWT": //key必须有足够的长度
      "Key": "asfasfdflj134aanjkdsjiio1232sdasdfdfkandsf12",
    "expres": "3",
     "Issuer": "https://localhost:7201",
    "Audience": "https://localhost:7201",
4)在program.cs文件注入JwtBearer
//注入配置类
builder.Services.Configure<JwtConfig>(builder.Configuration.GetSection("JWT"));
5)新建一个类,专门创建token
//依赖注入
  private readonly IOptionsSnapshot<JwtConfig> jwtconfig;
  public Demo3Controller(IOptionsSnapshot<JwtConfig> jwtconfig)

     this.jwtconfig = jwtconfig;

public string CreateToken()

    // 创建声明列表,即 Token 中携带的信息
    List<Claim> claims = new List<Claim>();
    claims.Add(new Claim(ClaimTypes.Name, "admin")); // 添加用户名
    claims.Add(new Claim(ClaimTypes.NameIdentifier, "1080")); // 添加用户 ID

    // 设置 Token 的过期时间
    DateTime expres = DateTime.Now.AddSeconds(jwtconfig.Value.Expres);
    Console.WriteLine($"过期时间expres");

    // 从配置文件中获取 JWT 密钥并转换为字节数组
    byte[] secbyse = Encoding.UTF8.GetBytes(jwtconfig.Value.Key);

    // 创建 SymmetricSecurityKey 对象并使用 HmacSha256 算法对密钥进行签名
    var secKey = new SymmetricSecurityKey(secbyse);
    var credetials = new SigningCredentials(secKey, SecurityAlgorithms.HmacSha256);

    // 创建 JwtSecurityToken 对象并设置声明、过期时间和签名信息
    var tokenDescriptor = new JwtSecurityToken(claims: claims, expires: expres, signingCredentials: credetials);

    // 生成 JWT Token 字符串并返回
    string jwt = new JwtSecurityTokenHandler().WriteToken(tokenDescriptor);
    return jwt;
6)再在program.cs文件中验证传入的token,代码如下:
builder.Services.AddAuthentication(JwtBearerDefaults.AuthenticationScheme).AddJwtBearer(opt =>

    var JwtOtp = builder.Configuration.GetSection("JWT").Get<JwtConfig>();
    byte[] keybase = Encoding.UTF8.GetBytes(JwtOtp.Key);
    var seckey = new SymmetricSecurityKey(keybase);
    opt.TokenValidationParameters = new()

        ValidateIssuer = false,
        ValidateAudience = false,
        ValidateLifetime = true,
        ValidateIssuerSigningKey = true,
        IssuerSigningKey = seckey,

    ;
    opt.Events = new JwtBearerEvents

        //权限验证失败后执行
        OnChallenge = context =>

            //终止默认的返回结果
            context.HandleResponse();
            string token = context.Request.Headers["Authorization"];
            var result = JsonConvert.SerializeObject(new  code = 401, message = "登录过期" );
            if (string.IsNullOrEmpty(token))

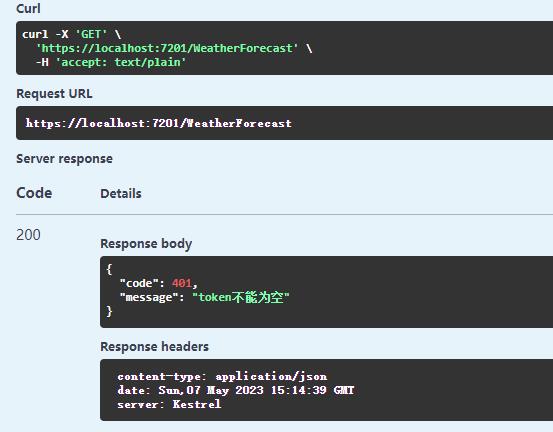
                result = JsonConvert.SerializeObject(new  code = 401, message = "token不能为空" );
                context.Response.ContentType = "application/json";
                //验证失败返回401
                context.Response.StatusCode = StatusCodes.Status200OK;
                context.Response.WriteAsync(result);
                return Task.FromResult(result);

            try

                JwtSecurityTokenHandler tokenheader = new();
                ClaimsPrincipal claimsPrincipal = tokenheader.ValidateToken(token, opt.TokenValidationParameters, out SecurityToken securityToken);

            catch (SecurityTokenExpiredException)

                result = JsonConvert.SerializeObject(new  code = 401, message = "登录已过期" );
                context.Response.ContentType = "application/json";
                //验证失败返回401
                context.Response.StatusCode = StatusCodes.Status200OK;
                context.Response.WriteAsync(result);
                return Task.FromResult(result);

            catch (Exception ex)

                Console.WriteLine(ex);
                result = JsonConvert.SerializeObject(new  code = 402, message = "token令牌无效" );
                context.Response.ContentType = "application/json";
                //验证失败返回401
                context.Response.StatusCode = StatusCodes.Status200OK;
                context.Response.WriteAsync(result);
                return Task.FromResult(result);

            context.Response.ContentType = "application/json";
            //验证失败返回401
            context.Response.StatusCode = StatusCodes.Status200OK;
            context.Response.WriteAsync(result);
            return Task.FromResult(result);

    ;
);
app.UseAuthentication();//.NETCore验证中间件,必须有。并且在   app.UseAuthorization();之前
7)、在需要权限的方法或控制器上加上特性[Authorize]
[HttpGet(Name = "GetAuthorize")]
 [Authorize]
public IEnumerable<WeatherForecast> Get()

    //doing
这样就完成了JwtBearer验证的代码,具体调用见下文。
调用流程如下:
1)、首先获得Token
可以通过登录验证后生成。如果是接口程序通过接口获得。
效果如下:

2)、获取Token后在请求头添加Authorization验证,并输入获得的Token,需要注意的是Token前面需要加Bearer并添加一个空格。
效果如下:

如果Token为空的效果:

注:在swagger加token需要另外在program.cs配置,代码如下:
builder.Services.AddSwaggerGen(s =>

    //添加安全定义
    s.AddSecurityDefinition("Bearer", new OpenApiSecurityScheme

        Description = "请输入token,格式为 Bearer xxxxxxxx(注意中间必须有空格)",
        Name = "Authorization",
        In = ParameterLocation.Header,
        Type = SecuritySchemeType.ApiKey,
        BearerFormat = "JWT",
        Scheme = "Bearer"
    );
    //添加安全要求
    s.AddSecurityRequirement(new OpenApiSecurityRequirement

        new OpenApiSecurityScheme
            Reference =new OpenApiReference
                Type = ReferenceType.SecurityScheme,
                Id ="Bearer"

        ,new string[]

);
);
添加好重启程序后会在swagger的右上方增加如下按钮,打开按钮根据提示即可完成添加。

结语
本文介绍了ASP.NET Core如使用JwtBearer,以及JwtBearer生成token验证的验证过程。希望对你有所收获,欢迎留言或吐槽。
来源公众号:DotNet开发跳槽
如何在 asp.net core 中设置 jwt 令牌的生命周期
【中文标题】如何在 asp.net core 中设置 jwt 令牌的生命周期【英文标题】:how to set lifetime of jwt token in asp.net core 【发布时间】:2021-06-04 04:14:55 【问题描述】:我已经在asp.net core 3.1中创建了项目,并且可以成功授权。
问题是我想增加 JWT 令牌的生命周期,我尝试了所有可能的方法,但仍然无法获得适当的帮助或回答我正在寻找的内容。
下面是startup.cs
中的代码services.AddAuthentication(JwtBearerDefaults.AuthenticationScheme)
.AddJwtBearer(options =>
options.TokenValidationParameters = new TokenValidationParameters
RequireExpirationTime = true,
ValidateIssuer = true,
ValidateAudience = true,
ValidateLifetime = true,
ValidateIssuerSigningKey = true,
//ClockSkew = TimeSpan.Zero,
ValidIssuer = _configuration.GetSection("BaseUrl").Value,
ValidAudience = _configuration.GetSection("BaseUrl").Value,
IssuerSigningKey = new SymmetricSecurityKey(Encoding.UTF8.GetBytes(_configuration.GetSection("IssuerSigningKey").Value)),
;
options.Events = new JwtBearerEvents
OnAuthenticationFailed = context =>
context.Response.OnStarting(() =>
context.Response.StatusCode = 499;
return Task.CompletedTask;
);
if (context.Exception.GetType() == typeof(SecurityTokenExpiredException))
context.Response.Headers.Add("Token-Expired", "true");
return Task.CompletedTask;
;
);
以下是生成 JWT 令牌的代码,
string GeneratJwtToken()

            var secretKey = new SymmetricSecurityKey(Encoding.UTF8.GetBytes(_configuration.GetSection("IssuerSigningKey").Value));
            var signinCredentials = new SigningCredentials(secretKey, SecurityAlgorithms.HmacSha256);

            var claims = new[]  new Claim("Source", "PmpMobileApp") ;

            var tokeOptions = new JwtSecurityToken(
                issuer: _configuration.GetSection("BaseUrl").Value,
                audience: _configuration.GetSection("BaseUrl").Value,
                claims,
                expires: DateTime.Now.AddSeconds(20),
                signingCredentials: signinCredentials
            );
            return new JwtSecurityTokenHandler().WriteToken(tokeOptions);
我见过刷新令牌的概念,但是对于刷新令牌,它应该从中间件返回 401 未经授权的错误,然后我可以调用刷新令牌 api。但在此它会返回 200 登录页面成功。
另外注意到,令牌在本地开发环境中不会过期,但在生产环境中会在几分钟内过期。
注意:- 在网络和移动设备上使用相同的项目。
【问题讨论】:
由于令牌内容是可读的,因为它只是 base64url 编码,您应该使用例如调试令牌jwt.io,并检查exp 属性的值。如果将鼠标悬停在它上面,它会显示人类可读的日期时间。 ValidateLifetime 选项基本上只是检查这个给定的日期时间是否已经过去;因此,如果 exp 日期时间包含预期值,则令牌不应在几分钟后被视为过期(问题可能是其他问题)。
【参考方案1】:
您已在 GeneratJwtToken() 方法中将其设置为 20 秒后过期:
expires: DateTime.Now.AddSeconds(20)
【讨论】:
我用同样的方法做了,但它不起作用。 同理是什么意思?我写的就是你发的。您将其设置为 20 秒后过期。你说你想增加寿命。例如,如果您希望它持续 1 天,则必须编写 DateTime.Now.AddDays(1)。 如果我将它更改为 DateTime.Now.AddYears(1),那么它也会在几分钟后过期。【参考方案2】:使用 cookieOption 中的 Expires 属性。
var cookieOptions = new CookieOptions

                HttpOnly = true,
                Expires = DateTime.UtcNow.AddDays(7)
            ;
完美运行!
【讨论】:
以上是关于在ASP.NET Core中轻松使用JwtBeare进行身份验证的主要内容,如果未能解决你的问题,请参考以下文章