SpringBoot配置加载 SpringBoot配置加载解析时机原理
Posted 酷酷
tags:
篇首语:本文由小常识网(cha138.com)小编为大家整理,主要介绍了SpringBoot配置加载 SpringBoot配置加载解析时机原理相关的知识,希望对你有一定的参考价值。
1 前言
不知道大家对于配置文件的加载有没有考虑过是什么时候加载解析的,这节我们就来看看。
2 执行入口
我们就先来看看加载配置的入口,核心类就是 ConfigFileApplicationListener主要作用就是读取应用的配置文件并add到Environment的PropertySources列表里。那么实际的执行过程如下:

那么执行入口我们找到了:
- SpringBoot启动执行run方法
- 准备环境变量,发布环境变量准备事件
- 监听到事件执行
3 ConfigFileApplicationListener 执行过程

先看下类图,可以发现两个信息该类是监听器、也是一个后置处理器哈。那么接下来我们就来看看 ConfigFileApplicationListener 的内部执行过程。
3.1 ConfigFileApplicationListener # onApplicationEvent
@Override
public void onApplicationEvent(ApplicationEvent event)
    if (event instanceof ApplicationEnvironmentPreparedEvent)
        // 环境准备完成事件,开始解析application.properties配置文件
        onApplicationEnvironmentPreparedEvent((ApplicationEnvironmentPreparedEvent) event);

    //暂时先不关注哈
    if (event instanceof ApplicationPreparedEvent)
        onApplicationPreparedEvent(event);


private void onApplicationEnvironmentPreparedEvent(ApplicationEnvironmentPreparedEvent event)
    // 从META-INF/spring.factories缓存获取EnvironmentPostProcessor配置的实现类
    List<EnvironmentPostProcessor> postProcessors = loadPostProcessors();
    // 因为当前对象也是实现的EnvironmentPostProcessor把当前类对象也添加进去
    postProcessors.add(this);
    // 排序
    AnnotationAwareOrderComparator.sort(postProcessors);
    // 遍历执行
    for (EnvironmentPostProcessor postProcessor : postProcessors)
        postProcessor.postProcessEnvironment(event.getEnvironment(), event.getSpringApplication());


List<EnvironmentPostProcessor> loadPostProcessors()
    return SpringFactoriesLoader.loadFactories(EnvironmentPostProcessor.class, getClass().getClassLoader());
可以看到当监听到ApplicationEnvironmentPreparedEvent 事件时,加载 META-INF/spring.factories下的EnvironmentPostProcessor类型的处理器,因为自己也是一个后置处理器所以排序后,依次执行每个后置处理器,那我们接下来看看每个后置处理。


3.2 SystemEnvironmentPropertySourceEnvironmentPostProcessor 分析
源码如下:
/**
 * 系统环境变量的名称
 * public static final String SYSTEM_ENVIRONMENT_PROPERTY_SOURCE_NAME = "systemEnvironment";
 * @param environment the environment to post-process
 * @param application the application to which the environment belongs
 * 来到这里之前初始化环境变量对象的时候  已经将系统的环境变量放置进了 Environment 的 MutablePropertySources 对象里了哈
 * propertySources.addLast(new SystemEnvironmentPropertySource(SYSTEM_ENVIRONMENT_PROPERTY_SOURCE_NAME, getSystemEnvironment()));
 */
@Override
public void postProcessEnvironment(ConfigurableEnvironment environment, SpringApplication application)
    // 系统环境变量名称 systemEnvironment
    String sourceName = StandardEnvironment.SYSTEM_ENVIRONMENT_PROPERTY_SOURCE_NAME;
    //  从 MutablePropertySources 对象CopyOnWriteArrayList类型集合中通过找到name为systemEnvironment的属性对象
    PropertySource<?> propertySource = environment.getPropertySources().get(sourceName);
    // 不为空的话 进行替换
    if (propertySource != null)
        // 其实就是将 SystemEnvironmentPropertySource 类型替换成了 OriginAwareSystemEnvironmentPropertySource类型
        // 至于为什么这么做 还请知道的小伙伴告知哈
        replacePropertySource(environment, sourceName, propertySource);
核心就是:将name为systemEnvironment的系统环境变量SystemEnvironmentPropertySource对象替换为OriginAwareSystemEnvironmentPropertySource对象。
3.3 SpringApplicationJsonEnvironmentPostProcessor 分析
源码如下:
@Override
public void postProcessEnvironment(ConfigurableEnvironment environment, SpringApplication application)
    // 取出前面加载的所有类型参数/属性数据
    MutablePropertySources propertySources = environment.getPropertySources();
    /**
     * 流式处理
     * MutablePropertySources 本身实现的 PropertySources 接口 而 PropertySources 又继承的 Iterable 所以是可迭代的
     * MutablePropertySources 有变量 List<PropertySource<?>> propertySourceList = new CopyOnWriteArrayList<>();
     * 实际就是 propertySourceList.stream()
     */
    // JsonPropertyValue 转换 filter 做过滤 findFirst 取出第一个 存在话的就执行 processJson 进行处理
    propertySources.stream().map(JsonPropertyValue::get).filter(Objects::nonNull).findFirst()
            .ifPresent((v) -> processJson(environment, v));

private void processJson(ConfigurableEnvironment environment, JsonPropertyValue propertyValue)
    // 从工厂获取 json格式解析器
    JsonParser parser = JsonParserFactory.getJsonParser();
    // 将json字符串转为Map
    Map<String, Object> map = parser.parseMap(propertyValue.getJson());
    if (!map.isEmpty())
        /**
         * 将扁平化后的参数保存到环境对象CopyOnWriteArrayList集合中,name:spring.application.json,value:内部类JsonPropertySource
         * flatten作用是将Map中值是集合或Map类的转为扁平化,
         * 例如:     map.put("node","10.73.123.338,10.73.123.339")
         * 扁平化后: map.put("node[0]","10.73.123.338")  map.put("node[1]","10.73.123.339")
         */
        addJsonPropertySource(environment, new JsonPropertySource(propertyValue, flatten(map)));


// ### SpringApplicationJsonEnvironmentPostProcessor.JsonPropertyValue
/**
 *
 * public static final String SPRING_APPLICATION_JSON_PROPERTY = "spring.application.json";
 * public static final String SPRING_APPLICATION_JSON_ENVIRONMENT_VARIABLE = "SPRING_APPLICATION_JSON";
 * @param propertySource
 * @return
 */
public static JsonPropertyValue get(PropertySource<?> propertySource)
    // 其实也就是过滤出每个 PropertySource 对象中的 spring.application.json或者SPRING_APPLICATION_JSON属性
    for (String candidate : CANDIDATES)
        Object value = propertySource.getProperty(candidate);
        // 是字符串类型的并且不为空的话 就用 JsonPropertyValue 包装起来用于后面的解析
        if (value instanceof String && StringUtils.hasLength((String) value))
            /**
             * propertySource 就是源属性
             * candidate 就是名字 spring.application.json或者 SPRING_APPLICATION_JSON
             * value 就是对应的值 对应到 JsonPropertyValue 对象的json属性
             */
            return new JsonPropertyValue(propertySource, candidate, (String) value);


    return null;
核心就是解析 json:
- 从环境对象中获取name为spring.application.json或SPRING_APPLICATION_JSON的值。
- 将json字符串值解析到Map中,并进行扁平化处理。
- 将得到的Map保存到环境对象中,其中name为spring.application.json,value为:内部类SpringApplicationJsonEnvironmentPostProcessor$JsonPropertySource。
3.4 CloudFoundryVcapEnvironmentPostProcessor 分析
源码如下:
@Override
public void postProcessEnvironment(ConfigurableEnvironment environment, SpringApplication application)
    /**
     * 通过判断是否存在变量为VCAP_APPLICATION或VCAP_SERVICES来识别是否需要激活Cloud Foundry平台
     * 如果激活则解析Cloud Foundry平台相关配置,保存到环境对象中
     */
    if (CloudPlatform.CLOUD_FOUNDRY.isActive(environment))
        Properties properties = new Properties();
        JsonParser jsonParser = JsonParserFactory.getJsonParser();
        addWithPrefix(properties, getPropertiesFromApplication(environment, jsonParser), "vcap.application.");
        addWithPrefix(properties, getPropertiesFromServices(environment, jsonParser), "vcap.services.");
        MutablePropertySources propertySources = environment.getPropertySources();
        if (propertySources.contains(CommandLinePropertySource.COMMAND_LINE_PROPERTY_SOURCE_NAME))
            propertySources.addAfter(CommandLinePropertySource.COMMAND_LINE_PROPERTY_SOURCE_NAME,
                    new PropertiesPropertySource("vcap", properties));

        else
            propertySources.addFirst(new PropertiesPropertySource("vcap", properties));
核心就是:
- 通过判断是否存在变量为VCAP_APPLICATION或VCAP_SERVICES来识别是否需要激活Cloud Foundry平台。
- 如果激活则解析Cloud Foundry平台相关配置,保存到环境对象中。name为vcap,value为Properties对象。
3.5 ConfigFileApplicationListener 本身
这个类方法是本章重点,这个类方法核心工作是解析application.properties/yml配置文件。在分析配置文件解析源码前,我们先回顾一下springboot几个关键配置的使用规则:
(1)spring.config.name:如果你不喜欢application.properties作为配置文件名称,可以指定多个比如 --spring.config.name= application,demo
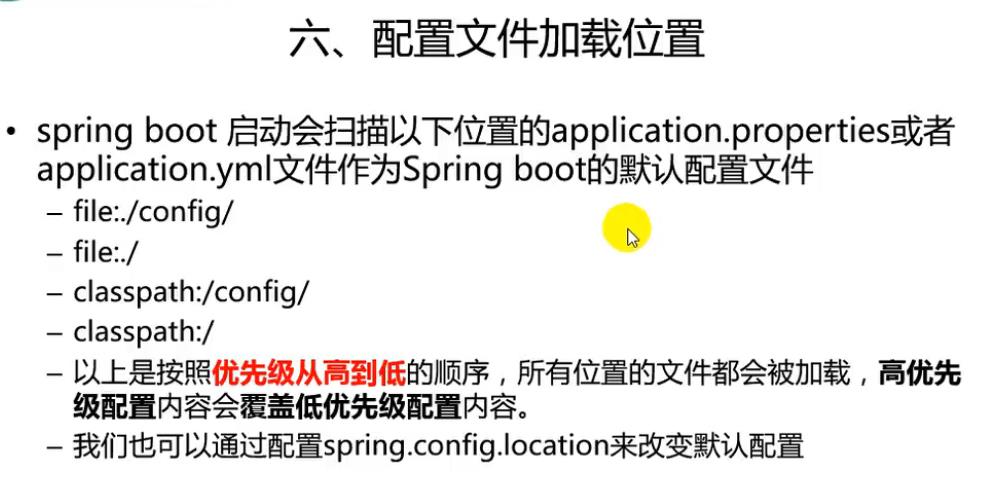
(2)spring.config.location:springboot默认查找配置文件目录列表顺序如下:
file:./config/
file:./
classpath:/config/
classpath:/
通过spring.config.location配置可以自行指定查找目录以及顺序
(3)spring.config.additional-location:在默认查找配置文件目录列表顺序基础上新增自己的目录列表顺序,这个新增列表顺序优先级高于默认的列表顺序
(4)spring.profiles.active:告诉springboot当前激活的profile是哪个环境,通过这个值可以找到特定环境配置文application-profile.properties/yml,如果没用配置默认为default(application-default.properties/yml)
(5)spring.profiles.include:指定要包含的其它profile文件,这样会把除了spring.profiles.active以外其它相关的application-spring.profiles.include.properties包含进来
那我们来看看源码:
@Override
public void postProcessEnvironment(ConfigurableEnvironment environment, SpringApplication application)
    // 调用内部 addPropertySources
    addPropertySources(environment, application.getResourceLoader());

protected void addPropertySources(ConfigurableEnvironment environment, ResourceLoader resourceLoader)
    /**
     * 把RandomValuePropertySource属性元放入environment中去
     * 可以通过environment.getProperty("random.*")返回各种随机值
     * 比如:
     *         environment.getProperty("random.int.5,100;") 5~100中随机(后面的;要接上,因为它会截掉最后一个字符;)
     *         environment.getProperty("random.uuid")
     *         environment.getProperty("random.int")
     */
    RandomValuePropertySource.addToEnvironment(environment);
    // 交给内部类 Loader 进行解析加载配置文件中的属性
    new Loader(environment, resourceLoader).load();

// 内部类
private class Loader
    private final Log logger = ConfigFileApplicationListener.this.logger;
    private final ConfigurableEnvironment environment;
    private final PropertySourcesPlaceholdersResolver placeholdersResolver;
    private final ResourceLoader resourceLoader;
    // PropertiesPropertySourceLoader 加载Properties  YamlPropertySourceLoader 加载 Yaml
    private final List<PropertySourceLoader> propertySourceLoaders;
    private Deque<Profile> profiles;
    private List<Profile> processedProfiles;
    private boolean activatedProfiles;
    private Map<Profile, MutablePropertySources> loaded;
    private Map<DocumentsCacheKey, List<Document>> loadDocumentsCache = new HashMap<>();
    Loader(ConfigurableEnvironment environment, ResourceLoader resourceLoader)
        // 我们的环境变量对象
        this.environment = environment;
        // 创建占位符的解析器 类似解析 $name:xx
        this.placeholdersResolver = new PropertySourcesPlaceholdersResolver(this.environment);
        // 资源加载比如读取 application.properties
        this.resourceLoader = (resourceLoader != null) ? resourceLoader : new DefaultResourceLoader();
        // 加载 PropertiesPropertySourceLoader YamlPropertySourceLoader 看名字大家应该知道是啥了
        this.propertySourceLoaders = SpringFactoriesLoader.loadFactories(PropertySourceLoader.class,
                getClass().getClassLoader());

    // 加载解析方法
    public void load()
        this.profiles = new LinkedList<>();
        this.processedProfiles = new LinkedList<>();
        this.activatedProfiles = false;
        this.loaded = new LinkedHashMap<>();
        initializeProfiles();
        while (!this.profiles.isEmpty())
            Profile profile = this.profiles.poll();
            if (profile != null && !profile.isDefaultProfile())
                addProfileToEnvironment(profile.getName());

            load(profile, this::getPositiveProfileFilter, addToLoaded(MutablePropertySources::addLast, false));
            this.processedProfiles.add(profile);

        resetEnvironmentProfiles(this.processedProfiles);
        load(null, this::getNegativeProfileFilter, addToLoaded(MutablePropertySources::addFirst, true));
        addLoadedPropertySources();
可以看到核心就是:
- 把RandomValuePropertySource放入environment中去
- 交给内部类 Loader 进行加载解析
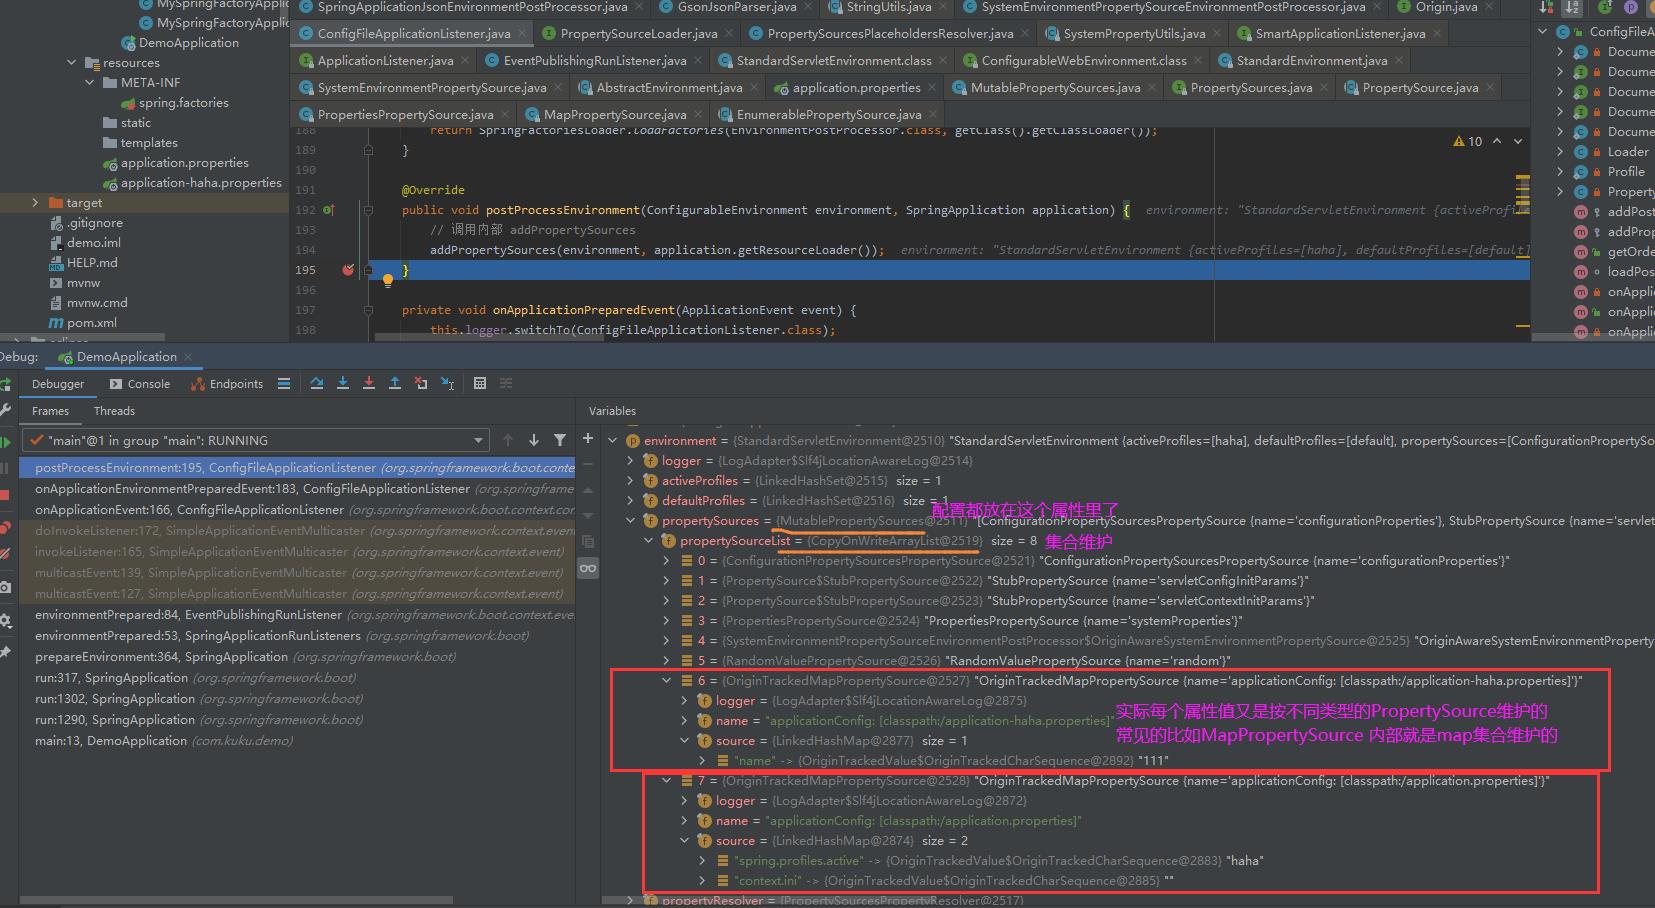
最后执行效果:

4 小结
好了,到这里我么你的配置文件解析时机我们就看到这里哈,还有一个重要的Loader是如何具体解析的我们没看,留着当个作业哈,有理解不对的地方欢迎指正哈。
SpringBoot配置文件加载位置
SpringBoot配置文件加载位置

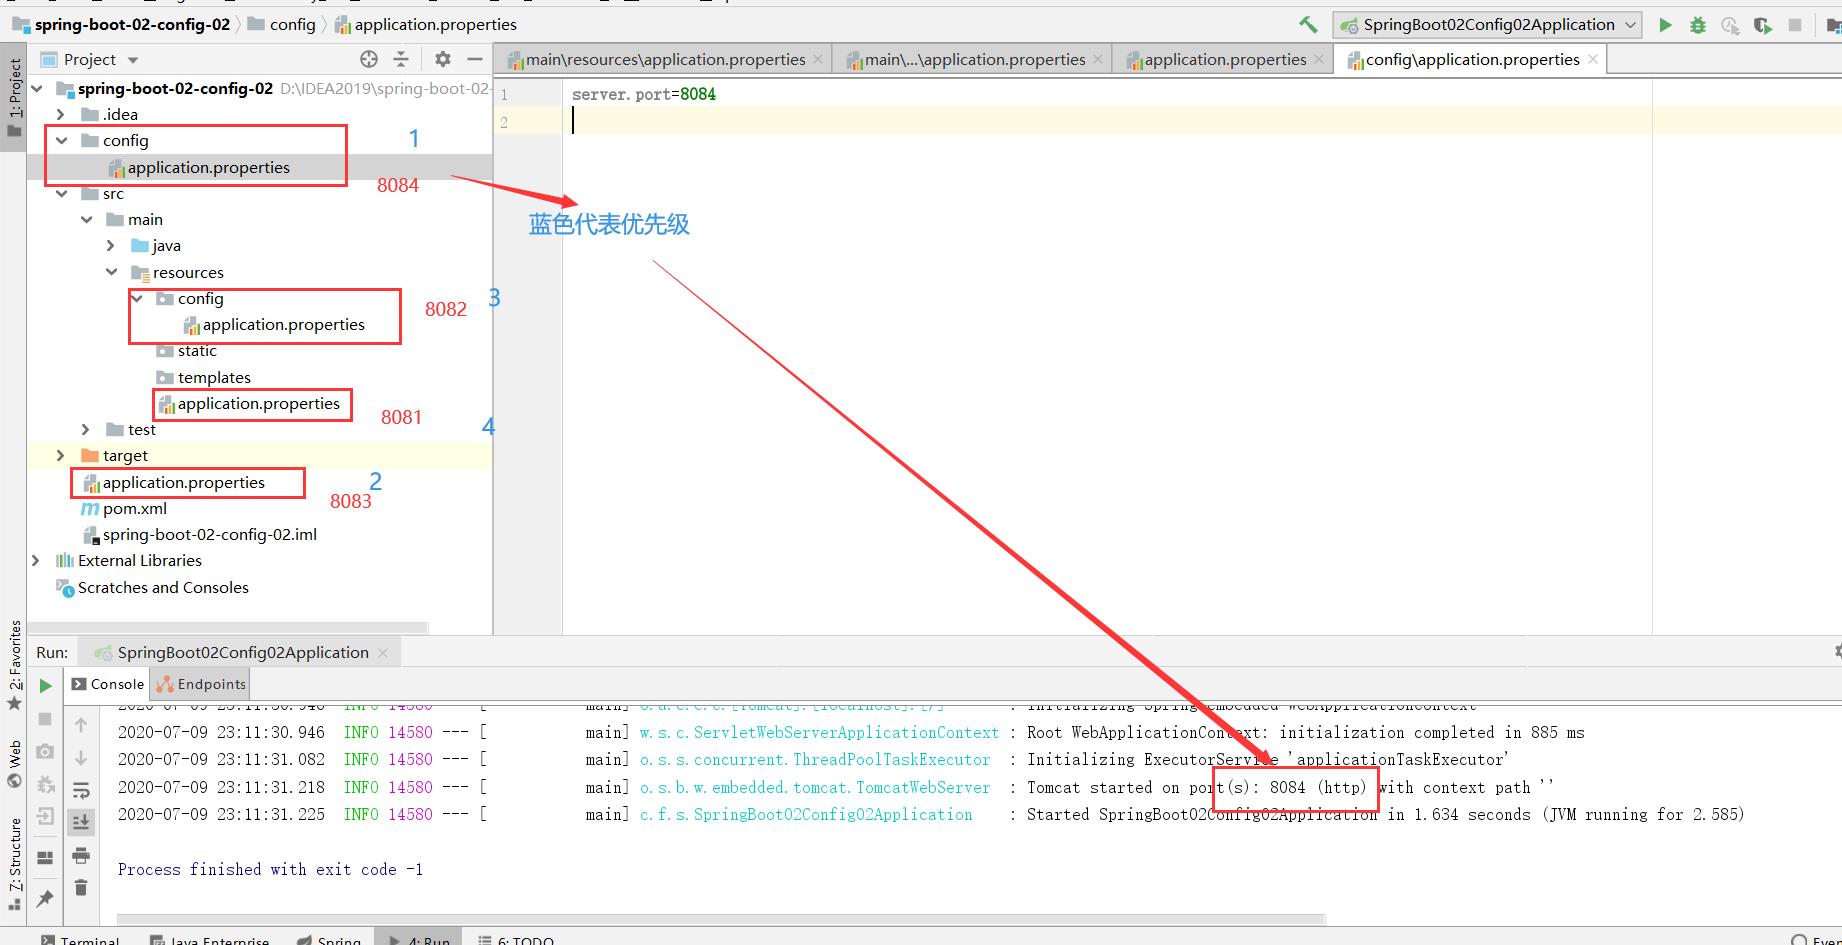
如果多个配置存在,高优先级覆盖低优先级,并会形成互补配置

项目打包好以后,我们可以使用命令行参数的形式,启动项目的时候来指定配置文件的新位置;不会形成互补配置;

命令行:java -jar xxxx --spring.config.location=xxxxxx
以上是关于SpringBoot配置加载 SpringBoot配置加载解析时机原理的主要内容,如果未能解决你的问题,请参考以下文章