美团一面:Spring Cloud 如何构建动态线程池?
Posted 疯狂创客圈
tags:
篇首语:本文由小常识网(cha138.com)小编为大家整理,主要介绍了美团一面:Spring Cloud 如何构建动态线程池?相关的知识,希望对你有一定的参考价值。
文章很长,且持续更新,建议收藏起来,慢慢读!疯狂创客圈总目录 博客园版 为您奉上珍贵的学习资源 :
免费赠送 :《尼恩Java面试宝典》 持续更新+ 史上最全 + 面试必备 2000页+ 面试必备 + 大厂必备 +涨薪必备
免费赠送 :《尼恩技术圣经+高并发系列PDF》 ,帮你 实现技术自由,完成职业升级, 薪酬猛涨!加尼恩免费领
免费赠送 经典图书:《Java高并发核心编程(卷1)加强版》 面试必备 + 大厂必备 +涨薪必备 加尼恩免费领
免费赠送 经典图书:《Java高并发核心编程(卷2)加强版》 面试必备 + 大厂必备 +涨薪必备 加尼恩免费领
免费赠送 经典图书:《Java高并发核心编程(卷3)加强版》 面试必备 + 大厂必备 +涨薪必备 加尼恩免费领
免费赠送 资源宝库: Java 必备 百度网盘资源大合集 价值>10000元 加尼恩领取
说在前面
在40岁老架构师 尼恩的读者社群(50+)中,最近有小伙伴拿到了一线互联网企业如美团、极兔、有赞、希音、百度、网易、滴滴的面试资格,遇到一几个很重要的面试题:
(1) Spring Cloud 如何构建动态线程池?
(2) 生产场景中,应该如何动态调整线程池的核心参数?
等等等等......
线程池、动态线程池,是面试的重点和高频点。
尼恩作为技术中台、数据中台的架构师,致力于为大家研究出一个 3高架构知识宇宙, 所以,这里,带大家完成一个 Spring Cloud 如何构建动态线程池 架构分析和实操。
当然,作为一篇文章,仅仅是抛砖引玉,后面有机会,带大家做一下这个高质量的实操,并且指导大家写入简历。
让面试官爱到 “不能自已、口水直流”。
也一并把这个题目以及参考答案,收入咱们的 《尼恩Java面试宝典》V66版本,供后面的小伙伴参考,提升大家的 3高 架构、设计、开发水平。
注:本文以 PDF 持续更新,最新尼恩 架构笔记、面试题 的PDF文件,请从公众号 【技术自由圈】获取。
业务场景分析
流量洪峰是互联网生产环境经常遇到的场景,例如某个时间点进行商品抢购活动,或者某个时间点集中触发定时任务,这些场景都有可能引发流量洪峰,所以如何应对流量洪峰是我们必须面对的问题。
纵向维度我们可以从代理层、WEB层、服务层、缓存层、数据层进行思考,横向维度我们可以从高频检测、缓存前置、节点冗余、服务降级等方向进行思考。本文我们从服务层动态调节线程数这个角度进行思考。
动态线程池是指我们可以根据流量的不同调节线程池某些参数,例如可以在业务低峰期调低线程数,在业务高峰期调高线程数增加处理线程从而应对流量洪峰。
本文我们结合SpringCloud应用,彻底介绍如何构建一个动态线程池。
为啥需要动态线程池?
线程池是Java并发编程中的一个重要工具,它可以有效地管理和复用线程,提高系统的性能和吞吐量。
但是,如果线程池的配置和使用不当,也会带来一些严重的问题,比如内存溢出、CPU过载、响应延迟、服务不可用等。
这些问题往往在生产环境中才会暴露出来,给系统带来巨大的风险和损失。
那么你是否想要更好地管理和监控你的线程池状态和性能?
你是否想要动态地调整你的线程池参数,而不需要重启你的应用?
你是否想要及时地收到你的线程池异常或风险的告警通知?
如果你的答案是肯定的,那么本文将教你如何在SpirngCloud微服务框架下,使用Nacos、Prometheus和Grafana这三个强大的组件,来实现自定义线程池的指标暴露、动态参数调整、指标采集和可视化监控、以及报警功能。
通过本文,你将学习到:
- 如何使用
Nacos注册中心来存储和管理你的线程池参数,并实现动态刷新 - 如何使用Micrometer来创建和管理你的线程池指标,并将它们导出到Prometheus格式
- 如何使用Prometheus来从你的应用中拉取指标数据,并存储在它自己的时间序列数据库中
- 如何使用
Grafana来从Prometheus中获取指标数据,并创建美观和实用的仪表盘,来展示你的指标数据 - 如何使用
Prometheus或Grafana的报警功能,为你的指标数据设置告警规则和通知渠道,当指标达到某些条件时,及时收到告警通知,例如钉钉、邮件等。如果线程池出现问题或者完成修改后,能够基于监控的信息,进行通知和告警。这样就需要考虑通知和告警的方式的多样性:比如基于钉钉、微信、飞书、电子邮件等渠道进行通知和告警。
本文将为你提供详细的步骤和代码,让你可以轻松地跟随操作,并实现自己的线程池监控和管理系统。
线程池监控和参数动态化的好处?
我们需要对线程池进行监控,来了解线程池的运行状态和性能指标,及时发现和解决问题,优化线程池的配置和使用。
监控线程池有以下几个好处:
-
可以观察线程池的核心参数
比如核心线程数、最大线程数、队列容量、活跃线程数、任务数量等,判断线程池是否合理配置和充分利用。
-
可以分析线程池的运行情况
比如任务执行时间、任务等待时间、任务拒绝率、任务失败率等,评估线程池的性能和稳定性。
-
可以设置线程池的预警机制
比如当线程池达到一定的阈值或发生异常时,及时通知相关人员,采取相应的措施,避免系统崩溃或影响用户体验。
-
动态地调整你的线程池参数,而不需要重启你的应用
如何获取线程池的一些指标数据?
要监控线程池的状态和性能,我们需要获取线程池的一些指标数据。
ThreadPoolExecutor类提供了一些方法来获取这些数据,比如:
- 核心线程数:
getCorePoolSize() - 最大线程数:
getMaximumPoolSize() - 阻塞队列:
getQueue(),可以通过它获取队列长度、元素个数等信息 - 工作线程数:
getPoolSize(),包括核心线程和非核心线程 - 活跃线程数:
getActiveCount(),也就是正在执行任务的线程 - 最大工作线程数:
getLargestPoolSize(),也就是线程池曾经到过的最大值 - 任务数量:
getTaskCount(),包括历史已完成和正在执行的任务
除了这些方法,ThreadPoolExecutor类还有一些钩子方法,它们没有具体的实现,但是我们可以重写它们来获取更多的数据,比如:
beforeExecute:在Worker线程执行任务之前会调用的方法,我们可以在这里记录任务开始执行的时间afterExecute:在Worker线程执行任务之后会调用的方法,我们可以在这里计算任务执行的耗时,并根据耗时计算最大耗时、最小耗时、平均耗时等terminated:当线程池从状态变更到TERMINATED状态之前调用的方法,我们可以在这里做一些清理或者统计工作
通过这些方法,我们就可以获取线程池的各种指标数据,为监控线程池提供基础。
SpringCloud 线程池监控管理方案
那么,如何实现线程池的监控呢?
我们可以采用以下几个步骤:
- 第一步,扩展
ThreadPoolExecutor类,重写beforeExecute、afterExecute和terminated方法,获取更多的指标信息,比如最短执行时间、最长执行时间、平均执行耗时等。 - 第二步,结合
Nacos注册中心实现线程池核心参数动态变更、实时生效。 - 第三步,使用Spring Boot提供的Actuator自定义一个Endpoint来发布线程池的指标数据,这样我们就可以通过HTTP请求来获取线程池的监控信息。
- 第四步,使用一些开源组件来采集、存储、展示和预警线程池的指标数据,比如
Prometheus、Grafana和AlertManager。这些组件可以帮助我们实现可视化的监控界面和灵活的预警策略。
接下来,我们根据以上步骤说明,一步步的实现一个完善的线程池监控管理方案。
第一步:扩展线程池,获取线程池指标数据
首先,我们在springboot项目配置文件(例如:application.yml)里,新增以下示例配置,用于后续根据该配置动态生成线程池。
monitor:
  thread:
    executors[0]:
      thread-pool-name: first-monitor-thread-pool
      core-pool-size: 4
      max-pool-size: 8
      queue-capacity: 1000
      keep-alive-time: 1000
    executors[1]:
      thread-pool-name: second-monitor-thread-pool
      core-pool-size: 2
      max-pool-size: 4
      queue-capacity: 2000
      keep-alive-time: 2000
根据以上配置,我们再编写对应的配置类,来读取配置文件里声明的线程池属性,代码如下:
/**
 * 获取线程池配置属性
 */
@ConfigurationProperties(prefix = "monitor.thread")
@Data
@Component
public class ThreadPoolConfigProperties
    private List<ThreadPoolProperties> executors = new ArrayList<>();


/**
 * 线程池的核心属性声明。
 */
@Data
@NoArgsConstructor
@AllArgsConstructor
public class ThreadPoolProperties
    /**
     * 线程池名称
     */
    private String threadPoolName;

    /**
     * 核心线程数,默认为 Runtime.getRuntime().availableProcessors()
     */
    private Integer corePoolSize = Runtime.getRuntime().availableProcessors();

    /**
     * 最大线程数,默认为 Runtime.getRuntime().availableProcessors()* 2
     */
    private Integer maxPoolSize = Runtime.getRuntime().availableProcessors() * 2;

    /**
     * 队列最大数量
     */
    private Integer queueCapacity;

    /**
     * 空闲线程存活时间
     */
    private Long keepAliveTime = 1L;

    /**
     * 空闲线程存活时间单位
     */
    private TimeUnit unit = TimeUnit.MILLISECONDS;
然后,我们需要扩展ThreadPoolExecutor类,重写beforeExecute、afterExecute和terminated方法,获取更多的指标信息,比如最短执行时间、最长执行时间、平均执行耗时等。
扩展关键点:
- 在构造线程池的时候,在构造方法里传入线程池名称
poolName, 该名称可用做线程池里线程名称前缀,方便日志跟踪。 - 在
beforeExecute方法里,通过ThreadLocal对象记录当前线程任务执行前的开始时间戳,用于后续计算线程任务执行耗时。 - 在
afterExecute方法里,计算当前线程执行耗时,累加总耗时,并计算平均耗时、最大耗时、最小耗时。 - 在线程池生命明周期相关方法里,打印线程池相关指标信息,提供公共方法暴露指标信息。
- 实现自定义线程工厂,在创建新的线程时,以线程池名称
poolName为前缀拼接创建线程序号为线程命名。
/**
 * 线程池监控类
 * <p>
 * 计算线程执行每个任务处理的耗时,以及平均耗时、最大耗时、最小耗时,以及输出监控日志信息等等
 */
public class MonitorThreadPool extends ThreadPoolExecutor
    private static final Logger LOGGER = LoggerFactory.getLogger(MonitorThreadPool.class);

    /**
     * 默认拒绝策略
     */
    private static final RejectedExecutionHandler DEFAULT_HANDLER = new AbortPolicy();

    /**
     * 线程池名称,一般以业务名称命名,方便区分
     */
    private final String poolName;

    /**
     * 最短执行时间
     */
    private Long minCostTime = 0L;

    /**
     * 最长执行时间
     */
    private Long maxCostTime = 0L;
    /**
     * 总的耗时
     */
    private AtomicLong totalCostTime = new AtomicLong();
    /**
     * 用于暂存任务执行起始时间戳
     */
    private ThreadLocal<Long> startTimeThreadLocal = new ThreadLocal<>();

    /**
     * 初始化
     */
    public MonitorThreadPool(int corePoolSize, int maximumPoolSize, long keepAliveTime, TimeUnit unit, BlockingQueue<Runnable> workQueue,String poolName)
        super(corePoolSize, maximumPoolSize, keepAliveTime, unit, workQueue,new MonitorThreadFactory(poolName),DEFAULT_HANDLER);
        this.poolName = poolName;


    /**
     * 线程池延迟关闭时(等待线程池里的任务都执行完毕),统计线程池情况
     */
    @Override
    public void shutdown()
        // 统计已执行任务、正在执行任务、未执行任务数量
        LOGGER.info(" 关闭线程池, 已执行任务: , 正在执行任务: , 未执行任务数量: ",
                this.poolName, this.getCompletedTaskCount(), this.getActiveCount(), this.getQueue().size());
        super.shutdown();


    /**
     * 线程池立即关闭时,统计线程池情况
     */
    @Override
    public List<Runnable> shutdownNow()
        // 统计已执行任务、正在执行任务、未执行任务数量
        LOGGER.info(" 立即关闭线程池,已执行任务: , 正在执行任务: , 未执行任务数量: ",
                this.poolName, this.getCompletedTaskCount(), this.getActiveCount(), this.getQueue().size());
        return super.shutdownNow();


    /**
     * 任务执行之前,记录任务开始时间
     */
    @Override
    protected void beforeExecute(Thread t, Runnable r)
        //记录任务开始时间
        startTimeThreadLocal.set(System.currentTimeMillis());
        super.beforeExecute(t, r);


    /**
     * 任务执行之后,计算任务结束时间
     */
    @Override
    protected void afterExecute(Runnable r, Throwable t)
        // 当前任务耗时
        long costTime = System.currentTimeMillis() - startTimeThreadLocal.get();
        startTimeThreadLocal.remove();
        // 更新最大耗时时长
        maxCostTime = maxCostTime > costTime ? maxCostTime : costTime;
        if (getCompletedTaskCount() == 0)
            minCostTime = costTime;

        // 更新最小耗时时长
        minCostTime = minCostTime < costTime ? minCostTime : costTime;
        // 统计总耗时
        totalCostTime.addAndGet(costTime);
        LOGGER.info("-monitor: " +
                        "任务耗时:  ms, 初始线程数: , 核心线程数: , 执行的任务数量: , " +
                        "已完成任务数量: , 任务总数: , 队列里缓存的任务数量: , 池中存在的最大线程数: , " +
                        "最大允许的线程数: ,  线程空闲时间: , 线程池是否关闭: , 线程池是否终止: ",
                this.poolName,
                costTime, this.getPoolSize(), this.getCorePoolSize(), this.getActiveCount(),
                this.getCompletedTaskCount(), this.getTaskCount(), this.getQueue().size(), this.getLargestPoolSize(),
                this.getMaximumPoolSize(), this.getKeepAliveTime(TimeUnit.MILLISECONDS), this.isShutdown(), this.isTerminated());
        super.afterExecute(r, t);


    // 获取最小耗时时长
    public Long getMinCostTime()
        return minCostTime;


    // 获取最大耗时时长
    public Long getMaxCostTime()
        return maxCostTime;


    // 计算平均耗时时长
    public long getAverageCostTime()
        if (getCompletedTaskCount() == 0 || totalCostTime.get() == 0)
            return 0;

        // 总完成耗时除以总完成任务数
        return totalCostTime.get() / getCompletedTaskCount();


    /**
     * 生成线程池所用的线程,改写了线程池默认的线程工厂,传入线程池名称,便于问题追踪
     */
    static class MonitorThreadFactory implements ThreadFactory
        private static final AtomicInteger POOL_NUMBER = new AtomicInteger(1);
        private final ThreadGroup group;
        private final AtomicInteger threadNumber = new AtomicInteger(1);
        private final String namePrefix;

        /**
         * 初始化线程工厂
         *
         * @param poolName 线程池名称
         */
        MonitorThreadFactory(String poolName)
            SecurityManager s = System.getSecurityManager();
            group = Objects.nonNull(s) ? s.getThreadGroup() : Thread.currentThread().getThreadGroup();
            namePrefix = poolName + "-" + POOL_NUMBER.getAndIncrement() + "-thread-";


        /**
         * 新增线程
         * @param r a runnable to be executed by new thread instance
         * @return
         */
        @Override
        public Thread newThread(Runnable r)
            Thread t = new Thread(group, r, namePrefix + THREAD_NUMBER.getAndIncrement(), 0);
            if (t.isDaemon())
                t.setDaemon(false);

            if (t.getPriority() != Thread.NORM_PRIORITY)
                t.setPriority(Thread.NORM_PRIORITY);

            return t;
最后我们实现线程池管理功能,
- 通过
ThreadPoolConfigProperties读取线程池配置信息,然后根据这些信息,生成对应的MonitorThreadPool线程池对象。 - 通过线程池名称
poolName, 提供对应线程池实例。
/**
 * 线程池管理上下文
 */
@Component
@Slf4j
public class ThreadPoolManager
    @Autowired
    private ThreadPoolConfigProperties threadPoolConfigProperties;
    /**
     * 存储线程池对象
     */
    public Map<String, MonitorThreadPool> threadPoolExecutorMap = new HashMap<>();

    /**
     * 根据配置信息,初始化线程池
     */
    @PostConstruct
    public void init()
        createThreadPools(threadPoolConfigProperties);


    /**
     * 初始化线程池的创建
     *
     * @param threadPoolConfigProperties
     */
    private void createThreadPools(ThreadPoolConfigProperties threadPoolConfigProperties)
        threadPoolConfigProperties.getExecutors().forEach(config ->
            if (!threadPoolExecutorMap.containsKey(config.getThreadPoolName()))
                MonitorThreadPool threadPoolMonitor = new MonitorThreadPool(
                        config.getCorePoolSize(),
                        config.getMaxPoolSize(),
                        config.getKeepAliveTime(),
                        config.getUnit(),
                        new LinkedBlockingQueue<Runnable>(config.getQueueCapacity()),
                        config.getThreadPoolName()
                );
                threadPoolExecutorMap.put(config.getThreadPoolName(),
                        threadPoolMonitor);

        );


    // 根据线程池名称,获取对应线程池实例
    public MonitorThreadPool getThreadPoolExecutor(String poolName)
        MonitorThreadPool threadPoolExecutorForMonitor = threadPoolExecutorMap.get(poolName);
        if (threadPoolExecutorForMonitor == null)
            throw new RuntimeException("找不到名字为" + poolName + "的线程池");

        return threadPoolExecutorForMonitor;


    // 获取线程池Map
    public Map<String, MonitorThreadPool> getThreadPoolExecutorMap()
        return threadPoolExecutorMap;
到这里,我们就实现了一个基本的线程池配置和监控功能,
- 可以通过配置文件实例化对应线程池
- 线程池运行时,会在相关生命周期方法里打印详细的指标信息,供开发人员参考。
为了验证上述实现的线程池功能是否满足要求,我们再编写一个测试接口,
/**
 * 线程池测试接口
 */
@RestController
@Slf4j
public class ThreadPoolController
    @Autowired
    private ThreadPoolManager threadPoolManager;

    @GetMapping("/execute")
    public String doExecute()
        threadPoolManager.getThreadPoolExecutorMap().forEach((poolName, monitorThreadPool) ->
            for (int i = 0; i < 100; i++)
                int taskId = i;
                monitorThreadPool.execute(() ->
                    try
                        log.info("run task:" + taskId);
                        Thread.sleep(new Random().nextInt(4000));
                     catch (InterruptedException e)
                        e.printStackTrace();

                );

        );
        return "success";
该接口用于对每个线程池,提交100个任务。
接下来我们看下部分输出结果:
 [   user-thread-pool-1-thread-1]   LN:? user-thread-pool-monitor: 任务耗时: 2849 ms, 初始线程数: 4, 核心线程数: 4, 执行的任务数量: 4, 已完成任务数量: 92, 任务总数: 100, 队列里缓存的任务数量: 4, 池中存在的最大线程数: 4, 最大允许的线程数: 8,  线程空闲时间: 1000, 线程池是否关闭: false, 线程池是否终止: false
 [   user-thread-pool-1-thread-1]   LN:? run task:96
 [   user-thread-pool-1-thread-4]   LN:? user-thread-pool-monitor: 任务耗时: 3407 ms, 初始线程数: 4, 核心线程数: 4, 执行的任务数量: 4, 已完成任务数量: 93, 任务总数: 100, 队列里缓存的任务数量: 3, 池中存在的最大线程数: 4, 最大允许的线程数: 8,  线程空闲时间: 1000, 线程池是否关闭: false, 线程池是否终止: false
 [   user-thread-pool-1-thread-4]   LN:? run task:97
 [  order-thread-pool-2-thread-2]   LN:? order-thread-pool-monitor: 任务耗时: 2266 ms, 初始线程数: 2, 核心线程数: 2, 执行的任务数量: 2, 已完成任务数量: 52, 任务总数: 100, 队列里缓存的任务数量: 46, 池中存在的最大线程数: 2, 最大允许的线程数: 4,  线程空闲时间: 2000, 线程池是否关闭: false, 线程池是否终止: false
 [  order-thread-pool-2-thread-2]   LN:? run task:54
 [   user-thread-pool-1-thread-1]   LN:? user-thread-pool-monitor: 任务耗时: 1553 ms, 初始线程数: 4, 核心线程数: 4, 执行的任务数量: 4, 已完成任务数量: 94, 任务总数: 100, 队列里缓存的任务数量: 2, 池中存在的最大线程数: 4, 最大允许的线程数: 8,  线程空闲时间: 1000, 线程池是否关闭: false, 线程池是否终止: false
 [   user-thread-pool-1-thread-1]   LN:? run task:98
 [   user-thread-pool-1-thread-3]   LN:? user-thread-pool-monitor: 任务耗时: 2396 ms, 初始线程数: 4, 核心线程数: 4, 执行的任务数量: 4, 已完成任务数量: 95, 任务总数: 100, 队列里缓存的任务数量: 1, 池中存在的最大线程数: 4, 最大允许的线程数: 8,  线程空闲时间: 1000, 线程池是否关闭: false, 线程池是否终止: false
 [   user-thread-pool-1-thread-3]   LN:? run task:99
 [   user-thread-pool-1-thread-4]   LN:? user-thread-pool-monitor: 任务耗时: 2017 ms, 初始线程数: 4, 核心线程数: 4, 执行的任务数量: 4, 已完成任务数量: 96, 任务总数: 100, 队列里缓存的任务数量: 0, 池中存在的最大线程数: 4, 最大允许的线程数: 8,  线程空闲时间: 1000, 线程池是否关闭: false, 线程池是否终止: false
 [  order-thread-pool-2-thread-1]   LN:? order-thread-pool-monitor: 任务耗时: 2713 ms, 初始线程数: 2, 核心线程数: 2, 执行的任务数量: 2, 已完成任务数量: 53, 任务总数: 100, 队列里缓存的任务数量: 45, 池中存在的最大线程数: 2, 最大允许的线程数: 4,  线程空闲时间: 2000, 线程池是否关闭: false, 线程池是否终止: false
 [  order-thread-pool-2-thread-1]   LN:? run task:55
 [   user-thread-pool-1-thread-2]   LN:? user-thread-pool-monitor: 任务耗时: 3932 ms, 初始线程数: 4, 核心线程数: 4, 执行的任务数量: 3, 已完成任务数量: 97, 任务总数: 100, 队列里缓存的任务数量: 0, 池中存在的最大线程数: 4, 最大允许的线程数: 8,  线程空闲时间: 1000, 线程池是否关闭: false, 线程池是否终止: false
 [  order-thread-pool-2-thread-1]   LN:? order-thread-pool-monitor: 任务耗时: 467 ms, 初始线程数: 2, 核心线程数: 2, 执行的任务数量: 2, 已完成任务数量: 54, 任务总数: 100, 队列里缓存的任务数量: 44, 池中存在的最大线程数: 2, 最大允许的线程数: 4,  线程空闲时间: 2000, 线程池是否关闭: false, 线程池是否终止: false
 [  order-thread-pool-2-thread-1]   LN:? run task:56
第二步:动态配置线程池参数
线程池使用面临的核心的问题在于:线程池的参数并不好配置。
一方面线程池的运行机制不是很好理解,配置合理需要强依赖开发人员的个人经验和知识;
另一方面,线程池执行的情况和任务类型相关性较大,IO密集型和CPU密集型的任务运行起来的情况差异非常大,这导致业界并没有一些成熟的经验策略帮助开发人员参考。
线程池参数设置不合理,比如核心线程数、最大线程数、任务队列容量、空闲线程存活时间等,可能导致线程池无法有效地处理任务,或者消耗过多的系统资源,甚至引发内存溢出。
那么有没有固定的计算公式,能够让开发人员很简易地计算出某种场景中的线程池应该是什么参数呢?
下图是业界的一些主流线程池参数配置方案:
第1类线程数: IO 密集型任务确定线程数
CPU核心数两倍的线程
第2类线程数: CPU 密集型任务确定线程数
线程数量应当等于CPU的核心数
第3类线程数: 为混合型任务确定线程数
最佳线程数目 =(线程等待时间与线程CPU时间之比 + 1)* CPU核数
以上线程池计算公式。具体请参见清华大学出版社的 尼恩《Java 高并发核心编程 卷2 加强版》PDF。
实际上, 大部分的线程都是 混合型线程, 很难准确的去估算 线程等待时间 和 线程CPU时间. 所以,一种有效的办法是: 根据 监控指标,动态的标准 线程池的线程数。
如何实现线程池参数的动态配置和即时生效呢? 一个有效的方法是将线程池的参数从代码中迁移到分布式配置中心上。
动态化线程池的核心设计包括以下三个方面:
-
简化线程池配置:
线程池构造参数有8个,但是最核心的是3个:
corePoolSize、maximumPoolSize,workQueue,它们决定了线程池的任务分配和线程分配策略。实际应用中我们获取并发性的场景主要是两种:
(1)并行执行子任务,提高响应速度。这种情况下,应该使用同步队列,没有任务应该被缓存下来,而是应该立即执行。
(2)并行执行大批次任务,提升吞吐量。这种情况下,应该使用有界队列,使用队列去缓冲大批量的任务,队列容量必须声明,防止任务无限制堆积。
所以线程池只需要提供这三个关键参数的配置,并且提供两种队列的选择,就可以满足绝大多数的业务需求。
-
参数可动态修改:
为了解决参数不好配,修改参数成本高等问题。
我们需要封装线程池,让线程池能够监听外部的消息,并根据消息进行修改配置。
需要将线程池的配置放置在平台侧,让开发人员方便地查看、修改线程池配置。
-
增加线程池监控:
没有状态观测就没有改进依据。
我们在线程池执行任务的生命周期添加了监控能力,帮助开发同学了解线程池状态。
以上这三个方面,我们先实现前两个方面的功能设计,在后续的步骤中我们再实现第三个方面功能。
具体的实现步骤如下:
1 使用配置中台进行参数的集中化管理
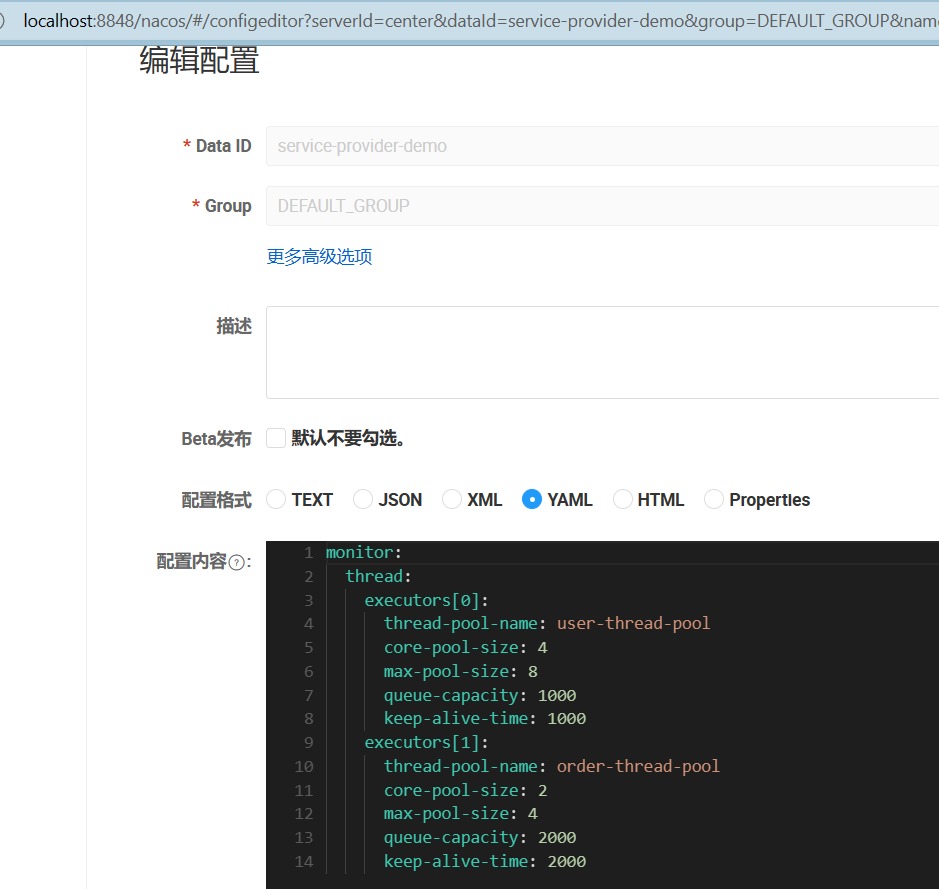
将线程池属性配置从本地配置文件迁移到Nacos注册中心。
2 让nacos的配置动态生效
ThreadPoolConfigProperties类加上@RefreshScope注解, 用于在nacos上修改配置后,实时同步到系统对象。
3 修改线程池的参数
ThreadPoolManager监听EnvironmentChangeEvent事件,通过ThreadPoolConfigProperties实例修改对应线程池属性。
1.使用配置中台nacos 进行参数的集中化管理
Nacos配置示例如下图所示:
2.让nacos的配置动态生效
ThreadPoolConfigProperties类加上@RefreshScope 注解, 用于在nacos`上修改配置后,实时同步到系统对象。
@RefreshScope
public class ThreadPoolConfigProperties
修改了 ThreadPoolConfigProperties后,接下来,springboot会触发与之相关的EnvironmentChangeEvent 环境变化事件。
EnvironmentChangeEvent 事件:环境变化事件。
接收到此事件表示应用里的配置数据已经发生改变。
EnvironmentChangeEvent事件里维护着一个配置项keys集合,当配置动态修改后,配置值发生变化后的key会设置到事件的keys集合中。
ThreadPoolManager监听EnvironmentChangeEvent事件,通过ThreadPoolConfigProperties实例修改对应线程池属性。
/**
 * 调整线程池
 *
 * @param threadPoolConfigProperties
 */
private void changeThreadPools(ThreadPoolConfigProperties threadPoolConfigProperties)
    threadPoolConfigProperties.getExecutors().forEach(config ->
        ThreadPoolExecutor threadPoolExecutor = threadPoolExecutorMap.get(config.getThreadPoolName());
        if (Objects.nonNull(threadPoolExecutor))
            threadPoolExecutor.setCorePoolSize(config.getCorePoolSize());
            threadPoolExecutor.setMaximumPoolSize(config.getMaxPoolSize());
            threadPoolExecutor.setKeepAliveTime(config.getKeepAliveTime(), config.getUnit());

    );


/**
     * 监听事件
     */
@EventListener
public void envListener(EnvironmentChangeEvent event)
    log.info("配置发生变更" + event);
    changeThreadPools(threadPoolConfigProperties);
3.修改线程池的参数
这里我们在changeThreadPools方法里,只修改了线程池的corePoolSize, maximumPoolSize, keepAliveTime三个属性。因为线程池核心类ThreadPoolExecutor 支持动态修改这三个属性。
以setCorePoolSize方法为例,该方法用于设置线程的核心数。该方法将覆盖构造函数中设置的任何值。
如果新值小于当前值,则多余的现有线程将在下次空闲时终止。
如果更大,如果需要,将启动新线程以执行任何排队的任务。
麻烦的问题是:线程池核心类ThreadPoolExecutor 不支持修改队列容量大小。所以,queue-capacity 不好修改。
至于为啥不支持修改队列容量大小,因为BlockingQueue接口相关实现类都不支持动态修改容量大小。
以ArrayBlockingQueue和LinkedBlockingQueue为例,ArrayBlockingQueue底层是数组,大小固定。
而LinkedBlockingQueue的capacity则被final修饰,不可修改。
private final int capacity;
如果我们想基于ArrayBlockingQueue进行改造,但修改大小必然要涉及到重新创建数组,以及新旧数组的数据迁移问题,有些复杂。
如果考虑基于LinkedBlockingQueue进行改造,我们只要将修饰capacity的final去掉即可实现动态调整。
但有一个问题,LinkedBlockingQueue具体实现中很多是基于capacity不变进行的设计,需要将涉及的功能进行调整。
对该功能感兴趣的同学可以参考elasticsearch官方提供的ResizableBlockingQueue队列。
该队列支持通过adjustCapacity方法动态修改队列容量。
package org.elasticsearch.common.util.concurrent;

import java.util.concurrent.BlockingQueue;

/**
 * Extends the @code SizeBlockingQueue to add the @code adjustCapacity method, which will adjust
 * the capacity by a certain amount towards a maximum or minimum.
 */
final class ResizableBlockingQueue<E> extends SizeBlockingQueue<E>

    private volatile int capacity;

    ResizableBlockingQueue(BlockingQueue<E> queue, int initialCapacity)
        super(queue, initialCapacity);
        this.capacity = initialCapacity;


    @Override
    public int capacity()
        return this.capacity;


    @Override
    public int remainingCapacity()
        return Math.max(0, this.capacity());


    /** Resize the limit for the queue, returning the new size limit */
    public synchronized int adjustCapacity(int optimalCapacity, int adjustmentAmount, int minCapacity, int maxCapacity)
        assert adjustmentAmount > 0 : "adjustment amount should be a positive value";
        assert optimalCapacity >= 0 : "desired capacity cannot be negative";
        assert minCapacity >= 0 : "cannot have min capacity smaller than 0";
        assert maxCapacity >= minCapacity : "cannot have max capacity smaller than min capacity";

        if (optimalCapacity == capacity)
            // Yahtzee!
            return this.capacity;


        if (optimalCapacity > capacity + adjustmentAmount)
            // adjust up
            final int newCapacity = Math.min(maxCapacity, capacity + adjustmentAmount);
            this.capacity = newCapacity;
            return newCapacity;
         else if (optimalCapacity < capacity - adjustmentAmount)
            // adjust down
            final int newCapacity = Math.max(minCapacity, capacity - adjustmentAmount);
            this.capacity = newCapacity;
            return newCapacity;
         else
            return this.capacity;
现在,我们验证下通过nacos修改线程池属性后,配置是否实时生效。
项目启动后,修改配置如下:
monitor:
  thread:
    executors[0]:
      thread-pool-name: user-thread-pool
      core-pool-size: 6
      max-pool-size: 8
      queue-capacity: 1000
      keep-alive-time: 1000
    executors[1]:
      thread-pool-name: order-thread-pool
      core-pool-size: 3
      max-pool-size: 4
      queue-capacity: 2000
      keep-alive-time: 2000
在控制台可以看到以下日志:
[ngPolling.fixed-127.0.0.1_8848] c.c.c.n.d.c.thread.ThreadPoolManager     LN:? 配置发生变更org.springframework.cloud.context.environment.EnvironmentChangeEvent[source=org.springframework.boot.web.servlet.context.AnnotationConfigServletWebServerApplicationContext@54534abf, started on Thu May 11 10:38:41 CST 2023, parent: org.springframework.context.annotation.AnnotationConfigApplicationContext@aa549e5]
[ngPolling.fixed-127.0.0.1_8848] o.s.c.e.event.RefreshEventListener       LN:? Refresh keys changed: [monitor.thread.executors[1].core-pool-size, monitor.thread.executors[0].core-pool-size]
运行测试接口,部分日志如下:
[   user-thread-pool-1-thread-1] c.c.c.n.d.c.thread.MonitorThreadPool     LN:? user-thread-pool-monitor: 任务耗时: 2336 ms, 初始线程数: 6, 核心线程数: 6, 执行的任务数量: 6, 已完成任务数量: 293, 任务总数: 300, 队列里缓存的任务数量: 1, 池中存在的最大线程数: 6, 最大允许的线程数: 8,  线程空闲时间: 1000, 线程池是否关闭: false, 线程池是否终止: false
[   user-thread-pool-1-thread-1] c.c.c.n.d.c.ThreadPoolController         LN:? run task:99
[   user-thread-pool-1-thread-6] c.c.c.n.d.c.thread.MonitorThreadPool     LN:? user-thread-pool-monitor: 任务耗时: 2175 ms, 初始线程数: 6, 核心线程数: 6, 执行的任务数量: 6, 已完成任务数量: 294, 任务总数: 300, 队列里缓存的任务数量: 0, 池中存在的最大线程数: 6, 最大允许的线程数: 8,  线程空闲时间: 1000, 线程池是否关闭: false, 线程池是否终止: false
[  order-thread-pool-2-thread-2] c.c.c.n.d.c.thread.MonitorThreadPool     LN:? order-thread-pool-monitor: 任务耗时: 2019 ms, 初始线程数: 3, 核心线程数: 3, 执行的任务数量: 3, 已完成任务数量: 247, 任务总数: 300, 队列里缓存的任务数量: 50, 池中存在的最大线程数: 3, 最大允许的线程数: 4,  线程空闲时间: 2000, 线程池是否关闭: false, 线程池是否终止: false
[  order-thread-pool-2-thread-2] c.c.c.n.d.c.ThreadPoolController         LN:? run task:50
[  order-thread-pool-2-thread-3] c.c.c.n.d.c.thread.MonitorThreadPool     LN:? order-thread-pool-monitor: 任务耗时: 3586 ms, 初始线程数: 3, 核心线程数: 3, 执行的任务数量: 3, 已完成任务数量: 248, 任务总数: 300, 队列里缓存的任务数量: 49, 池中存在的最大线程数: 3, 最大允许的线程数: 4,  线程空闲时间: 2000, 线程池是否关闭: false, 线程池是否终止: false
第三步:监控线程池
目前为止,我们已实现通过日志观察线程运行情况,以及通过和Nacos注册中心集合实现动态调整线程池核心参数功能。
但是作为开发人员,你是否经常遇到这样的问题:
当你的应用出现异常或性能下降时,你需要花费大量的时间和精力去查看日志文件,分析问题的原因和解决方案。日志文件往往分散在不同的服务器上,不易于集中管理和查询。
日志文件也可能过大或过多,导致磁盘空间不足或内存溢出。
日志文件的格式和内容也可能不统一或不清晰,给你带来阅读和理解的困难。
总之,通过日志进行监控是一种不方便和低效的方式,它会影响你的开发效率和应用质量。
有没有一种更好的方式来监控你的应用呢?答案是肯定的。
Spring Boot Actuator是Spring Boot的一个子项目,它可以为你的应用添加一些生产级的功能,而你只需要很少的配置。
这些功能包括:
- Endpoint:这是一些特殊的URL,可以暴露你的应用的内部信息,例如健康状况、指标、环境变量、日志等。你可以通过HTTP或
JMX访问这些Endpoint,或者通过一些工具来可视化地展示这些信息。 - Health:这是一个Endpoint,可以显示你的应用的健康状况,包括应用本身和它依赖的组件(如数据库、缓存、消息队列等)的状态。你可以自定义健康指标和细节。
- Metrics:这是一个Endpoint,可以显示你的应用的各种指标,包括内存、CPU、线程、HTTP请求等。你可以自定义指标和收集方式。
- Auditing:这是一个功能,可以记录你的应用的重要事件,如认证、授权、失败等。你可以自定义审计事件和存储方式。
- Logging:这是一个功能,可以让你在运行时查看和修改你的应用的日志级别。你可以通过Endpoint或
JMX来操作日志。
通过Endpoint,你可以快速地了解你的应用是否正常运行,是否有潜在的问题或风险,以及如何优化你的应用性能和资源利用率。
首先引入actuator依赖
<!--健康检查-->
<dependency>
    <groupId>org.springframework.boot</groupId>
    <artifactId>spring-boot-starter-actuator</artifactId>
</dependency>
下面我们自定义一个Endpoint类,暴露线程池相关指标信息。
@Configuration
@Endpoint(id = "thread")
public class ThreadPoolEndpoint
    @Autowired
    private ThreadPoolManager threadPoolManager;

    @ReadOperation
    public Map<String, Object> threadPoolsMetric()
        Map<String, Object> metricMap = new HashMap<>();
        List<Map> threadPools = new ArrayList<>();
        threadPoolManager.getThreadPoolExecutorMap().forEach((k, v) ->
            MonitorThreadPool tpe = (MonitorThreadPool) v;
            Map<String, Object> poolInfo = new HashMap<>();
            poolInfo.put("thread.pool.name", k);
            poolInfo.put("thread.pool.core.size", tpe.getCorePoolSize());
            poolInfo.put("thread.pool.largest.size", tpe.getLargestPoolSize());
            poolInfo.put("thread.pool.max.size", tpe.getMaximumPoolSize());
            poolInfo.put("thread.pool.thread.count", tpe.getPoolSize());
            poolInfo.put("thread.pool.max.costTime", tpe.getMaxCostTime());
            poolInfo.put("thread.pool.average.costTime", tpe.getAverageCostTime());
            poolInfo.put("thread.pool.min.costTime", tpe.getMinCostTime());
            poolInfo.put("thread.pool.active.count", tpe.getActiveCount());
            poolInfo.put("thread.pool.completed.taskCount", tpe.getCompletedTaskCount());
            poolInfo.put("thread.pool.queue.name", tpe.getQueue().getClass().getName());
            poolInfo.put("thread.pool.rejected.name", tpe.getRejectedExecutionHandler().getClass().getName());
            poolInfo.put("thread.pool.task.count", tpe.getTaskCount());
            threadPools.add(poolInfo);
        );
        metricMap.put("threadPools", threadPools);
        return metricMap;
在application.yml里暴露端口
#### 暴露端点
management:
  endpoints:
    web:
      base-path: "/actuator"  # 配置 Endpoint 的基础路径
      exposure:
        include: \'*\'  #在yaml 文件属于关键字,所以需要加引号
通过http接口: /service-provider-demo/actuator/thread 访问该endpoint信息:
    "threadPools": [

            "thread.pool.queue.name": "java.util.concurrent.LinkedBlockingQueue",
            "thread.pool.core.size": 6,
            "thread.pool.min.costTime": 9,
            "thread.pool.completed.taskCount": 300,
            "thread.pool.max.costTime": 7185,
            "thread.pool.task.count": 300,
            "thread.pool.name": "user-thread-pool",
            "thread.pool.largest.size": 6,
            "thread.pool.rejected.name": "java.util.concurrent.ThreadPoolExecutor$AbortPolicy",
            "thread.pool.active.count": 0,
            "thread.pool.thread.count": 6,
            "thread.pool.average.costTime": 1918,
            "thread.pool.max.size": 8
        ,

            "thread.pool.queue.name": "java.util.concurrent.LinkedBlockingQueue",
            "thread.pool.core.size": 3,
            "thread.pool.min.costTime": 61,
            "thread.pool.completed.taskCount": 300,
            "thread.pool.max.costTime": 3979,
            "thread.pool.task.count": 300,
            "thread.pool.name": "order-thread-pool",
            "thread.pool.largest.size": 3,
            "thread.pool.rejected.name": "java.util.concurrent.ThreadPoolExecutor$AbortPolicy",
            "thread.pool.active.count": 0,
            "thread.pool.thread.count": 3,
            "thread.pool.average.costTime": 1990,
            "thread.pool.max.size": 4

    ]
第四步:接入Prometheus
Prometheus是一个开源的监控和告警系统,它可以从应用的Endpoint拉取指标数据,并提供查询和可视化的功能。使用Prometheus可以获得以下好处:
- Prometheus可以定期从应用的Endpoint拉取指标数据,并存储在它自己的时间序列数据库中。这样就可以在任何时间点查看应用的历史数据,而不仅仅是当前的数据。我们也可以对数据进行聚合、过滤、计算等操作,以得到更多的洞察。
- Prometheus可以为指标数据设置告警规则,当某些条件满足时,它可以向我们发送通知,例如邮件、短信、Slack等。这样,我们就可以及时发现和处理应用的异常或风险,而不需要人工监控。
- Prometheus可以与其他工具集成,例如
Grafana、Alertmanager等,来提供更丰富的可视化和告警管理功能。我们可以使用Grafana来创建美观和实用的仪表盘,来展示你的指标数据。我们也可以使用Alertmanager来管理和分发你的告警通知。
总之,使用Prometheus,可以更方便和高效地监控和管理我们的应用,提升我们的应用质量和用户满意度。
Grafana是一个开源的数据可视化和监控平台,它可以从多种数据源(如Prometheus、InfluxDB、Elasticsearch等)获取数据,并创建美观和实用的仪表盘,来展示你的指标数据。
除了可视化功能,Grafana还提供了报警功能,让你可以为你的指标数据设置告警规则,当某些条件满足时,它可以向你发送通知,例如邮件、短信、Slack等。
接下来,我们将展示如何将线程池的指标信息上报到Prometheus, 并通过Grafana以图表的形式展示指标数据。
1.安装和配置 prometheus 和 Grafana
为了方便演示,我们直接在本机采用docker安装,
首先创建相关文件夹,config为配置文件夹,grafana-storage用于存储grafana数据,prometheus-data存储prometheus数据,

在config文件夹下,新建prometheus.yml配置文件:
global:
  scrape_interval:     60s
  evaluation_interval: 60s

scrape_configs:
  - job_name: prometheus
    static_configs:
      - targets: [\'10.23.48.43:9300\']
        labels:
          instance: prometheus
  - job_name: springboot
    metrics_path: \'/service-provider-demo/actuator/prometheus\'
    scrape_interval: 5s
    static_configs:
      - targets: [\'10.23.48.43:28088\']
        labels:
          instance: service-provider-demo
其中10.23.48.43:28088为service-provider-demo项目的ip和端口。
创建prometheus.bat:
docker run -d --name=prometheus -p 9300:9090 -v D:\\program\\docker\\prometheus\\config\\prometheus.yml:/etc/prometheus/prometheus.yml -v D:\\program\\docker\\prometheus\\prometheus-data:/prometheus prom/prometheus
创建grafana.bat:
docker run -d -p 9400:3000 --name=grafana -v D:\\program\\docker\\prometheus\\grafana-storage:/var/lib/grafana grafana/grafana
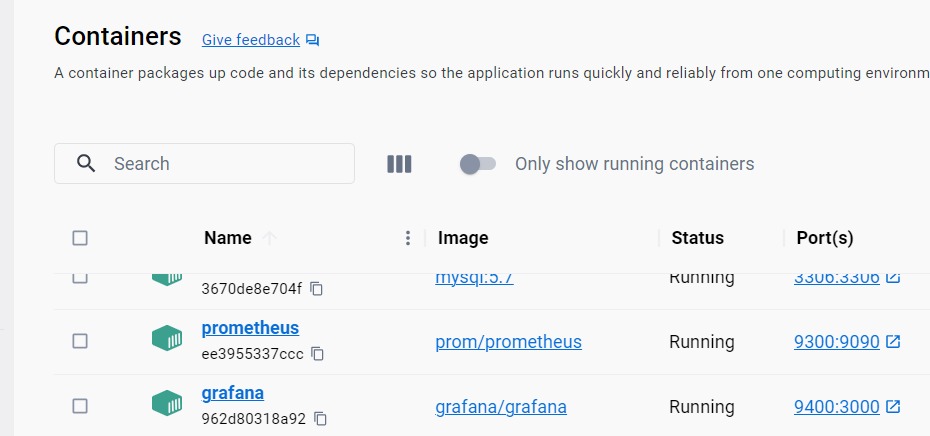
分别点击prometheus.bat和grafana.bat脚本启动prometheus和grafana,下图为启动后,docker desktop 客户端界面:
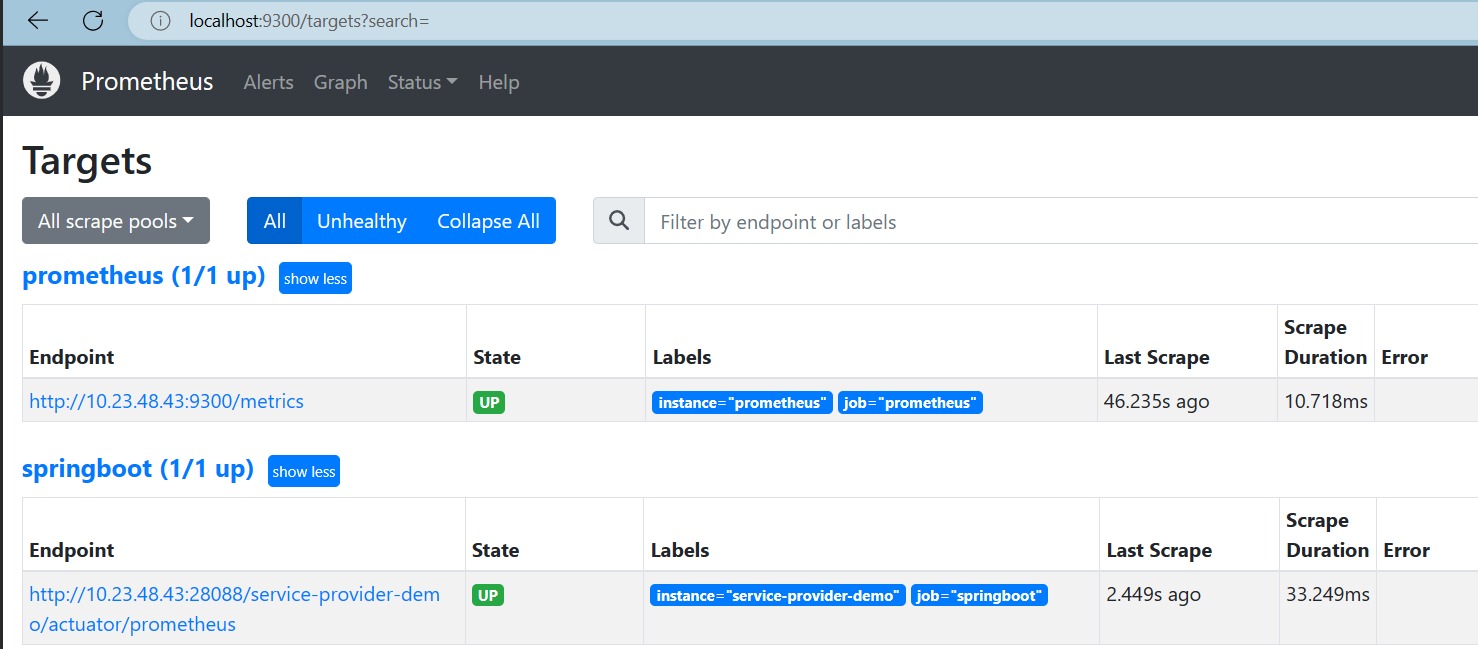
下图为prometheus管理页面:Prometheus Time Series Collection and Processing Server
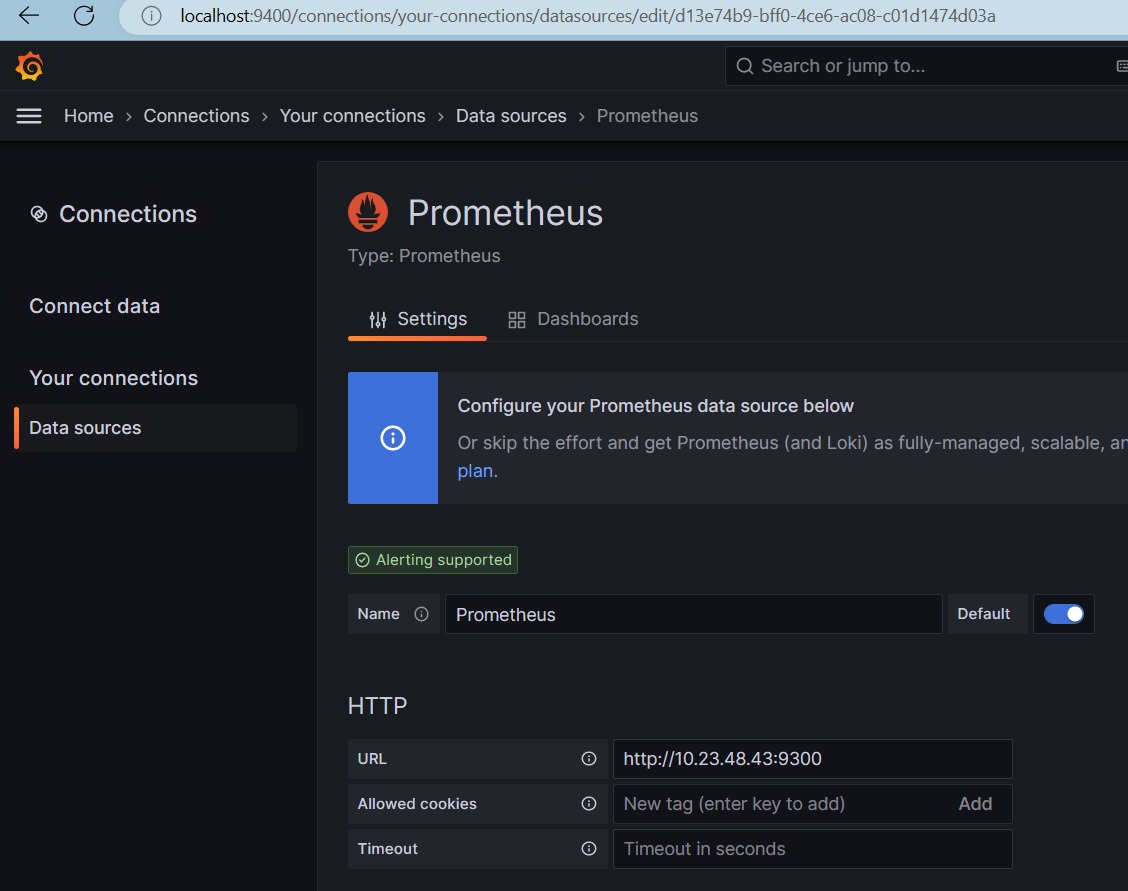
下图为grafana管理页面:Data sources - Your connections - Connections - Grafana
在connections界面,添加本机Prometheus数据源

在Dashboards界面,选择JVM仪表盘,即可看到,Application为service-provider-demo项目的相关JVM指标信息图表:
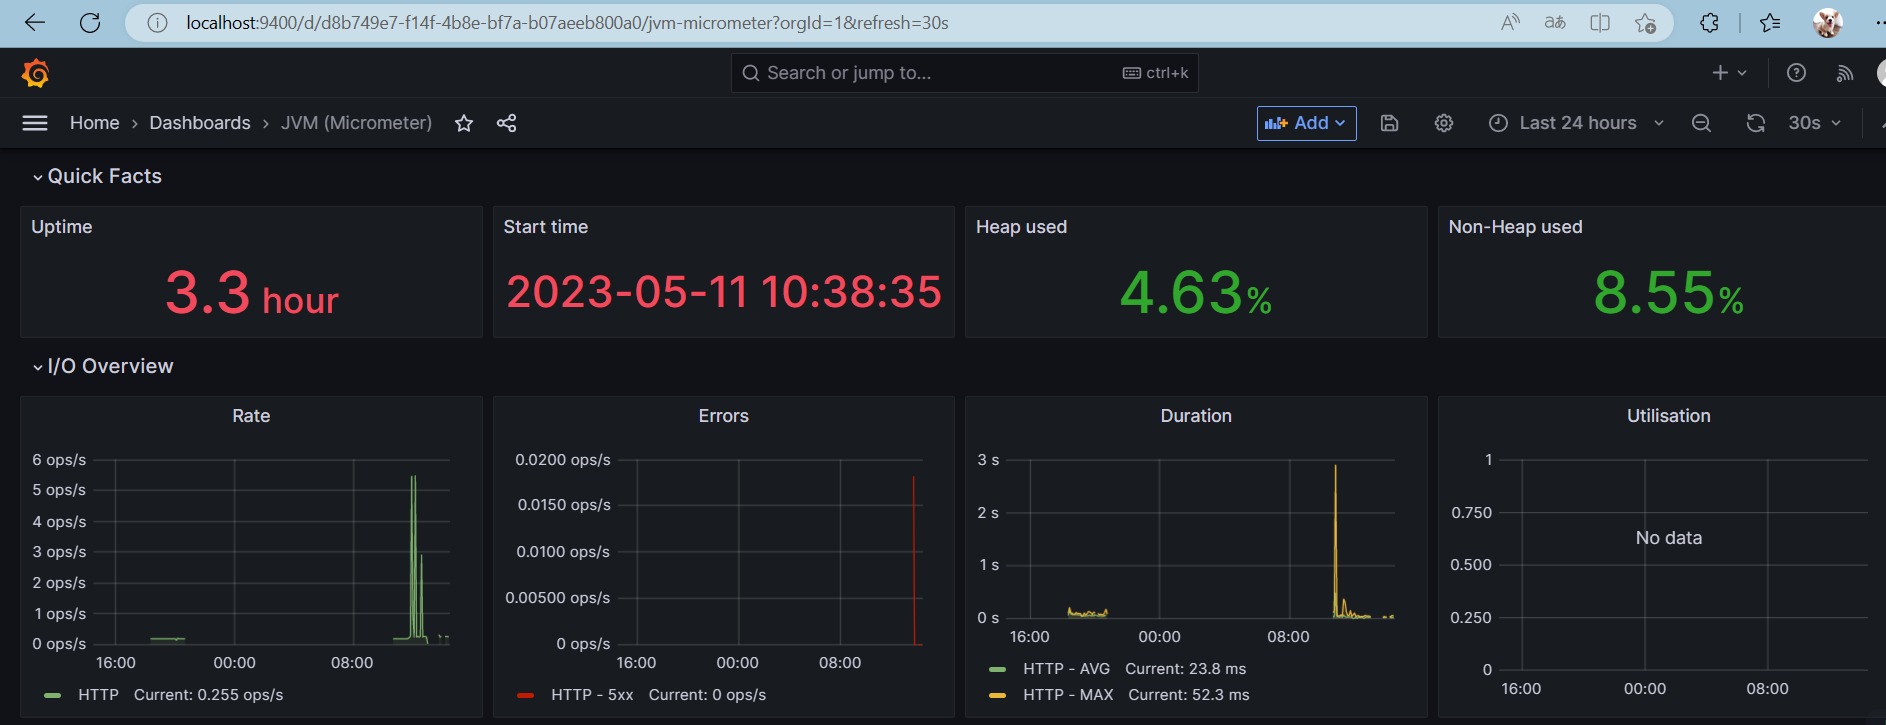
到这里,我们的环境就配置好了。
2.收集线程池指标信息
首先,在项目中引入prometheus相关依赖:
<!--健康检查-->
<dependency>
    <groupId>org.springframework.boot</groupId>
    <artifactId>spring-boot-starter-actuator</artifactId>
</dependency>

<dependency>
    <groupId>io.micrometer</groupId>
    <artifactId>micrometer-registry-prometheus</artifactId>
</dependency>
在application.yml文件中设置相关信息:
#### 暴露端点
management:
  endpoints:
    web:
      base-path: "/actuator"  # 配置 Endpoint 的基础路径
      exposure:
        include: \'*\'  #在yaml 文件属于关键字,所以需要加引号
  endpoint:
    health:
      show-details: always
  metrics:
    tags:
      application: $spring.application.name
    export:
      prometheus:
        enabled: true
        step: 20s
        descriptions: true
接下来,需要使用Micrometer来创建和管理我们的线程池指标数据。
Micrometer是一个度量工具库,它提供了一套通用的API,让项目可以在不同的监控系统中使用相同的指标。
我们需要注入一个MeterRegistry类型的bean,它是Micrometer的核心接口,负责注册和管理各种类型的指标。
Micrometer支持多种类型的指标,例如Counter(计数器)、Gauge(计量)、Timer(计时器)、DistributionSummary(分布摘要)等。我们可以根据需求选择合适的类型,并为它们添加名称、标签和描述。
在这里,我们会注册4个指标,分别是
threadPoolCompletedTaskCount: 已完成任务数, Counter类型(递增)threadPoolTotalCostTime: 已完成任务总耗时,Counter类型(递增)threadPoolActiveCount: 当前活跃任务数, Gauge类型 (根据实际情况变化)taskCostTimeHistogram: 直方图,任务耗时分布, Histogram类型 (统计不同耗时下的累计任务数量)
以下是用于初始化上述4个指标的代码:
@Configuration
public class PrometheusComponent implements ApplicationContextAware
    private static PrometheusComponent instance;
    /**
     * 已完成任务数
     */
    private Counter threadPoolCompletedTaskCount;
    /**
     * 已完成任务总耗时
     */
    private Counter threadPoolTotalCostTime;
    /**
     * 当前活跃任务数
     */
    private Gauge threadPoolActiveCount;
    /**
     * 直方图,任务耗时分布
     */
    private Histogram taskCostTimeHistogram;
    /**
     * 配置MeterRegistry
     * @param applicationName 应用名称
     * @return
     */
    @Bean
    MeterRegistryCustomizer<MeterRegistry> configurer(@Value("$spring.application.name") String applicationName)
        return (registry) -> registry.config().commonTags("application", applicationName);


    /**
     * 初始化指标对象
     * @param applicationContext
     * @throws BeansException
     */
    @Override
    public void setApplicationContext(ApplicationContext applicationContext) throws BeansException
        instance = this;
        CollectorRegistry collectorRegistry = applicationContext.getBean(CollectorRegistry.class);
        // 这里指定SpringBoot容器的CollectorRegistry,如果使用默认的会导致无法收集
        // 实例化指标,添加名称、标签和描述,注册到收集器里
        threadPoolCompletedTaskCount = Counter.build().name("thread_pool_task_completed_count").labelNames("poolName")
                .help("线程池已完成任务数").register(collectorRegistry);
        threadPoolTotalCostTime = Counter.build().name("thread_pool_total_cost_time").labelNames("poolName")
                .help("线程池已完成任务总耗时").register(collectorRegistry);

        threadPoolActiveCount = Gauge.build()
                .name("thread_pool_task_active_count").labelNames("poolName")
                .help("线程池当前活跃任务数").register(collectorRegistry);

        taskCostTimeHistogram = Histogram.build().labelNames("poolName")
                .name("thread_pool_task_cost_time").help("请求耗时分布")
                .register(collectorRegistry);


    public static PrometheusComponent getInstance()
        return instance;


    public Counter threadPoolCompletedTaskCount()
        return threadPoolCompletedTaskCount;


    public Counter threadPoolTotalCostTime()
        return threadPoolTotalCostTime;


    public Gauge threadPoolActiveCount()
        return threadPoolActiveCount;


    public Histogram taskCostTimeHistogram()
        return taskCostTimeHistogram;
改进MonitorThreadPool线程池类,在相关方法里添加相关指标设置:
public class MonitorThreadPool extends ThreadPoolExecutor
    // 用于统计任务耗时, 在任务开始时启动计时,任务结束时关闭计时,获取执行时长
    private ThreadLocal<Histogram.Timer> timerThreadLocal = new ThreadLocal<>();

    //// 省略其它代码

    /**
     * 线程池立即关闭时,统计线程池情况
     */
    @Override
    public List<Runnable> shutdownNow()
        // 统计已执行任务、正在执行任务、未执行任务数量
        LOGGER.info(" 立即关闭线程池,已执行任务: , 正在执行任务: , 未执行任务数量: ",
                this.poolName, this.getCompletedTaskCount(), this.getActiveCount(), this.getQueue().size());
        // 活跃任务数清零
        PrometheusComponent.getInstance().threadPoolActiveCount().labels(this.poolName).set(0);
        return super.shutdownNow();


    /**
     * 任务执行之前,记录任务开始时间
     */
    @Override
    protected void beforeExecute(Thread t, Runnable r)
        //记录任务开始时间
        startTimeThreadLocal.set(System.currentTimeMillis());
        // 活跃任务数 +1
        PrometheusComponent.getInstance().threadPoolActiveCount().labels(this.poolName).inc();
        // 开始计时
        timerThreadLocal.set(PrometheusComponent.getInstance().taskCostTimeHistogram()
                .labels(this.poolName)
                .startTimer());
        super.beforeExecute(t, r);


    /**
     * 任务执行之后,计算任务结束时间
     */
    @Override
    protected void afterExecute(Runnable r, Throwable t)
        //// 省略其它代码
        // 总耗时增加
        PrometheusComponent.getInstance().threadPoolTotalCostTime().labels(this.poolName).inc((double) costTime);
        // 完成任务数+1
        PrometheusComponent.getInstance().threadPoolCompletedTaskCount().labels(this.poolName).inc();
        // 活跃任务数-1
        PrometheusComponent.getInstance().threadPoolActiveCount().labels(this.poolName).dec();
        // 当前任务耗时直方图统计
        Histogram.Timer timer = timerThreadLocal.get();
        if (timer != null)
            timer.observeDuration();
            timerThreadLocal.remove();

        super.afterExecute(r, t);
3.可视化监控
- 启动项目,发起接口请求
GET http://localhost:28088/service-provider-demo/execute
- 通过Endpoint 查看指标信息
10.23.48.43:28088/service-provider-demo/actuator/prometheus
# HELP thread_pool_total_cost_time 线程池已完成任务总耗时
# TYPE thread_pool_total_cost_time counter
thread_pool_total_cost_timepoolName="order-thread-pool", 203466.0
thread_pool_total_cost_timepoolName="user-thread-pool", 201892.0
# HELP thread_pool_task_completed_count 线程池已完成任务数
# TYPE thread_pool_task_completed_count counter
thread_pool_task_completed_countpoolName="order-thread-pool", 100.0
thread_pool_task_completed_countpoolName="user-thread-pool", 100.0
# HELP thread_pool_task_active_count 线程池当前活跃任务数
# TYPE thread_pool_task_active_count gauge
thread_pool_task_active_countpoolName="order-thread-pool", 0.0
thread_pool_task_active_countpoolName="user-thread-pool", 0.0
# HELP thread_pool_task_cost_time 请求耗时分布
# TYPE thread_pool_task_cost_time histogram
thread_pool_task_cost_time_bucketpoolName="order-thread-pool",le="0.005", 0.0
thread_pool_task_cost_time_bucketpoolName="order-thread-pool",le="0.01", 0.0
thread_pool_task_cost_time_bucketpoolName="order-thread-pool",le="0.025", 1.0
thread_pool_task_cost_time_bucketpoolName="order-thread-pool",le="0.05", 2.0
thread_pool_task_cost_time_bucketpoolName="order-thread-pool",le="0.075", 2.0
thread_pool_task_cost_time_bucketpoolName="order-thread-p记美团一面,凉凉~

\\01. 自我介绍
\\02. Oauth2原理
3. Redis数据结构
常见五种数据结构:字符串、哈希、列表、集合、有序集合
4. Redis集群模式及区别
\\05. 消息队列如何保证数据不丢失
6. 集合
常用的集合有ArrayList、LinkedList、HashSet、HashMap、LinkedHashMap
7. ArrayList与LinkedList区别
8. ArrayList如何扩容
9. 如何使用线程安全的集合
1.使用线程安全的集合类:ConcurrentHashMap、CopyOnWriteArrayList

2.使用静态方法创建集合 java.util.Collections#synchronizedMap
\\10. 分布式锁
\\11. 分布式锁设置了过期时间,锁的方法执行执行很长会出现什么问题
\\12. JVM分为几大区域
\\13. JVM垃圾回收器区别
\\14. 垃圾回收算法
\\15. Kafka原理
\\16. Kafka生产者组与消费者组
\\17. 线程池各个属性的含义
\\18. 请求伪造(CSRF)
\\19. RPC有没有使用过
20. Redis缓存穿透和缓存击穿的区别
\\21.做一道算法题

以上是关于美团一面:Spring Cloud 如何构建动态线程池?的主要内容,如果未能解决你的问题,请参考以下文章