seata(seata配置 高可用)
Posted
tags:
篇首语:本文由小常识网(cha138.com)小编为大家整理,主要介绍了seata(seata配置 高可用)相关的知识,希望对你有一定的参考价值。
参考技术A 客户端要注册到nacosstore
mode = "db"
file
## store location dir
dir = "sessionStore"
# branch session size , if exceeded first try compress lockkey, still exceeded throws exceptions
maxBranchSessionSize = 16384
# globe session size , if exceeded throws exceptions
maxGlobalSessionSize = 512
# file buffer size , if exceeded allocate new buffer
fileWriteBufferCacheSize = 16384
# when recover batch read size
sessionReloadReadSize = 100
# async, sync
flushDiskMode = async
db
## the implement of javax.sql.DataSource, such as DruidDataSource(druid)/BasicDataSource(dbcp)/HikariDataSource(hikari) etc.
datasource = "druid"
## mysql/oracle/postgresql/h2/oceanbase etc.
dbType = "mysql"
driverClassName = "com.mysql.jdbc.Driver"
url = "jdbc: mysql://192.168.200.161:3307/seata1.3 "
user = "root"
password = "123456"
minConn = 5
maxConn = 30
globalTable = "global_table"
branchTable = "branch_table"
lockTable = "lock_table"
queryLimit = 100
maxWait = 5000
redis
host = "127.0.0.1"
port = "6379"
password = ""
database = "0"
minConn = 1
maxConn = 10
queryLimit = 100
registry.conf 采用nacos注册
registry
type = "nacos"
nacos
application = "seata-server"
serverAddr = "192.168.200.161:8848"
group = "SEATA_GROUP"
namespace = "062d258a-f77b-4375-b874-8045bd17523d"
cluster = "default"
username = "nacos"
password = "nacos"
eureka
serviceUrl = " http://localhost:8761/eureka "
application = "default"
weight = "1"
redis
serverAddr = "localhost:6379"
db = 0
password = ""
cluster = "default"
timeout = 0
zk
cluster = "default"
serverAddr = "127.0.0.1:2181"
sessionTimeout = 6000
connectTimeout = 2000
username = ""
password = ""
consul
cluster = "default"
serverAddr = "127.0.0.1:8500"
etcd3
cluster = "default"
serverAddr = " http://localhost:2379 "
sofa
serverAddr = "127.0.0.1:9603"
application = "default"
region = "DEFAULT_ZONE"
datacenter = "DefaultDataCenter"
cluster = "default"
group = "SEATA_GROUP"
addressWaitTime = "3000"
file
name = "file.conf"
config
type = "file"
nacos
serverAddr = "127.0.0.1:8848"
namespace = ""
group = "SEATA_GROUP"
username = ""
password = ""
consul
serverAddr = "127.0.0.1:8500"
apollo
appId = "seata-server"
apolloMeta = "http://192.168.1.204:8801"
namespace = "application"
zk
serverAddr = "127.0.0.1:2181"
sessionTimeout = 6000
connectTimeout = 2000
username = ""
password = ""
etcd3
serverAddr = " http://localhost:2379 "
file
name = "file.conf"
nohup sh bin/seat-server.sh -p 8091 -n 1&
nohup sh bin/seat-server.sh -p 8092 -n 2&
seata-spring-boot-starter 启动配置
2019年看seata时版本还是0.8,再次接触时已经1.4.2了。
历史文章:
Seata 分布式事务启动配置分析
Seata 分布式事务功能测试(一)
Seata 分布式事务功能测试(二)
Seata 分布式事务功能测试(三)
seata特殊的配置文件形式使得入手很容易蒙,最近看官方博客的部分文档发现可能有不少人都有类似的感觉,最主要的原因就是 registry 这个配置文件名字起的不好。如果改成 bootstrap 会更容易理解。
seata支持非常多的配置和服务注册发现方式,想要使用zookeeper,nacos等服务,首先要有一个配置知道如何去连接和使用这些服务。这部分的配置实际上就是 bootstrap 配置,这部分的配置非常少。
示例环境
- 框架: Spring Cloud [Alibaba]
- 配置和注册中心: nacos
- 使用 seata-spring-boot-starter [1.4.2]
客户端最简配置
最简配置就是启动必须用到的配置(包含使用默认值的),其余的配置都需要从配置中心(nacos)读取,你在配置文件(application.[yaml|properties])配置了也无法生效。
自动配置类 - 入口配置
先看 seata-spring-boot-starter 中几个自动配置类的注解:
@ConditionalOnProperty(prefix = SEATA_PREFIX, name = "enabled", havingValue = "true", matchIfMissing = true)
public class SeataAutoConfiguration

@ConditionalOnBean(DataSource.class)
@ConditionalOnExpression("${seata.enable:true} && ${seata.enableAutoDataSourceProxy:true} && ${seata.enable-auto-data-source-proxy:true}")
public class SeataDataSourceAutoConfiguration

@ConditionalOnProperty(prefix = SEATA_PREFIX, name = "enabled", havingValue = "true", matchIfMissing = true)
@ComponentScan(basePackages = "io.seata.spring.boot.autoconfigure.properties")
@AutoConfigureBefore({SeataAutoConfiguration.class, SeataDataSourceAutoConfiguration.class})
public class SeataPropertiesAutoConfiguration
从这部分我们就已经看到了几个配置,都是开关,而且默认都是 true,可以不配置,本文为了知道用到了那些配置,因此全部记录下来:
seata:
  enable: true # 这是个BUG,官方最新版本已经改成了 enabled,还没发布,想禁用就得写全都设置false
  enabled: true
  enableAutoDataSourceProxy: true
  enable-auto-data-source-proxy: true
在 Spring Boot 2.0 中,官方文档中推荐使用 enable-auto-data-source-proxy 这种烤串(用-串起来)形式,他可以自动匹配到驼峰和环境变量形式的名字。所以 enable-auto-data-source-proxy 和 enableAutoDataSourceProxy 代表了相同的含义,因此这里保留烤串,所以变成了两个配置:
seata:
  enabled: true
  enable-auto-data-source-proxy: true
在继续从 seata 的入口开始,入口在 io.seata.spring.boot.autoconfigure.SeataAutoConfiguration 代码:
 @Bean
 @DependsOn({BEAN_NAME_SPRING_APPLICATION_CONTEXT_PROVIDER, BEAN_NAME_FAILURE_HANDLER})
 @ConditionalOnMissingBean(GlobalTransactionScanner.class)
 public GlobalTransactionScanner globalTransactionScanner(
   SeataProperties seataProperties, FailureHandler failureHandler) {
     if (LOGGER.isInfoEnabled()) {
         LOGGER.info("Automatically configure Seata");
     }
     return new GlobalTransactionScanner(
            seataProperties.getApplicationId(),
            seataProperties.getTxServiceGroup(), failureHandler);
 }
这里就已经看到两个配置了 applicationId, txServiceGroup,这两个配置在 spring cloud 中有默认值,在 spring boot 中必须手工配置。 为什么 spring cloud 有默认值,而 spring boot 没有?看 SeataProperties 中的代码:
@Autowired
private SpringCloudAlibabaConfiguration springCloudAlibabaConfiguration;

public String getApplicationId() {
    if (applicationId == null) {
        applicationId = springCloudAlibabaConfiguration.getApplicationId();
    }
    return applicationId;
}

public String getTxServiceGroup() {
    if (txServiceGroup == null) {
        txServiceGroup = springCloudAlibabaConfiguration.getTxServiceGroup();
    }
    return txServiceGroup;
}
这里多了一层 SpringCloudAlibabaConfiguration,这个类在 Spring Boot 使用时也存在,但是一般不会配置里面的属性,看SpringCloudAlibabaConfiguration 中的代码:
@Component
@ConfigurationProperties(prefix = "spring.cloud.alibaba.seata")
public class SpringCloudAlibabaConfiguration implements ApplicationContextAware {

    private static final Logger LOGGER = LoggerFactory.getLogger(SpringCloudAlibabaConfiguration.class);
    private static final String SPRING_APPLICATION_NAME_KEY = "spring.application.name";
    private static final String DEFAULT_SPRING_CLOUD_SERVICE_GROUP_POSTFIX = "-seata-service-group";
    private String applicationId;
    private String txServiceGroup;
    private ApplicationContext applicationContext;

    /**
     * Gets application id.
     *
     * @return the application id
     */
    public String getApplicationId() {
        if (applicationId == null) {
            applicationId = applicationContext.getEnvironment()
                                .getProperty(SPRING_APPLICATION_NAME_KEY);
        }
        return applicationId;
    }

    /**
     * Gets tx service group.
     *
     * @return the tx service group
     */
    public String getTxServiceGroup() {
        if (txServiceGroup == null) {
            String applicationId = getApplicationId();
            if (applicationId == null) {
                LOGGER.warn("{} is null, please set its value", SPRING_APPLICATION_NAME_KEY);
            }
            txServiceGroup = applicationId + DEFAULT_SPRING_CLOUD_SERVICE_GROUP_POSTFIX;
        }
        return txServiceGroup;
    }
你可以通过 spring.cloud.alibaba.seata.applicationId 和 spring.cloud.alibaba.seata.tx-service-group 来配置这两个值,不用 Spring Cloud 时你肯定不这么用。另外如果没有配置这两个值,默认会使用 spring.application.name 和 ${spring.application.name}-seata-service-group 这两个配置,Spring Cloud 中必须配置 spring.application.name,所以默认值有效,Spring Boot中一般没人配置这个,所以没有默认值。
另外在 seata 中已经不建议使用 spring.cloud.alibaba.seata.applicationId 和 spring.cloud.alibaba.seata.tx-service-group,所以本文忽略这俩配置,直接使用优先级更高的官方推荐配置:
seata:
  application-id: 应用名
  tx-service-group: 事务分组名
GlobalTransactionScanner 初始化时会校验上面两个属性必填,所以这俩是必须配置的。
在 SeataDataSourceAutoConfiguration 中的具体配置中,也有几个存在默认值的配置:
@Bean(BEAN_NAME_SEATA_DATA_SOURCE_BEAN_POST_PROCESSOR)
 @ConditionalOnMissingBean(SeataDataSourceBeanPostProcessor.class)
 public SeataDataSourceBeanPostProcessor seataDataSourceBeanPostProcessor(SeataProperties seataProperties) {
     return new SeataDataSourceBeanPostProcessor(seataProperties.getExcludesForAutoProxying(), seataProperties.getDataSourceProxyMode());
 }

 /**
  * The bean seataAutoDataSourceProxyCreator.
  */
 @Bean(BEAN_NAME_SEATA_AUTO_DATA_SOURCE_PROXY_CREATOR)
 @ConditionalOnMissingBean(SeataAutoDataSourceProxyCreator.class)
 public SeataAutoDataSourceProxyCreator seataAutoDataSourceProxyCreator(SeataProperties seataProperties) {
     return new SeataAutoDataSourceProxyCreator(seataProperties.isUseJdkProxy(),
         seataProperties.getExcludesForAutoProxying(), seataProperties.getDataSourceProxyMode());
 }
筛选出来就是:
seataProperties.isUseJdkProxy(),
seataProperties.getExcludesForAutoProxying(),
seataProperties.getDataSourceProxyMode()
默认值分别为:
truenew String[]{}AT
对应的配置为:
seata:
  use-jdk-proxy: false
  excludes-for-auto-proxying:
  data-source-proxy-mode: AT
到这里为止我们能看到所有最浅的一层配置就这几个,其中就俩必须配置的,下面在深入到整个初始化过程中用到的所有配置。
深入初始化过程
再深入时,纯静态分析代码已经很难找出所有配置,需要通过动态调试的方式来跟踪出来,下面按照代码执行顺序列出所有配置。
在 GlobalTransactionScanner 初始化时,有一个字段读取的配置:
private volatile boolean disableGlobalTransaction = ConfigurationFactory.getInstance().getBoolean(
        ConfigurationKeys.DISABLE_GLOBAL_TRANSACTION, DEFAULT_DISABLE_GLOBAL_TRANSACTION);
这里需要重点说一下 ConfigurationFactory,当你看到通过 ConfigurationFactory.getInstance() 调用读取配置时,配置是从配置中心(例如 nacos)读取的。当你看到 ConfigurationFactory.CURRENT_FILE_INSTANCE 调用读取配置时,就是从启动配置( bootstrap )中读取的。
所以当上面代码要读取 seata.service.disableGlobalTransaction 时(默认值 false),因为要从配置中心(nacos)读取,所以就要开始初始化 nacos(其他配置中心类似)了,初始化 nacos 配置中心时,一定会从启动配置( bootstrap)读取 nacos 服务器的信息。
ConfigurationFactory 初始化
调用 ConfigurationFactory 方法时,首先会执行该类中的静态方法:
static {
    load();
}

private static void load() {
    String seataConfigName = System.getProperty(SYSTEM_PROPERTY_SEATA_CONFIG_NAME);
    if (seataConfigName == null) {
        seataConfigName = System.getenv(ENV_SEATA_CONFIG_NAME);
    }
    if (seataConfigName == null) {
        seataConfigName = REGISTRY_CONF_DEFAULT;
    }
    String envValue = System.getProperty(ENV_PROPERTY_KEY);
    if (envValue == null) {
        envValue = System.getenv(ENV_SYSTEM_KEY);
    }
    Configuration configuration = (envValue == null) ? new FileConfiguration(seataConfigName,
            false) : new FileConfiguration(seataConfigName + "-" + envValue, false);
    Configuration extConfiguration = null;
    try {
        extConfiguration = EnhancedServiceLoader.load(ExtConfigurationProvider.class).provide(configuration);
        if (LOGGER.isInfoEnabled()) {
            LOGGER.info("load Configuration:{}", extConfiguration == null ? configuration.getClass().getSimpleName()
                    : extConfiguration.getClass().getSimpleName());
        }
    } catch (EnhancedServiceNotFoundException ignore) {

    } catch (Exception e) {
        LOGGER.error("failed to load extConfiguration:{}", e.getMessage(), e);
    }
    CURRENT_FILE_INSTANCE = extConfiguration == null ? configuration : extConfiguration;
}
这部分是在初始化 CURRENT_FILE_INSTANCE,启动配置的初始化是一个 “鸡生蛋和蛋生鸡” 类似的问题,这个问题的处理需要依赖外部的环境,因此初始化中优先读取System.getProperty(对应 java 的 -Dproperty=value),不存在时再读取 System.getenv 系统的环境变量,通过外部决定启动配置的配置。
在 Spring [Boot|Cloud] 中使用 seata-spring-boot-starter 集成 seata 时,根本不存在这么一个配置文件,在 new FileConfiguration(seataConfigName, false) 中什么也没读到,这里最关键的过程在于 extConfiguration = EnhancedServiceLoader.load(ExtConfigurationProvider.class).provide(configuration);,这里通过 SpringBootConfigurationProvider 动态代理 FileConfiguration,将 Spring Boot 形式的配置文件代理了 FileConfiguration 默认的配置(细节不在展开),意思就是:
“从CURRENT_FILE_INSTANCE读取配置时,你以为还在从 registry.conf 读取配置,实际上已经从 application.[yaml|properties] 中读取了”
所以说,初始化时,所有通过 ConfigurationFactory.CURRENT_FILE_INSTANCE 读取的配置,都是我们可以在 application.[yaml|properties] 中配置的内容。还有一个重点就是 SpringBootConfigurationProvider 动态代理中读取配置时,调用了 convertDataId(String rawDataId) 方法,这个方法会给所有配置增加 seata. 前缀(还会特殊处理 .grouplist 后缀),因此后续凡是通过 ConfigurationFactory.CURRENT_FILE_INSTANCE 读取的配置,在配置文件中配置时,手动增加 seata. 前缀。
先总结一下:
- 通过
ConfigurationFactory.CURRENT_FILE_INSTANCE读取的配置都在application.[yaml|properties]中配置。 - 通过
ConfigurationFactory.getInstance()调用读取配置时,配置是从配置中心(例如nacos)读取的。
懂 Spring Cloud的人应该知道
application.[yaml|properties]也可以从配置中心读取,和这里不冲突。
ConfigurationFactory.getInstance 初始化配置中心
启动配置 CURRENT_FILE_INSTANCE 初始化之后,就该 ConfigurationFactory.getInstance 初始化配置中心了。
public static Configuration getInstance() {
    if (instance == null) {
        synchronized (Configuration.class) {
            if (instance == null) {
                instance = buildConfiguration();
            }
        }
    }
    return instance;
}
这里是一个单例的实现,创建过程在 buildConfiguration 中,看代码注释:
private static Configuration buildConfiguration() {
    //注意看 CURRENT_FILE_INSTANCE,这说明是从启动配置读取的,也就是在 application.[yaml|properties] 中配置的
    //读取 seata.config.type 本文配置的 nacos
    String configTypeName = CURRENT_FILE_INSTANCE.getConfig(
            ConfigurationKeys.FILE_ROOT_CONFIG + ConfigurationKeys.FILE_CONFIG_SPLIT_CHAR
                    + ConfigurationKeys.FILE_ROOT_TYPE);

    //忽略其他代码,后续代码会对 nacos 初始化
}
在上面方法中增加了一个配置:
seata:
  config:
    type: nacos
上面配置 nacos 后,需要创建 nacos 对应的配置,创建过程中还要读取很多配置:
//注意 nacos 中的这个静态字段
private static final Configuration FILE_CONFIG = ConfigurationFactory.CURRENT_FILE_INSTANCE;
//构造方法
private NacosConfiguration() {
    if (configService == null) {
        try {
            configService = NacosFactory.createConfigService(getConfigProperties());
            initSeataConfig();
        } catch (NacosException e) {
            throw new RuntimeException(e);
        }
    }
}
主要的配置在 getConfigProperties(),将 application.[yaml|properties] 中的配置转换为了一个 nacos 初始化需要用的配置文件,这部分会读取系统变量(System.getProperty)和 ConfigurationFactory.CURRENT_FILE_INSTANCE 中的配置,这里不考虑系统变量,直接列出所有 application.[yaml|properties] 中需要的配置:
seata:
  config:
    nacos:
      server-addr: IP:port #默认http,如果是https一定要配置为 https://HOSTNAME:port
      namespace: #默认值空,特别注意,空使用的public,但是这里不能写public
      username:
      password:
特别注意!!!
namespace 默认值空,空使用的 public,但是这里不能写public,如果写了就会因为nacos的ClientWorker认为文件和服务器端不一致,导致频繁刷日志。
连接 nacos 只需要这几个配置,只有 server-addr 是必填的。nacos连接后,通过 initSeataConfig() 初始化配置:
private static void initSeataConfig() {
      try {
          //配置中心的配置文件 seata.config.nacos.data-id
          //默认值为 seata.properties
          String nacosDataId = getNacosDataId();
          //配置中的GROUP seata.config.nacos.group
          //默认值为 SEATA_GROUP
          String config = configService.getConfig(nacosDataId, getNacosGroup(), DEFAULT_CONFIG_TIMEOUT);
          //如果你配置中存在该配置,就会使用这个配置内容初始化 seataConfig
          //也就是说,你可以把 seata 客户端用到的所有配置放到一个大的配置文件中
          //如果大配置中没有某个配置,seata 还会读取 nacos中是否直接存在某个配置项(dataId=配置)
          if (StringUtils.isNotBlank(config)) {
              try (Reader reader = new InputStreamReader(new ByteArrayInputStream(config.getBytes()),
                                     StandardCharsets.UTF_8)) {
                  seataConfig.load(reader);
              }
              //监控配置文件的变化
              NacosListener nacosListener = new NacosListener(nacosDataId, null);
              configService.addListener(nacosDataId, getNacosGroup(), nacosListener);
          }
      } catch (NacosException | IOException e) {
          LOGGER.error("init config properties error", e);
      }
  }
上面代码在 application.[yaml|properties] 中需要的配置:
seata:
  config:
    nacos:
      data-id: seata.properties # 这是默认值
      group: SEATA_GROUP # 这是默认值
到这里 nacos 配置中心初始化完成了,后续获取获取配置时,可以从 nacos 配置中心读取。
回到刚开始时字段初始化的代码。
Nacos 配置中心如何配置
private volatile boolean disableGlobalTransaction = ConfigurationFactory.getInstance().getBoolean(
        ConfigurationKeys.DISABLE_GLOBAL_TRANSACTION, DEFAULT_DISABLE_GLOBAL_TRANSACTION);
这里获取配置文件的方式就是读取 nacos 配置中心的内容,默认值为 false。nacos 配置中心有两种配置该配置的方式。
先看代码中读取配置的部分:
@Override
public String getLatestConfig(String dataId, String defaultValue, long timeoutMills) {
    //先读取系统属性System.getProperty
    String value = getConfigFromSysPro(dataId);
    if (value != null) {
        return value;
    }
    //这里的seataConfig是Properties,从nacos读取的seata.properties,上面代码有这个初始化过程
    //这里的seata.properties算是大配置,里面可以配置所有属性
    value = seataConfig.getProperty(dataId);
    //如果大配置没有
    if (null == value) {
        try {
            //直接从nacos读取配置
            value = configService.getConfig(dataId, getNacosGroup(), timeoutMills);
        } catch (NacosException exx) {
            LOGGER.error(exx.getErrMsg());
        }
    }

    return value == null ? defaultValue : value;
}
从代码可以看出有三种来源,按配置优先级顺序如下:
- 系统属性,通过
-Dkey=val配置 - 从seataConfig读取,在 nacos 的 seata.properties 中配置
- 直接从 nacos 读取
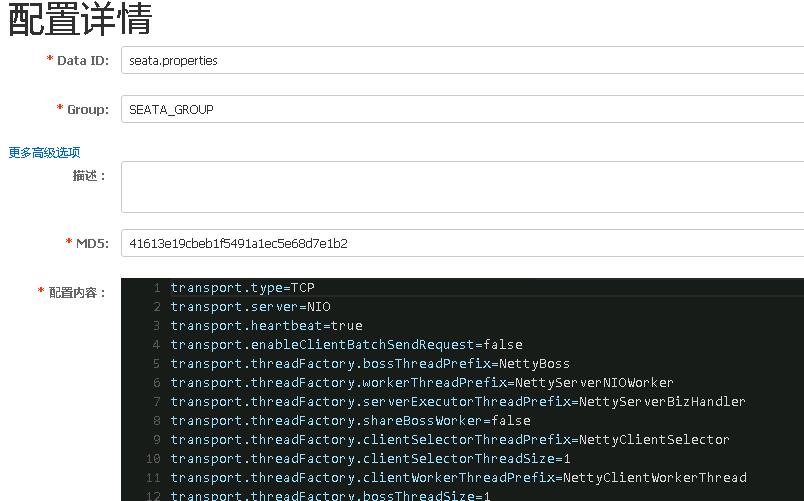
第1点不考虑,先看第2点,截个图方便理解:

配置的内容:

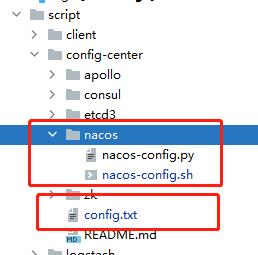
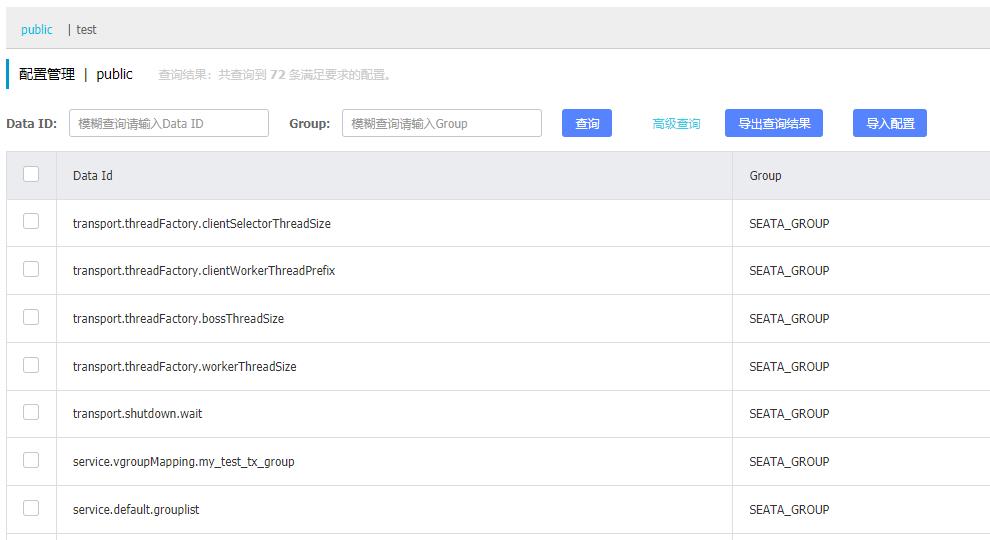
再看第3种,第3种可能是官方推荐的方式,因为官方针对 nacos 提供了 shell 和 py 脚本来导入配置信息,导入信息的格式就是第3种:

通过脚本导入到nacos的配置如下:

以上只是 nacos 配置中心相关的配置,下面继续看注册中心。
注册中心相关配置
注册中心的初始化在 RegistryFactory.getInstance() 中:
public static RegistryService getInstance() {
     if (instance == null) {
         synchronized (RegistryFactory.class) {
             if (instance == null) {
                 instance = buildRegistryService();
             }
         }
     }
     return instance;
 }

 private static RegistryService buildRegistryService() {
     RegistryType registryType;
     String registryTypeName = ConfigurationFactory.CURRENT_FILE_INSTANCE.getConfig(
         ConfigurationKeys.FILE_ROOT_REGISTRY + ConfigurationKeys.FILE_CONFIG_SPLIT_CHAR
             + ConfigurationKeys.FILE_ROOT_TYPE);
     try {
         registryType = RegistryType.getType(registryTypeName);
     } catch (Exception exx) {
         throw new NotSupportYetException("not support registry type: " + registryTypeName);
     }
     if以上是关于seata(seata配置 高可用)的主要内容,如果未能解决你的问题,请参考以下文章