如何在vsvisualstudio调试环境下查看lua的调用栈,变量信息
Posted
tags:
篇首语:本文由小常识网(cha138.com)小编为大家整理,主要介绍了如何在vsvisualstudio调试环境下查看lua的调用栈,变量信息相关的知识,希望对你有一定的参考价值。
参考技术A 编辑C:/Program Files/Microsoft Visual Studio 8/Common7/Packages/Debugger/autoexp.dat文件,在文件最后[hresult]之上的空白插入以下代码,就可以在 visualstudio调试的时候看到lua的调用栈、变量信息
lua_State
preview (
#(
"thread top=", [$c.top-$c.base, i]
)
)
children (
#(
[raw members]: [$c,!],
globals: [$c.l_gt],
registry: [$c.l_G->l_registry],
stack size: [$c.top-$c.base, i],
stack:#array (
expr: $c.base[$i],
size: $c.top - $c.base,
base: 1
),
callStack Size: $e.ci-$e.base_ci,
callStack:
#array (
expr: $e.ci[-$i],
size: $e.ci-$e.base_ci,
)
)
)
Node
preview (
#( $c.i_key.tvk, " = ", $c.i_val )
)
children (
#(
key: $c.i_key.tvk,
val: $c.i_val,
#if( $c.i_key.nk.next != 0 ) (
#( next: $c.i_key.nk.next )
)
)
)
lua_TValue
children (
#switch($c.tt)
#case 2 ( ; LUA_TLIGHTUSERDATA
ptr: #((const char*)($c.value.p))
)
#case 5 ( ; LUA_TTABLE
#(
[raw]: [$c,!],
array size: $c.value.gc->h.sizearray,
#array (
expr: $e.value.gc->h.metatable,
size: $e.value.gc->h.metatable != 0,
): #( metatable: $e ),
#array (
expr: $c.value.gc->h.array[$i],
size: $c.value.gc->h.sizearray,
base: 1
),
#array (
expr: #( $c.value.gc->h.node[$i], 2 ),
size: (1<<$c.value.gc->h.lsizenode),
base: 1
): #( hash part: $e )
)
)
#case 6 ( ; LUA_TFUNCTION
#if ($c.value.gc->cl.c.isC) (
#(
env: $c.value.gc->cl.c.env,
#array (
expr: $e.value.gc->cl.c.upvalue[$i],
size: $e.value.gc->cl.c.nupvalues,
): #( upvalues: $e )
)
) #else (
#($c.value.gc->cl.l)
)
)
#case 7 ( ; LUA_TUSERDATA
#(
#array (
expr: $e.value.gc->u.uv.metatable,
size: $e.value.gc->u.uv.metatable != 0,
): #( metatable: $e ),
env: $c.value.gc->u.uv.env,
ptr: #((const char*)((&$c.value.gc->u)+1)),
size: $c.value.gc->u.uv.len
)
)
#case 8 ( #($c.value.gc->th) ) ; LUA_TTHREAD
)
preview (
#switch($c.tt)
#case 0 ( "nil" ) ; LUA_TNIL
#case 1 (
#if ($c.value.b == 0) (
"false"
) #else (
"true"
)
)
#case 2 ( ; LUA_TLIGHTUSERDATA
#($c.value.p, " lightuserdata") )
#case 3 ( ; LUA_TNUMBER
#("#", $c.value.n) )
#case 4 ( ; LUA_TRING
#( $c.value.gc->ts) )
#case 5 ( ; LUA_TTABLE
#( "table" )
)
; #case 6 ( #($c.value.gc->cl) ) ; LUA_TFUNCTION
#case 6 ( ; LUA_TFUNCTION
#if ($c.value.gc->cl.c.isC) (
#($c.value.gc->cl)
) #else (
#( [((const char *) (&($e.value.gc->cl.l.p->source->tsv)+1)),sb],"(" ,*($e.value.gc->cl.l.p->lineinfo),")" )
)
)
#case 7 ( #($c.value.gc->u) ) ; LUA_TUSERDATA
#case 8 ( #($c.value.gc->th) ) ; LUA_TTHREAD
#default ( "empty" )
)
)
Udata
preview (
#( "userdata size=", $c.uv.len, " ptr=", #((void*)((&$c)+1)) )
)
CClosure
preview (
$c.f
)
LClosure
preview (
#([(const char *) (&($e.p->source->tsv)+1),sb] ,"(",*($e.p->lineinfo),")" )
)
Closure
preview (
#if ($e.c.isC) ( #($e.c) )
#else ( #($e.value.gc->cl.l) )
)
Table
children (
#(
[raw]: [$c,!],
[array size]: $c.sizearray,
#array (
expr: $e.metatable,
size: $e.metatable != 0,
): #( metatable: $e ),
#array (
expr: $c.array[$i],
size: $c.sizearray,
base: 1
),
#array (
expr: #( $c.node[$i], 2 ),
size: (1<<$c.lsizenode),
base: 1
): #( key: $e )
)
)
preview (
#( "table" )
)
TString
preview (
#("'", [(const char *) (&($e.tsv)+1),sb] )
)
CallInfo
preview (
#( $e.func, ",",$e.func->value.gc->cl.l.p->lineinfo[$e.savedpc -$e.func->value.gc->cl.l.p->code-1] )
)
本回答被提问者和网友采纳
tvm在linux环境下的安装与编译及vscode如何配置tvm的远程连接调试环境
文章目录
前言
本篇文章介绍一下 tvm 在linux环境下的安装与编译,以及如何使用vscode来配置tvm的远程连接调试环境。
所需软硬件环境:
| 环境 | 版本 |
|---|---|
local system | windows 10 |
service system | ubuntu 18.04 |
tvm | latest(0.9.dev0) |
python(conda) | python 3.8.13 |
local IDE | vscode |
1. 安装TVM
1.1 下载源码
# 从github上拉取源码
git clone --recursive https://github.com/apache/tvm tvm
# --recursive指令:由于tvm依赖了很多第三方的开源库(子模块)
# 加入该参数之后也将相应的子模块一起进行clone

# 或者直接下载源码
https://tvm.apache.org/download

1.2 创建虚拟环境及安装依赖库
使用conda创建tvm的虚拟python环境,python版本为3.8,虚拟环境名为tvmenv:
conda create -n tvmenv python=3.8
编辑tvm目录下的conda/build-environment.yaml文件:
# conda/build-environment.yaml
# Build environment that can be used to build tvm.
name: tvmenv

# The conda channels to lookup the dependencies
channels:
  - anaconda
  - conda-forge

# 将name的值改为刚刚创建的虚拟环境名tvmenv
执行下面的指令,将构建tvm所需的环境依赖更新到当前虚拟环境中:
conda env update -f conda/build-environment.yaml
# conda env update -n tvmenv -f conda/build-environment.yaml
# 设置完之后需要重新deactivate/activate对环境进行激活
如果上述命令执行较慢,可以将
conda换成国内源(建议使用北京外国语大学的开源镜像站):参考连接
然后修改conda/build-environment.yaml文件:
channels:
  - defaults
  # - anaconda
  # - conda-forge
安装python依赖库:
pip install decorator tornado psutil 'xgboost<1.6.0' cloudpickle -i https://pypi.tuna.tsinghua.edu.cn/simple

# 如果使用onnx或者pytorch作为原始模型,则还需要安装相应的依赖库
pip install onnx onnxruntime -i https://pypi.tuna.tsinghua.edu.cn/simple
pip install torch==1.7.1 torchvision==0.8.2 torchaudio==0.7.2 -i https://pypi.tuna.tsinghua.edu.cn/simple
在当前虚拟环境中添加用于tvm debug的环境变量:
conda env config vars set TVM_LOG_DEBUG="ir/transform.cc=1,relay/ir/transform.cc=1"
# conda env config vars set TVM_LOG_DEBUG="ir/transform.cc=1,relay/ir/transform.cc=1" -n tvmenv
# 设置完之后需要重新deactivate/activate对环境进行激活是环境变量生效
使用这种方式设置环境变量的好处是:只有当前环境被激活(conda activate)时,自定义设置的环境变量才起作用,当conda deactivate后自定义的环境变量会自动清除。
当然,也可以更简单粗暴一些:
export TVM_LOG_DEBUG="ir/transform.cc=1,relay/ir/transform.cc=1"
在当前虚拟环境中添加用于tvm python的环境变量:
export TVM_HOME=your tvm path
export PYTHONPATH=$TVM_HOME/python:$PYTHONPATH
1.3 编译TVM源码
在tvm目录下创建build文件夹,并将cmake/config.cmake文件复制到此文件夹中:
mkdir build
cp cmake/config.cmake build/
编辑build/config.cmake进行相关配置:
# 本次是在cpu上进行测试,因此没有配置cuda
set(USE_LLVM ON)			# line 136
set(USE_RELAY_DEBUG ON)		# line 285

# 在末尾添加一个cmake的编译宏,确保编译出来的是debug版本
set(CMAKE_BUILD_TYPE Debug)

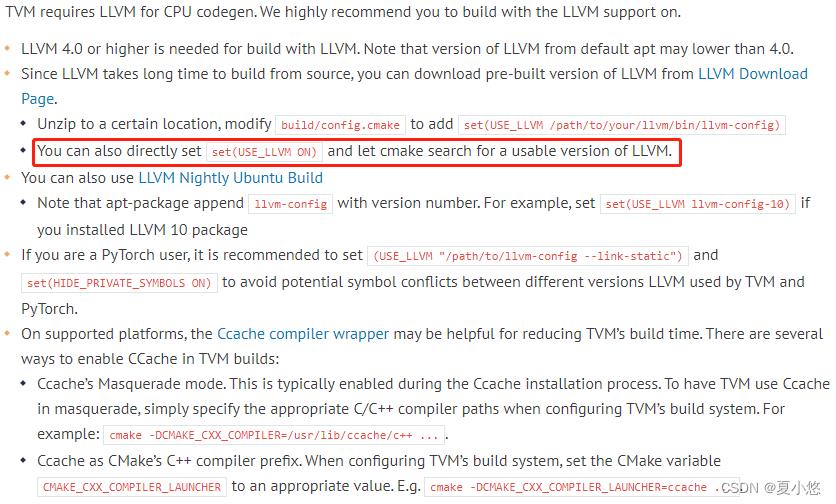
编译tvm,这里开启了16个线程:
cd build
cmake ..
make -j 16
# 建议开多个线程,否则编译速度很慢哦
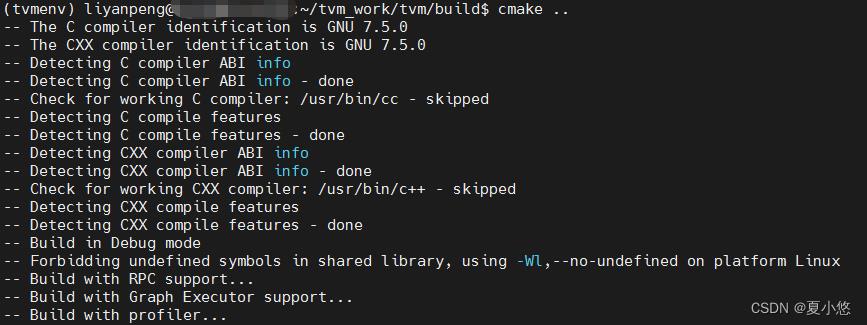

大约5分钟,即可生成我们需要的两个共享链接库:libtvm.so 和 libtvm_runtime.so

1.4 验证安装是否成功
tvm版本验证:
import tvm

print(tvm.__version__)

pytorch模型验证:
# from_pytorch.py
# https://tvm.apache.org/docs/how_to/compile_models/from_pytorch.html
# ps: TVM supports PyTorch 1.7 and 1.4. Other versions may be unstable.

import tvm
from tvm import relay
from tvm.contrib.download import download_testdata
import numpy as np

# PyTorch imports
import torch
import torchvision

######################################################################
# Load a pretrained PyTorch model
# -------------------------------
model_name = "resnet18"
model = getattr(torchvision.models, model_name)(pretrained=True)
# or
# model = torchvision.models.resnet18(pretrained=True)
# or
# pth_file = 'resnet18-f37072fd.pth'
# model = torchvision.models.resnet18()
# ckpt = torch.load(pth_file)
# model.load_state_dict(ckpt)
model = model.eval()

# We grab the TorchScripted model via tracing
input_shape = [1, 3, 224, 224]
input_data = torch.randn(input_shape)
scripted_model = torch.jit.trace(model, input_data).eval()

######################################################################
# Load a test image
# -----------------
# Classic cat example!
from PIL import Image

# img_url = "https://github.com/dmlc/mxnet.js/blob/main/data/cat.png?raw=true"
# img_path = download_testdata(img_url, "cat.png", module="data")
img_path = 'cat.png'
img = Image.open(img_path).resize((224, 224))

# Preprocess the image and convert to tensor
from torchvision import transforms

my_preprocess = transforms.Compose(
    [
        transforms.Resize(256),
        transforms.CenterCrop(224),
        transforms.ToTensor(),
        transforms.Normalize(mean=[0.485, 0.456, 0.406], std=[0.229, 0.224, 0.225]),
    ]
)
img = my_preprocess(img)
img = np.expand_dims(img, 0)

######################################################################
# Import the graph to Relay
# -------------------------
# Convert PyTorch graph to Relay graph. The input name can be arbitrary.
input_name = "input0"
shape_list = [(input_name, img.shape)]
mod, params = relay.frontend.from_pytorch(scripted_model, shape_list)

######################################################################
# Relay Build
# -----------
# Compile the graph to llvm target with given input specification.
target = tvm.target.Target("llvm", host="llvm")
dev = tvm.cpu(0)
with tvm.transform.PassContext(opt_level=3):
    lib = relay.build(mod, target=target, params=params)

######################################################################
# Execute the portable graph on TVM
# ---------------------------------
# Now we can try deploying the compiled model on target.
from tvm.contrib import graph_executor

dtype = "float32"
m = graph_executor.GraphModule(lib["default"](dev))
# Set inputs
m.set_input(input_name, tvm.nd.array(img.astype(dtype)))
# Execute
m.run()
# Get outputs
tvm_output = m.get_output(0)

#####################################################################
# Look up synset name
# -------------------
# Look up prediction top 1 index in 1000 class synset.
# synset_url = "".join(
#     [
#         "https://raw.githubusercontent.com/Cadene/",
#         "pretrained-models.pytorch/master/data/",
#         "imagenet_synsets.txt",
#     ]
# )
# synset_name = "imagenet_synsets.txt"
# synset_path = download_testdata(synset_url, synset_name, module="data")

# https://raw.githubusercontent.com/Cadene/pretrained-models.pytorch/master/data/imagenet_synsets.txt
synset_path = 'imagenet_synsets.txt'
with open(synset_path) as f:
    synsets = f.readlines()

synsets = [x.strip() for x in synsets]
splits = [line.split(" ") for line in synsets]
key_to_classname = spl[0]: " ".join(spl[1:]) for spl in splits

# class_url = "".join(
#     [
#         "https://raw.githubusercontent.com/Cadene/",
#         "pretrained-models.pytorch/master/data/",
#         "imagenet_classes.txt",
#     ]
# )
# class_name = "imagenet_classes.txt"
# class_path = download_testdata(class_url, class_name, module="data")
# https://raw.githubusercontent.com/Cadene/pretrained-models.pytorch/master/data/imagenet_classes.txt
class_path = 'imagenet_classes.txt'
with open(class_path) as f:
    class_id_to_key = f.readlines()

class_id_to_key = [x.strip() for x in class_id_to_key]

# Get top-1 result for TVM
top1_tvm = np.argmax(tvm_output.numpy()[0])
tvm_class_key = class_id_to_key[top1_tvm]

# Convert input to PyTorch variable and get PyTorch result for comparison
with torch.no_grad():
    torch_img = torch.from_numpy(img)
    output = model(torch_img)

    # Get top-1 result for PyTorch
    top1_torch = np.argmax(output.numpy())
    torch_class_key = class_id_to_key[top1_torch]

print("Relay top-1 id: , class name: ".format(top1_tvm, key_to_classname[tvm_class_key]))
print("Torch top-1 id: , class name: ".format(top1_torch, key_to_classname[torch_class_key]))


2. 配置vscode
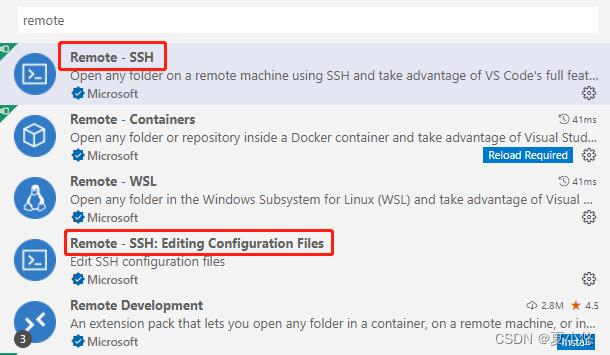
安装两个vscode远程连接所需的两个插件,具体如下图所示:
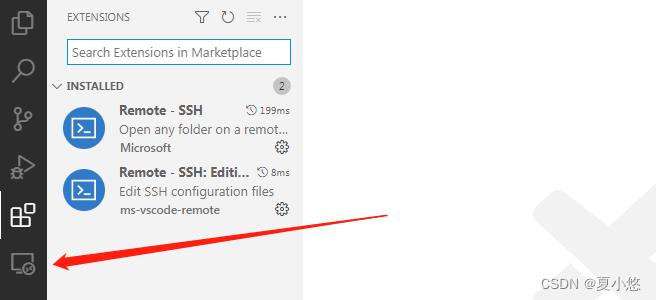
安装完成之后,在左侧工具栏会出现一个图标,点击图标进行ssh配置:
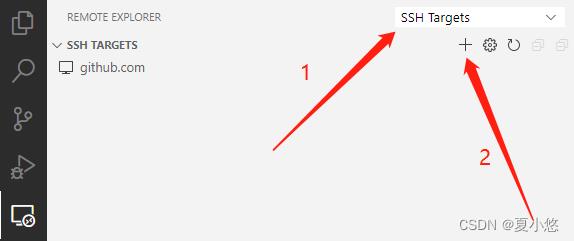
ssh yourname@yourip -A
然后右键选择在当前窗口进行连接:
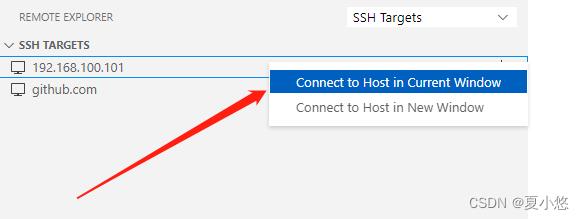
除此之外,还可以设置免费登录,具体可参考这篇文章。
3. 安装FFI Navigator
由于TVM是由Python和C++混合开发,且大多数的IDE仅支持在同一种语言中查找函数定义,因此对于跨语言的FFI 调用,即Python跳转到C++或者C++跳转到Python,vscode是做不到的。虽然解决这个问题在技术上可能非常具有挑战性,但我们可以通过构建一个与FFI注册码模式匹配并恢复必要信息的项目特定分析器来解决这个问题,FFI Navigator就这样诞生了,作者仍然是陈天奇博士。
安装方式如下:
# 建议使用源码安装
git clone https://github.com/tqchen/ffi-navigator.git

# 安装python依赖
cd python
python setyp.py install
vscode需要安装FFI Navigator插件,直接搜索安装即可(安装到服务器端)。
最后需要在.vscode/setting.json进行配置,内容如下:
    "python.analysis.extraPaths": [
        "$workspaceFolder/python"
    ],   // 添加额外导入路径, 告诉pylance自定义的python库在哪里
    "ffi_navigator.pythonpath": "/home/liyanpeng/anaconda3/envs/tvmenv/bin/python", // 配置FFI Navigator
    "python.defaultInterpreterPath": "/home/liyanpeng/anaconda3/envs/tvmenv/bin/python",
    "files.associations":
        "type_traits": "cpp",
        "fstream": "cpp",
        "thread": "cpp",
        "*.tcc": "cpp"
更详细内容可以参考项目链接。
结束语
对于vscode的使用技巧及C/C++相关的配置,这里不再详细的介绍了,感兴趣的小伙伴们可以了解下。
以上是关于如何在vsvisualstudio调试环境下查看lua的调用栈,变量信息的主要内容,如果未能解决你的问题,请参考以下文章