设计任务
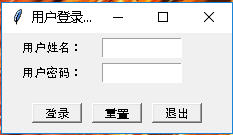
初步设计程序登录界面,详细分析设计步骤。程序详细分析
基本框架设计
``` import tkinter as tk import tkinter.messagebox root = tk.Tk() # 创建应用程序窗口 root.title("用户登录界面设计") root.geometry("230x100") # --------功能块代码开始---------------功能块代码结束------
root.mainloop()
<h2 style="color:cyan;">设计标签用于提示用户</h2>
labelName = tk.Label(root, text=\'用户姓名:\', justify=tk.RIGHT, width=80)
labelPwd = tk.Label(root, text=\'用户密码:\', justify=tk.RIGHT, width=80)
<h2 style="color:cyan;">设计输入框</h2>
entryName = tk.Entry(root, width=80, textvariable=varName)
entryPwd = tk.Entry(root, show=\'*\', width=80, textvariable=varPwd)
<h2 style="color:cyan;">设计按钮</h2>
buttonOk = tk.Button(root, text=\'登录\', relief=tk.RAISED, command=login)
buttonCancel = tk.Button(root, text=\'重置\', relief=tk.RAISED, command=cancel)
buttonquit = tk.Button(root, text=\'退出\', relief=tk.RAISED, command=_quit)
<h2 style="color:cyan;">设计功能函数</h2>
**关联变量**
varName = tk.StringVar()
varName.set(\'\')
varPwd = tk.StringVar()
varPwd.set(\'\')
**登录按钮处理函数**
def login():
# 获取用户名和密码
name = entryName.get()
pwd = entryPwd.get()
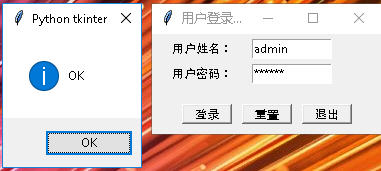
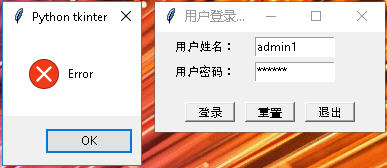
if name == \'admin\' and pwd == \'123456\':
tk.messagebox.showinfo(title=\'Python tkinter\', message=\'OK\')
else:
tk.messagebox.showerror(\'Python tkinter\', message=\'Error\')
**重新输入按钮处理函数**
def cancel():
# 清空用户输入的用户名和密码
varName.set(\'\')
varPwd.set(\'\')
**退出按钮处理函数**
def _quit():
root.quit()
root.destroy()
<h2 style="color:cyan;">各个组件排兵布阵</h2>
labelName.place(x=10, y=5, width=80, height=20)
labelPwd.place(x=10, y=30, width=80, height=20)
entryName.place(x=100, y=5, width=80, height=20)
entryPwd.place(x=100, y=30, width=80, height=20)
buttonOk.place(x=30, y=70, width=50, height=20)
buttonCancel.place(x=90, y=70, width=50, height=20)
buttonquit.place(x=150, y=70, width=50, height=20)
<h1 style="background:cyan;">完整程序组装</h1>
import tkinter as tk
import tkinter.messagebox
root = tk.Tk() # 创建应用程序窗口
root.title("用户登录界面设计")
root.geometry("230x100")
--------功能块代码开始-------
功能函数设计
varName = tk.StringVar()
varName.set(\'\')
varPwd = tk.StringVar()
varPwd.set(\'\')
def login():
# 获取用户名和密码
name = entryName.get()
pwd = entryPwd.get()
if name == \'admin\' and pwd == \'123456\':
tk.messagebox.showinfo(title=\'Python tkinter\', message=\'OK\')
else:
tk.messagebox.showerror(\'Python tkinter\', message=\'Error\')
def cancel():
# 清空用户输入的用户名和密码
varName.set(\'\')
varPwd.set(\'\')
def _quit():
root.quit()
root.destroy()
主窗口中的各个组件设计
labelName = tk.Label(root, text=\'用户姓名:\', justify=tk.RIGHT, width=80)
labelPwd = tk.Label(root, text=\'用户密码:\', justify=tk.RIGHT, width=80)
entryName = tk.Entry(root, width=80, textvariable=varName)
entryPwd = tk.Entry(root, show=\'*\', width=80, textvariable=varPwd)
buttonOk = tk.Button(root, text=\'登录\', relief=tk.RAISED, command=login)
buttonCancel = tk.Button(root, text=\'重置\', relief=tk.RAISED, command=cancel)
buttonquit = tk.Button(root, text=\'退出\', relief=tk.RAISED, command=_quit)
主窗口中各个组件的排放位置 = 排兵布阵
labelName.place(x=10, y=5, width=80, height=20)
labelPwd.place(x=10, y=30, width=80, height=20)
entryName.place(x=100, y=5, width=80, height=20)
entryPwd.place(x=100, y=30, width=80, height=20)
buttonOk.place(x=30, y=70, width=50, height=20)
buttonCancel.place(x=90, y=70, width=50, height=20)
buttonquit.place(x=150, y=70, width=50, height=20)
--------功能块代码结束------
root.mainloop() # 窗口运行循环
<h1 style="background:cyan;">最终效果</h1>


