一文让你搞懂javascript如何实现继承
Posted 朝阳人生
tags:
篇首语:本文由小常识网(cha138.com)小编为大家整理,主要介绍了一文让你搞懂javascript如何实现继承相关的知识,希望对你有一定的参考价值。
一、本文想给你聊的东西包含一下几个方面:(仅限于es6之前的语法哈,因为es6里面class这关键字用上了。。)
1.原型是啥?原型链是啥?
2.继承的通用概念。
3.Javascript实现继承的方式有哪些?
二、原型是啥?原型链是啥?
1.原型是函数本身的prototype属性。
首先js和java不一样,js顶多算是一个基于对象的语言,而不是标准的面向对象的语言。
所以我们谈继承,只能是基于new关键字作用域构造函数的场景。
上代码:
    function Person(name,age)
        this.name = name;
        this.age = age;


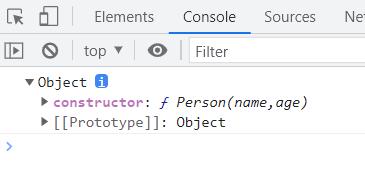
    console.log(Person.prototype);
代码 1

图1
定义一个构造函数,默认起原型就是一个Object对象,相当于一个new Object()。
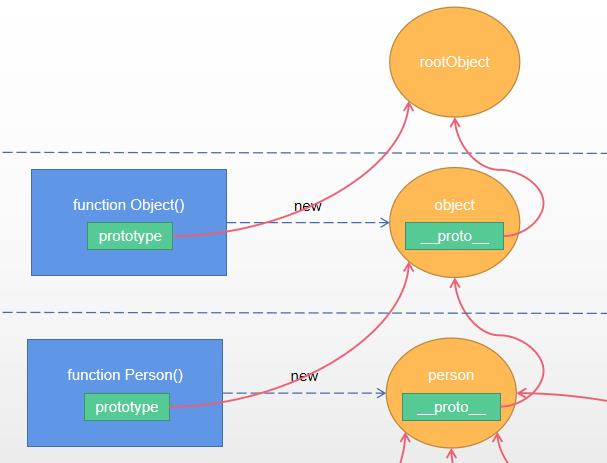
而且还有一个new出来的对象有一个隐式原型属性__proto__,也指向了构造函数的原型。
也就是说: Person.prototype === new Person().__proto__。
用图来表示就是:

图2
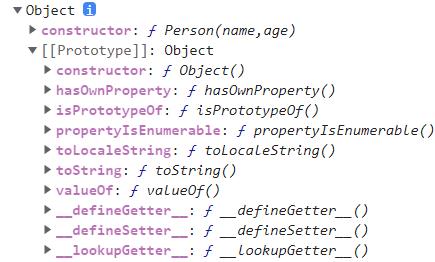
在上图中,我把Object.prototype 叫rootObject,那么rootObject中就有了所有对象都共享的方法,如下图:

图3
如果person.toString()方法调用,那么起自身没有toString方法,就是走__proto__指向的原型对象中找,而object中也没有
所有就找到了根对象。所以构造函数原型对象存在的意义是使得该构造函数产生的对象可以共享属性和方法。
所以原型对象中的属性和方法就类似于java类中定义的static属性和方法,所有对象都可以共享。
那么如上图2所示,person -> object -> rootObject之间就形成了原型链。
二、继承的通用概念
如果一个类B继承了类A,在java中这些写:class B extends A
那么类B就拥有了A中的所有属性和方法。
继承是面向对象编程的一大特性,目的很简单,就是复用。
三、javascript中实现继承的方式有哪些?
1.原型链
假如有个构造函数Student想要继承Person函数,想拥有Person中的属性和方法,可以使用原型链来实现。
上代码
// 定义Person
function Person(name,age)
    // 保证属性有初始值
    this.name = name ? name : "";
    this.age = (age || age === 0) ? age : 0;
    this.setName = function (name)
        this.name = name;

    this.setAge = function (age)
        this.age = age;

    this.getPersonInfo = function ()
        return "[Person]: " + this.name + "_" + this.age;


// 定义一个所有Person对象都能共享的属性和方法
Person.prototype.typeDesc = "人类";
Person.prototype.hello = function ()
    console.log("hello");

function Student(score)
    this.score = score;
    this.setScore = function (score)
        this.score = score;

    this.getStudentInfo = function ()
        return "[Student:]: " + this.score;


// 修改Student的原型
Student.prototype = new Person();

let student1 = new Student(90);
let student2 = new Student(80);
let student3 = new Student(70);

console.log(student1.typeDesc);  //  能访问

student1.setName("aa");
student1.setAge(99);
console.log(student1.getPersonInfo()); // 能访问

console.log(student1.getStudentInfo()); // 能访问
代码2
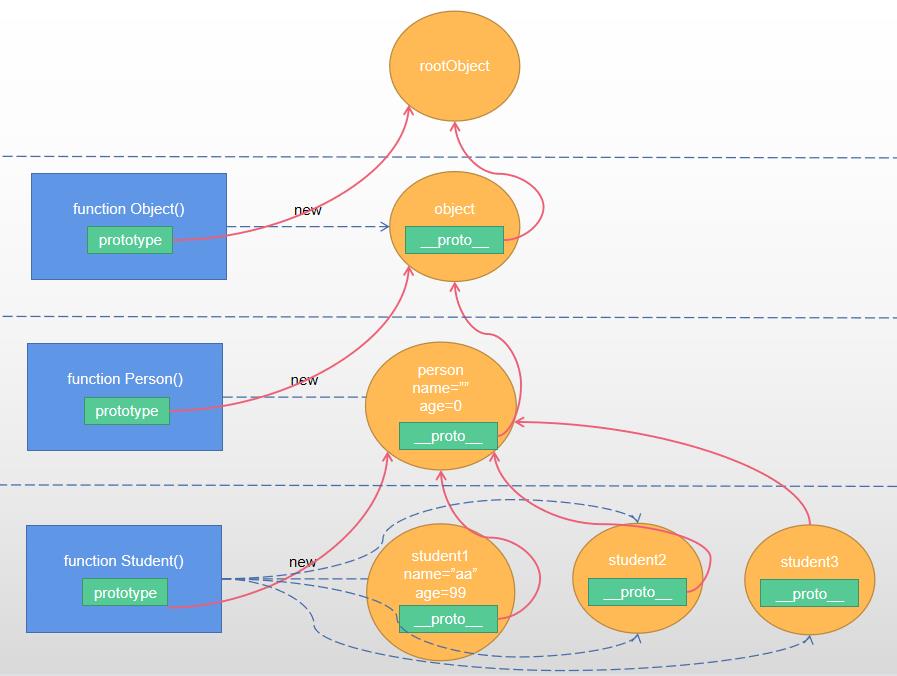
给你一张图吧 更清楚

图 4
老铁,你思考下?虽然看似student1对象能访问了能访问了Person中定义的方法和属性,但是有没有问题呢?
本来name,age是对象的私有属性,不属于“类级别”,但是他们却出现在了Student的原型对象中,而且此时如果你
console.log(student2.name),发现其访问到了原型person对象的name属性了,是个初始的空字符串,这里为什么要在Person函数中使用初始值,
这个在工作中是很常见的,对象创建出来一般属性都是需要初始值的。
所以原型链实现继承,缺点是:原型对象中多出了一些没必要的属性。
而且由于student2和student3等其他Student的对象仍然能访问到原型对象person中的属性,这会让人产生错觉,以为他们也拥有name,age的私有属性。
于是,你接着看下面的方式。
2.复用构造方法
这东西严格来讲,我感觉不太像继承,但是好像用起来还挺好用,起码省事了。。。。
继续哈,上代码啊(改变一下代码2)
    // 定义Person
    function Person(name,age)
        // 保证属性有初始值
        this.name = name ? name : "";
        this.age = (age || age === 0) ? age : 0;
        this.setName = function (name)
            this.name = name;

        this.setAge = function (age)
            this.age = age;

        this.getPersonInfo = function ()
            return "[Person]: " + this.name + "_" + this.age;


    // 定义一个所有Person对象都能共享的属性和方法
    Person.prototype.typeDesc = "人类";
    Person.prototype.hello = function ()
        console.log("hello");

    function Student(name, age, score)
        // 使用call调用函数,可以改变this指向,服用了父类的构造方法
        Person.call(this, name,age);
        this.score = score;
        this.setScore = function (score)
            this.score = score;

        this.getStudentInfo = function ()
            return "[Student:]: " + this.score;


    let student1 = new Student("aa", 99, 99);
    console.log(student1.typeDesc);  // undefined
    console.log(student1.hello);   // undefined
    console.log(student1.getStudentInfo());  // 能访问
    console.log(student1.getPersonInfo());   // 能访问
代码 3
此时虽然,虽然复用了Person构造函数,但是原型Person的原型student1无法访问到。
缺点很明显:虽然复用了Person的构造函数,但是却没有继承Person的原型。
好了,我们演变一下。。
3.共享原型
基于上述代码3,在Student函数后面加入如下代码:
Student.prototype = Person.prototype;
代码 4
其实就是两个构造函数都指向同一原型。。
此时发现,student1能访问Person原型上的内容了。
还是要问一下,这样就行了吗?
问题:一旦Student向原型里面加了变量或者函数,或者修改原型中的变量内容时,哪怕是Person构造出来的对象,
同样也感知到了。。。。 这样互相影响的话,两个构造函数的原型中的变量和函数掺杂在一起,确实不合适?
那怎么办呢?
来吧,看看下面的变种。
4.圣杯模式
说实话我也不知道为啥取名叫圣杯模式,感觉也不是官方的命名,有些人还叫其他名字。
把代码4替换成如下代码:
    // 定义空函数
    function F()
    // 空函数和Person共享原型
    F.prototype = Person.prototype;
    // 改变Student的原型
    Student.prototype = new F();
    // 添加原型上的构造函数
    Student.prototype.constructor = Student;
代码 5
这样做Student的原型和Person的原型就不是一个对象了,而且不像原型链那样,由于new Person()作为Student.prototype导致该原型对象中包含了Person对象的私有属性。
来吧,给你个最终版本的代码,希望能帮助到你,能力有限,相互借鉴哈。。
5.圣杯模式+复用构造函数(算是比较完美了)
    // 定义Person
    function Person(name,age)
        // 保证属性有初始值
        this.name = name ? name : "";
        this.age = (age || age === 0) ? age : 0;
        this.setName = function (name)
            this.name = name;

        this.setAge = function (age)
            this.age = age;

        this.getPersonInfo = function ()
            return "[Person]: " + this.name + "_" + this.age;


    // 定义一个所有Person对象都能共享的属性和方法
    Person.prototype.typeDesc = "人类";
    Person.prototype.hello = function ()
        console.log("hello");

    function Student(name, age, score)
        // 使用call调用函数,可以改变this指向,服用了父类的构造方法
        Person.call(this, name,age);
        this.score = score;
        this.setScore = function (score)
            this.score = score;

        this.getStudentInfo = function ()
            return "[Student:]: " + this.score;


    // 定义空函数
    function F()
    // 空函数和Person共享原型
    F.prototype = Person.prototype;
    // 改变Student的原型
    Student.prototype = new F();
    // 添加原型上的构造函数
    Student.prototype.constructor = Student;


    let student1 = new Student("aa", 99, 99);
    console.log(student1.typeDesc);  // 人类
    student1.hello();   // hello
    console.log(student1.getStudentInfo());  // 能访问
    console.log(student1.getPersonInfo());   // 能访问

    let student2 = new Student("bb", 33, 88);
    student2.setScore(89);
    // student2和student1都各自有自己的私有属性,并不会受影响。
    console.log(student1.getStudentInfo());
    console.log(student2.getStudentInfo());

    Student.prototype.temp = "新加属性";
    console.log(Person.prototype.temp);  // undefined
代码 6
总结:可能我们在平常工作中很少这样写代码,或者用到这种继承模式,但是框架中很有可能会用到这些思想。
圣杯模式是共享原型模式的一个变种,使用空函数F来作为中间桥梁,巧妙得解决了共享原型模式的问题,同时
也解决了原型链模式的产生多余属性的问题。
一文让你搞懂设计模式
来源 | 程序喵大人,作者 | 程序喵大人
最近在研究设计模式,发现尽管设计模式是针对面向对象语言提出的,但貌似市面上大多数都是基于java给出的例子,C++的例子极少。本文把主要的设计模式用C++代码实现了一套,心得总结如下,希望对大家有所帮助。
设计模式是主要针对面向对象语言提出的一种设计思想,主要是提高代码可复用性,抵御变化,尽量将变化所带来的影响降到最低。
封装:隐藏内部实现
继承:复用现有的代码
多态:改写对象的行为
依赖倒置原则:针对接口编程,依赖于抽象而不依赖于具体,抽象(稳定)不应依赖于实现细节(变化),实现细节应该依赖于抽象,因为稳定态如果依赖于变化态则会变成不稳定态。
开放封闭原则:对扩展开放,对修改关闭,业务需求是不断变化的,当程序需要扩展的时候,不要去修改原来的代码,而要灵活使用抽象和继承,增加程序的扩展性,使其易于维护和升级,类、模块、函数等都是可以扩展的,但是不可修改。
单一职责原则:一个类只做一件事,一个类应该仅有一个引起它变化的原因,并且变化的方向隐含着类的责任。
里氏替换原则:子类必须能够替换父类,任何引用基类的地方必须能透明地使用其子类的对象,开放关闭原则的具体实现手段之一。
接口隔离原则:接口最小化且完备,尽量少public来减少对外交互,只把外部需要的方法暴露出来。
最少知道原则:一个实体应该尽可能少地与其他实体发生相互作用。
将变化的点进行封装,做好分界,保持一侧变化,一侧稳定,调用侧永远稳定,被调用测内部可以变化。
优先使用组合而非继承,继承为白箱操作,而组合为黑箱,继承某种程度上破坏了封装性,而且父类与子类之间耦合度比较高。
针对接口编程,而非针对实现编程,强调接口标准化。
总结:没有一步到位的设计模式,刚开始编程时不要把太多精力放到设计模式上,需求总是变化的,刚开始着重于实现,一般敏捷开发后为了应对变化重构再决定采取合适的设计模式。
接下来,重点介绍几种主要的设计模式,并用C++代码实现了一套。
父类定义算法的骨架,而将一些步骤延迟到子类去实现,使得子类可以复用骨架,并附加特性,以开发框架举例,框架开发人员把框架调用流程定好,而将某些具体的步骤作为虚函数留给子类去重写。
class Game {public:Game() {}virtual ~Game() {}void Run() {InitGame();StartGame();StopGame();}protected:virtual void StartGame() { std::cout << "step 2: start game" << std::endl; }private:void InitGame() { std::cout << "step 1: init game" << std::endl; }void StopGame() { std::cout << "step 3: stop game" << std::endl; }};
class BasketBall : public Game {void StartGame() override { std::cout << "start basketball game" << std::endl; }};
class SocketBall : public Game {void StartGame() override { std::cout << "start socketball game" << std::endl; }};
int main() {Game *game = new BasketBall();game->Run();delete game;Game *game2 = new SocketBall();game2->Run();delete game2;return 0;}g++ test.cc -std=c++11 && ./a.out输出:step 1: init gamestart basketball gamestep 3: stop gamestep 1: init gamestart socketball gamestep 3: stop game
代码很简单,体现的是思想,游戏包含三个步骤,初始化游戏、开始游戏、停止游戏。初始化游戏和停止游戏步骤比较统一,由父类Game定义好,而开始游戏是第二个步骤,可以有打篮球和踢足球,将来也可以有羽毛球、乒乓球等等,每增加一项运动,都可以从Game父类中继承后重写开始游戏这个函数,达到不同的功能,符合模板方法的特性,即如何在确定稳定结构前提下,应对子步骤需求的变化。
定义一系列的算法,将它们一个个封装,使得他们可以相互替换,一般为了解决多个if-else带来的复杂性,在多种算法相似的情况下,通过策略模式可减少if-else带来的复杂性和难以维护性,一般在项目中发现多个if-else并且预感将来还会在此增加if-else分支,那基本上就需要使用策略模式。
先举一个不使用策略模式的例子,拿计算来说,下面代码定义了加法操作和减法操作,以后如果需要增加乘法除法等计算,那就需要在枚举里添加新类型,并且增加if-else分支,这违反了开放关闭原则。
enum class CalOperation {add,sub};int NoStragegy(CalOperation ope) {if (ope == CalOperation::add) {std::cout << "this is add operation" << std::endl;} else if (ope == CalOperation::sub) {std::cout << "this is sub operation" << std::endl;} // 如何将来需要增加乘法或者除法或者其它运算,还需要增加if-elsereturn 0;}
下例为使用策略模式。
定义一个基类Calculation。
class Calculation {public:Calculation() {}virtual ~Calculation() {}virtual void operation() { std::cout << "base operation" << std::endl; }};
每增加一种运算,就增加一个继承基类的子类。
重写operation()函数。
class Add : public Calculation {void operation() override { std::cout << "this is add operation" << std::endl; }};
class Sub : public Calculation {void operation() override { std::cout << "this is sub operation" << std::endl; }};
int Stragegy() {Calculation *cal = new Add();cal->operation();delete cal;Calculation *cal2 = new Sub(); // 这里将来都可以用工厂模式改掉,不会违反开放封闭原则cal2->operation();delete cal2;return 0;}
是不是方便了很多,将来如果有乘法除法和其它运算规则,只需要再加一个继承基类的子类即可。
定义对象间的一对多关系,当一个对象状态发生改变的时候,其它依赖于它的对象都会得到广播通知并进行自定义动作,通过面向对象技术的多态技术,可以降低这种依赖关系,降低耦合度。
class ObserverBase {public:ObserverBase() {}virtual ~ObserverBase() {}virtual void Update() {}};
class ObserverFirstChild : public ObserverBase { void Update() override { std::cout << "first child receive notify" << std::endl; }};
class ObserverSecondChild : public ObserverBase { void Update() override { std::cout << "second child receive notify" << std::endl; }};
class NotifyBase { public: void Add(ObserverBase *ob) { observers.emplace_back(ob); };
void Remove(ObserverBase *ob) { observers.remove(ob); }
void Notify() { for (auto observer : observers) { observer->Update(); } }
private: std::list<ObserverBase *> observers;};
int main() { ObserverBase *base1 = new ObserverFirstChild(); ObserverBase *base2 = new ObserverSecondChild();
NotifyBase notify; notify.Add(base2); notify.Add(base1); notify.Notify(); notify.Remove(base1); notify.Notify();
delete base2; delete base1; return 0;}
通过观察者模式可以灵活地控制依赖的对象。
可以动态地增加和删除需要得到通知的对象。
动态地给一个对象添加一些额外的职责,扩展一个类的功能。就增加功能来说,使用装饰器模式比单纯地继承子类更加灵活,不一定非要疯狂使用继承方式。
举个例子,有游戏这个大类,扩展这个类的功能,有打篮球、踢足球、玩lol、玩卡丁车,可以分别定义继承游戏基类的四个子类,但是如果想组合这几个功能呢,一个对象既会打篮球又会玩卡丁车,既会打篮球又会玩lol,再定义几个类继承游戏基类显然不是好的做法,装饰器模式可以很好地解决这个问题。
首先定义一个Game基类。
class Game {public:Game() {}virtual ~Game() {}virtual void Skill() { std::cout << "game skill" << std::endl; }};
定义卡丁车子类和lol子类。
class CarGame : public Game {public:void Skill() override { std::cout << "car game" << std::endl; }};
class LolGame : public Game {public:void Skill() override { std::cout << "lol game" << std::endl; }};
篮球和足球子类也可以像上面一样继承定义,但是如果都像上面一样继承的话不能实现动态扩展功能的需求,所以先定义一个装饰类,之后定义继承这个装饰类的篮球和足球子类。
class DecoratorGame : public Game {protected:Game *game_;public:DecoratorGame(Game *game) { game_ = game; }void Skill() override { game_->Skill(); }virtual ~DecoratorGame() {}};
    #ifndef __BASKETBALL__#define __BASKETBALL__
#include "decorator_game.h"
class BasketBallGame : public DecoratorGame { public: BasketBallGame(Game *game) : DecoratorGame(game) {}
 void Skill() override { std::cout << "basketball game" << std::endl; DecoratorGame::Skill(); }};
#endif


    #ifndef __SOCKETBALL__#define __SOCKETBALL__
#include "decorator_game.h"
class SocketBallGame : public DecoratorGame { public: SocketBallGame(Game *game) : DecoratorGame(game) {}
 void Skill() override { std::cout << "socket game" << std::endl; DecoratorGame::Skill(); }};
#endif
最后看使用。
int main() {Game *lol = new LolGame();Game *car = new CarGame();// 一个人既会打篮球又会打LOL可以如下使用Game* basketball_lol = new BasketBallGame(lol);basketball_lol->Skill();std::cout << std::endl;// 一个人既会打篮球又会玩卡丁车可以如下使用Game* basketball_car = new BasketBallGame(car);basketball_car->Skill();std::cout << std::endl;// 一个人既会打篮球又会玩卡丁车又会踢足球可以如下使用Game* g = new SocketBallGame(basketball_lol);g->Skill();delete lol;delete basketball_car;delete basketball_lol;delete g;return 0;}// 输出basketball gamelol gamebasketball gamecar gamesocket gamebasketball gamelol game
通过上例可以看出,使用观察者模式可以动态地扩展类的职责,动态地组合类的各个功能,当看代码时发现一个类既继承了父类同时又持有父类的对象指针,那这基本上就是装饰器模式。
确定好抽象部分和实现部分,将抽象部分和实现部分分离,使得他们可以独立地变化,实现系统和抽象系统可能各自都会有各自的变化,使用桥接模式可以更加灵活地扩展,方法:用组合代替继承。
举例:一个图形基类,可以有圆形矩形多边形等等,每个都需要从图形基类中继承出一个子类,但是每个子类还需要画图、画颜色,圆形可能需要黄色黑色白色蓝色等等,矩形也可能需要黄色黑色白色蓝色等等,这种如果单纯地使用继承就不太灵活,可以使用桥接模式,把图形种类当作抽象部分,画颜色当作实现部分,使用组合的方式将抽象部分和实现部分分离。
首先将实现部分(画图)提取出来,同时多种画图方式从这个基类继承后重写,之后会作为Shape图形类的一个成员变量。
class ShapeDrawImpl {public:virtual void Draw() = 0;virtual ~ShapeDrawImpl() {}};
class ShapeDrawImplRed : public ShapeDrawImpl{ public: virtual void Draw() override { std::cout << "draw red" << std::endl; }};
class ShapeDrawImplBlack : public ShapeDrawImpl{ public: virtual void Draw() override { std::cout << "draw black" << std::endl; }};
上面定义了两种颜色的实现方式,红色和黑色。下面定义图形的类,定义一个图形基类,持有画图实现的句柄,之后定义多个继承图形基类的子类,圆形子类和矩形子类。
class Shape {protected:ShapeDrawImpl *impl;public:virtual void Update() {}Shape(ShapeDrawImpl *impl_) : impl(impl_) {}};
class ShapeCircle : public Shape {public: void Update() override { std::cout << "circle shape update" << std::endl; impl->Draw(); }
ShapeCircle(ShapeDrawImpl *imp) : Shape(imp) {}};
class ShapeRectangle : public Shape { public: void Update() override { std::cout << "rectangle shape update" << std::endl; impl->Draw(); }
ShapeRectangle(ShapeDrawImpl *imp) : Shape(imp) {}};
int main() { ShapeDrawImpl *impl = new ShapeDrawImplBlack(); Shape* circle = new ShapeCircle(impl); circle->Update();
delete impl; delete circle;
return 0;}输出:circle shape updatedraw black
通过桥接模式可以更好地应对变化,应对抽象和实现的多种组合变化。
工厂模式属于创建型模式,主要用于创建对象时不向外部暴露创建逻辑,通过一个共同的接口指向新创建的对象,通过面向对象的多态,将创建对象的工作延迟到子类执行,由子类决定实例化哪个对象。用于隔离对象使用者与其具体类型之间的耦合关系,当具体类型经常变化时,可以考虑使用工厂模式。有一个类型的抽象基类,同时又有很多继承该抽象基类的具体类型,我们做的就是使其依赖于抽象而不依赖于具体,实现方式是创建一个工厂基类,再为每个具体类型定义一个可以创建其相应对象的工厂,每一个具体类对应一个具体工厂,工厂类继承自工厂基类,通过工厂基类的多态性就可以决定创建什么类型的对象。
class Game {public:Game() {}virtual ~Game() {}virtual void Play() {std::cout << "play game" << std::endl;}};
class BasketBall : public Game { void Play() override { std::cout << "play basketball" << std::endl; }};
class SocketBall : public Game { void Play() override { std::cout << "play socketball" << std::endl; }};
可以通过游戏工厂选择创建不同游戏类型的对象。
class GameFactory {public:GameFactory() {}virtual ~GameFactory() {}virtual Game* CreateGame() = 0;};
class BasketBallFactory : public GameFactory { public: Game* CreateGame() override{ return new BasketBall(); };};
class SocketBallFactory : public GameFactory { public: Game* CreateGame() override{ return new SocketBall(); };};
int main() { GameFactory* factory = new BasketBallFactory(); Game* game = factory->CreateGame(); game->Play();
delete factory; delete game;
factory = new SocketBallFactory(); game = factory->CreateGame(); game->Play();
delete factory; delete game;
return 0;}输出:play basketballplay socketball
当有新类型增加时,需要添加一个具体类和一个相应的创建工厂,尽管减少了耦合度,但是其实还是比较麻烦的。
和工厂方法模式类似,不做过多介绍,说一下定义,抽象工厂方法模式主要提供一个接口,让该接口负责创建多系列“相关或相互的对象”,无需指定具体的类。系列对象指的是某一特定系列下的对象间有相互依赖或相互作用的关系,不同系列的对象之间不能相互依赖。如果没有多系列对象创建的需求变化,没必要使用抽象工厂方法模式,使用简单工厂方法模式就可以。
拿上一个举例继续说,游戏类型是一个系列,我们有了一个游戏类型的工厂,以后可能会再加入娱乐圈类型的一个系列,那就再做一个娱乐圈类型的系列工厂,以后可能还有文艺类型的系列,那就再加一个文艺类型的系列工厂,这就有了三个系列的工厂,所以就可以在这三类工厂的基础上再抽象出一个抽象的超级工厂,根据不同需求选择实例化哪一个系列的具体工厂,再创建具体工厂下的具体类型的对象。
用于创建重复的对象,定义一个clone接口,通过调用clone接口创建出与原来类型相同的对象。
class Game {public:virtual Game* clone() = 0;virtual void Play() = 0;};
class BasketBall : public Game { virtual Game* clone() override { return new BasketBall(); }
virtual void Play() override { std::cout << "basketball" << std::endl; }};
int main() { Game *game = new BasketBall(); game->Play(); Game* new_game = game->clone(); new_game->Play();
delete game; delete new_game;
return 0;}
单纯看game不知道它是什么类型,它可能是篮球游戏也可能是足球游戏等,如果想创建一个与它相同类型的对象就可以使用原型模式,其实就是实现一个clone接口,如果一个对象的拷贝构造函数比较复杂而自己不想使用拷贝构造的方式创建对象也可以使用原型模式,使用方式见上例。
用于构建一个复杂的大的对象,一个复杂的对象通常需要一步步才可以构建完成,建造者模式强调的是一步步创建对象,并通过相同的构建过程可以获得不同的结果对象。一般来说建造者对象不是直接返回的,与抽象工厂方法区别是抽象工厂方法用于创建多个系列的对象,而建造者模式强调一步步构建对象,并且构建步骤固定。
举例:想要构建一个老师类的对象,老师有第一技能和第二技能,第一技能是数学就代表是数学老师,第一技能是英语就代表是语文老师,构造一个老师对象需要先设定老师的第一技能再设定老师的第二技能,强调一步步设定技能,将这一步步的构建过程可以抽象出建造者模式。
首先定义老师类。
class Teacher {private:std::string first_skill_;std::string second_skill_;public:void SetFirstSkill(const std::string& skill) { this->first_skill_ = skill; }void SetSecondSkill(const std::string& skill) { this->second_skill_ = skill; }};
定义一个老师的抽象构建器,再根据具体老师继承出具体的老师构建器。
class TeacherAbstractBuilder {public:TeacherAbstractBuilder() {}virtual ~TeacherAbstractBuilder() {}virtual void BuildFirstSkill() = 0;virtual void BuildSecondSkill() = 0;virtual Teacher* GetTeacher() = 0;};
class MathTeacherBuilder : public TeacherAbstractBuilder { public: MathTeacherBuilder() { this->teacher_ = new Teacher(); }
~MathTeacherBuilder() { delete this->teacher_; }
Teacher* GetTeacher() { return this->teacher_; }
void BuildFirstSkill() { this->teacher_->SetFirstSkill("math"); }
void BuildSecondSkill() { this->teacher_->SetSecondSkill("english"); }
private: Teacher* teacher_;};
class EnglishTeacherBuilder : public TeacherAbstractBuilder { public: EnglishTeacherBuilder() { this->teacher_ = new Teacher(); }
~EnglishTeacherBuilder() { delete this->teacher_; }
Teacher* GetTeacher() { return this->teacher_; }
void BuildFirstSkill() { this->teacher_->SetFirstSkill("english"); }
void BuildSecondSkill() { this->teacher_->SetSecondSkill("math"); }
private: Teacher* teacher_;};
定义一个稳定的Director类,由它根据具体的老师构建器决定构建哪一个老师。
class Director {public:Director(TeacherAbstractBuilder* builder) { this->builder_ = builder; }~Director() {}void Create() {this->builder_->BuildFirstSkill();this->builder_->BuildSecondSkill();}private:TeacherAbstractBuilder* builder_;};
使用方法如下:
int main() {TeacherAbstractBuilder *builder = new MathTeacherBuilder();Director *director = new Director(builder);delete builder;delete director;builder = new EnglishTeacherBuilder();director = new Director(builder);delete builder;delete director;return 0;}
通过Director利用不同的具体构建器,都采用相同的步骤,一步步构建出不同的具体的老师类对象。
不多说了,网上太多了,列一段单例的代码。
static SingleTon& GetInstance() {static SingleTon t;return t;}
通过共享技术有效支持大量细粒度的对象,主要解决面向对象代价问题。通过共享有效降低创建的对象个数,类似于对象池。
举例:篮球分多种颜色,我开始想要蓝色的篮球,后来想要红色的篮球,这就需要创建两个对象,当我再想要一个蓝色的篮球,如果能够继续使用之前的那个对象就更好,通过享元模式可以做到。
class BasketBall {public:BasketBall(const std::string& color) : color_(color) {}~BasketBall() {}private:std::string color_;};
class BasketballFactory { private: std::unordered_map<std::string, BasketBall*> map_;
public: BasketBall* GetBasketBallWithColor(const std::string& color) { if (map_.find(color) == map_.end()) { BasketBall* p = new BasketBall(color); map_[color] = p; return p; } else { return map_[color]; } }};
int main() { BasketballFactory factory; BasketBall* white_ball1 = factory.GetBasketBallWithColor("white"); BasketBall* black_ball1 = factory.GetBasketBallWithColor("black"); BasketBall* white_ball2 = factory.GetBasketBallWithColor("white"); BasketBall* black_ball2 = factory.GetBasketBallWithColor("black"); std::cout << white_ball1 << std::endl; std::cout << white_ball2 << std::endl; std::cout << black_ball1 << std::endl; std::cout << black_ball2 << std::endl; // remember to delete return 0;}输出:0x7fffe4984e700x7fffe4984e700x7fffe4984f000x7fffe4984f00
感觉外观模式没啥特别的,就是做好功能之间边界的划分,做好封装,弄清楚哪部分是稳定的,哪部分是变化的,对外稳定松耦合,对内迭代变化高内聚,子系统的内部外部要做好解耦,为子系统的一组接口提供一个稳定一致的界面,子系统中的任何变化都不会影响这个界面的变化。
为其它对象提供一种代理,以控制这个对象的访问。一般对于比较大的对象访问比较困难或者会带来很多麻烦,例如裸指针的使用,所以一般使用智能指针来控制裸指针,使用智能指针也是一种代理模式。
举例:A喜欢B,想送给B礼物,但是却不认识B,而C却认识B,所以可以把C作为A的代理去送给B礼物。
class Girl {private:std::string name_;public:Girl(const std::string &name) : name_(name) {}std::string GetName() const noexcept { return name_; }};
class Gift { public: virtual void GiveGift() = 0;};
class GiftProxy : public Gift { public: GiftProxy(Girl girl) : girl_(girl) {}
void GiveGift() override { std::cout << "send " << girl_.GetName() << " gift" << std::endl; }
private: Girl girl_;};
int main() { Girl lili("lili"); GiftProxy proxy(lili); proxy.GiveGift(); return 0;}
如上述代码,通过代理模式就可以给代码中的丽丽送礼物。
太常见了,大家基本都会用,两个不兼容的接口之间的桥梁,就像耳机转换头、充电器转换头等等都是适配器模式,将一个类的接口转换为客户希望的另一种接口的形式,使得原本由于接口不兼容而不能一起工作的类可以一起工作。
使用一个中介对象来封装一系列的对象交互,当多个对象间互相引用且操作比较复杂时可以考虑使用中介模式。如下图所示,左侧五个对象互相依赖,通过中介这个桥梁就可以减少这个依赖。
当一个对象的行为依赖于它的状态并且其有很多种状态而且将来还会有更多状态时,如果使用简单的if-else来增加新状态就违反了面向对象的开闭原则,这时可以考虑使用状态模式,将具体的状态做出一个抽象类,也类似于工厂模式,将具体的状态分散于各个子类中,避免了更多的if-else分支。
using namespace std;class Context;class State {public:virtual void Handle(Context *context) = 0;};class Context {public:Context(State *state) : state_(state) {}void Request() {if (state_) {state_->Handle(this);}}void ChangeState(State *pState) { state_ = pState; }private:State *state_;};class ConcreteStateA : public State {public:void Handle(Context *context) override { cout << "I am state a" << endl; }};class ConcreteStateB : public State {public:void Handle(Context *context) override { cout << "I am state b" << endl; }};int main() {State *state_a = new ConcreteStateA();State *state_b = new ConcreteStateB();Context *context = new Context(state_a);context->Request();context->ChangeState(state_b);context->Request();delete context;delete state_b;delete state_a;return 0;}
以上是关于一文让你搞懂javascript如何实现继承的主要内容,如果未能解决你的问题,请参考以下文章
知识必备一文让你搞懂design设计的CoordinatorLayout和AppbarLayout联动,让Design设计更简单~