tensorflow实现mnist手写数字识别
Posted wancy
tags:
篇首语:本文由小常识网(cha138.com)小编为大家整理,主要介绍了tensorflow实现mnist手写数字识别相关的知识,希望对你有一定的参考价值。
1. softmax函数
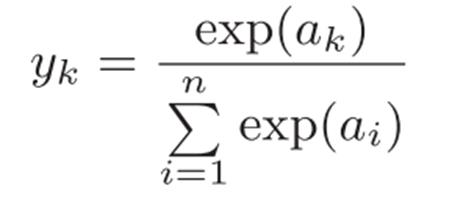
在数学,尤其是概率论和相关领域中,归一化指数函数,或称Softmax函数,是逻辑函数的一种推广。它能将一个含任意实数的K维向量z“压缩”到另一个K维实向量σ(z)中,使得每一个元素的范围都在(0,1)之间,并且所有元素的和为1。该函数多用于多分类问题中。在多项逻辑回归和线性判别分析中,ak属于yk类的概率为:

很显然,ak属于每个类别的概率和为1,属于yk的概率在0~1之间。
Softmax 回归模型是解决多类回归问题的算法,是当前深度学习研究中广泛使用在深度网络有监督学习部分的分类器,经常与交叉熵损失函数联合使用。
2. softmax溢出问题
当a足够大(比如100)或者足够小时(比如-100),导致计算机计算e^a溢出(上溢或下溢)
根据上述softmax公式进行推导:

即softmax(x)=softmax(x+a),这个结论被称为softmax的冗余性。
我们令 x=x+a,其中a=−max(x),则:
(x+a)的最大值等于0,避免了上溢的问题;
同时,因为一定有x+a=0, 所以分母中的各个加数至少有一个为1,也就不可能趋于0,由此避免下溢的问题。
3. 交叉熵损失函数
交叉熵可在神经网络(机器学习)中作为损失函数,p表示真实标记的分布,q则为训练后的模型的预测标记分布,交叉熵损失函数可以衡量p与q的相似性。交叉熵作为损失函数还有一个好处是使用sigmoid函数在梯度下降时能避免均方误差损失函数学习速率降低的问题,因为学习速率可以被输出的误差所控制。

4. tensorflow实现mnist数字分类
使用tensorflow2中的高阶API keras实现卷积神经网络对mnist手写数字分类
import os
os.environ["CUDA_DEVICE_ORDER"] = "PCI_BUS_ID"
os.environ["CUDA_VISIBLE_DEVICES"] = "-1"
import tensorflow as tf
from tensorflow.keras import  layers,models
import  matplotlib.pyplot as plt
import numpy as np

#读取数据
data=np.load(\'mnist.npz\')
data.files
train_images,train_labels,test_images,test_labels=data[\'x_train\'],data[\'y_train\'],data[\'x_test\'],data[\'y_test\']
# train_images=train_images.reshape(32,28,28,1)#分别为batch_size, height, width, channel
# test_images=test_images.reshape(32,28,28,1)
train_images=np.array(train_images)
train_images=np.reshape(train_images,(-1,28,28,1))#分别为batch_size, height, width, channel
print("train_images",train_images[0])
test_images=np.array(test_images)
test_images=np.reshape(test_images,(-1,28,28,1))
print("test_images",test_images[0])
model=models.Sequential()
model.add(layers.Conv2D(28,(3,3),activation=\'relu\',input_shape=(28,28,1)))#
model.add(layers.MaxPool2D((2,2),input_shape=(26,26,28))) # 添加池化层
model.add(layers.Conv2D(10,(4,4),activation=\'relu\',input_shape=(13,13,28)))
model.add(layers.MaxPool2D((2,2),input_shape=(3,3,10))) # 添加池化层
model.add(layers.Flatten(input_shape=(-1,2,2,10)))#将卷积得到的数据展平后与全连接层连接
model.add(layers.Dense(20,activation=\'relu\'))
model.add(layers.Dense(10,activation=\'softmax\'))
model.summary( )
#编译模型
model.compile(optimizer=\'adam\',loss=\'sparse_categorical_crossentropy\',metrics=[\'accuracy\'])
#训练
his=model.fit(train_images,train_labels,verbose=1,epochs=10,validation_data=(test_images,test_labels))
#保存模型
model.save(\'conv_minist.h5\')

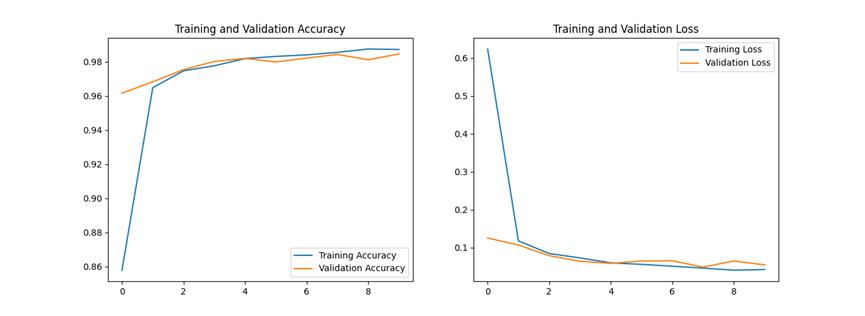
#画图 性能评估
acc = his.history[\'accuracy\']
val_acc = his.history[\'val_accuracy\']
loss =his.history[\'loss\']
val_loss = his.history[\'val_loss\']

plt.figure(figsize=(15, 5))
plt.subplot(1, 2, 1)
plt.plot(acc, label=\'Training Accuracy\')
plt.plot(val_acc, label=\'Validation Accuracy\')
plt.title(\'Training and Validation Accuracy\')
plt.legend()
#plt.grid()
plt.subplot(1, 2, 2)
plt.plot(loss, label=\'Training Loss\')
plt.plot(val_loss, label=\'Validation Loss\')
plt.title(\'Training and Validation Loss\')
plt.legend()
#plt.grid()
plt.show()

tensorflow实现深度神经网络对mnist手写数字分类
import tensorflow.compat.v1 as tf
tf.disable_v2_behavior()
import numpy as np
import matplotlib.pyplot as plt
import pylab
from tensorflow.examples.tutorials.mnist import input_data   #报错时,请参考本文最后参考资料的最后两个链接
mnist = input_data.read_data_sets("MNIST_data/", one_hot=True)
print("mnist:")
print(mnist)
# tf.reset_default_graph()
# 定义占位符
X = tf.placeholder("float", [None, 784])
Y = tf.placeholder("float", [None, 10])
# 定义变量,reduction_indices=1)
W = tf.Variable(tf.random_normal([784, 10]))
b = tf.Variable(tf.random_normal([10]))
pred = tf.nn.softmax(tf.matmul(X, W) + b)  # softmax分类,X是一个二维张量,也就是一个二维矩阵
# 损失函数
cost = -tf.reduce_sum(Y * tf.log(pred))
# 超参数设置
learn_rate = 0.01  # 学习率
round = 1000  # 迭代次数
# 设置字典用于存储迭代轮数对应的损失值,方便画图
epoch_J = "epoch": [], "loss": []
# 梯度下降
Optimizer = tf.train.GradientDescentOptimizer(learn_rate).minimize(cost)
# 初始化函数
init = tf.initialize_all_variables()
# 启动
with tf.Session() as sess:
    sess.run(init)
    for i in range(round):
        batch_x, batch_y = mnist.train.next_batch(100)  # 批次大小为100
        sess.run(Optimizer, feed_dict=X: batch_x, Y: batch_y)  # 梯度下降
        loss = sess.run(cost, feed_dict=X: batch_x, Y: batch_y)  # 取这次迭代的代价函数值
        epoch_J["epoch"].append(i + 1)
        epoch_J["loss"].append(loss)  # 把本次迭代的代价函数值放入字典中
        print("迭代次数:", i + 1, " loss值:", epoch_J["loss"][i], " 当前W:", sess.run(W), "当前b:",
              sess.run(b))  # 输出每次迭代的损失值和参数值
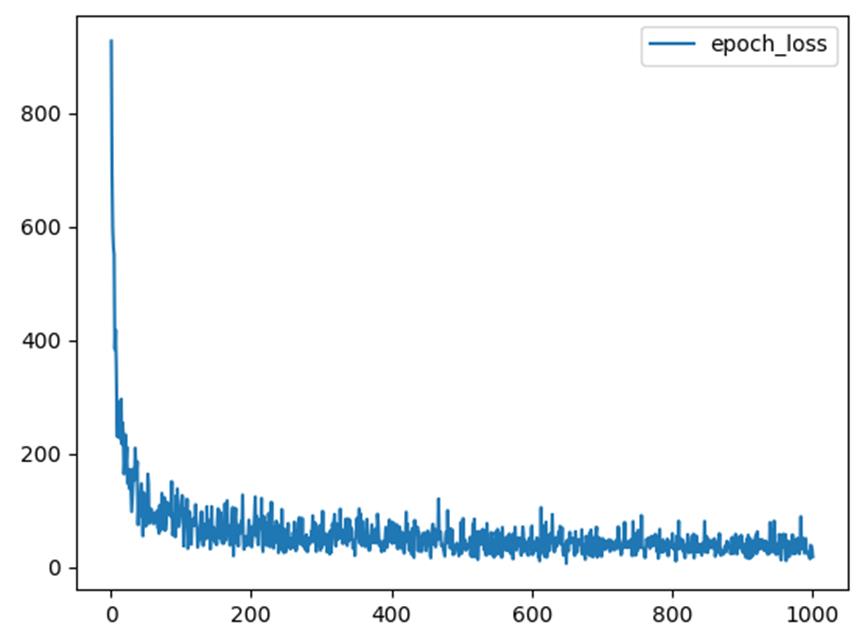
    # 画代价函数图
    plt.plot(epoch_J["epoch"], epoch_J["loss"],  label="epoch_loss")
    plt.legend()
    plt.show()

    # 评估模型
    correct_prediction = tf.equal(tf.argmax(Y, 1), tf.argmax(pred, 1))#对比这两个矩阵或者向量的相等的元素,如果是相等的那就返回True,反正返回False
    print(tf.argmax(Y, 1))
    print("correct_prediction",correct_prediction)
    accuary = tf.reduce_mean(tf.cast(correct_prediction, "float"))## 将bool值转为float类型(即0或1)再求均值即为准确率
    print(tf.cast(correct_prediction,"float"))
    print(sess.run(accuary, feed_dict=X: mnist.test.images, Y: mnist.test.labels))

总结:关于mnist数据集可以去我的主页K近邻算法(KNN)查看,有解释与离线数据。本文存在不足,未解释softmax如何应用于手写数字分类,未对tensorflow代码详细解释,也未对卷进神经网络作详细说明,后期补上。
若存在错误或不足之处,欢迎指正与评论!
代码与数据百度网盘链接:https://pan.baidu.com/s/1Z-vJJoY1AGnDZat5PpDzWg?pwd=8gfx
参考资料:
https://blog.csdn.net/whdeast/article/details/104962702
https://www.cnblogs.com/wangguchangqing/p/12068084.html
https://blog.csdn.net/jluzhanghm1720/article/details/122262758
https://www.cnblogs.com/YuanShiRenY/p/16523959.html
https://blog.csdn.net/zx1245773445/article/details/86443099
https://blog.csdn.net/weixin_43977534/article/details/107752562
https://blog.csdn.net/qq_43263950/article/details/112237192
Android+TensorFlow+CNN+MNIST 手写数字识别实现
以上是关于tensorflow实现mnist手写数字识别的主要内容,如果未能解决你的问题,请参考以下文章