Spring AOP官方文档学习笔记之Spring AOP的其他知识点
Posted shame11
tags:
篇首语:本文由小常识网(cha138.com)小编为大家整理,主要介绍了Spring AOP官方文档学习笔记之Spring AOP的其他知识点相关的知识,希望对你有一定的参考价值。
1.选择哪种AOP
(1) 使用Spring AOP比使用完整版的AspectJ更方便简单,因为不需要在开发和构建过程中引入AspectJ编译器以及织入器,如果我们只希望通知能够在Spring Bean上执行,那么选用Spring AOP就可以了,如果我们希望通知能够在不由Spring所管理的对象上执行,那么就需要使用AspectJ,如果我们希望为除方法以外的连接点(比如成员变量)提供通知,那么也需要使用AspectJ
2.Spring AOP的代理机制
(1) Spring AOP使用Jdk动态代理或Cglib动态代理来为目标对象创建代理对象,Jdk动态代理由Jdk提供,而Cglib动态代理则是由一个开源类库提供,如果要代理的目标对象至少实现了一个接口,那么就会使用Jdk动态代理,否则如果目标对象没有实现任何接口,那么就会使用Cglib动态代理,创建一个Cglib代理对象
(2) Spring默认使用Jdk动态代理,但我们可以强制让Spring始终使用Cglib动态代理,但需注意,使用Cglib动态代理,无法对final修饰的方法织入通知,因为这些方法不能在子类中被重写,具体开启Cglib动态代理的方式如下
<!-- 方式一:在使用基于xml的配置时,设置<aop:config/>标签中的proxy-target-class属性为true -->
<aop:config proxy-target-class="true">
        <!-- ... -->
</aop:config>

<!-- 方式二:在混合使用基于xml和注解的配置时,设置<aop:aspectj-autoproxy/>标签中的proxy-target-class属性为true -->
<aop:aspectj-autoproxy proxy-target-class="true"/>

<!-- 方式三:在使用基于注解的配置时,设置@EnableAspectJAutoProxy注解中的proxyTargetClass属性为true -->
@EnableAspectJAutoProxy(proxyTargetClass = true)
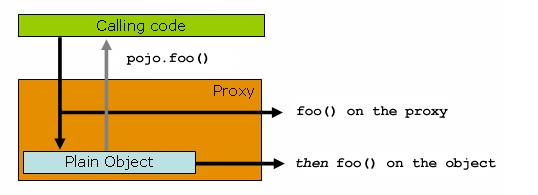
(3) 当一个bean被代理后,我们从容器中获取到这个bean,并对其使用 .getClass().getName() 方法来输出它的类名称,可见如 cn.example.spring.boke.ExampleA$$EnhancerBySpringCGLIB$$ff6c22d2或com.sun.proxy.$Proxy18 这样的输出,而当我们关闭掉AOP后,得到的通常是形如 cn.example.spring.boke.ExampleA 这样的输出,这其实是因为我们从容器中获取的是该bean被增强过后的代理对象,而非它原始的目标对象,因而,对这个bean的方法调用就是对代理对象的方法调用,然后由代理对象委托调用原始对象上相关的方法以及该方法相关的拦截器(advice),如下

(4) 在目标对象中,使用this指针进行自调用不会触发通知的执行
//一个普通的bean,在它的a方法中使用this指针,自调用b方法
@Component
public class ExampleA
    public void a()
        System.out.println("a...");
        this.b();


    public void b()
        System.out.println("b...");


//切面,切入ExampleA这个bean中的所有方法
@Component
@Aspect
public class Logger
    @Before(value = "execution(* cn.example.spring.boke.ExampleA.*(..))")
    public void beforePrint()
        System.out.println("beforePrint...");


@Configuration
@EnableAspectJAutoProxy
@ComponentScan(basePackages = "cn.example.spring.boke")
public class Config

//获取ExampleA,调用a方法,打印结果
AnnotationConfigApplicationContext ctx = new AnnotationConfigApplicationContext(Config.class);
ExampleA exampleA = ctx.getBean(ExampleA.class);
exampleA.a();

//可见,Spring对a方法进行了织入,而b方法却没有,原因就是因为这里的this指向的是目标对象,一个普通的bean ExampleA,而非它的代理对象,自然而然无法进行织入了,因此关键的目标就是如何获取到代理对象
beforePrint...
a...
b...


//想要获取代理对象,首先要先将@EnableAspectJAutoProxy注解中的exposeProxy属性设置为true
@EnableAspectJAutoProxy(exposeProxy = true)

//接着修改ExampleA中的a方法,在调用b方法时不再使用this指针,而是AopContext.currentProxy(),即获取当前对象的代理对象
public void a()
    System.out.println("a...");
//        this.b();
    ((ExampleA) AopContext.currentProxy()).b();


//接着,再执行打印,可见此时通知已被正确执行
beforePrint...
a...
beforePrint...
b...
Spring不推荐使用如上的方法,因为这会使Spring AOP与我们的代码强耦合,具有侵入性,最好的方式是重构我们的代码,避免发生自调用,此外,Spring AOP会产生这种问题的原因是Spring AOP是基于代理实现的,而AspectJ框架就不存在这种自调用问题,因为它不是一个基于代理的AOP框架
3.基于java代码的AOP
public class ExampleA
    public void a()
        System.out.println("a...");


//切面必须由@Aspect注解标注,否则容器会抛出异常
@Aspect
public class Logger
    @Before(value = "execution(* cn.example.spring.boke.ExampleA.*(..))")
    public void beforePrint()
        System.out.println("beforePrint...");


//创建AOP工厂,生成代理对象
public static void main(String[] args) throws Exception
    //1.使用AspectJProxyFactory工厂,用于生成目标对象的代理对象
    AspectJProxyFactory factory = new AspectJProxyFactory(new ExampleA());

    //2.添加一个切面,该切面必须由@Aspect注解标注
    factory.addAspect(Logger.class);

    //3.生成代理对象
    ExampleA proxy = factory.getProxy();
    proxy.a();
Spring IOC官方文档学习笔记之基于注解的容器配置
1.基于注解的配置与基于xml的配置
(1) 在xml配置文件中,使用context:annotation-config</context:annotation-config>标签即可开启基于注解的配置,如下所示,该标签会隐式的向容器中添加ConfigurationClassPostProcessor,AutowiredAnnotationBeanPostProcessor,CommonAnnotationBeanPostProcessor,PersistenceAnnotationBeanPostProcessor,RequiredAnnotationBeanPostProcessor这5个后置处理器,用于注解配置
<beans ....>

    <!-- 开启基于注解的配置,该标签不常用,常用下面的<context:component-scan />标签 -->
    <context:annotation-config></context:annotation-config>

    <!-- 开启注解扫描,它不仅有着 <context:annotation-config />标签相同的效果,还提供了一个base-package属性用来指定包扫描路径,将路径下所扫描到的bean注入到容器中 -->
    <!-- <context:component-scan base-package="cn.example.spring.boke"></context:component-scan> -->
</beans>
(2) Spring同时支持基于注解的配置与基于xml的配置,可以将两者混合起来使用;注解配置会先于xml配置执行,因此,基于xml配置注入的属性值会覆盖掉基于注解配置注入的属性值,如下所示
//定义一个普通bean
@Component(value = "exampleA")
public class ExampleA

    //通过注解,注入属性值
    @Value("Annotation injected")
    private String str;

    public void setStr(String str)
        this.str = str;


    public String getStr()
        return str;


<!-- xml配置文件 -->
<beans ....>

    <context:component-scan base-package="cn.example.spring.boke"></context:component-scan>

    <!-- 通过xml,注入属性值,注意:这里bean的id与上面基于注解所提供的bean的id是一致的 -->
    <bean id="exampleA" class="cn.example.spring.boke.ExampleA">
        <property name="str" value="xml inject"></property>
    </bean>
</beans>

//测试,打印结果为 xml inject,证明注解方式会先于xml方式执行
ClassPathXmlApplicationContext ctx = new ClassPathXmlApplicationContext("boke/from.xml");
System.out.println(((ExampleA) ctx.getBean("exampleA")).getStr());
2.@Required
(1) @Required注解用于setter方法上,表示某个属性值必须被注入,若未注入该属性值,则容器会抛出异常,从Spring 5.1版本开始,该注解已被弃用,Spring目前推荐使用构造函数注入来注入这些非空依赖项,如下所示
//ExampleA有一个非空属性str
public class ExampleA

    private String str;

    @Required
    public void setStr(String str)
        this.str = str;


<!-- xml配置文件 -->
<beans ....>
    <context:annotation-config></context:annotation-config>

    <bean id="exampleA" class="cn.example.spring.boke.ExampleA">
        <!-- 必须要设置str属性值,如果将下面这条标签注释掉,那么启动时容器会抛出异常 -->
        <property name="str" value="must"></property>
    </bean>
</beans>
3.@Autowired
未完待续...
以上是关于Spring AOP官方文档学习笔记之Spring AOP的其他知识点的主要内容,如果未能解决你的问题,请参考以下文章